-
5
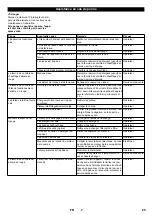
Using the timer, the heating and the oil sep-
arator of the appliance can be controlled in
a fully automatic manner.
A Daily overview of the programmed
switching times (5 = Friday)
B Channel status
C1 = Oil separator - Channel 1
C2 = Heating - Channel 1
C Operating voltage OK
Gear reserve operations
D Menu
E Display special functions
F Display summer/ winter time
G Current weekdays (1=Monday,
2=Tuesday...)
H Confirm
Yes
I
Continue...
No
Recommendation:
–
Run the oil separator for a few minutes
before heating.
–
Take into account the heating time of
approx.1 hour of the heating element
while programming the timer.
Note
The operating instructions of the timer are
located in the switching cabinet.
Î
Set the timer according to the operating
instructions of the manufacturer.
Î
Set the heating switch and the oil sepa-
rator switch to automatic mode at the
operating panel. Timer is activated.
Î
Switch off the main switch and close.
Î
Close cover.
Î
Empty the detergent container.
Î
Empty the pump.
Caution
Risk of injury and damage! Observe the
weight of the appliance when you transport
it.
Î
Drain off the detergent liquid.
Î
Switch off the appliance and remove
the plug from the socket.
Î
Release parking brakes.
Î
Push the appliance.
Î
When transporting in vehicles, secure
the appliance according to the guide-
lines from slipping and tipping over.
Timer (optional)
Shutting down
Frost protection
Transport
15
EN
Содержание PC 60T
Страница 2: ...2...
Страница 92: ...2 0 15 Ohm 3 92 EL...
Страница 93: ...3 1 2 3 4 5 6 7 8 9 10 11 12 13 14 15 16 17 18 Not Aus 19 20 21 22 93 EL...
Страница 94: ...4 1 2 3 AUTO OFF 1 ON 4 5 6 94 C 7 AUTO OFF 1 ON 8 80 C 130 kg 30 3 1 2 3 OFF 94 EL...
Страница 95: ...5 Am besten vor Arbeitsbeginn durchf hren 1 A 5 B C1 1 C2 2 C D E F G 1 2 H I 1 95 EL...
Страница 96: ...6 1 K rcher 40 200 1000 96 EL...
Страница 97: ...7 0 97 EL...
Страница 108: ...2 0 15 BGV A3 108 RU...
Страница 109: ...3 1 2 3 4 5 6 7 8 9 10 11 12 13 14 15 16 17 18 19 20 21 22 109 RU...
Страница 110: ...4 1 2 3 OFF 1 ON 1 4 5 6 94 C 7 OFF 1 ON 1 8 80 C 130 30 1 2 3 OFF 110 RU...
Страница 111: ...5 Am besten vor Arbeitsbeginn durchf hren 1 A 5 B C1 1 C2 2 C D E F G 1 2 H I 1 111 RU...
Страница 112: ...6 1 Karcher 40 200 1000 112 RU...
Страница 113: ...7 0 113 RU...
Страница 180: ...2 30 mA IEC 60364 1 0 15 Ohm BGV A3 180 BG...
Страница 181: ...3 1 2 3 4 5 6 7 8 9 10 11 12 13 14 15 16 17 18 19 20 21 22 181 BG...
Страница 182: ...4 1 2 3 AUTO OFF 1 ON 4 5 6 94 C 7 AUTO OFF 1 ON 8 80 C 130 30 3 1 2 3 OFF 182 BG...
Страница 183: ...5 Am besten vor Arbeitsbeginn durchf hren A 5 B C1 1 C2 2 C OK D E F G 1 2 H I 1 T o 183 BG...
Страница 184: ...6 1 K rcher 40 200 1000 184 BG...
Страница 185: ...7 0 185 BG...
Страница 212: ...2 0 15 BGV A3 212 UK...
Страница 213: ...3 1 2 3 4 5 6 7 8 9 10 11 12 13 14 15 16 17 18 19 20 21 22 213 UK...
Страница 214: ...4 1 2 3 OFF 1 ON 1 4 5 6 94 C 7 OFF 1 ON 1 8 80 C 115 30 3 1 2 3 OFF 214 UK...
Страница 215: ...5 Am besten vor Arbeitsbeginn durchf hren A 5 B C1 1 C2 2 C OK D E F G 1 2 H I 1 215 UK...
Страница 216: ...6 1 K rcher 40 200 1000 216 UK...
Страница 217: ...7 0 217 UK...
Страница 219: ......


