


-
8
m
DANGER
Risk of explosion!
Î
Only use batteries with terminal cover.
Restore terminal cover in the event of
loss.
m
DANGER
Risk of explosion!
Î
Do not place tools or similar items on
the battery. Risk of short-circuit and ex-
plosion.
m
DANGER
Risk of injury!
Î
Ensure that wounds never come into
contact with lead. Always clean your
hands after working on batteries.
m
DANGER
Risk of fire and explosion!
Î
Smoking and naked flames are strictly
prohibited.
Î
Rooms where batteries are charged
must have good ventilation because
highly explosive gas is emitted during
charging.
m
DANGER
Danger of causticization!
Î
Rinse thoroughly with lots of clear water
if acid gets into the eye or comes in con-
tact with the skin.
Î
Then consult a doctor immediately.
Î
Wash off the acid If it comes in contact
with the clothes.
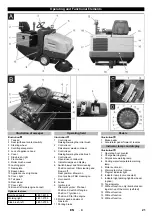
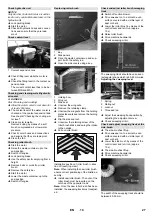
Normally, the machine is equipped with a
maintenance-free battery.
1
Positive terminal
2
Terminal cover
3
Negative terminal
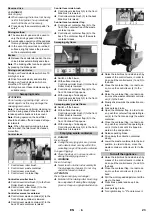
Î
Insert battery in battery mount.
Î
Screw on mounts on battery base.
Î
Connect pole terminal (red cable) to
positive pole (+).
Î
Connect pole terminal to negative pole
(-).
Î
Attach the pole covers.
Î
Check that the battery poles and pole
terminals are adequately protected with
pole grease.
CAUTION
Risk of damage!
Î
Regularly check the fluid level in acid-
filled batteries.
Î
Unscrew all cell caps.
Î
Take a sample from each cell using the
acid tester.
–
The acid in a fully charged battery has a
specific weight of 1.28 kg/l at a temper-
ature of 20 °C.
–
The acid in a partially discharged bat-
tery has a specific weight between 1.00
and 1.28 kg/l.
–
The specific weight of the acid must be
uniform in all cells.
Î
Put the acid sample back into the same
cell.
Î
Where fluid level is too low, top up cells
to the mark provided with distilled wa-
ter.
Î
Charge battery.
Î
Screw in cell caps.
m
DANGER
Risk of injury!
Î
Comply with safety regulations on the
handling of batteries. Observe the di-
rections provided by the manufacturer
of the charger.
m
DANGER
Risk of damage!
Î
Charge the battery only with an appro-
priate charger.
Î
Unscrew all cell caps.
(only with low-maintenance battery)
Î
Connect positive terminal cable from
the charger to the positive pole connec-
tion on the battery.
Î
Connect negative terminal cable from
the charger to the negative pole con-
nection on the battery.
Î
Plug in mains connector and switch on
charger.
Î
Charge battery using lowest possible
level of charging current.
Î
When the battery is charged, first re-
move the charger from the mains and
then disconnect it from the battery.
Î
Screw in cell caps.
(only with low-maintenance battery)
Î
Disconnect pole terminal to negative
pole (-).
Î
Disconnect pole terminal to positive
pole (+).
Î
Loosen the mounts on battery base.
Î
Remove the battery from the battery
holder.
Î
Dispose of the used battery according
to the local provisions.
m
DANGER
Risk of injury!
Î
Always apply the safety rod when the
waste container is raised.
Î
Perform the safeguarding only from
outside the hazard zone.
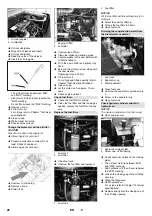
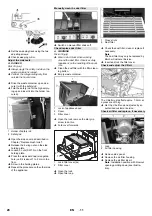
1
Holder of safety rod
2
Brake fluid container
3
Closing head
Î
Move up the waste container and se-
cure it by means of the safety rod, see
Chapter "Emptying the waste contain-
er"
Î
Check if the there is enough brake fluid
in the brake fluid reservoir.
Note
The filling level has to be between Min.
and Max.
Î
If necessary, refill DOT brake fluid cur-
rently commercially available.
m
DANGER
Risk of burns!
Î
Allow engine to cool down.
Î
Wait for at least 5 minutes after switch-
ing off the engine before checking the
engine oil fill level.
Fire, sparks, open light, and
smoking not allowed!
Danger of causticization!
First aid!
Warning note!
Disposal!
Do not throw the battery in the
dustbin!
Installing and connecting the battery
Check and correct the fluid level of the
battery (only with low-maintenance
battery with cell caps)
Charging battery
Remove the battery
Checking the brake fluid level and
topping up brake fluid
Check engine oil level and top up, if
required
(1
Содержание KM 130/300 R D Classic
Страница 2: ......