


-
1
Please read and comply with
these original instructions prior
to the initial operation of your appliance and
store them for later use or subsequent own-
ers.
Before first start-up it is definitely neces-
sary to read the safety indications no.
5.956-250!
Your sales outlet should be informed about
any transit damage noted when unpacking
the product.
–
Warning and information plates on the
machine provide important directions
for safe operation.
–
In addition to the information contained
in the operating instructions, all statuto-
ry safety and accident prevention regu-
lations must be observed.
Notes about the ingredients (REACH)
You will find current information about the
ingredients at:
www.kaercher.com/REACH
The warranty terms published by the rele-
vant sales company are applicable in each
country. We will repair potential failures of
your appliance within the warranty period
free of charge, provided that such failure is
caused by faulty material or defects in man-
ufacturing. In the event of a warranty claim
please contact your dealer or the nearest
authorized Customer Service centre.
Please submit the proof of purchase.
m
DANGER
To avoid risks, all repairs and replacement
of spare parts may only be carried out by
authorized customer service personnel.
–
Only use accessories and spare parts
which have been approved by the man-
ufacturer. The exclusive use of original
accessories and original spare parts
ensures that the appliance can be oper-
ated safely and trouble free.
–
At the end of the operating instructions
you will find a selected list of spare
parts that are often required.
–
For additional information about spare
parts, please go to the Service section
at www.kaercher.com.
m
DANGER
Warns about immediate danger which can
lead to severe injuries or death.
WARNING
Warns about possible danger which could
lead to severe injuries or death.
CAUTION
Points out a possibly dangerous situation
which can lead to light injuries or property
damage.
ATTENTION
Pointer to a possibly dangerous situation,
which can lead to property damage.
General notes . . . . . . . . . . . . .
EN
1
Environmental protection
EN
1
Warranty . . . . . . . . . . . .
EN
1
Accessories and Spare Parts EN
1
Symbols in the operating in-
structions . . . . . . . . . . . .
EN
1
Symbols on the machine
EN
1
Proper use . . . . . . . . . . . . . . . .
EN
2
Foreseeable misuse. . . .
EN
2
Suitable surfaces . . . . . .
EN
2
Safety instructions . . . . . . . . . .
EN
2
Safety instructions concerning
the operation . . . . . . . . .
EN
2
Safety information concerning
the driving operation . . .
EN
2
Appliances with combustion
engine . . . . . . . . . . . . . .
EN
2
Appliances with high emptying
system . . . . . . . . . . . . . .
EN
2
Devices with overhead guard EN
2
Safety information concerning
the transport of the appliance EN
2
Safety information concerning
maintenance and care . .
EN
3
Function. . . . . . . . . . . . . . . . . .
EN
3
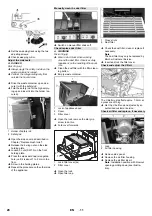
Unloading tips . . . . . . . . . . . . .
EN
3
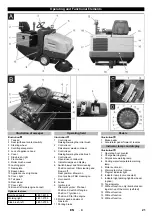
Operating and Functional Ele-
ments. . . . . . . . . . . . . . . . . . . .
EN
4
Illustration of sweeper . .
EN
4
Operating field . . . . . . . .
EN
4
Pedals . . . . . . . . . . . . . .
EN
4
Indicator lamps and display
EN
4
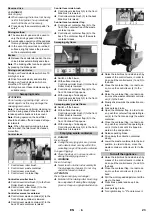
Before Startup . . . . . . . . . . . . .
EN
5
Lock/ release parking brake
EN
5
Moving sweeper without en-
gaging self-propulsion . .
EN
5
Moving sweeper by engaging
self-propulsion . . . . . . . .
EN
5
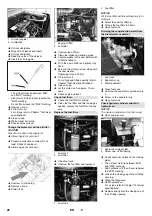
Start up . . . . . . . . . . . . . . . . . .
EN
5
General notes . . . . . . . .
EN
5
Inspection and maintenance
work . . . . . . . . . . . . . . . .
EN
5
Refuelling . . . . . . . . . . . .
EN
5
Operation. . . . . . . . . . . . . . . . .
EN
5
Adjusting driver's seat . .
EN
5
Starting the machine . . .
EN
5
Drive the machine . . . . .
EN
5
Sweeping mode . . . . . . .
EN
6
Emptying waste container
EN
6
Turn off the appliance . .
EN
6
Transport . . . . . . . . . . . . . . . . .
EN
7
Storage/decommissioning . . . .
EN
7
Care and maintenance . . . . . .
EN
7
General notes . . . . . . . .
EN
7
Cleaning. . . . . . . . . . . . .
EN
7
Maintenance intervals . .
EN
7
Maintenance Works . . . .
EN
7
Troubleshooting. . . . . . . . . . . .
EN
13
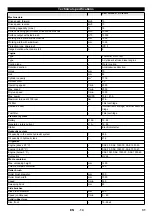
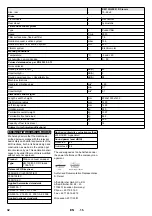
Technical specifications. . . . . .
EN
14
EC Declaration of Conformity .
EN
15
General notes
Environmental protection
The packaging material can be
recycled. Please do not throw the
packaging material into house-
hold waste; please send it for re-
cycling.
Old appliances contain valuable
materials that can be recycled.
Please arrange for the proper re-
cycling of old appliances. Please
dispose your old appliances us-
ing appropriate collection sys-
tems.
Engine oil, diesel and petrol must not be
released into the environment. Protect the
ground and dispose of used oil in an envi-
ronmentally responsible way.
Warranty
Accessories and Spare Parts
Symbols in the operating
instructions
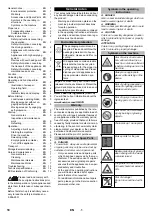
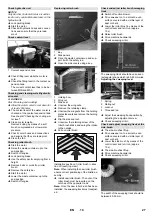
Symbols on the machine
Risk of burns on account of
hot surfaces! Allow the ex-
haust to cool down sufficient-
ly before starting work on the
machine.
Always use appropriate
gloves while working on the
device.
Risk of getting squeezed on
account of getting jammed
between vehicle parts.
Risk of injury on account of
moving parts. Do not reach
in.
Risk of fire. Do not vacuum
up any burning or glowing
objects.
Chain pick-up / crane point
Intake points for the jack
Maximum decline of ground
when driving with the waste
container raised.
The gradient in the direction
of travel should not exceed
18%.
Risk of damage!
Do not rinse out the dust fil-
ter.
(1
Содержание KM 130/300 R D Classic
Страница 2: ......