background image

46

Basic Settings and Service Procedures

ICC 1 S D

Hydraulic System – Hydraulic fluid filter

1

2

3

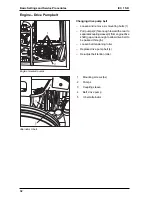
Tilt up operator seat.

Unscrew filler neck cover.

Remove filter element (1) with protective tube
(2) by pulling both out of filler neck (3).

Insert new filter element (1) in protective tube
(2).

Install protective tube (2) with filter element
(1) in filler neck (3).

Replace cover, start thread clockwise, and
turn until hand-tight.

1

Filter element

2

Protective tube

3

Filler neck

Hydraulic fluid filter

Replacing hydraulic fluid filter

Replacement of the hydraulic fluid filter is required
when indication of pressure gauge is in red range.

Note:

Engine must be shut off before the filter can
be changed.

Содержание ICC 1 S D

Страница 1: ...ICC 1 S D 1 142 Service Manual 5 905 432 03 01...

Страница 2: ...andbooks for the major equipment which can be used initially as instructional material and later as sources of reference Furthermore we regularly distribute service information bulletins that provide...

Страница 3: ...ew toward rear 17 Fuel tank 18 Heater 19 Engine compartment view from rear 20 Function Groups 22 24 Sweeping and vacuum system 22 Water system 23 Basic Settings and Service Procedures 25 55 Engine 25...

Страница 4: ...l 48 Checking working pressures 49 Pressure relief valve 51 Pumps 52 Impeller fan 53 55 Changing impeller fan 53 Adjusting magnetic brake 55 Troubleshooting 56 Circuit Diagram 58 Circuit Diagram Searc...

Страница 5: ...et via separate brake lever Braking action on rear wheels only via hydraulicsystem Sweepingsystem 2 inward rotating side brushes Sweeping roller not required Vacuumsystem Sweeping debris is shredded b...

Страница 6: ...7 6 5 4 3 2 1 11 1 Cover debris container 2 Debris container 3 Dual circuit radiator hydraulic fluid engine coolant 4 Operator seat 5 Support caster vacuum intake 6 Side brush LH 7 Bumper 8 Turn signa...

Страница 7: ...quipment Features Sidebrush view 1 Pressurized gas spring side brush 2 Stop screw side brush bottom position 3 Adjusting screws side brush sweeping pattern 4 Hydraulic motor LF side brush 5 LH side br...

Страница 8: ...Unit Functions ICC 1 S D Equipment Features Rear view 1 Safety beacon 2 Filler neck fuel tank 3 RH side brush 4 Side cover panel 5 Rear cover panel 6 Water tank 7 Filler neck water tank 1 2 3 4 5 6 7...

Страница 9: ...es Raised debris container view 1 Debris container 2 Air exhaust 3 Debris container cover 4 Water tank 5 Rear cover panel 1 2 3 4 5 6 7 8 6 Removable grille dual circuit radiator hydraulic fluid engin...

Страница 10: ...12 Drive pedal forward 13 Lever Raise Lower debris container 14 Lever Raise Lower side brush and vacuum inlet with brush speed control 15 Lever Open Close coarse debris flap 16 Switch impeller fan S9...

Страница 11: ...d displays 1 Debris container raised 2 Pre glow cycle activated 3 Excessive engine coolant temperature 4 Spare 5 Low charging current warning 6 Low engine oil pressure warning 7 Blocked air cleaner wa...

Страница 12: ...n F9 Headlamps F10 Position lamps RH F11 Position lamps LH F12 Engine stop solenoid F13 Safety beacon F14 Fan windshield defroster F15 Stop lights F16 Headlamps Relays K1 Ignition switch K2 Fan cabin...

Страница 13: ...console open view D2 Control module engine shut off solenoid S14 Switch safety beacon S15 Switch windshield defroster fan S7 Switch cabin heater fan S6 Switch windshield wiper S16 Switch working spotl...

Страница 14: ...Bowden cable coarse debris flap 5 Hydraulic line Lower debris container 6 Hydraulic line Lower brushes Sweeping 7 Hydraulic fluid inlet 8 Hydraulic line Raise brushes 9 Hydraulic line Lower brushes 10...

Страница 15: ...tment view from left 1 Magnetic clutch vacuum impeller fan 2 Filler neck engine oil 3 Glow plug 4 Injector nozzle 5 Injection pump 6 Oil dip stick 7 Air intake hose 8 Fuel filter 9 Engine 10 Tension r...

Страница 16: ...uipment Features Engine compartment view from right 1 Oil dip stick 2 Coolant radiator electric fan 3 Adjustment screw V belt tension 4 Magnetic brake vacuum impeller fan 5 Exhaust manifold 6 Starter...

Страница 17: ...Equipment Features Engine compartment view toward rear 1 RH limit switch debris container S10 2 LH limit switch debris container S11 3 Air cleaner 4 Engine cover 5 LH stop screw debris container 6 RH...

Страница 18: ...18 Unit Functions ICC 1 S D Equipment Features Fuel tank 1 Fuel level sensor 2 Fuel filler neck 3 Fuel tank 1 2 3...

Страница 19: ...19 ICC 1 S D Unit Functions Equipment Features Heater 1 Hot water supply hose 2 Heat exchanger 3 Warm water return hose 4 Heater fan shroud...

Страница 20: ...20 Unit Functions ICC 1 S D Equipment Features Engine compartment view from rear...

Страница 21: ...Hose to water pump inlet 12 Hydraulic pumps side brushes debris container steering 13 Hydraulic line to hydraulic fluid tank 14 Hydraulic line to hydraulic motor RR wheel 15 Hydraulic line from bypass...

Страница 22: ...tion plate 2 Air exhaust 3 Chain curtain 4 Deflection plate 5 Cover 6 Debris container 7 Fresh water tank 8 Engine 9 Impeller fan Function Groups Sweeping Vacuum system 10 Vacuum duct 11 Support caste...

Страница 23: ...ater filter 4 Water pump 5 Non return valve 6 Metering valve vacuum channel 7 Spray nozzle vacuum channel 8 Spray nozzle 2x side brushes 9 Metering valve side brushes 10 Tank fill level indicator in o...

Страница 24: ...24 Unit Functions ICC 1 S D 1 Shut off valve 2 Water filter 3 Water pump 4 Solenoid valve water pump Function Groups Water system...

Страница 25: ...remove fuel filter bowl 3 complete with contents Replace fuel filter insert 3 Bleeding air from fuel system Bleeding air from fuel system Loosenairbleedingscrew 4 approx 2turns Startengine andallowtor...

Страница 26: ...combination of two cooling circuits oneforhydraulicfluid theotherforengine coolant The fan transports the cooling air from theoutsideintotheenginecompartment passing it through the dual circuit radiat...

Страница 27: ...ound With engine running bridge the connector 1 to vehicle ground indicator lamp must illuminate and buzzer must sound Replace temperature switch 2 as required Note A radiator that is blocked by dirt...

Страница 28: ...aximum deflection Read engine speed on tachometer Adjust Bowden cable 8 in such a way that throttle lever 5 touches adjusting screw 4 Make necessary corrections on clamp bolt 6 or adjusting nut 7 as r...

Страница 29: ...This shuts off the fuel supply inlet causing the engine to stop After about 15 seconds solenoid valve switches off again and opens fuel supply inlet Engine shut off solenoid valve Manual actuation of...

Страница 30: ...e air cleanermustbecleanedoritscartridgereplaced Detach air cleaner cover 5 and clean together with air cleaner housing 1 do not wash Loosen clamp 4 Clean or replace filter cartridge 3 Press in warnin...

Страница 31: ...tor lamp fails to extinguish check top up engine oil first Check for switching voltage on terminal of connecting cable If a voltage is present oil pressure switch must be replaced If no voltage is pre...

Страница 32: ...s 2 far enough toward the rear to separatecouplingsleeve 3 fromenginedrive shaft gap wide enough to allow drive belt to be passed through Loosen belt tensioning roller Replace drive pump belt 4 Re adj...

Страница 33: ...s Raise side brushes back up machine Check sweeping pattern Adjusting brush contact pressure Checking sweeping pattern Loosen lock nut 4 Turn stop screw 3 to adjust side brush contact pressure on grou...

Страница 34: ...nism Spray nozzles Cleaning spray nozzles on side brush Loosen union nut 1 and remove nozzle Blow out spray nozzle with pressurized air from front 2 Replace as required Installspraynozzle 2 andtighten...

Страница 35: ...ay that the front sealing lip 2 at the coarse dirt flap 1 has about 0 to 1 mm ground clearance Using guide rods 7 adjust sealing lip 2 to provideabout10to18mmgroundclearance at rear Aftereachadjustmen...

Страница 36: ...ver 3 to Neutral position Turn switch clockwise until 9 switching noise is heard Turn switch 9 counter clockwise one half turn 1 Lever coarse dirt flap 2 Lever side brushes and vacuum intake 3 Lever d...

Страница 37: ...container as shown Carefully raise crane hook until rope is taut Remove retaining bolts 3 on LH and RH lifting cylinders Remove both container swivel bolts 2 on LH and RH side panels Using suitable t...

Страница 38: ...on front axle with 3 5 shots from grease gun Lubricating axle mounting Lubricategreasefittings arrow onfrontaxle mounting with 3 5 shots from grease gun Lubricating steering knuckle Lubricating front...

Страница 39: ...ables drum brake Braking action on rear wheels is by hydraulicsonly TheBowdenbrakecablesareadjustedbymeans of the adjusting screw 1 Loosen lock nut 4 Turn adjusting screw 1 to adjust brake When the fr...

Страница 40: ...tuating spring from eyelet 2 Pull off protective cap 3 from stop light switch Remove electrical cable Replace stop light switch 1 Floor panel 2 Actuating spring stop light switch 3 Protective cap stop...

Страница 41: ...prevent rolling and loosen wheel bolts Insert round steel bar 20 mm dia into rear jacking eye Place hydraulic jack under protruding round bar and jack up unit Support unit with block Changewheel tight...

Страница 42: ...ringtapeintooneofthetiretread grooves Pass measuring tape under unit and across to opposite wheel Read mesaurement x on tread groove corresponding to opposite wheel With toe in properly adjusted dimen...

Страница 43: ...ing ramp 2 of approx 150 mm height Turn steering wheel to the left or right Removeuppershockabsorbermountingbolt 1 Removelowershockabsorbermountingbolt 3 Take out shock absorber 4 1 Upper mounting bol...

Страница 44: ...chunitontotransportvehicle andsecure to tie down points Important The unit may be towed only with bypass valveopen Towingwithclosedbypassvalve will damage hydraulic drive components Towing speed must...

Страница 45: ...erator seat Note When carrying out procedures on the hydraulic system care must be taken to maintain extreme cleanliness throughout Even minor contaminations may cause component damage or complete sys...

Страница 46: ...nsertnewfilterelement 1 inprotectivetube 2 Install protective tube 2 with filter element 1 in filler neck 3 Replace cover start thread clockwise and turn until hand tight 1 Filter element 2 Protective...

Страница 47: ...t the Debris Container lever 2 on the side console to Raise position hold lever and actuate emergency pump lever 1 in a pumping motionuntildebriscontainerhasbeenraised to desired height To lower debri...

Страница 48: ...ination When in rest position the Forward drive pedal must be positioned in parallel with the Reverse drive pedal The drive pedal position can be adjusted at each linkage pivot point Detach fork 2 fro...

Страница 49: ...union 5 from bypass valve 6 Swivel bypass line 4 sideways Close bypass line 4 with blind plug to prevent admission of contaminants Screw connecting union 1 of testing set 7 onto T joint 2 and tighten...

Страница 50: ...idebrushes and debris container Unscrew pressure line to control block 3 from pressure side connection 1 Install T joint 2 between pressure side connection 1 and pressure line 3 Install testing set 4...

Страница 51: ...s 2x see arrows Liftsideconsoleapprox 30mmuntilpressure relief valve can be seen Loosen lock nut 1 Using Allen wrench 3 adjust pressure by turning screw 2 Turning clockwise increases pressure Turning...

Страница 52: ...ting bolts 1 Pull pumps off toward the rear Installing hydraulic pumps Install pumps complete with connecting sleeve 4 engine drive shaft Install then tighten a total of six mounting bolts 1 Connect a...

Страница 53: ...nt axle carrier 3 Remove heater assembly and place toward rear with heater hoses still attached Remove seat Tilt up seat panel 90 angle and detach pressurized gas spring Loosen hose clamp 2 on vacuum...

Страница 54: ...page 36 Slide out impeller fan front panel sideways between fuel tank and axle Remove center bolt and washer 1 from impeller fan 2 Pull off impeller fan 2 toward the front Grease impeller shaft Insta...

Страница 55: ...ing 2 and drive plate must be adjusted An adjustment will be required only if the magnetic brake has been replaced Using the feeler gauge check air gap 1 once around the entire circumference Toadjusta...

Страница 56: ...belt tension Multifunctional display Excessive engine coolant temperature Check engine coolant level top up as required Check adjust V belt tension alternator water pump Check radiator for leaks and...

Страница 57: ...valve on control block Check pressure in working hydraulic circuit Switch off side brushes Adjust pressure relief valve Debris container cannot be lowered Check replace valve on control block Switch...

Страница 58: ...0 6 15 2 11 5 V1 S4 P S3 S2 P V2 X1 5 X1 6 X1 7 8 K5 3 3 S5 2 1 E3 3 7 P1 1 2 R3 R2 R4 1 2 F17 X1 C S1 15 54 50 30 II 0 I 0 1 D1 50 30 86 L 87 85 T R1 F7 F12 F1 V3 H5 G2 G 1 P1 1 7 M6 M K9 30 87 K9 85...

Страница 59: ...Front fuse box M1 Starter Engine compartment M4 Windshield wiper motor Cab M6 Motor radiator fan Engine compartment P1 Combination instrument Instrument panel R1 R3 Glow plugs Engine compartment R4 R...

Страница 60: ...60 CircuitDiagram ICC 1 S D Circuit diagram 0 088 215 page 2...

Страница 61: ...eller fan Engine compartment Y3 Solenoid valve water pump Rear cover panel Y4 Impeller fan brake Engine compartment Pos Designation Installed location D3 Control impeller fan brake Side console E7 LH...

Страница 62: ...H2 H3 H4 E3 E4 E5 E6 31 X1 20 X1 18 X1 19 X1 21 X1 15 S12 15 30 L R 49 49a K5 49 31 49a K5 1 9 S13 6 9 5 3 2 1 4 7 8 F11 F10 X1 16 E3 1 9 E1 B2 X1 17 E2 F9 K1 2 13 F8 F2 F15 S19 H8 H9 L R O HORN LIGH...

Страница 63: ...L Windshield E2 Headlamp R Windshield E3 Position light LF Front bumper E4 Position light LR Windshield E5 Position light RF Front bumper E6 Position light RR Windshield F2 Fuse four way flashers Fro...

Страница 64: ...fuse box 3 F10 Fuse position lights R Front fuse box 3 F11 Fuse position lights L Front fuse box 3 F12 Fuse engine shutoff Front fuse box 1 F13 Fuse warning beacon Front fuse box 2 Pos Designation Ins...

Страница 65: ...container RH Engine compart 2 S12 Switch four way flashers Instument panel 3 S13 Combination switch Instument panel 3 S14 Switch warning beacon Control console 2 S15 Switch windshield defroster fan C...

Страница 66: ...66 Hydraulic Block Diagram ICC 1 S D Hydraulic block diagram 0 088 258...

Страница 67: ...motor R L drives 8 Hydraulic pump steering 9 Valve block steering 10 Steering valve 11 Steering cylinder 12 Hydraulic pump side brushes debris container 13 Control block 13 1 Pressure relief valve 13...

Страница 68: ...68 Hydraulic Line Diagram ICC 1 S D Hydraulic line diagram 2 706 010...

Страница 69: ...steering 8 Hydraulic pump side brushes and debris container 9 Hydraulic cylinder debris container 10 Hydraulic motor RH drive motor 11 Hydraulic pump drive components 12 Hydraulikzylinder side brushe...

Страница 70: ...iner raised height mm 1350 Hydraulic fluid type HV 46 Hydraulic fluid capacity total l 35 Hydraulic pressure drive system bar 150 180 Hydraulic pressure side brushes at operating speed bar 60 80 Press...

Страница 71: ...71 ICC 1 S D Specifications Special tools Testing equipment 2 639 387 Tachometer 6 491 361 Magnetic field tester 6 803 003 Assembly torque ratings Rear wheels 100 Nm Front wheels 90 Nm...

Отзывы: