


-
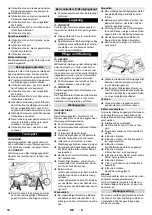
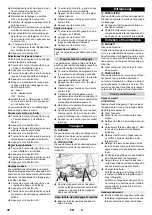
9
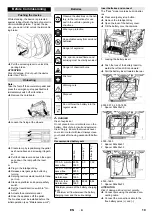
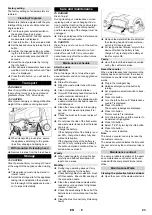
Squeeze the locking hooks.
Pull off the float.
Turn the protective turbine strainer in a
counter-clockwise direction.
Remove protective turbine strainer.
Rinse dirt off the protective turbine
strainer with water.
Reattach protective turbine strainer.
Attach float.
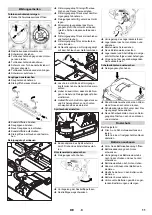
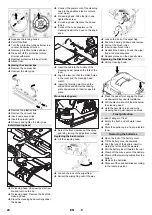
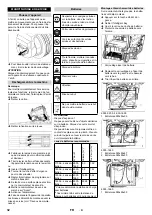
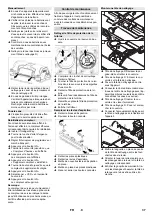
Remove the vacuum bar.
Unscrew the star grips.
Remove the plastic parts.
Remove the vacuum lips.
Insert new vacuum lips.
Insert the plastic parts.
Screw in and tighten the star grips.
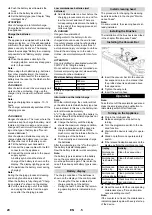
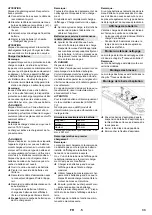
R cleaning head: Unscrew the star han-
dle and remove the lid.
D cleaning head: Remove the lid of the
cleaning head.
Place the cleaning head centrally under
the device.
Connect the power cord of the cleaning
head to the appliance (same colours
must meet).
R cleaning head: Slide the lid in and
tighten the screw.
D cleaning head: Replace the lid and
lock it.
Connect the hose couplers on the
cleaning head to the hose on the appli-
ance.
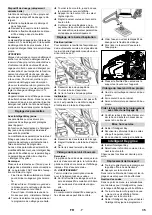
Insert the tab into the middle of the
cleaning head, between the fork of the
lever.
Align the lever so that the drilled holes
in the lever and the cleaning head
match.
Insert the retaining pin through the
drilled holes and swivel the locking
plate downwards so that it snaps into
place.
Select the floor clearance of the spray
guard by turning the adjustment wheel.
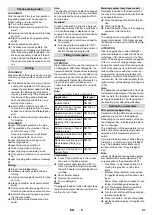
Lift the cleaning head.
Loosen the lock of the wiper flap.
Swivel the wiping flap out of the way.
Loosen the lock of the wiper flap.
Push the bearing lid down and remove.
Pull out the brush roller.
Insert a new brush roller.
Reattach the bearing lid and the wiper
flap in reverse sequence.
Repeat process on the opposite side.
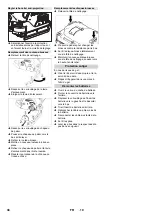
Lift the cleaning head.
Press the pedal for changing the brush-
es downward beyond its resistance.
Pull the disc brush out of the side below
the cleaning head.
Hold the new disc brush under the
cleaning head, push upward and lock.
In case of danger of frost:
Empty the fresh and dirt water reser-
voirs.
Store the appliance in a frost-protected
room.
Open the lock of the battery cover.
Tilt the battery cover backwards.
Push the lock of the battery insert to-
wards the left and tilt it downward.
Pull the battery insert towards the rear.
Clamp off the minus pole of the battery.
Clamp off the remaining cables from the
battery.
Remove the batteries.
Dispose of the used batteries according
to the local provisions.
Replacing the vacuum lips
Install cleaning head
Mount splash guard
Replacing the brush rollers
Replacing the Disk Brushes
Frost protection
Removing the batteries
24
EN
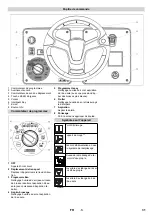
Содержание B 95 RS
Страница 2: ...2...
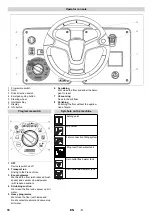
Страница 151: ...2 1 2 3 4 5 6 7 8 9 10 11 12 13 14 15 16 Dose 17 18 19 20 21 22 23 R 24 25 26 27 151 EL...
Страница 152: ...3 1 2 3 4 Not Aus 5 6 Intelligent Key 7 8 1 OFF 2 3 Eco 4 5 Heavy 6 7 8 152 EL...
Страница 155: ...6 Intelligent Key 2 10 Intelligent Key 15 OFF RM 746 RM 780 RM 755 es RM 69 ASF RM 753 155 EL...
Страница 158: ...9 R 50 50 R R Intelligent Key YES K rcher D 158 EL...
Страница 159: ...10 R D R D 159 EL...
Страница 160: ...11 OFF 0 Timeout 0 15 A4 0 5 160 EL...
Страница 161: ...12 1 2 qua Mizer 2 Aqua Mizer OFF 10 D D Aqua Mizer OFF 10 Dose Dose qua Mizer 161 EL...
Страница 178: ...2 1 2 3 4 5 6 7 8 9 10 11 12 13 14 15 16 Dose 17 18 19 20 21 22 IEC 60320 C14 23 R 24 25 26 27 178 RU...
Страница 179: ...3 1 2 3 4 5 6 7 8 1 OFF 2 3 Eco 4 5 Heavy 6 7 8 179 RU...
Страница 182: ...6 2 10 15 OFF 182 RU...
Страница 184: ...8 Yes No up down OFF OFF 10 R 184 RU...
Страница 185: ...9 10 R 50 50 R R K rcher D 185 RU...
Страница 186: ...10 R D R D 186 RU...
Страница 187: ...11 OFF 0 0 15 A4 0 5 187 RU...
Страница 188: ...12 1 2 2 Aqua Mizer OFF 10 R D Aqua Mizer OFF 10 Dose Dose Aqua Mizer 188 RU...
Страница 297: ...2 1 2 3 4 5 6 7 8 9 10 11 12 13 14 15 16 Dose 17 18 19 20 21 22 23 R 24 25 26 27 297 BG...
Страница 298: ...3 1 2 3 4 5 6 7 8 1 OFF 2 3 Eco 4 5 Heavy 6 7 8 298 BG...
Страница 301: ...6 2 10 15 OFF 301 BG...
Страница 303: ...8 up down OFF OFF 10 10 R 303 BG...
Страница 304: ...9 R 50 50 R R YES K rcher D 304 BG...
Страница 305: ...10 R D R D 305 BG...
Страница 306: ...11 OFF 0 0 15 A4 0 5 306 BG...
Страница 307: ...12 1 2 Aqua Mizer 2 OFF 10 R D OFF 10 Dose Dose 307 BG...
Страница 350: ...2 1 2 3 4 5 6 7 8 9 10 11 12 13 14 15 16 Dose 17 18 19 20 21 22 IEC 60320 C14 23 R 24 25 26 27 350 UK...
Страница 351: ...3 1 2 3 4 5 6 7 8 1 OFF 2 3 Eco 4 5 Heavy 6 7 8 351 UK...
Страница 354: ...6 2 10 15 OFF 354 UK...
Страница 356: ...8 Yes No up down OFF OFF 10 R 356 UK...
Страница 357: ...9 10 R 50 50 R R K rcher D 357 UK...
Страница 358: ...10 R D R D 358 UK...
Страница 359: ...11 OFF 0 0 15 A4 0 5 359 UK...
Страница 360: ...12 1 2 2 Aqua Mizer OFF 10 R D Aqua Mizer OFF 10 Dose Dose Aqua Mizer 360 UK...
Страница 363: ......
Страница 364: ...http www kaercher com dealersearch...


