-
6
Press Info button - the set value blinks.
Set the desired language by turning the
info button.
Confirm the changed setting by press-
ing the Info button or wait till the set val-
ue is automatically accepted after 10
seconds.
Adjust the trailing time of the brushes.
Same adjustment as "Set language".
Turn the info button until the function
"Battery menu" is displayed.
Press the info button - select the charg-
ing marker line according to the built-in
batteries.
Note
: Setting the charging marker line
should be discussed with Kärcher cus-
tomer service. This applies especially if
the battery is not listed in the menu.
Confirm the changed setting by press-
ing the Info button or wait till the set val-
ue is automatically accepted after 10
seconds.
Recreate the basic settings.
DANGER
Risk of injury! When loading or unloading
the machine, it may only be operated on
gradients up to the maximum value (see
"Technical Specifications"). Drive slowly.
몇
CAUTION
Risk of personal injury or damage! Mind the
weight of the appliance during transport.
Raise the cleaning head to avoid dam-
age to the brushes.
Remove the brush to avoid damage to
the brushes.
When transporting in vehicles, secure
the appliance according to the guide-
lines from slipping and tipping over.
몇
CAUTION
Risk of personal injury or damage! Consider
the weight of the appliance when storing it.
This appliance must only be stored in inte-
rior rooms.
DANGER
Risk of injury! Before working on the appli-
ance, remove the Intelligent Key and the
mains plug of the charger.
Drain and dispose of the dirt water and
the residual fresh water.
Recommended cleaning processes are
shown on the display at certain cleaning in-
tervals.
Perform the maintenance task shown
on the display.
Press the Info Button, the display will be
reset. The display will be shown again
at certain predefined time intervals.
Note
: A service reset resets all mainte-
nance intervals.
ATTENTION
Risk of damage. Do not sluice the appli-
ance with water and do not use aggressive
detergents.
Drain off dirt water.
Rinse the wastewater reservoir with
clean water or with the rinsing system
for the wastewater reservoir (option).
Remove the coarse dirt sieve from the
wastewater reservoir and clean it.
Clean the outside of the appliance with
a damp cloth which has been soaked in
mild detergent.
Check the fluff filter, clean if required.
Only BR model: Remove bulk waste
container and empty it.
Only BR model: Clean water distributor
channel (see section „Maintenance
work“).
Clean the vacuum lips and the wiping
lips, check for wear and replace if re-
quired.
Check the brushes for wear, replace if
required.
Press the lock of the wastewater reser-
voir in and close the cover of the waste-
water reservoir so that a gap remains
open to facilitate drying.
Check battery poles for oxidation, brush
off if necessary. Ensure that the con-
nection cable sits firmly.
Clean the seals between dirt water res-
ervoir and cover and check for tight-
ness, replace if required.
Check the acid density of the cells if the
batteries are not maintenance-free bat-
teries.
Clean the brush tunnel (only BR model).
Have the prescribed inspection carried
out by the customer service.
Drain the wastewater, see section
"Drain wastewater“.
Open the cover of the wastewater res-
ervoir.
Pull the flexible lock off of the rinsing
system.
Connect the water hose to the rinsing
system.
Close the cover of the wastewater res-
ervoir until it rests on the flexible lock.
Open the water supply and rinse the
wastewater reservoir for about 30 sec-
onds.
Repeat the rinsing process 2 to 3 times.
Shut off the water supply and discon-
nect the hose from the appliance.
Reattach the flexible lock to the connec-
tion. Leave the wastewater reservoir
cover open a crack to let it dry.
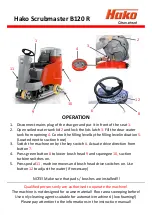
1 Wear indicator
2 Vacuum lip
The vacuum lips must be replaced or re-
versed if they are worn down to the wear in-
dicator.
Remove the vacuum bar.
Unscrew the star grips.
Setting the language
Brush trailing
Setting the charging marker line
LOAD DEFAULT
Transport
Storage
Maintenance and care
Maintenance schedule
Maintenance intervals
Display
Display all
Clean the vacuum bar 20 hours
Clean the fluff filter
20 hours
Clean water filter.
50 hours
Check the suction lips 100 hours
Check the brushes
100 hours
Service reset
200 hours
After each operation
Monthly
Yearly
Maintenance Works
Wastewater reservoir rinsing system
(option)
Replace or turn vacuum lips
8
EN
Содержание B 40 C Bp
Страница 1: ...R egister and w in w w w kaercher com B 40 C Bp B 40 W Bp 59641620 09 14...
Страница 2: ...2...
Страница 14: ......
Страница 15: ......
Страница 16: ...http www kaercher com dealersearch...