-
4
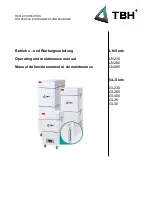
Insert the vacuum bar into the vacuum
bar suspension in such a manner that
the profiled sheet is positioned above
the suspension.
Tighten the wing nuts.
Insert the suction hose.
DANGER
Risk of injury. Pull the Intelligent Key to take
all functions out of operation immediately.
Insert batteries and connect (see "Be-
fore Start-up").
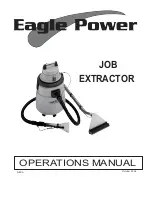
Place long lateral boards of the packag-
ing as a ramp next to the pallet.
Fix the ramp on the pallet with nails.
Place short boards as a support under-
neath the ramp.
Remove the wooden bars in front of the
wheels.
Lift the cleaning head by pressing the
pedal all the way down.
Remove the cardboard with the R
cleaning head.
Push down the appliance through the
ramp from the pallet.
Plug in the Intelligent Key.
Turn the program selection switch to
transport mode.
Press the driving lever and slowly move
the machine down from the ramp.
Remove the Intelligent Key.
DANGER
Risk of injury. Push the pedal for raising/
lowering the cleaning head with one foot
only. The other foot must firmly be placed
on the floor.
In dangerous situations, release the safety
switch/drive lever.
ATTENTION
Risk of damage. The suction bar must be
lifted for reversing.
Note:
The device is designed and built in such a
way that the cleaning head protrudes to-
wards the right. This enables working in a
comfortable way close to the edges.
Plug in the Intelligent Key.
Preselect the speed on the drive speed
rotary knob.
Turn the programme selection switch to
transport mode.
Drive the machine.
Forwards:
Press the driving lever to the front.
Backward:
Press the driving lever to the rear.
Note:
The device moves only when the driving le-
ver is moved by 15°.
Stop the machine: Release driving lever.
Open the lock of the fresh water reser-
voir.
Fill fresh water (maximum 60 °C) until
the lower edge of the filling nozzle.
Close the lock of the fresh water reser-
voir.
With automatic fill of fresh water reser-
voir (option)
Connect the hose to the automatic fill-
ing system and open the water supply
(max. 60 °C, max. 5 bars).
Monitor the appliance - the automatic
filling system will interrupt the water
supply when the tank is full.
Shut off the water supply and discon-
nect the hose from the appliance.
몇
WARNING
Risk of damage. Only use the recommended
detergents. With other detergents, the opera-
tor bears the increased risk regarding the op-
erational safety and danger of accident.
Only use detergents that are free from sol-
vents, hydrochloric acid and hydrofluoric
acid.
Follow the safety instructions for using de-
tergents.
Note:
Do not use highly foaming detergents.
Detergent is added to the fresh water on
the way to the cleaning head with the help
of a dosaging device.
Note:
The dosing unit can be used to add 3% de-
tergent at maximum. With higher dosage
the detergent must be put into the fresh wa-
ter tank.
Place the detergent bottle into the holder.
Close the bottle lid.
Insert the suction hose of the dosaging
equipment into the bottle.
Note:
If the fresh water tank is empty, then the
function of adding detergent gets deactivat-
ed. The cleaning head continues to work
without the addition of any liquid.
Add the detergent to the fresh water
reservoir.
Adjust the water quantity using the reg-
ulating button according to the dirt on
the floor covering.
Note:
Carry out initial cleaning attempts with low
water volume. Increase water volume step-
by-step until the desired cleaning result is
achieved.
The detergent pump of the dosing equip-
ment does not start working until a mini-
mum water volume is present.
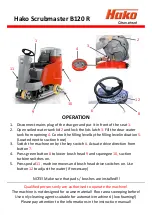
To improve the vacuuming result on tiled
floors the vacuum bar can be turned to an
oblique position of up to 5°.
Loosen the wing nuts.
Turn the vacuum bar.
Tighten the wing screws.
If the vacuum result is unsatisfactory the in-
clination of the straight vacuum bar can be
modified.
Adjust the rotary handle to incline the
suction bar.
Installing the Vacuum Bar
Unloading
B 40 C Bp
B 40 W Bp
Operation
Driving with motor support
(B 40 W Bp only)
Filling in detergents
Fresh water
Detergent
Application
Detergent
Routine cleaning of all water
resistant floors
RM 746
RM 780
Routine cleaning of glossy
surfaces (e.g. granite)
RM 755 es
Routine cleaning and basic
cleaning of industrial floors
RM 69 ASF
Routine cleaning and basic
cleaning of fine stoneware
tiles
RM 753
Routine cleaning of tiles in
sanitary areas
RM 751
Cleaning and disinfection in
sanitary areas
RM 732
Removal of coating from all
alkali-resistant floors (e.g.
PVC)
RM 752
Removal of coating from li-
noleum floors
RM 754
Appliance with dosing equipment DOSE
(option)
Models without dosing equipment
Setting the water quantity
Setting the Vacuum Bar
Oblique position
Inclination
6
EN
Содержание B 40 C Bp
Страница 1: ...R egister and w in w w w kaercher com B 40 C Bp B 40 W Bp 59641620 09 14...
Страница 2: ...2...
Страница 14: ......
Страница 15: ......
Страница 16: ...http www kaercher com dealersearch...