background image

14

Maintenance

To reduce risk of electric shock unplug before cleaning or servicing.

2

1

4

3

2

1

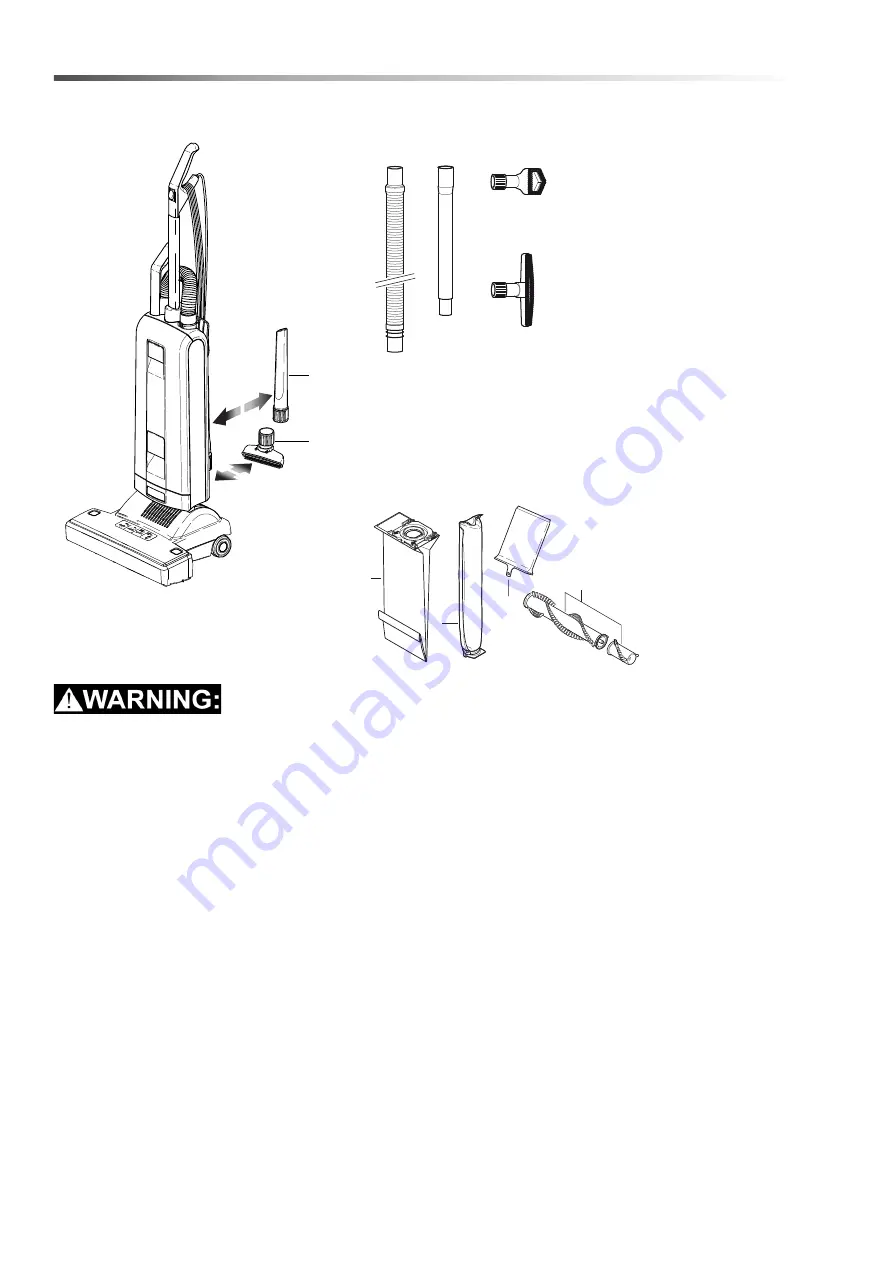
A.) Attachments

1. Upholstery Nozzle

2. Crevice Nozzle

B.) Optional Attachments

1. 8.613-769.0 Extension

2. 8.640-969.0 Extension

3. 8.628.474.0 Dusting 

4. 8.614-653.0 Wall 

C.) Service Parts

1. Paper Bag

2. Micro Filter

3. Exhaust Filter
4. Brush Roller Set

A

B

    Hose 

    Tube, Black 

    Brush 

    and Upholstery Brush 

2

1

3

4

C

8.643-388.0   Manual - Karcher Sensor XP18

Содержание 1.012-613.0

Страница 1: ...8 643 388 0 E 04 01 20 Sensor XP18 Vacuum Operating Instructions ENG MODEL 1 012 613 0 SR XP18 From Serial No G505001004 If Serial Number not listed Contact Manufacturer...

Страница 2: ...de la garantie est facile et rapide Votre enregistrement nous permettra de mieux vous servir tout au long de la dur e de vie de votre produit Pour enregistrer votre produit consultez http warranty kar...

Страница 3: ...3 Notes 8 643 388 0 Manual Karcher Sensor XP18...

Страница 4: ...4 8 643 388 0 Manual Karcher Sensor XP18 Machine Data Label...

Страница 5: ...uctions 8 IMPORTANT SAFEGUARDS 9 Operation Components 10 Preparation 10 Functions of the display 11 Maintenance Removal of the Exhaust Filter 12 Fitting a New Exhaust Filter 12 Brush Roller 13 Removin...

Страница 6: ...familiarize the operator with the operation and function of the machine The MAINTENANCE section contains preventive maintenance to keep the machine and its compo nents in good working condition They...

Страница 7: ...s for Servicing of Appliances 20 Do not use machine as a step 21 If used on plush carpet or carpet with thick padding do not leave machine in one place with machine turned on 22 Do not use the handle...

Страница 8: ...erly grounded outlet sketch A can be installed by a qualified electrician The green colored rigid ear lug or the like extending from the adapter must be connected to a permanent ground such as a prope...

Страница 9: ...floor bush off carpet by keeping handle in locked position and lowering handle with on hand to raise bush off floor Operate accessories with other hand Always plug your cleaner into a standard wall ou...

Страница 10: ...ch 22 then slot the handle assembly into the top of the dust bag housing 6 and push firmly down When the handle has been pushed down as far as it will go press catch 22 down If the handle Is not pushe...

Страница 11: ...copic handle grip lift it away from the machine and stretch out the hose After use insert the telescopic attach ment tube into the back of the machine Raise the handle of the machine and the hose will...

Страница 12: ...ygiene filter 45 The exhaust filter is located underneath the cover 19 on the back of the power head Removal of the Exhaust Filter Disconnect machine from the mains Move the dustbag housing into the u...

Страница 13: ...t cut into the bristles Removing Blockages Underneath the machine is an inspection door to check for blockages 144 Blockages in the neck 20 picture 2 can be checked by first lifting off the dust bag h...

Страница 14: ...stery Nozzle 2 Crevice Nozzle B Optional Attachments 1 8 613 769 0 Extension 2 8 640 969 0 Extension 3 8 628 474 0 Dusting 4 8 614 653 0 Wall C Service Parts 1 Paper Bag 2 Micro Filter 3 Exhaust Filte...

Страница 15: ...ir Flow 50 l s Dust Bag Capacity 5 3 liters Working Width 378 mm 15 Brush Drive Tooth Belt Brush Speed 2700 rpm Floor Adjustment Automatically Sensor Advised Cable 12 2 m 40 Weight XP18 8 0 kg 17 6 lb...

Страница 16: ...16 Notes 8 643 388 0 Manual Karcher Sensor XP18...

Страница 17: ...8 643 388 0 E 04 01 20 Sensor XP18 La Aspiradora Instrucciones de funcionamiento SPA MODELO 1 012 613 0 SR XP18 From Serial No G505001004 If Serial Number not listed Contact Manufacturer...

Страница 18: ...2 Modelo Fecha de la compra N mero de serie Distribuidor Direcci n N de tel fono Representante de ventas 8 643 388 0 Manual Karcher Sensor XP18 Etiqueta de Datos de la M quina...

Страница 19: ...rucciones Para Conectar El Equipo A Tierra 6 IMPORTANTES PRECAUCIONES 7 Operaci n Componentes 8 Preparaci n 8 Funclones de Despliegue 9 Mantenimiento Extracci n del Filtro del Escape 10 Colocaci n de...

Страница 20: ...iarizar al operario con el manejo y el funcionamiento de la m quina La secci n MANTENIMIENTO incluye instrucciones sobre mantenimiento preventivo para mantener la m quina y sus componentes en buenas c...

Страница 21: ...paraciones 19 Utilice nicamente piezas de reemplazo id nticas Consulte las instrucciones para realizar el mantenimiento de los aparatos 20 No utilice la m quina como escalera 21 Si se la utiliza sobre...

Страница 22: ...tierra boceto A La espiga r gida verde la argolla o pieza similar que se extiende desde el adaptador debe conectarse a una conexi n a tierra permanente como una tapa de la caja de distribuci n adecuad...

Страница 23: ...el manguito de piso lejos de la alfombra con la manija en posici n trabada y baje la manija con la mano para levantar el manguito del piso Opere los elementos accesorios con la otra mano Siempre ench...

Страница 24: ...asta que cierre el pestillo del compartimiento 8 Levante el pestlllo 22 y despues deslice el ensamb laJe de la manija en la parte superior def compar timiento para la bolsa para polvo 6 y preslone fir...

Страница 25: ...nda la manguera Despu s del uso inserte el tubo telesc pico nuevamente en la m quina Levante el asa de la m quina y la manguera autom ticamente se retraer Para usar la manguera sin el tubo como se mue...

Страница 26: ...el escape est ubicado debajo de la cubierta 19 en la parte posterior del cabezal de potencia Extracci n del Filtro del Escape Desconecte la m quina de la red el ctrica Ponga el alojamiento de la bolsa...

Страница 27: ...los rodillos cepilladores no corte las cerdas Eliminar El Bloqueo Debajo de la maquina existe una puerta de inspec cion 144 que permite ver si hay bloqueos Se pueden revisar las obstrucciones del cue...

Страница 28: ...les 1 Boquilla para tapicer a 2 Boquilla para grietas B Accesorios opcionales 1 Manguera Flexible 2 Tubo r gido 3 Cepillo para sacudir 4 Cepillo de tapicer a y pared C Piezas de repuesto 1 Bolsa de pa...

Страница 29: ...0 l s Capacidad bolsa del polvo 5 3 liters Ancho operacional 378 mm 15 pulgadas Motor del cepillo cinta dentada Velocidad del cepillo 2700 rpm Ajuste al suelo Sensor autom tico aconsejado Cable 12 2 m...

Страница 30: ......

Страница 31: ...8 643 388 0 E 04 01 20 Sensor XP18 L aspirateur Mode d emploi FRA Mod le 1 012 613 0 SR XP18 From Serial No G505001004 If Serial Number not listed Contact Manufacturer...

Страница 32: ...2 Mod le Date d achat Num ro de s rie D taillant Adresse Num rodet l phone Repr sentant commercial 8 643 388 0 Manual Karcher Sensor XP18 tiquette de donn es de la machine...

Страница 33: ...TANTES 5 Instructions De Mise La Terre 6 MESURES DE S CURIT IMPORTANTES 7 Op ration Composants 8 Pr paration 8 Fonctions du Panneau de Contrles 9 Entretien Retrait du filtre d vacuation 10 Montage d u...

Страница 34: ...fonctionnement et les fonctions de la machine La section ENTRETIEN contient les mesures d entretien pr ventif pour maintenir la machine et ses composants en bon tat Elles sont num r es dans cet ordre...

Страница 35: ...es r parations doivent tre effectu s par du personnel qualifi 19 N utiliser que des pi ces de rechange identiques Consulter les instructions d entretien des appareils 20 Ne pas utiliser la machine com...

Страница 36: ...e patte ou autre pi ce rigide verte s tendant de l adaptateur doit tre connect e un dispositif permanent mis terre comme le couvercle d une bo te de sortie correctement mise la terre Si un adaptateur...

Страница 37: ...a brosse de sol sur lev e par rapport au tapis en maintenant la poign e en position verrouill e et en abaissant la poign e avec la main pour soulever la brosse du tapis Utilisez les accessoires avec l...

Страница 38: ...te de brossage Verifier que le poussoir de blocage 8 est bien bloque Lever le levier de blocage 22 et introduire le manche 3 refermer le levier de blocage Bien verifier que le manche 3 est bien enfonc...

Страница 39: ...le tube de fixation t lescopique l arri re de la machine Soulevez la poign e de la machine et le tuyau se r tractera automatiquement Afin d utiliser le tuyau sans le tube comme indiqu sur la photo de...

Страница 40: ...emps que le micro filtre hygi nique 45 Le filtre d vacuation est situ sous le couvercle 19 l arri re de la t te motoris e Retrait du filtre d vacuation D brancher la machine du secteur D placer le bo...

Страница 41: ...poils de brosse Supprimer les blocages Sous la machine existe une trappe d inspection 144 en cas de colmatage Si besoin est ouvrir et d baucher Si quelque chose vient a bloquer le passage del air dan...

Страница 42: ...ccessoires 1 Buse sp ciale meuble 2 Buse sifflet B Accessoires supplementaires 1 Rallonge flexible 2 Tube plastique 3 Buse fauteui 4 Brosse pour murs et tissus C Pieces de rechange 1 Sac papier 2 Micr...

Страница 43: ...spiration 5 3 liters Largoor de travail 378 mm 15 Entrainement de la brosse Tooth Belt Vitresse rotation de la brosse 2700 rpm R glage de la t te sur le sol Automatiquement Sensor Inform C ble 12 2 m...

Страница 44: ......

Страница 45: ...17 Parts Spare Parts List 1 012 613 0 Sensor XP18 8 643 388 0 Manual Karcher Sensor XP18...

Страница 46: ...Filter Bag Housing 62 30 29 23 63 64 13 50 46 20 21 17 22 24 25 26 27 41 37 35 38 62 19 18 32 62 15 16 1 10 7 2 3 5 6 60 8 61 11 4 51 45 62 28 34 33 36 40 39 31 62 8 643 388 0 Manual Karcher Sensor XP...

Страница 47: ...AY 24 86145280 5084 SPRING FOR LOCKING ROD 25 86433960 51103KG DUST BAG HOUSING LOCKING CATCH KARCHER GRAY 26 86143120 5083 LOCKING ROD 27 86433970 51102BG DUST BAG HOUSING BUMPER BASE BASALT GRAY 28...

Страница 48: ...20 121 129 128 130 145 146 144 147 149 151 161 150 165 148 164 2x 10⁹a 110 111 161 3x 113 112 164 2x 114 118 119 125 126 131 124 123 164 132 135 141 134 143 142 133 137 136 162 138 139 162 162 162 164...

Страница 49: ...20 86434210 52052 FELT STRIP 121 86434220 52054 CABLE GUIDE 122 86434490 52250KG BRUSH ROLLER RELEASE BUTTON SR XP 18 R H KARCHER GRAY 123 86434240 52112 SUPPORT MOTOR HOUSING 124 86434250 52021 SUPPO...

Страница 50: ...S REAR BOTTOM PLATE SR XP18 CPL INCL POS 150 165 150 86144960 5400 3 SEALING STRIP 429 5MM 151 86434520 52128GS FRONT BOTTOM PLATE SR XP18 CPL 152 86434530 52038SW BUMPER SR XP18 BLACK 160 86321410 01...

Страница 51: ...housing Logement sac poussi re Compartimiento del filtro Handle tube Tube de manche Tubo de la manilla 120V PCB power supply controller Circuit imprim Alimentation Contr leur lectronique Fuente de ali...

Страница 52: ...06637L 86433880...

Отзывы: