background image

11

Working in Manual mode:

In Manual mode the 962G self-leveling mechanism is 
disabled and the laser beams can be set at any slope 

required.

1. Verify that the locking switch #1 is on the OFF position.
2. Press and hold the beam selector button (a) for 3 

seconds, to activate the manual mode. The laser level will 
project all the beams: a 360° horizontal beam, vertical 

beam and 2 plumb dots that will flash every 3 sec. to 

let you know that the beam is not leveled. The beam 
indicator (b) will turn on.

3. To mark a slope, tilt the laser to the desired angle.

4. To choose a beam, briefly press the beam selector button 

(a) - it will change the beams by cycle:

  All beams => Horizontal beam only => Vertical beam 

only => Hori Vertical beams => Plumb dots only 
=> OFF.

5. The last click on the beam selector button (a) will switch 

OFF all the beams and the beam indicator (b) will turn off.

6. While in Manual mode, turning the locking switch #1 from 

OFF to ON will turn off the Manual mode. The automatic 
self – leveling mode will be activated (if the laser level is 
within the self – leveling range).

Содержание Prolaser Multi Beam GREEN Orbital laser

Страница 1: ...Prolaser Multi Beam GREEN Orbital laser Model No 962G 165 50m Up to 60m 200 4 AA INCLUDED User Manual...

Страница 2: ...odes that emits a horizontal circular line vertical line and two plumb dots The laser is innovatively designed for a very broad range of Professional and DIY jobs including Hanging cabinets and shelve...

Страница 3: ...3 CONTENTS Features 4 Safety instructions 5 6 Battery installation Safety 7 8 Overview 9 Operating instructions 10 12 Maintenance 13 Field calibration test 14 23 Specifications 24 Warranty 25...

Страница 4: ...indoor working range 30m 100 The max detectable range of the laser in pulse mode is 60m 200 For optimal vertical line viewing position the laser at least 2 meters from the wall Manual mode allows angu...

Страница 5: ...te the laser level near children or let children operate the laser level Do not look into a laser beam using magnifying optical devices such as binoculars or a telescope since it will increase the lev...

Страница 6: ...0 C or above 45 C 14 F to 113 F Do not operate the laser in explosive atmospheres such as flammable liquids gases or dust Sparks can cause ignition When not in use remove the battery engage the pendul...

Страница 7: ...uses 4 standard AA batteries Installation 1 Press down the ledge of the battery cover 2 Insert 4 new AA batteries of the same brand according to the polarity diagram on the battery cover 3 Reclose th...

Страница 8: ...Battery can deteriorate leak or explode and can cause injury or fire 1 Do not shorten the battery terminals 2 Do not dispose of battery into household waste 3 Do not dispose of battery in fire 4 Defec...

Страница 9: ...Beam Selector Manual mode button b Beam Battery indicator c Pulse Mode button d Pulse Mode indicator 3 Horizontal laser beam window 4 Forward vertical laser beam window 5 Down plumb dot window 6 Batte...

Страница 10: ...s a 360 horizontal beam vertical beam and 2 plumb dots The beam indicator b will turn on 3 Press the beam selector button a to choose the required laser beams by cycle All beams Horizontal beam only V...

Страница 11: ...that the beam is not leveled The beam indicator b will turn on 3 To mark a slope tilt the laser to the desired angle 4 To choose a beam briefly press the beam selector button a it will change the beam...

Страница 12: ...aser beams 1 The pulse mode can be activated both in Automatic and in Manual mode 2 Turn on the laser level to the required mode 3 Press the Pulse mode button c to activate it The Pulse mode indicator...

Страница 13: ...e laser level with a clean soft cloth Do not use solvents Although the laser level is dust and dirt resistant to a certain degree don t store in dusty places as long term exposure may damage internal...

Страница 14: ...cy of the plumb line 1 Checking the Height Accuracy of the Horizontal beam Up and down deviation 1 Set up the laser on a tripod or on a flat stable surface between two walls A and B approximately 5met...

Страница 15: ...15...

Страница 16: ...16 6 Move the laser level towards wall B and position it approximately 0 5 meter from wall B 7 Mark on wall B the center of the cross beams as b2 see figure 3...

Страница 17: ...send the laser level to a qualified technician for repair 2 Checking the Level Accuracy of the Horizontal beam Side to side inclination 1 Set up the laser on a tripod or on a flat surface at a distanc...

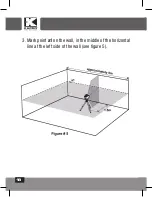
Страница 18: ...18 3 Mark point a1 on the wall in the middle of the horizontal line at the left side of the wall see figure 5...

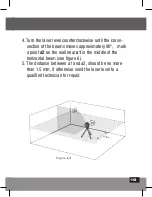
Страница 19: ...ction of the beams moves approximately 90 mark a point a2 on the wall near a1 in the middle of the horizontal beam see figure 6 5 The distance between a1 and a2 should be no more than 1 5 mm if otherw...

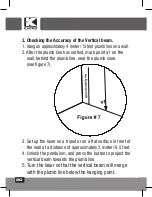
Страница 20: ...behind the plumb line near the plumb cone see figure 7 3 Set up the laser on a tripod or on a flat surface in front of the wall at a distance of approximately 2 meter 6 5 feet 4 Unlock the pendulum a...

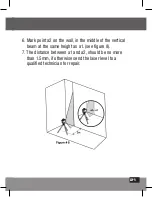
Страница 21: ...on the wall in the middle of the vertical beam at the same height as a1 see figure 8 7 The distance between a1 and a2 should be no more than 1 5mm if otherwise send the laser level to a qualified tec...

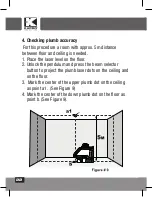
Страница 22: ...1 Place the laser level on the floor 2 Unlock the pendulum and press the beam selector button to project the plumb laser dots on the ceiling and on the floor 3 Mark the center of the upper plumb dot o...

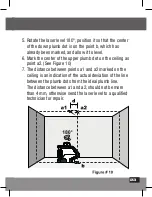
Страница 23: ...e center of the upper plumb dot on the ceiling as point a2 See Figure 10 7 The distance between points a1 and a2 marked on the ceiling is an indication of the actual deviation of the line between the...

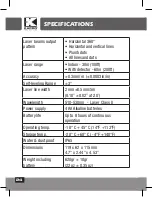
Страница 24: ...leveling Range 3 Laser line width 2 mm 0 5mm 5m 0 10 0 02 at 20 Wavelength 510 530nm Laser Class II Power supply 4 AA Alkaline batteries Battery life Up to 8 hours of continuous operation Operating t...

Страница 25: ...with proof of purchase Model 962G The serial number sticker is positioned inside the battery compartment CE CONFORMITY CERTIFICATE This product meets the standards of the Electromagnetic Compatibilit...

Страница 26: ...1 00 Rev 3 0 2020 Kapro Industries Ltd...

Отзывы: