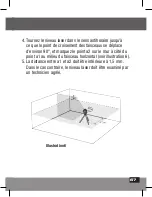
Kapro 962 Скачать руководство пользователя страница 70

70

4

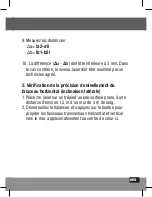
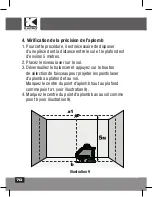
. Vérification de la précision de l’aplomb

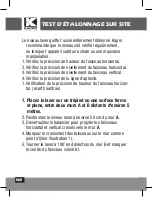
1. Pour cette procédure, il est nécessaire de disposer 

d’une pièce dont la distance entre le sol et le plafond est 

d’environ 5 mètres.

2. Placez le niveau laser sur le sol.

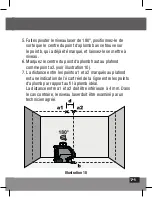
3. Déverrouillez le balancier et appuyez sur le bouton 

de sélection de faisceau pour projeter les points laser 

d'aplomb au plafond et au sol.

  Marquez le centre du point d'aplomb haut au plafond 

comme point a1. (voir illustration 9).

4. Marquez le centre du point d’aplomb bas au sol comme 

point b (voir illustration 9).

Illustration 9

Содержание 962

Страница 1: ...Prolaser Multi Beam Orbital laser Model No 962 165 50m Up to 50m 165 4 AA INCLUDED User Manual Manual del usuario Manuel d utilisation...

Страница 2: ...des that emits a horizontal circular line vertical line and two plumb dots The laser is innovatively designed for a very broad range of Professional and DIY jobs including Hanging cabinets and shelves...

Страница 3: ...3 CONTENTS Features 4 Safety instructions 5 6 Battery installation Safety 7 8 Overview 9 Operating instructions 10 12 Maintenance 13 Field calibration test 14 23 Specifications 24 Warranty 25...

Страница 4: ...indoor working range 30m 100 The max detectable range of the laser in pulse mode is 50m 165 For optimal vertical line viewing position the laser at least 2 meters from the wall Manual mode allows angu...

Страница 5: ...te the laser level near children or let children operate the laser level Do not look into a laser beam using magnifying optical devices such as binoculars or a telescope since it will increase the lev...

Страница 6: ...0 C or above 45 C 14 F to 113 F Do not operate the laser in explosive atmospheres such as flammable liquids gases or dust Sparks can cause ignition When not in use remove the battery engage the pendul...

Страница 7: ...uses 4 standard AA batteries Installation 1 Press down the ledge of the battery cover 2 Insert 4 new AA batteries of the same brand according to the polarity diagram on the battery cover 3 Reclose th...

Страница 8: ...Battery can deteriorate leak or explode and can cause injury or fire 1 Do not shorten the battery terminals 2 Do not dispose of battery into household waste 3 Do not dispose of battery in fire 4 Defec...

Страница 9: ...Beam Selector Manual mode button b Beam Battery indicator c Pulse Mode button d Pulse Mode indicator 3 Horizontal laser beam window 4 Forward vertical laser beam window 5 Down plumb dot window 6 Batte...

Страница 10: ...s a 360 horizontal beam vertical beam and 2 plumb dots The beam indicator b will turn on 3 Press the beam selector button a to choose the required laser beams by cycle All beams Horizontal beam only V...

Страница 11: ...hat the beam is not leveled The beam indicator b will turn on 3 To mark a slope tilt the laser to the desired angle 4 To choose a beam briefly press the beam selector button a it will change the beams...

Страница 12: ...aser beams 1 The pulse mode can be activated both in Automatic and in Manual mode 2 Turn on the laser level to the required mode 3 Press the Pulse mode button c to activate it The Pulse mode indicator...

Страница 13: ...e laser level with a clean soft cloth Do not use solvents Although the laser level is dust and dirt resistant to a certain degree don t store in dusty places as long term exposure may damage internal...

Страница 14: ...cy of the plumb line 1 Checking the Height Accuracy of the Horizontal beam Up and down deviation 1 Set up the laser on a tripod or on a flat stable surface between two walls A and B approximately 5met...

Страница 15: ...15...

Страница 16: ...16 6 Move the laser level towards wall B and position it approximately 0 5 meter from wall B 7 Mark on wall B the center of the cross beams as b2 see figure 3...

Страница 17: ...send the laser level to a qualified technician for repair 2 Checking the Level Accuracy of the Horizontal beam Side to side inclination 1 Set up the laser on a tripod or on a flat surface at a distanc...

Страница 18: ...18 3 Mark point a1 on the wall in the middle of the horizontal line at the left side of the wall see figure 5...

Страница 19: ...ction of the beams moves approximately 90 mark a point a2 on the wall near a1 in the middle of the horizontal beam see figure 6 5 The distance between a1 and a2 should be no more than 1 5 mm if otherw...

Страница 20: ...behind the plumb line near the plumb cone see figure 7 3 Set up the laser on a tripod or on a flat surface in front of the wall at a distance of approximately 2 meter 6 5 feet 4 Unlock the pendulum a...

Страница 21: ...on the wall in the middle of the vertical beam at the same height as a1 see figure 8 7 The distance between a1 and a2 should be no more than 1 5mm if otherwise send the laser level to a qualified tec...

Страница 22: ...1 Place the laser level on the floor 2 Unlock the pendulum and press the beam selector button to project the plumb laser dots on the ceiling and on the floor 3 Mark the center of the upper plumb dot o...

Страница 23: ...e center of the upper plumb dot on the ceiling as point a2 See Figure 10 7 The distance between points a1 and a2 marked on the ceiling is an indication of the actual deviation of the line between the...

Страница 24: ...leveling Range 3 Laser line width 2 mm 0 5mm 5m 0 10 0 02 at 20 Wavelength 625 645nm Laser Class II Power supply 4 AA Alkaline batteries Battery life Up to 12 hours of continuous operation Operating t...

Страница 25: ...e with proof of purchase Model 962 The serial number sticker is positioned inside the battery compartment CE CONFORMITY CERTIFICATE This product meets the standards of the Electromagnetic Compatibilit...

Страница 26: ...ite una l nea circular horizontal l nea vertical y dos puntos de plomada El l ser est dise ado de modo innovador para una amplia gama de tareas profesionales y de bricolaje incluyendo Colgar gabinetes...

Страница 27: ...icas 28 Instrucciones de seguridad 29 30 Instalaci n de bater as y Seguridad 31 32 Visi n general 33 Instrucciones de operaci n 34 36 Mantenimiento 37 Prueba de calibraci n de campo 38 47 Especificaci...

Страница 28: ...do pulso es de 50m 165 Para una visualizaci n ptima de la l nea vertical coloque el l ser al menos a 2 metros de la pared Para una visualizaci n ptima de la l nea vertical coloque el l ser al menos a...

Страница 29: ...re el nivel l ser cerca de ni os ni permita a los ni os utilizar el nivel l ser No mire a un rayo l ser utilizando dispositivos pticos de aumento tal como prism ticos o telescopio ya que esto aumentar...

Страница 30: ...iores a 45 C 14 F a 113 F No opere el l ser en atm sferas explosivas tales como l quidos inflamables gases o polvo Las chispas pueden causar ignici n Cuando no est en uso quite la bater a active el bl...

Страница 31: ...ulti Beam Orbital usa 4 bater as AA est ndar Instalaci n 1 Presione el pestillo de la tapa de las bater as 2 Inserte 4 pilas AA nuevas de igual marca de acuerdo con el diagrama de polaridad en la tapa...

Страница 32: ...iorarse producir fugas o explosiones y pueden causar lesiones o incendios 1 No acorte los terminales de las bater as 2 No deseche las bater as en la basura hogare a 3 No deseche las bater as en el fue...

Страница 33: ...a Selector de rayos Bot n de modo manual b Indicador de rayos bater a c Bot n de modo pulso d Indicador de modo pulso 3 Ventana de rayo l ser horizontal 4 Ventana de rayo l ser vertical delantera 5 Ve...

Страница 34: ...al 360 un rayo vertical y 2 puntos de plomada Se encender el indicador de rayos b 3 Presione el bot n selector de rayos a para elegir los rayos l ser necesarios por ciclo Todos los rayos Solo rayo hor...

Страница 35: ...icar que el rayo no est nivelado Se encender el indicador de rayos b 3 Para marcar una pendiente incline el l ser hasta el ngulo deseado 4 Para elegir un rayo presione brevemente el bot n selector de...

Страница 36: ...el detector detecte los rayos l ser 1 El modo de pulsos puede ser activado en los modos Autom tico y Manual 2 Encienda el nivel l ser al modo requerido 3 Presione el bot n de modo de pulsos c para act...

Страница 37: ...ser con un pa o suave y limpio No utilice disolventes Aunque el nivel l ser es resistente al polvo y la suciedad en cierta medida no lo almacene en lugares polvorientos ya que una exposici n de largo...

Страница 38: ...isi n de la l nea de plomada 1 Comprobaci n de la precisi n de la altura del rayo horizontal desviaci n hacia abajo y hacia arriba 1 Instale el l ser sobre un tr pode o sobre una superficie estable en...

Страница 39: ...39...

Страница 40: ...sici nelo aproxi madamente a 0 5 metros de la pared B 7 Marque en la pared B el centro de las l neas cruzadas como b2 ver la figura 3 8 Gire el l ser180 hacia la pared A y marque en la pared el centro...

Страница 41: ...n de la precisi n de nivelaci n del rayo horizontal inclinaci n de lado a lado 1 Instale el l ser sobre un tr pode o sobre una superficie plana a una distancia de aproximadamente 1 5 metros de una pa...

Страница 42: ...42 3 Marque el punto a1 en la pared en el medio de la l nea horizontal en el lado izquierdo de la pared ver la figura 5...

Страница 43: ...la secci n cruzada de los rayos se mueva aproximadamente 90 marque un punto a2 en la pared cerca de a1 en medio del rayo horizontal ver la figura 6 5 La distancia entre a1 y a2 no debe ser de m s de...

Страница 44: ...n del rayo vertical 1 Cuelgue una plomada de aproximadamente 4 metros 13 pies en una pared 2 Despu s de asentada la plomada marque el punto a1 en la pared detr s de la l nea de plomada cerca del cono...

Страница 45: ...el rayo vertical hacia la l nea de plomada 5 Gire el l ser de modo que el rayo vertical se fusione con la l nea de plomada por debajo del punto de suspensi n 6 Marque el punto a2 en la pared en el med...

Страница 46: ...oque el nivel l ser en el piso 2 Desbloquee el p ndulo y presione el bot n selector de rayos para proyectar los puntos de plomada de l ser en el cielorraso y en el piso 3 Marque el centro del punto de...

Страница 47: ...del punto de plomada superior en el cielorraso como punto a2 ver la figura 10 7 La distancia entre los puntos a1 y a2 marcada en el cielorraso es indicaci n de la desviaci n real de la l nea entre lo...

Страница 48: ...del rayo l ser 2 mm 0 5mm 5m 0 10 0 02 a 20 Longitud de onda 625 645nm L ser de Clase II Fuente de alimentaci n 4 bater as AA alcalinas Vida til de bater as Hasta 12 horas de funcionamiento continuo...

Страница 49: ...bante de compra Modelo 962 La etiqueta con el n mero de serie se encuentra dentro del compartimiento de bater as CERTIFICADO DE CONFORMIDAD CE Este producto cumple con las normas de Compatibilidad Ele...

Страница 50: ...ligne circulaire horizontale une ligne verticale et deux points d aplomb De conception innovante ce laser se destine de tr s nombreuses t ches professionnelles ou de bricolage notamment Pose d tag res...

Страница 51: ...51 CONTENU Fonctions 52 Consignes de s curit 53 54 Installation des piles et s curit 55 56 Vue d ensemble 57 Utilisation 58 60 Entretien 61 Test d talonnage 62 71 Caract ristiques 72 Garantie 73...

Страница 52: ...e en int rieur 30m 100 Port e maximale de d tection du laser en mode impulsion 50 m tres 165 Pour une vision optimale de la ligne verticale positioner le laser 2 m tres au moins du mur Protection IP65...

Страница 53: ...proximit d enfants ou laisser des enfants utiliser le niveau laser Ne pas regarder dans le faisceau laser avec un mat riel optique grossissant des jumelles ou un t lescope par exemple pouvant aggraver...

Страница 54: ...rieures 45 C 14 F 113 F Ne pas utiliser en environnement inflammable tel qu en pr sence de liquides gaz ou poussi res inf ammables Les tincelles de l outil sont inflammables Lorsqu il n est pas utilis...

Страница 55: ...Beam utilise 4 piles AA standard Installation 1 Appuyez sur l ergot du cache du compartiment piles 2 Ins rez 4 piles AA neuves de m me marque en respectant le sch ma de polarit figurant sur le cache...

Страница 56: ...er fuir ou exploser et causer des blessures ou provoquer un incendie 1 Ne pas raccourcir les bornes des piles 2 Ne pas jeter les piles aux ordures m nag res 3 Ne pas jeter les piles au feu 4 Les piles...

Страница 57: ...l b T moin Indicateur de faisceau charge des piles c Bouton mode impulsion d T moin de mode impulsion 3 Fen tre de projection du faisceau laser horizontal 4 Fen tre de projection du faisceau laser ver...

Страница 58: ...60 un faisceau vertical et 2 points d aplomb Le t moin lumineux de faisceau b s illumine 3 Appuyez sur le bouton de s lection de faisceau a pour choisir le faisceau laser par cycle Tous les faisceaux...

Страница 59: ...au n est pas nivel Le t moin lumineux de faisceau b s illumine 3 Pour marquer une inclinaison inclinez le laser l angle d sir 4 Pour choisir un faisceau appuyez bri vement sur le bouton de s lection d...

Страница 60: ...s faisceaux laser 1 Le mode impulsion peut tre engag en mode automatique et en mode manuel 2 Allumez le niveau laser au mode d sir 3 Appuyez sur le bouton mode impulsion c pour l engager Le t moin Mod...

Страница 61: ...ement l aide d un chiffon propre et doux N utilisez pas de solvants Bien que le niveau laser soit r sistant l eau et la poussi re ne le remisez pas en un endroit poussi reux une longue exposition tant...

Страница 62: ...cision de la ligne d aplomb 1 V rification de la pr cision de hauteur du faisceau horizon tal cart haut bas 1 Placez le laser sur un tr pied ou une surface ferme et plane entre deux murs A et B distan...

Страница 63: ...63 5 m tres environ Illustration 1 Illustration 2...

Страница 64: ...le niveau laser vers le mur B et positionnez le environ 50 cm du mur B 7 Sur le mur B marquez comme point b2 le croisement des faisceaux voir illustration 3 8 Tourner le laser 180 end direction du mur...

Страница 65: ...V rification de la pr cision de nivellement du faisceau horizontal inclinaison lat rale 1 Placez le laser sur un tr pied ou une surface plane une distance d environ 1 5 m d un mur de 5 m de long 2 D...

Страница 66: ...66 3 Marquez le point a1 sur le mur au milieu de la ligne horizontale du c t gauche du mur voir illustration 5 Illustration 5...

Страница 67: ...des faisceaux se d place d environ 90 et marquez le point a2 sur le mur c t du point a1 au milieu du faisceau horizontal voir illustration 6 5 La distance entre a1 et a2 doit tre inf rieure 1 5 mm Da...

Страница 68: ...il d aplomb c t du plomb voir illustration 7 3 Placez le laser sur un tr pied ou une surface plane face au mur une distance d environ 2 m tres 4 D verrouillez le balancier et appuyez sur le bouton pou...

Страница 69: ...int a2 au milieu du faisceau vertical et la m me hauteur que a1 voir illustration 8 La distance entre a1 et a2 doit tre inf rieure 1 5mm Dans le cas contraire le niveau laser doit tre examin par un te...

Страница 70: ...5 m tres 2 Placez le niveau laser sur le sol 3 D verrouillez le balancier et appuyez sur le bouton de s lection de faisceau pour projeter les points laser d aplomb au plafond et au sol Marquez le cent...

Страница 71: ...le centre du point d aplomb haut au plafond comme point a2 voir illustration 10 7 La distance entre les points a1 et a2 marqu s au plafond est une indication de l cart r el de la ligne entre les poin...

Страница 72: ...t automatique 3 Largeur de ligne laser 2 mm 0 5 mm 5 m 0 10 0 02 20 Longueur d onde 625 645 nm laser de classe 2 Alimentation 4 piles alcalines AA Autonomie Jusqu 12 heures de fonctionnement continu T...

Страница 73: ...hat avec la preuve d achat Mod le n 962 L tiquette de num ro de s rie se trouve l int rieur du compartiment piles CERTIFICAT DE CONFORMIT CE Ce produit est conforme aux normes de compatibilit lectroma...

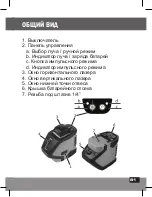
Страница 74: ...74 Kapro 962 Prolaser Multi Beam Orbital 962 Prolaser Multi Beam Orbital 360 RU...

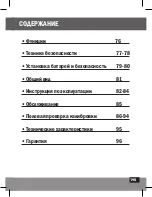
Страница 75: ...75 76 77 78 79 80 81 82 84 85 86 94 95 96...

Страница 76: ...76 1 360 1 3 30 50m 2 IP65 1 4 4...

Страница 77: ...77 II EN 60825 1 25249 6 65...

Страница 78: ...78 10 C 45 C...

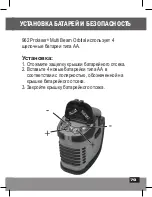
Страница 79: ...79 962 Prolaser Multi Beam Orbital 4 1 2 4 3...

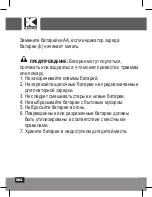
Страница 80: ...80 AA b 1 2 3 4 5 6 7...

Страница 81: ...81 1 2 a b c d 3 4 5 6 7 1 4...

Страница 82: ...82 3 1 2 1 ON b 3 a 4 3 5 1 OFF...

Страница 83: ...83 1 1 OFF 2 a 3 b 3 4 a OFF 5 a b 6 1 ON OFF...

Страница 84: ...84 50 1 2 3 c d 4 5 a 6 c d...

Страница 85: ...85 b...

Страница 86: ...86 KAPRO 1 2 3 4 1 1 5 2 0 5 3 4 a1 1 5 180 B b1 2...

Страница 87: ...87 1 2 6 0 5 B 7 b2 3 8 180 2 4...

Страница 88: ...88 9 a a2 a1 b b1 b2 10 a b 3 2 1 1 5 5 2...

Страница 89: ...89 3 a1 5 5...

Страница 90: ...90 4 a1 2 6 5 a1 a2 1 5 6...

Страница 91: ...91 7 3 1 4 2 a1 7 3 2 4 5...

Страница 92: ...92 6 2 a1 8 7 a1 a2 1 5 8...

Страница 93: ...93 9 4 5 1 2 3 1 9 4 b 9...

Страница 94: ...94 5 180 b 6 2 10 7 1 2 1 2 4 10...

Страница 95: ...0m 100ft 50m 165ft 0 3mm m 0 0003in in 3 2 mm 0 5mm 5m 0 10 0 02 at 20 625 645 Laser Class II 4 AA 12 10 C 45 C 14 F 113 F 20 C 60 C 4 F 140 F IP65 119 x 62 x 115 mm 4 7 x 2 44 x 4 53 620gr 10gr 22 oz...

Страница 96: ...96 962 CEM 2014 30 EU 2014 35 EU 962 2014 30 EU 2011 65 EU EN60825 1 2014 EN61326 1 2013...

Страница 97: ...97...

Страница 98: ...98...

Страница 99: ...99...

Страница 100: ...1 00 Rev 3 0 2020 Kapro Industries Ltd...

Отзывы: