background image

19

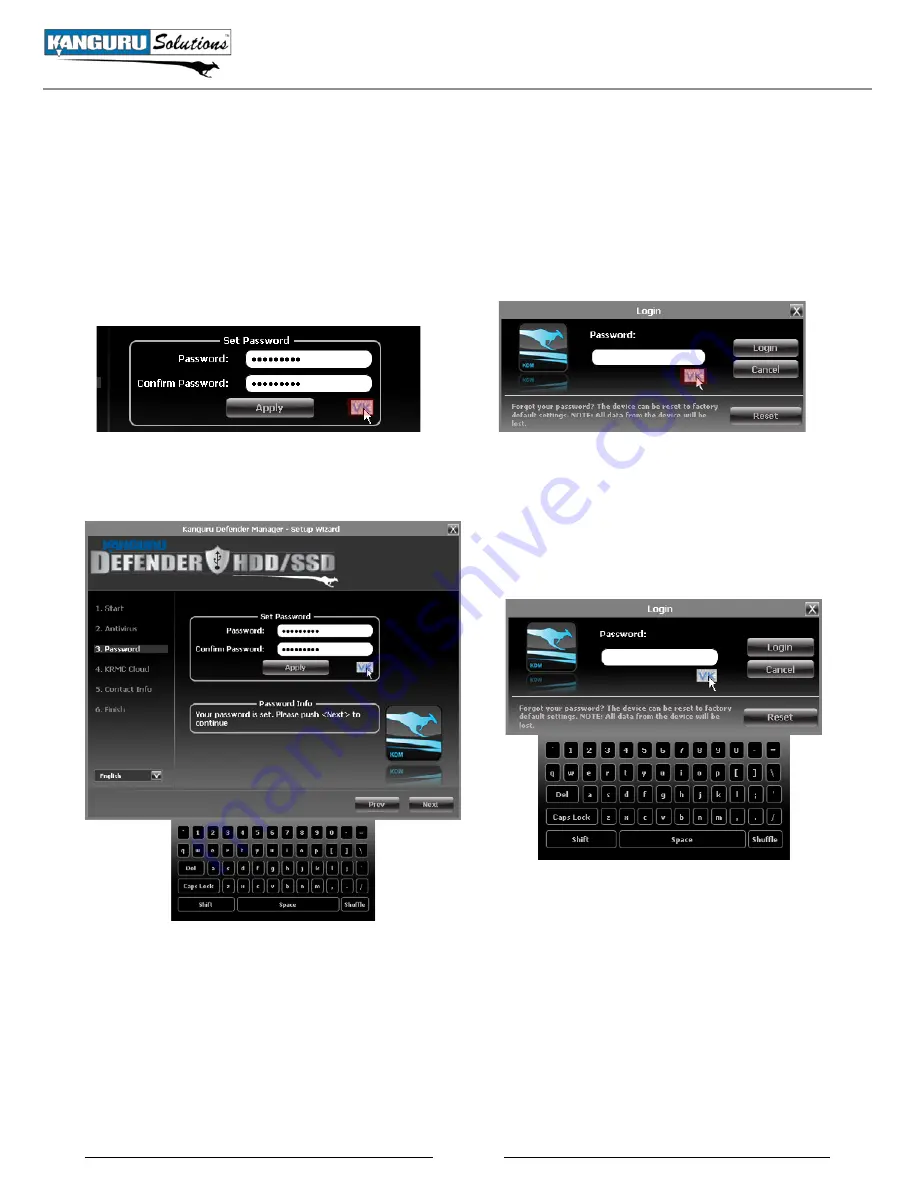
3.4 Using the Virtual Keyboard to enter Your Password

The virtual keyboard feature can be accessed anytime you are required to enter your password in order to 

prevent key logging applications from recording your key strokes and potentially stealing your password. 

To use the virtual keyboard to enter your password:

1.  Click on 

VK

 button which is located near the password entry field.


2.  The virtual keyboard will appear below the Setup Wizard window. Click on the keys on the virtual 

keyboard to enter your password.

3.  Click on the 

VK

 button again to close the virtual keyboard. 

Note: 

You can click on the 

Shuffle

 key located at the bottom, right-hand corner of the virtual keyboard 

to randomize the virtual keyboard layout. Shuffling the keyboard layout protects your password from 

mouse tracking applications designed to thwart virtual keyboards.

Using the Virtual Keyboard to Enter Your Password

Содержание Defender KDH3B

Страница 1: ...Kanguru Defender HDD SSD User Manual Copyright 2013 All Rights Reserved Model no KDH3B KDH3B SSD ...

Страница 2: ...tation expressed implied or statutory with respect to its products or the contents or use of this documentation and all accompanying software and specifically disclaims its quality performance merchantability or fitness for any particular purpose Kanguru Solutions reserves the right to revise or update its products software or documentation without obligation to notify any individual or entity Exp...

Страница 3: ...tition 17 3 3 1 Resetting from the Login Screen 18 3 4 Using the Virtual Keyboard to Enter Your Password 19 3 5 Encrypting Files and Folders 20 3 6 On board Antivirus 21 3 6 1 Device Scan 22 3 6 2 Path Scan 23 3 6 3 File Scan 24 3 7 Changing Your Password 25 3 8 KRMC Cloud Settings 26 3 9 Changing Languages 27 3 10 Online Documentation 28 3 11 About KDM 28 4 Updating Your Defender HDD 29 4 1 Updat...

Страница 4: ...ents of the package you received If any of the parts listed below are missing please contact Kanguru Solutions 508 376 4245 and you will be shipped replacement parts immediately Kanguru Defender Drive USB3 0 Cable Carry pouch Quick Start Guide Registration Form 1 2 System Requirements 1 Available USB port USB 3 0 recommended 256MB of internal DDR RAM 1GB or higher recommended 500MHz internal CPU 1...

Страница 5: ... Solutions if you have any questions about which option would be the best fit for your organization With KRMC you will be able to Create and manage a master password for your Defenders Remotely delete all data on a target drive Schedule actions for present or future times Audit at administrator and super administrator level Locate devices via IP address IP Address network location Locate devices v...

Страница 6: ...58 F 0 C 70 C Dimensions 5 5 x 3 5 x 1 Kanguru Defender HDD Capacities1 250GB 500GB 1TB Rotation Speed 5400 Cache Size 8MB Reliability 750 000 hrs Access Time 8 5 11ms Weight 10 3 oz Kanguru Defender SSD Capacities1 128GB 256GB Write Cycles 10 000 write cycles block Mean Time Between Failure 1 000 000 hours Access Time 0 4ms Weight 9 6 oz 1 Kanguru Solutions defines a gigabyte GB as 1 000 000 000 ...

Страница 7: ...contains information on how to use your Kanguru Defender Please read these sections carefully 2 1 Parts and Functions Activity Indicator LED Power Indicator LED USB A USB Micro B USB Cable General Operation Parts and Functions USB Cover ...

Страница 8: ... first as shown in the image below 2 On the other side of the drive pull open the rubber USB cover to reveal the USB port 3 Connect the Micro B side of the USB cable to the Defender s USB port Connect the A side of the USB cable to your computer The LED indicators on the side of the drive will light up You are now ready to begin using your Kanguru Defender drive USB A to computer USB Micro B to dr...

Страница 9: ...omputer 2 Double click on the KDM exe file to launch the KDM application If it is your first time running KDM you will need to complete the setup wizard in order to set your security password see section 3 2 The Setup Wizard on page 11 If you have already setup your security password you will be prompted to login see section 3 3 Unlocking the Security Partition on page 17 Caution The KDM exe file ...

Страница 10: ...the following manner Note This is user preference only There is no need to configure Windows in order to use your Defender 1 From My Computer click on the Organize menu and then select Folder and search options 2 The Folder Options window appears Scroll down to the option for Hidden Files and Folders and select Show hidden files folders and drives 3 Click on the OK button to finish configuring Win...

Страница 11: ...p Wizard or closing the Setup Wizard by clicking on the X button 3 2 1 Selecting a Setup Language The default language for the Setup Wizard is set to English To run the Setup Wizard in a different language 1 From the Start screen click on the icon next to the Language Menu 2 A list of available languages will appear in a drop down menu Select your desired language from the drop down menu The Setup...

Страница 12: ...tup Wizard click on the Prev button until you return to the Start Screen 2 On the Start Screen you will see a Reset button in the bottom left corner of the application window Click on the Reset button 3 A dialog box appears asking you to confirm the reset Click on Yes to reset your device to the factory default settings After the device has been reset to the factory default setting you will be req...

Страница 13: ...ntivirus protection If your Defender does not already have a valid antivirus license key then you must fill out the following registration form with the required information and then click on the Apply button in order to activate your one 1 year of free antivirus protection Click on the Skip button if you do not wish to activate antivirus protection Important If you decide to skip activating your ...

Страница 14: ...hich you have entered in the Set Password section an explanation will be visible in the Password Info window Note The Password Info window will inform you if there are any password requirements It updates in real time Disregard the messages in the Password Info box until you have finished entering your password into both the Password and Confirm Password fields 3 Click on the Apply button to set y...

Страница 15: ... A dialog box will appear asking if you want to register your device with KRMC Cloud Click on the Yes button 3 Your web browser will open and direct you to the KRMC Cloud login page 4 Purchase a license for your drive in order to use it with KRMC Cloud If you choose not to remotely manage your Defender using KRMC Cloud select the Disable KRMC Cloud option and then click on the Apply button Importa...

Страница 16: ...ically be imported to the KRMC Cloud server when you register your drive Fill in your information in the appropriate fields and then click on the Apply button A window will appear confirming that your data has been saved Click on the OK button to close the window and then click on the Next button to finish setting up your drive Congratulations Your Defender s secure encrypted partition is now read...

Страница 17: ...tton Unplugging and then reinserting your Defender or manually running KDM exe will bring the login window back Once you have successfully logged in to KDM the Defender s secure partition will be accessible through My Computer or Windows Explorer For more information on accessing the secure partition see section 3 5 Encrypting Files and Folders on page 20 Caution Once KDM has started you should ne...

Страница 18: ... on the device will be lost To reset your Defender to the factory default 1 Start KDM 2 When the login screen appears click on the Reset button 3 When you are prompted to confirm the reset click on the Yes button 4 When your password and data stored on the secure partition have been erased the following message will appear Click on the OK button to complete the reset The next time you run KDM you ...

Страница 19: ...s located near the password entry field 2 The virtual keyboard will appear below the Setup Wizard window Click on the keys on the virtual keyboard to enter your password 3 Click on the VK button again to close the virtual keyboard Note You can click on the Shuffle key located at the bottom right hand corner of the virtual keyboard to randomize the virtual keyboard layout Shuffling the keyboard lay...

Страница 20: ... KDM to gain access to the secure partition 3 Click on the KDM icon located in the task bar and then select Explore Security Drive from the popup menu The Defender s security partition opens in a new window We recommend using either the drag drop action right click copy paste action or the shortcut keys Ctrl C and Ctrl V to copy and paste files and folders directly to and from the secure partition...

Страница 21: ...oading the Defender will save your place and continue the download the next time it is connected to a computer with internet access Virus definitions are stored in the System folder on the secure partition If these files are deleted they will be automatically re downloaded If the device is reset to the factory default these files will be deleted and will need to be re downloaded Caution Do not sto...

Страница 22: ...ton to begin scanning your Defender 3 Once the scan has started Click on the Pause Scan button to pause the scan process Click on the Resume Scan button to resume the scan Click on the Stop Scan button to cancel the scan process 4 The scan results will appear in the Scan Results window 5 Click on the View Scan Log button to view a log of the previous scan 6 Click on the OK button to close the anti...

Страница 23: ...he top of the antivirus console 2 Click on the Start Scan button and then select a path on your computer to begin scanning 3 Once the scan has started Click on the Pause Scan button to pause the scan process Click on the Resume Scan button to resume the scan Click on the Stop Scan button to cancel the scan process 4 The scan results will appear in the Scan Results window 5 Click on the View Scan L...

Страница 24: ...of the antivirus console 2 Click on the Start Scan button and then select a file to begin scanning 3 Once the scan has started Click on the Pause Scan button to pause the scan process Click on the Resume Scan button to resume the scan Click on the Stop Scan button to cancel the scan process 4 The scan results will appear in the Scan Results window 5 Click on the Advanced Info button to view a log ...

Страница 25: ...ns Enter your current password in the Old Password field Enter your new password in the New Password field and then enter it again in the Confirm New Password field 3 When you are ready to proceed click on the Apply button to set your new password 4 Once your new password has been set a confirmation window appears informing you that your password has been successfully changed Click on the OK butto...

Страница 26: ...e s KRMC functionality 1 Click on the KDM icon located in the task bar and then select Security Settings from the popup menu 2 The Password Settings window opens Click on the KRMC Cloud Settings tab at the top of the window to enter the KRMC Cloud Settings window 3 Enable or Disable KRMC Cloud by selecting the appropriate radio button and then click on the Apply button KRMC Cloud Settings ...

Страница 27: ... change the language 1 Right click on the KDM icon located in the task bar and then hover your cursor over the Language option in the popup menu A list of available languages appears 2 From the submenu click on the desired language that you want the KDM application to be displayed in Changing Languages ...

Страница 28: ... in the task bar Click on Quick Start Guide to download a digital copy of the Defender s Quick Start Guide Click on Defender User Manual to download a digital copy of the Defender s User Manual 3 11 About KDM To view information regarding the version of KDM currently installed on your device right click on the KDM icon located in the task bar and then select About Online Documentation About KDM ...

Страница 29: ...t access Standard edition Defender HDD users can also manually search and download available client updaters from the Kanguru Support site Defender HDD client updaters can be found under the USB Client Software Updates forum in the Software Downloads and Updaters section support kanguru com 4 2 Updating KRMC enterprise edition drives Enterprise edition Defender HDD drives are managed by the Kangur...

Страница 30: ...tory that KDM updater file is saved in 5 Open a command prompt window by clicking on Start All Programs Accessories Command Prompt 6 Within the command prompt window navigate to the directory containing your KDM updater file and the SHA256 Checksum tool 7 Type sha256 exe filename exe where filename exe is the name of the updater file that you are checking 8 Press the Enter key A 64 character strin...

Страница 31: ...containing your encrypted data will be inaccessible until you log into KDM again To unmount your Defender right click on the KDM icon located in the task bar and then select Unmount Kanguru Defender The KDM icon in the task bar will disappear and the Defender s secure partition will no longer be accessible Caution Do not disconnect the Kanguru Defender without first properly unmounting your device...

Страница 32: ... Note The icon may look different depending on which version of Windows you are running Windows XP 2000 Windows Vista 7 2 A popup menu appears listing all USB devices connected to your computer Select the Defender from the menu it will appear with two drive letters A message will appear indicating that the portable storage device can be safelay removed You can now disconnect the Defender If a mess...

Страница 33: ...shipping errors should be reported to Kanguru Solutions within three 3 working days or receipt of merchandise 7 Tech Support If you experience any problems using your Kanguru Defender or have any technical questions regarding any of our products please call our technical support department Our tech support is free and available Monday thru Friday 9am to 5pm EST Call 1 508 376 4245 or Visit our web...

Страница 34: ...ation is required then KDM will read this information and connect to the internet as normal If KDM is able to determine your proxy server s address but the proxy requires authentication then you will need to enter your credentials in the window that appears If KDM is unable to determine your proxy server s address then you will need to enter the proxy server address proxy type and credentials Ente...

Страница 35: ...2 Click on the Windows Start menu Run 3 Type in gpedit msc and then click on the OK button 4 The Group Policy window appears 5 In the left panel click on Computer Configuration Windows Settings Security Settings Local Policies Security Options 6 In the right panel locate the policy for Devices Restrict CD ROM access to locally logged on user only 7 Double click on the policy and then configure the...

Страница 36: ... the left panel click on Computer Configuration Windows Settings Security Settings Local Policies Security Options 6 In the right panel locate the policy for Devices Allowed to format and eject removable media 7 Double click on the policy and then configure the policy to Administrators and Interactive Users 8 Log off Windows and then login again as a restricted user You are now be able to reformat...

Страница 37: ... on Computer Management The Computer Management Console appears 4 In the left panel click on Storage Disk Management 5 In the right panel locate the Defender HDD s secure partition It should be listed as a Removable Disk 6 Right click on the removable disk and select Properties from the menu 7 ThePropertieswindowappears ClickonthePoliciestabandthenselectOptimizeforPerformance as the removal policy...

Страница 38: ...gal terms and conditions available at www kanguru com Please review and agree before use Thank you Kanguru Solutions 1360 Main Street Millis MA 02054 www kanguru com 03 08 13 v1 0 2 2013 Kanguru Solutions ...

Отзывы: