INSTALLATION INSTRUCTIONS
Pulldown Kitchen Faucet
1072005-2-B
Page 3 of 4
Questions? Problems? For additional assistance, please contact Kallista’s Customer
Service Department at 1-888-4KALLISTA (1-888-452-5547) or FAX 1-888-272-3094.
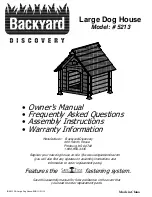
2. SUPPLY INSTALLATION
3" (7.6 cm)
or Larger
Cold
Cold
Hot
CAUTION: Risk of restricted water flow and product dam-
age.
Use extreme care when bending the supply hoses to avoid
kinking and twisting. Hoses must not be taut after installation.
NOTe:
If the sink is not installed, install it at this time. Be sure to fol-
low all instructions packed with the sink.
NOTe:
If the sink installation requires that you coil the supply hoses to
obtain a good connection, maintain an inside coil diameter of at least 3”
(7.6 cm).
NOTe:
The most common type of faucet installation is with the handle
positioned to the right. Pull the handle for cold water or push the
handle for hot water. If the handle is installed to the left or centered,
reverse the supply tubes; connect the tube for cold water to the hot
supply and the tube for hot water to the cold supply. This will maintain
the relationship of pulling the handle for cold water or pushing for hot
water. If the handle is centered, press it to the right for cold water or to
the left for hot water.
Position the hot and cold water supplies to not interfere with other
hoses.
Connect the supply hoses to the supply stops. Left is hot, right is
cold.
Tighten all connections
3. FLUSH THe SUPPLY LINeS
Valve Outlet Hose
Place the valve outlet hose into a bucket or suitable container.
Turn on the hot and cold supplies.
Turn the faucet handle to the full cold ON position.
Let the water run for one minute to remove any debris.
Rotate the faucet handle to full hot position.
Let the water run for one minute to remove any debris.
Turn the faucet handle to the OFF position.