background image

0150-0163f 

5-1 

Calibur DSR 

I

NSTALLER 

P

ROGRAMMING


For security reasons, a password is provided to limit access to the Advanced menu.  For instructions 
about entering the Advanced menu, see section 

4.7 Main Menu 

 Advanced Menu

, on page 4-12. 

5.1 

Advanced Menu 

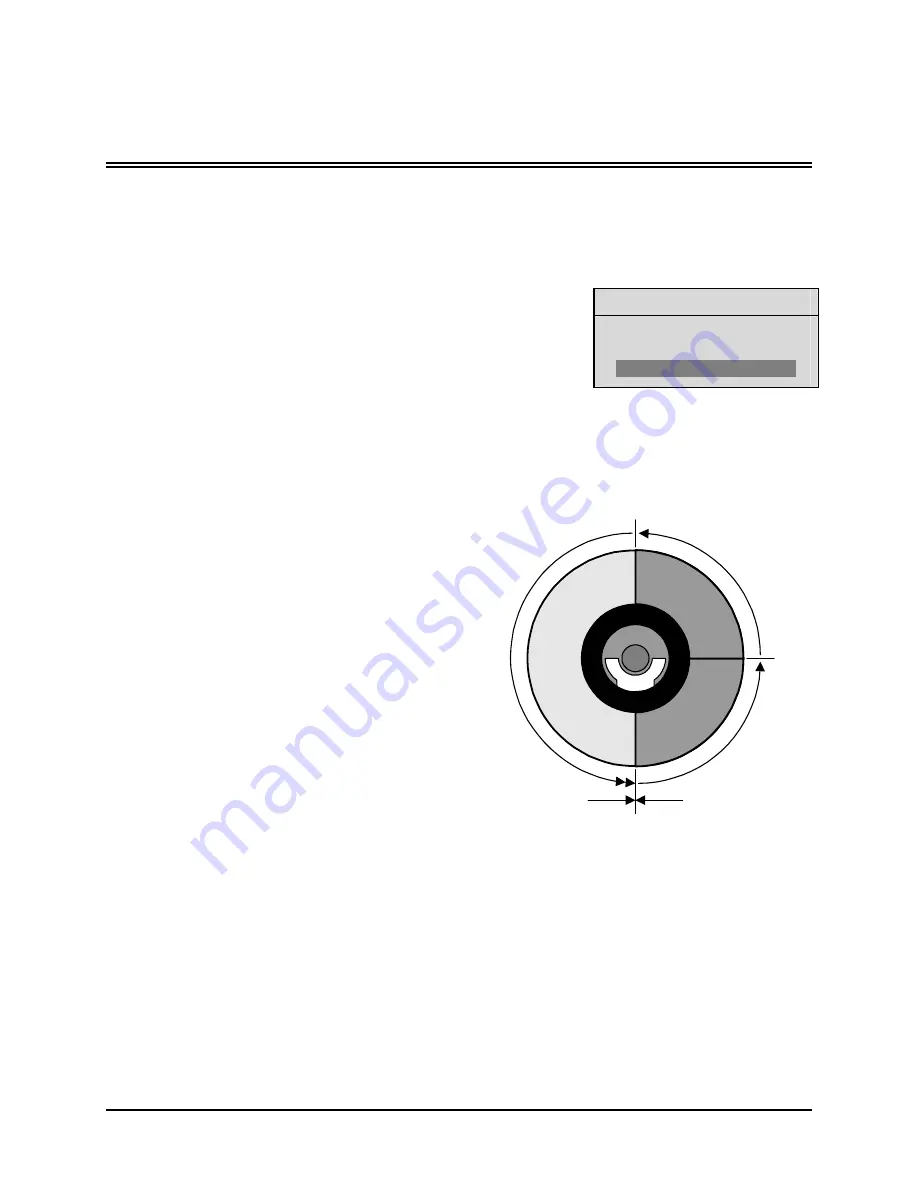
 Disk Overwrite Mode 

Disk Overwrite Mode 

Select Mode 

Continuous Overwrite 

Use this menu to specify how the unit will handle disk overwrite 
issues once the hard disk becomes full. 

The unit handles disk overwrite issues in three ways: 

• 

No Overwrite. 

• 

Overwrite Once. 

• 

Continuous Overwrite. 


Advanced Menu 

 Disk Overwrite Mode 

 No Overwrite 

Physical Start

and End of Disk

Unit Stops

Recording when this

point is reached

Previously

recorded data

Previously

recorded data

New recorded

data


Functions of No Overwrite mode: 

• 

Recording always starts at end of 
last recording. 

• 

Recording stops when end of disk is 
reached (when disk is full). 

• 

When the end of the disk is reached, 
the unit displays an on-screen 
message indicating that the disk is 
full, and the unit has stopped 
recording.  User must acknowledge 
the on-screen message by pressing 
the 

Enter

 button. 

• 

Unit will not record over previously 
recorded data.  To continue 
recording, the data must be erased 
(or deleted) in the 

Advanced 


Disk Maintenance 

menu. 

No Overwrite Mode


Содержание Calibur DSR-2000e

Страница 1: ...Calibur DSR 2000e Single Channel Color Digital Video Recorder User Manual...

Страница 2: ...e illegal to dispose of this battery improperly under local state or federal laws Check with your local waste management officials for disposal and recycling options CAUTION Electrostatic Sensitive De...

Страница 3: ...consent of GE Interlogix All information and specifications furnished by GE Interlogix are believed to be accurate and reliable No responsibility is assumed by GE Interlogix for neither its use nor a...

Страница 4: ...Calibur DSR iv 0150 0163f...

Страница 5: ...2 4 Specifying Search Parameters 2 5 3 THE MENU SYSTEM 3 1 4 OPERATOR PROGRAMMING 4 1 4 1 Main Menu Time Date 4 1 4 2 Main Menu Alarms 4 2 4 3 Main Menu Timer Settings 4 3 4 4 Main Menu Record Setting...

Страница 6: ...Menu Factory Settings 5 6 5 10 Advanced Menu Change Password 5 6 6 RS 232 REMOTE PROTOCOL 6 1 7 FACTORY DEFAULTS 7 1 8 TECHNICAL SPECIFICATIONS 8 1 9 WARRANTY AND SERVICE 9 1 9 1 Factory Service 9 1 9...

Страница 7: ...second NTSC or 50 pictures per second PAL Continuous Recording in Disk Overwrite mode LCD on front panel indicates Time Date Mode and Record Speed in pps Video Archiving via the unit s SCSI port Acces...

Страница 8: ...sswords Password Name Function Changeable by user Password Advanced Menu Password Provides access to the Advances menu for the installer Yes See page 5 6 3 4 7 7 Factory Password Restores the unit to...

Страница 9: ...plays the Time Date Mode and Record or Playback speed in pictures per second pps 11 Increase and Decrease Record Speed buttons Press these buttons to increase or decrease the Record or Playback speed...

Страница 10: ...t Composite video output with BNC style connector Caution Do not connect both video inputs at the same time Ethernet Port Wire Type Cat 5 Connector Type RJ 45 Max Cable Length 100 feet 30 5 meters Min...

Страница 11: ...herwise the system will not operate properly Additional menu setup may be necessary to configure archive device See section 4 6 Main Menu Archive Setup RS 232 Serial Port Use a Null Modem cable when c...

Страница 12: ...missing contact GE Interlogix Customer Service for a replacement Part Number 0900 0127a As a substitute purchase a female DB 9 connector and make all connections as shown in this section DB 9 Connecto...

Страница 13: ...ion by automatically synchronizing the Multiplexer and the DSR The DSR sends a VEXT pulse to the Multiplexer indicating that it is ready to record the next image The Multiplexer responds by sending th...

Страница 14: ...HOUR 24 HOUR Press the Enter button to confirm the selection and exit the menu OR Press the Menu button to exit the menu without making changes o Main Menu Time Date Set Date Format Date Format Setup...

Страница 15: ...arms o Main Menu Alarms Alarms Menu Hardwire Alarm Enable Teletext Alarm Disable Alarm Buzzer Enable CANCEL OK Use this menu to specify Whether an alarm condition will be activated when the unit detec...

Страница 16: ...Calibur DSR 1 10 0150 0163f...

Страница 17: ...3 4 1 Current time 2 Record time left until disk full 3 Record Mode Indicated 4 Normal Record Speed in Pictures Per Second If the letter A precedes the record rate the unit is configured to record or...

Страница 18: ...page 4 5 of the Operator Programming section of this manual The front panel LCD displays the normal record speed during and alarm condition The unit returns to the normal record speed when the alarm c...

Страница 19: ...d The user can alter the playback speed using the Up Down Record Speed buttons Altering the playback speed overrides any change in playback speed that would occur due to an alarm condition in the play...

Страница 20: ...the upper left hand corner of the primary monitor 2 3 The Search Interface SEARCH The Search Interface feature allows the user to search the hard disk for recorded events such as an alarm condition or...

Страница 21: ...to navigate highlight the TIME parameter then press the Enter button The unit will enter Edit mode 2 Use the Jog to change the start and stop time values Use the Shuttle to navigate among the differen...

Страница 22: ...r Search Results 000 001 002 003 Start Date 01 01 00 01 01 00 02 12 00 02 12 00 Start Time 00 07 14 23 35 20 23 43 30 00 17 23 Days HH MM SS 0 00 00 36 0 00 08 11 0 00 33 49 0 01 38 18 ENTER to play S...

Страница 23: ...n A Pop up or Pull down menu will appear Pull down Menus Pull down menus are the top level menus Make a selection in a Pull down menu to enter the appropriate sub menu typically a Pop up menu Changes...

Страница 24: ...the Main menu see section 4 Advanced Menu o Main Menu Time Date Set Time Format Set Date Format Set Time Set Date Use this menu to specify The time format 12 or 24 hours The date format MM DD YY DD M...

Страница 25: ...g The record speed when the unit detects an alarm condition The recorded picture quality o Main Menu Display Settings Current Time Date Record Capacity Archive Status Last Alarm Playback Time Date Use...

Страница 26: ...s a password is provided to limit access to the Advanced menu For instructions about entering the Advanced menu see Main Menu Advanced Menu on the previous page The Advanced menu provides access to al...

Страница 27: ...y The data transfer rate for the RS 232 serial port The units Ethernet network connection settings o Advanced Menu Multiplexer Format The DSR is compatible with several different brands of multiplexer...

Страница 28: ...s Password Box Use this menu to enter the Factory Password and restore the unit to the factory defaults Please enter the Factory Password O o Advanced Menu Change Password Password Box Use this menu t...

Страница 29: ...the Jog to select the desired Time format Format the time as either 12 HOUR 24 HOUR Press the Enter button to confirm the selection and exit the menu OR Press the Menu button to exit the menu without...

Страница 30: ...ally Use the Jog to change the values Use the Shuttle to navigate among the three fields 3 Press the Enter button to confirm the selection 4 To Save the changes and Exit the menu Use the Jog to select...

Страница 31: ...vigate among the fields 2 Use the Jog to change the values of the highlighted fields 3 To Save the changes and Exit the menu Use the Jog to select OK then press the Enter button OR 4 To Exit the menu...

Страница 32: ...tures per second NTSC Record Speeds 60 30 20 10 5 3 2 1 0 5 0 2 0 1 0 0 PAL Record Speeds 50 25 17 10 5 3 2 1 0 5 0 2 0 1 0 0 8 When finished entering the Record Speed use the Shuttle to navigate to t...

Страница 33: ...the Enter button to confirm the selection and exit the menu OR Press the Menu button to exit the menu without making changes Caution Do not connect both video inputs at the same time o Main Menu Recor...

Страница 34: ...e last alarm During Playback the time and date the recording was made o Main Menu Display Settings Current Time Date OFF ON To display the current Time and Date near the upper right hand corner of the...

Страница 35: ...lect On The data is displayed near the upper right hand corner of the screen Use the Jog to select On or Off Press the Enter button to confirm the selection and exit the menu OR Press the Menu button...

Страница 36: ...Use the Jog to change the start and stop date values Use the Shuttle to navigate among the different parameters 3 To activate the start or stop date parameter use the Jog to place an X in the check bo...

Страница 37: ...1 29 2000 11 29 2000 Start Time 17 52 14 09 35 20 10 00 04 10 03 25 Size MB 26842 2062 278 x 66 x Selected 383 MB Available on Target Medium 652 MB ENTER to play SEARCH to archive Selecting from the A...

Страница 38: ...Restore Search Results window will appear Specifying Search Parameters Selecting a Start and Stop Date 1 Using the Shuttle to navigate highlight the DATE parameter then press the Enter button The unit...

Страница 39: ...sults menu will appear Please note that restoring data indicated in this menu is not currently supported on the DSR unit Press the Menu button to exit the menu Restore Search Results 000 001 Start Dat...

Страница 40: ...data this message box will appear Press the Enter button to acknowledge the message and complete the deleting process Archive medium erased OK 4 7 Main Menu Advanced Menu Password Box Please Enter The...

Страница 41: ...rwrite o Advanced Menu Disk Overwrite Mode No Overwrite Physical Start and End of Disk Unit Stops Recording when this point is reached Previously recorded data Previously recorded data New recorded da...

Страница 42: ...will continue recording again when the user presses the Record button Overwrite Once Mode o Advanced Menu Disk Overwrite Mode Continuous Overwrite Functions of Continuous Overwrite mode Recording alw...

Страница 43: ...sing Disk CANCEL Caution Erasing the disk removes recorded data without the possibility of restoring it To begin erasing the disk use the Jog to select ERASE DISK PERMANENT then press the Enter button...

Страница 44: ...ill reset if any values change OK Ethernet Settings Use this menu to adjust the Ethernet settings for your network Use the Shuttle to navigate to the desired setting then use the Jog to adjust the val...

Страница 45: ...e Brightness Contrast Saturation o Advanced Menu Adjust Picture Adjust Brightness Adjust Brightness 050 CANCEL OK Use this menu to increase or decrease the brightness of the image 1 Use the Shuttle to...

Страница 46: ...OCK KEYBOARD Press the Enter button to confirm the selection and exit the menu OR Press the Menu button to exit the menu without making changes 5 9 Advanced Menu Factory Settings Password Box Please E...

Страница 47: ...Password Has Been Accepted OK If the password in the Confirmation Box matches the password from the Password box this message will appear Press the Enter button to select OK and exit the menu Message...

Страница 48: ......

Страница 49: ...50 41 55 03 Fast Forward Sx FWD Ex 02 46 57 44 03 Rewind Sx REW Ex 02 52 45 57 03 Frame Forward Sx FED Ex 02 46 41 44 03 Frame Reverse Sx RAD Ex 02 52 41 44 03 Play Reverse Sx RPL Ex 02 52 50 4C 03 I...

Страница 50: ...ts of the year for the year value For example 2001 is entered as 01 Time is always designated in Military Time Example In this example 14 39 on December 25 2000 is used to demonstrate the Set Clock Co...

Страница 51: ...equest Sx SMS Ex 02 73 4D 73 03 ASCII Status Response Messages Command ASCII String Model Name Response Sx MLN DSR 2000e Ex Software Version Number Response Sx SVN 1 18 Ex Sx RMS 0 Ex Not Recording Sx...

Страница 52: ......

Страница 53: ...Continuous Overwrite Archive Overwrite Mode Not currently implemented Auto Delete Mode Off Background Archive Mode Off Input Composite Front Panel Locked Off Brightness 50 Contrast 50 Saturation 50 Di...

Страница 54: ......

Страница 55: ...30 x 355 x 89 Weight 10 lbs 4 5 kg Connections Ethernet Port 10 100Mb RJ 45 Power Connector 2 1mm Barrel Connector Center Positive Accessory I O Port DB 9 Male See Section 1 9 Accessories Port SCSI Po...

Страница 56: ...ack 315mV 40k Ohms Unbalanced Audio Out RCA jack 315mV 600 Ohms Unbalanced On screen Video Indicators Archive Status End of Data Fast Forward Last Alarm Pause Play Record Capacity Reverse Play Rewind...

Страница 57: ...terial Authorization number RMA The unit s serial number must be provided before a RMA number can be issued Units returned to the factory for service must have freight and insurance prepaid and must s...

Страница 58: ...r all non warranty repairs the customer will be billed for parts labor and shipping Labor will be billed in half hour increments Note Customers requesting an estimate prior to repair will be notified...

Отзывы: