6
INSTALLATION INSTRUCTIONS
Two persons are required for proper installation. A
qualified installer should be commissioned to make the
mounting.
MOUNTING OF A COOKER HOOD
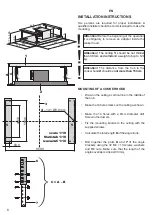
• Draw on the ceiling a vertical line in the middle of
the hob.
• Make the 14 holes marks on the ceiling as shown.
• Make the 14 holes with a 8mm diameter drill.
Screw in the dowels.
• Fix the mounting boards to the ceiling with the
supplied screws.
• Calculate the total length
C
of the angle irons.
• Bolt together the parts
6
and
7
of the angle
brackets using the 32 M4 × 10 screws, washers
and M4 nuts. Make sure that the length of the
angles overlap is at least 36 mm).
EN
950,0
60,0
4
– 14 × Ø8,0 mm
440,0
560,0
scale 1:10
Maßstab 1:10
масштаб 1:10
950
1050 1100
297 × 297
270–490
205
65
5
650
700
1
A
B
C
2
3
5
5
6
C = A – B
7
Atttention!
Before the beginning of the operation
it is obligatory to remove an adapter inside the
cooker hood.
Atttention!
The ceiling
1
should be not thinner
than 30 mm and withstand a weight of up to 120
kg.
Atttention!
The distance from the hob to the
cooker hood
2
should be
not more than 150 cm
.


