


Mode
Mode
Fan
Fan
Timer
Timer
Timer
Timer
Sleep
Sleep
Short
cut
Short
cut
Turbo
Turbo
ON/OFF
ON/OFF
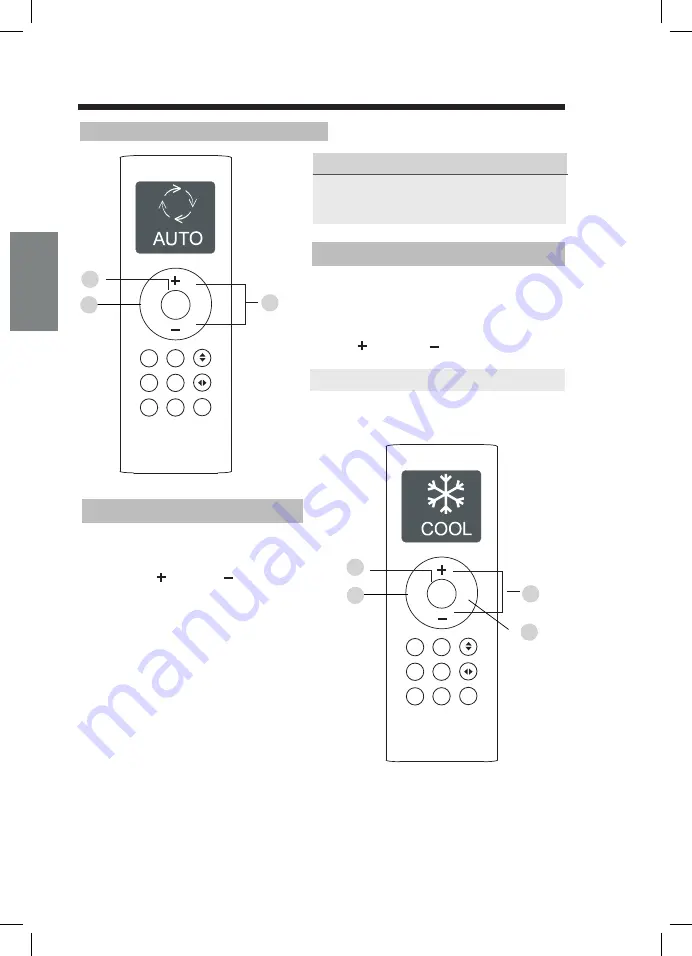
1. Press the
MODE
button to select
COOL
mode.
2. Set your desired temperature using
the
Temp
or
Temp
button.
3. Press the
FAN
button to select the
fan speed.
4. Press the
ON/OFF
button to start the
unit.
In
AUTO
mode, the unit will automatically
select the COOL, FAN, HEAT or DRY mode
based on the set temperature.
1. Press the
MODE
button to select Auto mode.
2. Set your desired temperature using the
Temp
or
Temp
button.
3. Press the
ON/OFF
button to start the unit.
,
NOTE:
FAN SPEED
can t be set in Auto mode.
SETTING TEMPERATURE
AUTO operation
The operating temperature range for units is
O
17-30 C. You can increase or decrease the
O
set temperature in 1 C increments.
COOL operation
3
4
1
1
3
2
2
Remote LCD Screen Indicators
How To Use The Basic Functions
Information are displayed when the remote controller is powered up.
Transmission Indicator
Sleep mode display
Follow me feature
display
LOCK feature
display
Not available for
this unit
Not available for
this unit
Not available for
this unit
Silence feature
display
Lights up when remote
sends signal to indoor
unit
ON/OFF display
Appears when the unit
is turned on, and disappears
when the it is turned off.
TIMER ON display
( )
Battery display
Fan speed display
Displays selected fan speed:
Temperature/Timer display
Displays the set temperature
by default, or timer setting
when using TIMER ON/OFF
functions
Temperature range:
o
17-30 C
Timer setting range:
0-24 hours
This display is blank when
operating in FAN mode.
Low battery detection
MODE display
Displays the current
mode, including:
Displays when TIMER
ON is set
TIMER OFF display
( )
Displays when TIMER
OFF is set
This fan speed can not be
adjusted in AUTO or DRY
mode.
Note:
operation only the relative functional signs are shown on the display window.
All indicators shown in the figure are for the purpose of clear presentation. But during the actual
Low speed
Medium speed
High speed
Auto fan speed
Follow
me
Follow
me
Self
clean
Self
clean
LED
LED
1. Press the
MODE
button to select
DRY
mode.
2. Set your desired temperature using the
Temp
or
Temp
button.
3. Press the
ON/OFF
button to start the unit.
,
NOTE:
FAN SPEED
can t be changed in
DRY mode.
1. Press the
MODE
button to select FAN
mode.
2. Press the
FAN
button to select the
fan speed.
3. Press the
ON/OFF
button to start the
unit.
,
NOTE:
You can t set temperature in FAN
mode. As a result, your remote control s
LCD screen will not display temperature.
DRY operation(dehumidifying)
FAN operation
,
1. Press the
MODE
button to select
HEAT
mode.
2. Set your desired temperature using
the
Temp
or
Temp
button.
3. Press the
FAN
button to select the
fan speed.
4. Press the
ON/OFF
button to start the
unit.
HEAT operation
NOTE:
As outdoor temperature drops, the
performance of your unit s HEAT function
may be affected. In such instances, we
recommend using this air conditioner in
conjunction with other heating appliance.
,
How To Use The Basic Functions
How To Use The Basic Functions
3
3
1
1
2
2
4
1
3
2
Mode
Fan
Timer
Timer
Turbo
ON/OFF
Mode
Fan
Timer
Timer
Turbo
ON/OFF
Mode
Fan
Timer
Timer
Turbo
ON/OFF
Sleep
Sleep
Short
cut
Short
cut
Sleep
Short
cut
Follow
me
Follow
me
Follow
me
Self
clean
Self
clean
Self
clean
LED
LED
LED
EN
74
75
Содержание FLY
Страница 2: ......
Страница 4: ......
Страница 45: ...Kliknij Zarejestruj si Wprowad sw j adres e mail i has o a nast pnie kliknij Rejestracja 2 1...
Страница 52: ...Post puj zgodnie z czynno ciami opisanymi w powy szych krokach aby przej do trybu AP 2...
Страница 54: ...Po wybraniu wybierz metod Konfiguracja r czna Android Po cz si z sieci bezprzewodow iOS Wprowad has o 5 6...
Страница 60: ......
Страница 67: ......
Страница 108: ...2 Enter your email address and password and then click Register 5...
Страница 111: ...8 Wait smart devices to find then click to add it Select home Wi Fi enter the password 3 4...
Страница 112: ...9 Wait connecting to the network 5 6 Configuration Success you can modify the default name...
Страница 115: ...12 please follow the above steps to enter AP mode 2...
Страница 117: ...14 When choose the Manual Setup method Android Connect to the wireless network iOS Please enter password 5 6...
Страница 118: ...15 Network configuration is successful Configuration Success you can see the device in the list 7 8...
Страница 123: ...20...
Страница 124: ...21 Sleep User can customize their own comfortable sleep by setting target temperature...
Страница 130: ......
Страница 172: ...Klicken Sie auf Create Account Geben Sie Ihre E Mail Adresse und Ihr Passwort ein und klicken Sie dann auf Register 2 1...
Страница 177: ...Warten auf eine Verbindung mit dem Netzwerk Die Konfiguration war erfolgreich Sie k nnen den Standardnamen ndern 5 6...
Страница 180: ...Folgen Sie bitte den obigen Schritten um in den AP Modus zu gelangen 2...
Страница 183: ...Netzwerkkonfiguration war erfolgreich 8 Die Konfiguration war erfolgreich Sie sehen das Ger t in der Liste 7...
Страница 188: ...20...
Страница 189: ...21 Schlaf Der Benutzer kann seinen eigenen komfortablen Schlaf durch die Einstellung der Zieltemperatur anpassen...
Страница 195: ......
Страница 197: ......
Страница 198: ...kaisai com...


