background image

5

F-2

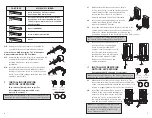
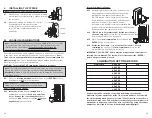
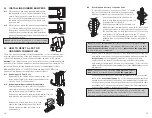
Slide the drive hub (a) into the drive sleeve (b) until the

inside unit assembly (c) rests flush against the door.

F-3

For standard door thickness 1

5

8

" (41 mm) to 2" (51

mm),

secure the outside and inside unit assemblies to

the door by using four 2

7

8

" (73 mm) screws (d)

(supplied) in all four holes as indicated.

For thinner door 1

3

8

" (35 mm) to 1

1

2

" (38 mm),

secure the outside and inside unit assemblies to the door

by using four 2

1

2

" (64 mm) screws (e) (supplied) in all

four holes as indicated.

For thicker door 2

1

8

" (54 mm) to 2

1

4

" (57 mm),

secure the outside

and inside unit assemblies to the door by using four 3

1

4

" (82mm)

screws (f) (supplied) in all four holes as indicated.

G.

INSTALLING THE INSIDE
LEVER/KNOB

Note:

Installing the lever/knob assemblies to the unit

before mounting the unit assemblies, may ease initial

installation.

G-1

Insert the inside lever/knob (a) onto the unit assembly.

Secure the inside lever/knob with the

3

8

" (5mm) hex

screw (b) supplied using the allen wrench (c) supplied.

H.

CHANGING KEY-IN-LEVER/KNOB
CYLINDER

The Simplex 5000 outside lever/knob comes preassembled with Kaba's

key-in-lever/knob cylinder (Kaba 1599). To use a different key-in-lever/

knob cylinder, follow the remaining steps in this section.

H-1

Remove KIL/KIK cylinder (a) from the outside

lever/knob (b) by removing the lever insert (e) (no

insert on knob). Remove the rubber cylinder

retainer (c) using a small screwdriver or needle

nose pliers.

4

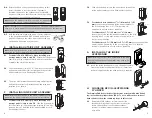
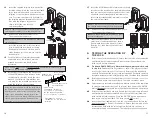
D-4

Rotate the knob or key cylinder (re-insert key at this

point) clockwise to test the rotation. If properly

installed, the knob or key cylinder should rotate 90

degrees clockwise so that the arrow (knob) is pointing

up or the dot (key cylinder) is at the top.

Note:

Leave the actuator set in this position for installation

(if key cylinder is used, remove the key at this point).

Note:

The tailpiece of the passage actuator is scored on several places to

allow you to easily break off the section that extends beyond the required

length to engage the passage set cam.

D-5

Hold the tailpiece firmly with a pair of pliers, adjacent

to the desired break line. With a second pair of pliers,

grip the tailpiece on the other side of the scored line

and bend up and down until it breaks.

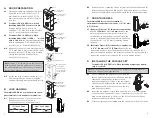
E.

INSTALLING OUTSIDE UNIT ASSEMBLY

Note:

Installing levers/knobs to the unit assemblies before

mounting the unit assemblies may ease initial installation.

E-1

For models 5041 & 5051 only. When installing non-

passage models, skip to step E-2

. Ensure that the passage

cam (b) is rotated counterclockwise until it stops. When

complete, the slot will be vertical.

E-2

Slide the drive unit (a) into 2

1

8

" (54 mm) cross bore hole

by depressing latch bolt (b) in slightly until the outside

unit assembly (c) rests flush against the door.

E-3

The drive unit (d) must engage the latch unit prongs (e)

and the shoe retractor (f) must engage the latch unit

tailpiece (g) as shown.

F.

INSTALLING INSIDE UNIT ASSEMBLY

Note:

Installing levers/knobs to the unit assemblies before

mounting the unit assemblies may ease initial installation.

F-1

For Models 5041 & 5051 only. When installing non-

passage models, skip to step F-2

. Slide the drive hub (a)

into the sleeve (b), and the passage tailpiece (d) into the

passage cam slot until the inside unit assembly (c) rests

flush against the door.

b

f

g

e

d

c

a

b

c

d

a

b

c

a

b

d, e, f

c

a

b

c

a

b

b

a

d

c

Содержание Simplex 5000 Series

Страница 1: ...Kaba Access Control 2941 Indiana Avenue Winston Salem NC 27105 USA Tel 800 849 8324 336 725 1331 Fax 800 346 9640 336 725 3269 www kabaaccess com PKG2842 0407 5000 CYLINDRICAL INSTALLATION INSTRUCTIONS ...

Страница 2: ...se damage Kaba Access Control s warranty does not cover damages caused by installation Caution Wear safety glasses when preparing door TABLE OF CONTENTS Exploded Install Parts 1 Tools Required 1 A Door Preparation 2 B Lock Handing 3 C Door Thickness 3 D Installing The Passage Set 4 E Installing Outside Unit Assembly 5 F Installing Inside Unit Assembly 5 G Installing The Inside Lever Knob 6 H Chang...

Страница 3: ...he cylindrical drive unit b Rotate cylindrical drive unit 180 degrees Reposition spacer c as found before disassembly Remount drive unit with the two connecting screws C DOOR THICKNESS The Simplex 5000 lock is preassembled to accommodate standard door thickness 1 5 8 41 mm to 2 51 mm C 1 Reference Figure A For thinner door applications of 1 3 8 35 mm to 1 1 2 38 mm Remove and discard the two conne...

Страница 4: ... or key cylinder should rotate 90 degrees clockwise so that the arrow knob is pointing up or the dot key cylinder is at the top Note Leave the actuator set in this position for installation if key cylinder is used remove the key at this point Note The tailpiece of the passage actuator is scored on several places to allow you to easily break off the section that extends beyond the required length t...

Страница 5: ... outside unit assembly b levers fit closer than knobs Insert the release tool d or screw driver into the outside lever knob as shown and slide the lever catch down until it clicks Note For all interchangeable removable cores except ASSA Medeco Yale proceed to section J 3 For ASSA Medeco Yale cores skip to section J 5 6 H 2 Determine the proper tailpiece d needed for your KIL KIK cylinder from the ...

Страница 6: ...rstop is required we recommend the use of a floor secured stop The environment and conditions of use determine the life of finishes on Kaba Access Control products Finishes on Kaba Access Control products are subject to change due to wear and environmental corrosion Kaba Access Control cannot be held responsible for the deterioration of finishes Authorization to Return Goods Returned merchandise w...

Страница 7: ...n Door Exercise Room This lock is New Installation Replacing a conventional keyed lock Replacing a Kaba Mechanical Pushbutton Lock Replacing a Kaba Electronic Access Control Replacing a Keyless Lock other than Kaba How did you learn about Kaba Access Control Pushbutton Locks Advertisement Previous Use Internet Web Another Use Locksmith Maintenance Training Class Other please specify What was your ...

Страница 8: ...he outside lever knob Rotate key counterclockwise to stop position and hold Ensure that the latch is fully retracted and flush with the latch faceplate Rotate key clockwise to horizontal position and remove key The latch should be fully extended 10 J 3 Insert the supplied tailpiece e with the flat installed vertically into the outside lever knob b as shown Make certain you rotate the tailpiece so ...

Страница 9: ...he door frame making certain that the strike opening is aligned a with the latch bolt L 2 Mortise doorframe for strike 3 32 3 mm deep minimum to dimensions shown Secure strike b to the door frame using two 1 25 mm combination screws c supplied M CHANGING COMBINATIONS Note The factory set combination of your new 5000 series Press 2 and 4 at the same time then release Press 3 then release Press the ...

Страница 10: ...press the wrong key stem by mistake rotate the reset cam back toward you toward the key stems and release This resets the code gears and you must repeat the above procedure O 3 14 N INSTALLING RUBBER BUMPERS N 1 Close the door and apply pressure making sure the deadlatch a rests on the strike plate b as shown Standing on the frame door stop side of the door check for gaps between the door and the ...

Страница 11: ...e and release Rotate the reset cam back toward you with your finger toward the key stems as far as it will go and release Enter your new combination code by depressing the key stem corresponding to the first number 1 through 5 of your code For example if the new code is 3 2 5 then you would depress 3 first then 2 and finally 5 Record this new combination code for future reference Push the shoulder...

Страница 12: ...19 18 Notes Notes ...

Отзывы: