background image

11

10

1

2

3

4

5

6

7

8

9

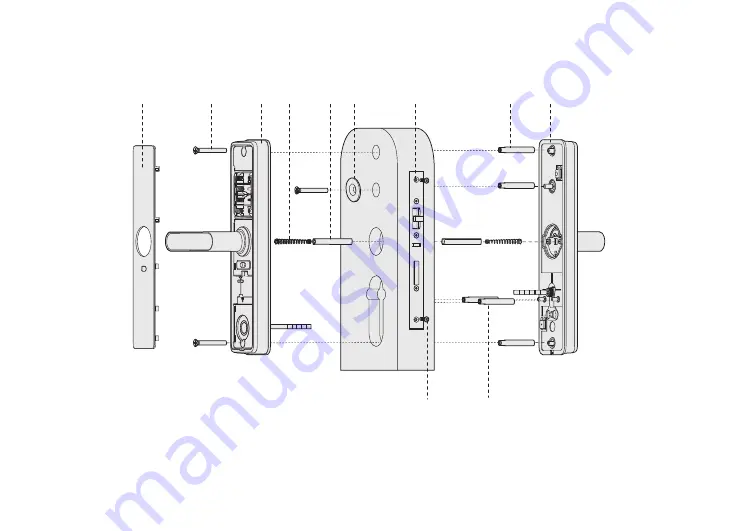
Explosive View

1.Inside escutcheon cover 
2.Mounting screw(3pcs)

3.Inside escutcheon assembly 

4.Pressure spring (2pcs)
5.Square shaft (2pcs)

6.Mounting plate (1pcs)

7.Mortise (1pcs)

8.Connecting screw bolt(M6)(3pcs)
9.Outside escutcheon assembly

10.Screw for mortise (2pcs)

11.Connecting screw bolt(M5) (2pcs) 

Notice: the pressure spring have to screw in the square shaft.

Содержание L8

Страница 1: ...dasgroup com Shenzhen Kaadas Intelligent Technology Co Ltd reserves all rights for the nal interpretation to this user manual All design and speci cations are subject to change without notice L8 User...

Страница 2: ...View Before Installation Installation Steps 2 Product Overview Front Escutcheon Back Escutcheon 3 How to set Before set First time access into master mode User setting Access into master mode by maste...

Страница 3: ...l packing If some components lost please check with the sellers Outside escutcheon with rubber gasket Mounting Plate RFID Card Inside escutcheon with rubber gasket Installation Template Mortise Strike...

Страница 4: ...Inside escutcheon assembly 4 Pressure spring 2pcs 5 Square shaft 2pcs 6 Mounting plate 1pcs 7 Mortise 1pcs 8 Connecting screw bolt M6 3pcs 9 Outside escutcheon assembly 10 Screw for mortise 2pcs 11 Co...

Страница 5: ...Left in 1 Move the latch bolt switcher to the other end as the arrow shows 2 Push the latch bolt inside the mortise 3 Turn around 180 degree 4 Let the latch bolt eject Notice Make sure the position o...

Страница 6: ...ng out screws positional component and shield sleeve in proper order Put the cable into the right end then place shield sleeve and positional component on proper order and fasten the screws at last Ro...

Страница 7: ...er Rotating the handle to the other end Place positional component and fasten the screws Positional Component Positional Component Screws Screws Notice Default screw pack for door is thickness 38 60mm...

Страница 8: ...ake the mortise deadbolt come out Mortise screws Cable Pressure spring Square shaft Screw Connecting screw bolt Notice the pressure spring have to screw in the square shaft Fix the connecting screw bo...

Страница 9: ...quare shaft and pressure spring on the back inside escutcheon and connect the mortise cable and outside escutcheon cable with inside escutcheon then align and insert square shaft and night latch key p...

Страница 10: ...ide escutcheon cover installed well avoid it fall o when close the door Install 4pcs batteries and Inside escutcheon cover Check if all functions are working well then installation is nished Inside es...

Страница 11: ...ust for reference please refer to the real product as nal Inside escutcheon cover Reset button Indicator light Touchpad Card reader area Fingerprint sensor Mirco USB port 2 Product Overview Inside esc...

Страница 12: ...ups normal ngerprint 1 group Master ngerprint 100 groups 99 groups normal ngerprint 1 group Master ngerprint 20 groups Normal User PIN code One time PIN code 100 pcs master PIN code or master ngerprin...

Страница 13: ...n take away your nger after voice prompt Remove nger and scan again Repeat above steps multiple times until voice prompt Enrollment succeed Add temporary user Press 1 to enroll user card Place card on...

Страница 14: ...bove operations Voice prompt of Enrollment succeed Press 1 for delete individual user Pin code ngerprint card Enter user Pin code ngerprint card Voice prompt of Delete succeed Press 2 for delete all u...

Страница 15: ...ode by Master Fingerprint 1 Wake up touchscreen keypad with palm 2 Press twice then press the already enrolled master ngerprint then enter into the master mode Notice Pls avoid master ngerprint same a...

Страница 16: ...nsor Card reader area Press the handle to open Press the handle to open Press the handle to open 4 How to use Open from outside PIN code opening Fingerprint opening Card opening Touch pad screen by pa...

Страница 17: ...Micro USB port at the front Then unlock the door and replace all batteries immediately Press the reboot button to restart the lock when the system is unresponsive No user data is deleted Close door f...

Страница 18: ...ce prompt Restored to factory settings Change master PIN code After that all user information and settings will be cleared Reset button Change the battery When battery voltage is lower than 4 8V voice...

Отзывы: