41
7.3 Installation and Working Preparation
A.
Adjust the adjustable stand to get a suitable working height, if it is necessary.
B.
Installation of paper and O.P.P. tape:
Take the paper tape, O.P.P. tape and the supporter from the accessory box.
And take the small accessory parts from the tools drawer attached below the
Table mechanisms, and then thread the paper strip and O.P.P. strip.
Caution:
It is necessary to assemble the O.P.P. tape and paper tape holders
when the machine is to be run with edge cutting operation. If only
used films or sheets sealing, it is not necessary to use the tapes.
C.
Plug the 4P power cable of the generator into the 4P power socket of the
transformer unit and tightly fasten.
D.
Plug the 10P control cable of the machine into the 10P control socket of the
generator and tightly fasten.
E.
Plug the 2P output power cable of the machine into the 2P output socket of the
generator and tightly fasten.
F.
Plug another 2P cable of the machine into the 2P socket of the generator and
tightly fasten.
(
for KS-2010 and KS-3010 only
)
G.
Use copper wires to connect the ground of the transformer unit to the ground
line of the factory to eliminate accumulation of static charge.
Caution:
grounding cable should be correctly connected to “earth ground”, not
to the “ground” of the power supply, to prevent current leakage and
accumulation of static charge.
H.
Connect the air filter to a 6kg/cm
2
air source with an I. D. 8mm hose, then the
dry and clean air will be supplied into the system.
I.
Connect the power supply cord on the transformer unit to the correct
power source.
Содержание KS-72
Страница 12: ...11...
Страница 13: ...12...
Страница 22: ...21...
Страница 23: ...22...
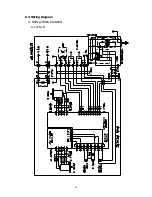
Страница 31: ...30 6 4 Wiring Diagram A MAIN WIRING DIAGRAM A 1 KS 72...
Страница 32: ...31 A 2 KS 85...
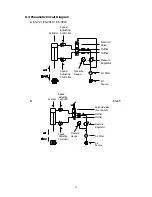
Страница 35: ...34 1 2W 10W 1 2W 6 5 Circuit Diagram A MOTOR SPEED CONTROL CIRCUIT DIAGRAM A 1 KS 72 UPPER MOTOR WORKING ROLLER...
Страница 38: ...37 FUSE FUSE B GENERATOR CIRCUIT DIAGRAM KS 72 KS 85 KS 2010 KS 3010...

