background image

37

English

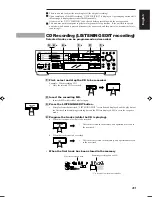
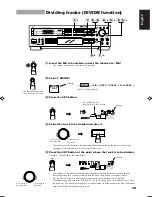
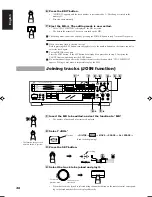
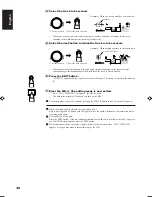
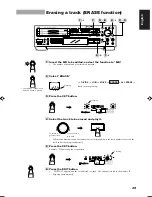
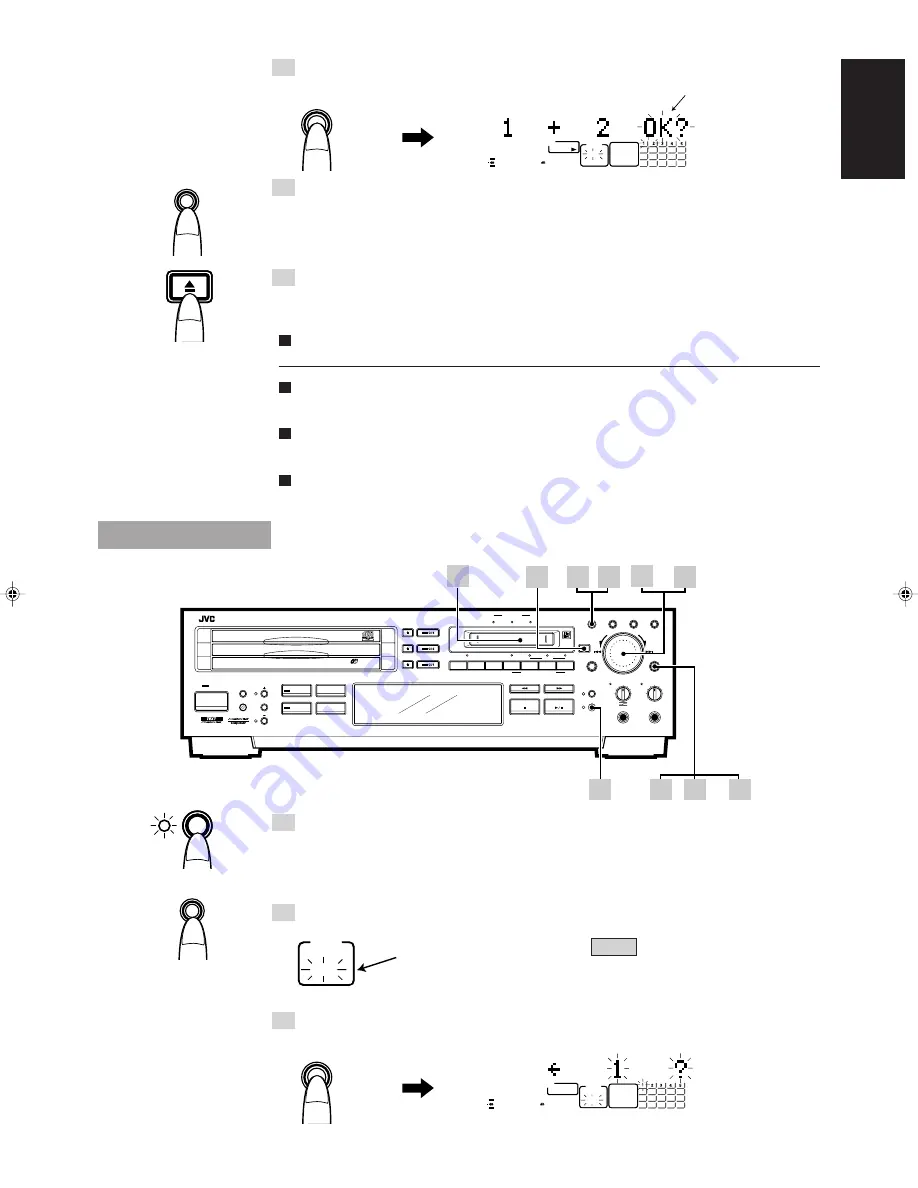
5 Press the SET button.

Example:  When joining the second track

6 Press the EDIT button.

“EDITING” appears, and the track number is decremented by 1.  The change is stored in the
memory IC.

Play stops automatically.

7 Eject the MD. 

\

 The editing mode is now exited.

After “UTOC WRITING” is displayed, the MD is ejected.

The data in the memory IC has been recorded on the MD.

The editing mode can also be exited by pressing the POWER button in step 7 to turn off the power.

When the wrong track is selected in step 4
Before pressing the SET button, turn the jog dial or use the number buttons on the remote control to
select the track again.
To stop JOIN at any time
Press the EDIT button.  If the SET button has already been pressed as in step 5, first press the
CANCEL button, and then press the EDIT button.
Do not disconnect the power cord or subject the unit to the vibration while “UTOC WRITING”
appears.  Doing so may make it impossible to play the MD.

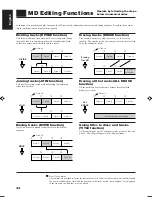
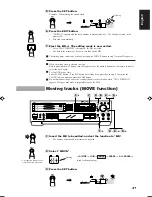
Moving tracks (MOVE function)

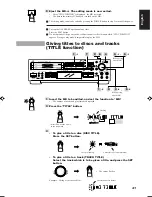
1 Insert the MD to be edited, and set the function to “MD.”

The number of tracks and play time are displayed.

2 Select “MOVE.”

3 Press the SET button.

• The function changes each

time this button is pressed.

=


DIVIDE 

=


JOIN


=


 MOVE 


=


ERASE


=


ALL ERASE


=

(back to the beginning)

Flashing

EDIT

MD

EDIT

MD EDIT

MOVE

Flashing

SET

SET

XU-301    MD-CD COMBINATION DECK

REC

PAUSE

REC

START

REC

DIGITAL

CD

REC SOURCE SELECTOR

LINE

MIC

STOP

MIXING

CANCEL

CD

MD

MIC

MAX

MIN

PHONES

MIX BALANCE

REC LEVEL

CD
LINE

LINE
MIC

PLAY MODE

/CHARA

DISPLAY

TITLE

EDIT

32kHz

44.1kHz

DIGITAL INPUT

48kHz

LISTENING

SKIP

1st TRACK

REC

TIMER

/CLOCK

STANDBY

CD REC

SET

2

CD

CD

3

1

CD

PLAY & EXCHANGE

3

-

CD

NORMAL SPEED

CD PITCH CONTROL

POWER

EDIT

2

1

1

5

4

-1

-1

-1

4

3

-2

-2

7

·

·

5

-2

·

·

6

SAMPLING RATE CONVERTER

MD

L

R

40 30

15 10

20

6

3

0

MD EDIT

JOIN

MD

L

R

40 30

15 10

20

6

3

0

MD EDIT

MOVE

08/p34-44 (E)

4/1/98, 5:49 PM

37

Содержание XU-301BK

Страница 1: ...INATION DECK PLATINE COMBINÉE MD CD XU 301BK XU 301 MD CD COMBINATION DECK REC PAUSE REC START REC DIGITAL CD REC SOURCE SELECTOR LINE MIC STOP MIXING CANCEL CD MD MIC MAX MIN PHONES MIX BALANCE REC LEVEL CD LINE LINE MIC PLAY MODE CHARA DISPLAY TITLE EDIT 32kHz 44 1kHz DIGITAL INPUT 48kHz LISTENING SKIP 1st TRACK REC TIMER CLOCK STANDBY CD REC SET 2 CD CD 3 1 CD PLAY EXCHANGE 3 CD NORMAL SPEED CD...

Страница 2: ...DO NOT EXPOSE THIS APPLI ANCE TO RAIN OR MOISTURE CAUTION To reduce the risk of electrical shocks fire etc 1 Do not remove screws covers or cabinet 2 Do not expose this appliance to rain or moisture AC power cord The AC power cord of this unit has certain one way direction connections to prevent electric shock Refer to the illustra tion for correct connection For CANADA CAUTION TO PREVENT ELECTRIC...

Страница 3: ... recording 29 CD Recorfing 1st TRACK recording 30 CD Recorfing LISTENING EDIT recording 31 Mixing Recording 32 MD Editing Functions 34 Dividing tracks DIVIDE function 35 Joining tracks JOIN function 36 Moving tracks MOVE function 37 Erasing a track ERASE function 39 Erasing all the tracks ALL ERASE function 40 Giving titles to discs and tracks TITLE function 41 Character Layout Table 44 CLOCK TIME...

Страница 4: ... unit 9 Unplug the power cord if there is a chance that lightning may strike 10 If water should find its way inside the unit unplug the power cord from the outlet and consult your dealer 11 Do not install the unit in a poorly ventilated location 2 Installation 1 Avoid placing the unit on or adjacent to an amplifier this is to prevent the humming caused by the unit s proximity to some types of ampl...

Страница 5: ...44 1 kHz and 48 kHz Mixing and recording of CD LINE CD MIC or LINE MIC recording signals possible Choice of 3 analog recording signal sources CD LINE and MIC 3CD MD mixing programs CD synchro recording in 3 modes single action 1st track and listening edit CD pitch control This enables the CD play speed to be adjusted up to 12 faster or slower than the normal play speed Timer functions Timer play a...

Страница 6: ...nal connecting cord This is connected for synchro recording CD player cassette deck or other component made by JVC Selecting the MODE switch position When connected with MD input output terminals of the amplifier or receiver When connected with TAPE input output terminals of the amplifier or receiver Support for JVC s TEXT COMPU LINK For further details on the TEXT COMPU LINK function see page 51 ...

Страница 7: ...n is to be used connect the CD player etc and unit s ground side using the pin cord XU 301BK MD CD combination deck To OPTICAL OUT connector Output signal Optional optical digital cable To OPTICAL INPUT connector Stereo amplifier with OPTICAL connector Before purchasing an optical digital cable optional make sure that the cable in question can be connected to the amplifier etc Do not bend the opti...

Страница 8: ...nding tray is opened or closed DISPLAY CHARA button See page 17 This button changes the contents of the display window and the character input mode PLAY MODE button See pages 16 23 TITLE button See page 18 Jog dial See pages 17 45 46 SET button See pages 17 45 46 PHONES jack Headphones which have been purchased separately are connected here Control buttons Set the function to CD when using CDs or ...

Страница 9: ...recording REC START This is used to start recording REC STOP This is used to stop recording Jog dial See pages 23 35 MD opening REC SOURCE SELECTORS and lamps See pages 28 33 DIGITAL Selects the device that is connected to the OPTICAL IN jack as the recording source CD Selects CD1 through CD3 as the recording source LINE Selects the device that is connected to the LINE IN jack as the recording sou...

Страница 10: ... R03 or UM4 alkaline batteries with fresh units The dry batteries provided with the unit are for operational check purposes Replace them with fresh units at the earliest opportunity XU 301 MD CD COMBINATION DECK REC PAUSE REC START REC DIGITAL CD REC SOURCE SELECTOR LINE MIC STOP MIXING CANCEL CD MD MIC MAX MIN PHONES MIX BALANCE REC LEVEL CD LINE LINE MIC PLAY MODE CHARA DISPLAY TITLE EDIT 32kHz ...

Страница 11: ... REC button LISTENING EDIT and SKIP buttons REC SOURCE selector buttons REC PAUSE button REC START button REC STOP button 1 buttons See pages 15 22 CD button POWER button CD1 CD2 and CD3 buttons REPEAT button See pages 16 23 This is used to listen to a CD or MD repeatedly RANDOM button See pages 16 23 This is used to play CD or MD tracks at random DISPLAY MODE button See page 21 This changes what ...

Страница 12: ...on See page 43 This is used to enter the editing modes Upper lower case letter selector button See page 43 Upper case letters are input when this button s lamp is off Lower case letters are input when this button s lamp is lighted 4 buttons See pages 25 43 In the MIX program play mode These buttons are used to select theprogram source and tracks When titles are given These buttons select the title...

Страница 13: ... be turned on and a function can be selected simply by pressing one of the buttons shown in the figure below The power can be turned OFF only by the POWER button The currently selected function CD at the time of purchase appears in the display window The clock display appears in the display window It flashes if the clock has not been set Main unit Main unit Remote control The function is set to CD...

Страница 14: ...rectly Continuous play starts with the CD corresponding to the number of the button pressed If the button is pressed when the power is turned off continuous play starts when the power is next turned on When play starts from CD2 The CDs are played in the sequence of CD2 CD3 CD1 after which play is automatically stopped When play starts from CD3 The CDs are played in the sequence of CD3 CD1 CD2 afte...

Страница 15: ... off the power turn down the volume to prevent this from happening If in step 2 the CD1 button is pressed first while the CD tray is open the CD tray will close and play will start from the first track on that CD Storing CDs Always ensure that each CD is stored in its own case Do not place CDs in direct sunlight near a heating appliance or any other location which is susceptible to high temperatur...

Страница 16: ...displayed as shown if the CD is dusty or scratched or if it has been placed upside down on the tray In a case like this check whether the CD is upside down and turn it over if it is If it is not check whether the CD is dusty or scratched and clean or replace it if it is If there are no CDs inside the unit and the 6 button or CD1 CD2 or CD3 button is pressed the NO DISC message will appear after th...

Страница 17: ...rresponding to the buttons pressed appears in the display window and direct play now starts Another track can be selected even during play Press the number button s corresponding to the track which is to be heard The display now changes to indicate the corresponding track No and play starts from the beginning of the track concerned To select a track of a CD on another tray select the CD tray and t...

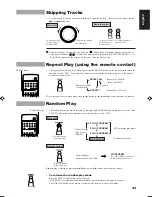
Страница 18: ...OM button on the remote control or the PLAY MODE button on the main unit when the function is in the CD stop mode Random play is started by pressing the 6 button or the 3 button on the remote control To release the random play mode Press the PLAY MODE button in the stop mode RANDOM is cleared from the display window and the random play mode is released The NORMAL button on the remote control can a...

Страница 19: ...rs to be used for the title For details refer to the character layout table on page 44 TITLE This appears when no title has been given Flashing Turn the dial counterclockwise to go in the reverse direction DISC TITLE Disc name PERFORMER Name of artist GENRE Genre of music CHARA DISPLAY Upper case letters symbols Lower case letters symbols Numbers Each time this is pressed the character type change...

Страница 20: ... 6 button When the title or name of the artist has been entered 6 Press the TITLE button EDITING appears and the data is stored in the memory IC To enter the name of the artist repeat the procedure starting from step 1 Selecting and entering a genre genres for up to 200 CDs can be stored Continued from step 1 on page 17 5 Use the jog dial to select and enter the genre Each time the jog dial is tur...

Страница 21: ... TRACK SPOKEN WORD WORLD MUSIC Disc Lock Function To prevent children from taking out or inserting CDs A Disc Lock function can be engaged to make it impossible for children to take CDs out or insert others In the power standby mode press CD1 0 button while holding down 7 button LOCKED appears for 3 seconds and it is no longer possible to take out or insert CDs To release the Disc Lock function Re...

Страница 22: ...en all the tracks on an MD have been played through play will stop automatically Stopping play temporarily When the button on the left is pressed 8 is displayed When it is pressed again play is resumed from the place where it was stopped Operate by following the steps below in numerical order MD Lamp lights Music calendar The display changes to track No 1 after 3 seconds Place the MD with its labe...

Страница 23: ...se the DISPLAY CHARA button or the DISPLAY MODE button on the remote control Each time it is pressed the display changes as shown below When it is pressed in the stop mode When it is pressed during play Tips and Precautions To ensure that the MD sound remains perfect Each MD disc is housed inside a cartridge which protects it from dust and dirt and which ensures easy handling However bear in mind ...

Страница 24: ... track from No 1 to No 10 Press the number button corresponding to the track To play track No 11 or above First press the button and then press one of the number buttons Example Track No 15 Press followed by Example Track No 20 Press followed by Example Track No 25 Press twice followed by The track number corresponding to the buttons pressed appears in the display window and direct play now starts...

Страница 25: ...on the main unit when the function is set to MD Random play is started by pressing the 6 button or the 3 button on the remote control To release the random play mode Press the PLAY MODE button in the stop mode RANDOM is cleared from the display window and the random play mode is released The NORMAL button on the remote control can also be used to release this mode Normal display random mode is rel...

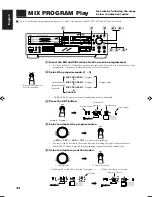
Страница 26: ... number flash 5 Select and enter one of the tracks When track 2 on the MD is selected for program 1 When the selection is entered Operate by following the steps below in numerical order Press this if the stop mode has been established Normal display program mode released Example Program 1 Program 2 flashes Flashing PLAY MODE XU 301 MD CD COMBINATION DECK REC PAUSE REC START REC DIGITAL CD REC SOUR...

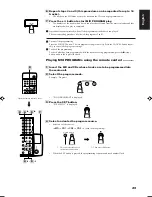
Страница 27: ...the CANCEL button repeat edly to cancel all the program settings To check the programming To check what has been programmed while the tracks are being programmed press the 7 stop button and use the jog dial to check Playing MIX PROGRAMs using the remote control 1 Insert the MD and CDs whose tracks are to be programmed into the main unit 2 Select the program mode Example Program 1 P1 NO PROGRAM is ...

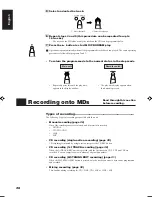
Страница 28: ...corded DIGITAL CD CD1 CD3 LINE MIC CD recording single action recording page 29 CD recording is initiated by a single action just press the CD REC button CD recording 1st TRACK recording page 30 When the 1st TRACK REC button is pressed only the first tracks on CD1 CD2 and CD3 are recorded You can compile your own album of original hit numbers CD recording LISTENING EDIT recording page 31 When the ...

Страница 29: ...ide the knob on the cartridge side to the open position This prevents recording over or editing of the existing material To proceed with recording over or editing return the knob to the closed position When sticking adhesive labels onto MD cartridges for use Adhere the label securely all the way to the edge of the cartridge so that it will not peel off If the label protrudes from its adhesion area...

Страница 30: ...tinuously 5 Play the sound of the source to be recorded If the CD1 button is pressed when CDs serve as the source the tracks are recorded in the follow ing sequence CD1 CD2 CD3 6 Press the REC START button to start the recording Press the TRACK MARKING button on the remote control to allocate track numbers during recording When MD recording is completed After UTOC WRITING is displayed operation st...

Страница 31: ...rt simultaneously This is called synchro recording Recording starts from track 1 When a CD is recorded its digital signals are recorded in their original form A track mark is automatically placed where one track changes to the next and the track number also changes When MD recording is completed After UTOC WRITING is displayed operation stops automatically It also stops automatically when CD play ...

Страница 32: ... stop mode Example When recording from CD1 CD whose first track is to be recorded first 3 Insert the recording MD Insert the MD with its label side facing up 4 Press the 1st TRACK REC button to start recording CD play and MD recording start simultaneously Only the first track on the CD is recorded When a CD is recorded its digital signals are recorded in their original form A track mark is automat...

Страница 33: ...t track and remaining recording time on the MD are displayed MD is set to the rec pause mode 4 Program the tracks while the CD is playing a When the track now playing is to be recorded The track is stored in the memory and operation moves on to the next track b When the track is not to be recorded The track is not stored in the memory and operation moves on to the next track When the first track h...

Страница 34: ...g the SET button on the remote control or unit at the desirable location There is no need to adjust the recording level for a digital recording Up to 32 tracks can be included in the programming The same track cannot be programmed twice If a CD has no tracks which are to be recorded remove it from the CD tray Upon completion of the MD recording UTOC WRITING is displayed Operating any button while ...

Страница 35: ...quence CD1 CD2 CD3 6 Press the REC START button to start the recording When MD recording is completed After UTOC WRITING is displayed operation stops automatically Press the REC STOP button to stop the recording at any time Upon completion of the MD recording UTOC WRITING is displayed Operating any button while this message is displayed may render the MD unusable Always wait for UTOC WRITING to be...

Страница 36: ... ERASE function All the tracks can be erased at once without recording fresh material over them Giving titles to discs and tracks TITLE function A title consisting of up to 32 characters can be given to a disc and a track The title given appears in the display window JOIN DIVIDE MOVE Erasing Track B ALL ERASE 1 2 4 3 1 3 2 1 2 3 2 1 4 3 2 1 4 3 2 1 4 3 2 1 3 2 1 4 3 2 1 4 3 Track No Track A Track ...

Страница 37: ...8 seconds before or after the position The recording lasting for 4 seconds starting from the position to which the dividing point has been moved is repeatedly played XU 301 MD CD COMBINATION DECK REC PAUSE REC START REC DIGITAL CD REC SOURCE SELECTOR LINE MIC STOP MIXING CANCEL CD MD MIC MAX MIN PHONES MIX BALANCE REC LEVEL CD LINE LINE MIC PLAY MODE CHARA DISPLAY TITLE EDIT 32kHz 44 1kHz DIGITAL ...

Страница 38: ...o play the MD Joining tracks JOIN function 1 Insert the MD to be edited and set the function to MD The number of tracks and play time are displayed 2 Select JOIN 3 Press the SET button 4 Select the track to be joined and play it When the track to be joined is selected using the number button on the remote control correspond ing to the track number the track is played directly DIVIDE JOIN MOVE ERAS...

Страница 39: ... Do not disconnect the power cord or subject the unit to the vibration while UTOC WRITING appears Doing so may make it impossible to play the MD Moving tracks MOVE function 1 Insert the MD to be edited and set the function to MD The number of tracks and play time are displayed 2 Select MOVE 3 Press the SET button The function changes each time this button is pressed DIVIDE JOIN MOVE ERASE ALL ERAS...

Страница 40: ... mode can also be exited by pressing the POWER button in step 7 to turn off the power When the wrong track is selected in step 4 and or step 5 Before pressing the SET button turn the jog dial or use the number buttons on the remote control to select the track again To stop MOVE at any time Press the EDIT button If the movement destination has already been selected as in step 5 first press the CANC...

Страница 41: ...ically The function changes each time this button is pressed DIVIDE JOIN MOVE ERASE ALL ERASE back to the beginning Flashing Flashing Flashing XU 301 MD CD COMBINATION DECK REC PAUSE REC START REC DIGITAL CD REC SOURCE SELECTOR LINE MIC STOP MIXING CANCEL CD MD MIC MAX MIN PHONES MIX BALANCE REC LEVEL CD LINE LINE MIC PLAY MODE CHARA DISPLAY TITLE EDIT 32kHz 44 1kHz DIGITAL INPUT 48kHz LISTENING S...

Страница 42: ...it to the vibration while UTOC WRITING appears Doing so may make it impossible to play the MD Erasing all the tracks ALL ERASE function 1 Insert the MD to be edited and set the function to MD The number of tracks and play time are displayed 2 Select ALL ERASE 3 Press the SET button 4 Press the EDIT button MD BLANK DISC appears and all the tracks are erased The change is stored in the memory IC The...

Страница 43: ...sc DISC TITLE Press the SET button To give a title to a track TRACK TITLE Select the track which is to be given a title and press the SET button Example Giving a title to track No 1 Press this when the unit is in the stop mode Cursor flashing Character to be input flashing The cursor flashes The track number flashes MD TITLE SET SET When giving a track title When giving a track title Flashing XU 3...

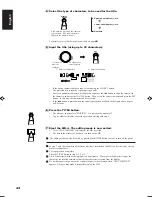
Страница 44: ... UTOC WRITING is displayed the MD is ejected The data in the memory IC has been recorded on the MD The editing mode can also be exited by pressing the POWER button in step 7 to turn off the power In step 3 only those numbers of the tracks which are recorded on the MD can be selected by the jog dial as track numbers To stop operation at any time Press the TITLE button in step 2 3 4 or 5 Up to 5 cha...

Страница 45: ...the title containing up to 32 characters using the character input buttons The characters can be input directly 6 Press the ENTER button The procedure can also be completed by pressing the TITLE button again 7 Eject the MD This completes the editing UTOC WRITING flashes and the MD is ejected When selecting a track using the number buttons on the remote control keep the remote control s cover close...

Страница 46: ...en for the disc and tracks which have been recorded The characters which can be used for this purpose are shown below Upper case letters Lower case letters Numbers A B C D E F G H I J K L M N O P Q R S T U V W X Y Z a b c d e f g h i j k l m n o p q r s t u v w x y z 0 1 2 3 4 5 6 7 8 9 space space ...

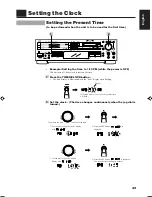
Страница 47: ... dial to align the hour display with 2 Press the SET button is displayed 3 Use the dial to align the minute display with 4 Press the SET button is displayed Two seconds later the display darkens When the time is to be re set the present time will flash Flashes XU 301 MD CD COMBINATION DECK REC PAUSE REC START REC DIGITAL CD REC SOURCE SELECTOR LINE MIC STOP MIXING CANCEL CD MD MIC MAX MIN PHONES M...

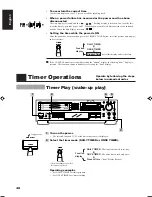
Страница 48: ... the time of purchase is displayed 2 Select the timer mode DAILY TIMER or ONCE TIMER Operating examples Set DAILY TIMER for timer playback Set ONCE TIMER for timer recording Operate by following the steps below in numerical order Lamp goes out TIMER CLOCK TIMER CLOCK TIMER CLOCK TIMER CLOCK DAILY TIMER ONCE TIMER Present Time Select this display and set the time Function display The mode changes e...

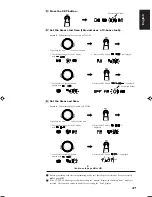
Страница 49: ...g hour display is restored This function comes in handy for correcting the hour display The start time flashes To put back the time To advance the time 1 Use the dial to align the hour display with 2 Press the SET button is displayed The end time flashes 3 Use the dial to align the minute display with 4 Press the SET button is displayed To put back the time To advance the time 1 Use the dial to al...

Страница 50: ...ration is also cleared MD The timer programming is displayed once and then the function display is restored CD CD STANDBY POWER STANDBY POWER Place the MD to be heard in position Place the CD or CDs to be heard in position on the CD1 CD2 and or CD3 tray Lamp lights DAILY This display appears when the DAILY TIMER play mode is set When REC flashes turn the jog dial to select PLAY flashing The timer ...

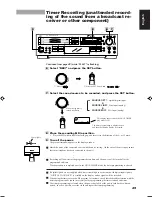
Страница 51: ...and no signals will be recorded When using the timer to record a BS program for instance check that the broadcast station with the desired program can be tuned in correctly before programming the timer start and end times The timer programming is cleared when the power has failed or the power cord has been discon nected In a case like this reset the clock and repeat the timer programming ONCE 1 Se...

Страница 52: ...bination deck 1 Place the CD inside the CD player Program the tracks if they are to be recorded in a pro grammed sequence 2 Place the recording MD in the MD CD combination deck 3 Press the DIGITAL button with digital connections Press the LINE button when analog connections have been performed 4 Press the REC PAUSE button Always proceed to operate from the stop mode 5 Press the PLAY button on the ...

Страница 53: ...l mini plugs black 2 TEXT COMPU LINK connectors Use the cable with the stereo mini plugs green IMPORTANT Set the Master Slave Selector on the rear panel to 2 SLAVE UNIT 3 Connect the stereo receiver and unit using the cables with RCA pin plugs see page 4 and a digital cable if desired see page 5 4 Connect the AC power cords of these components to the AC outlets Notes In order to use the TEXT COMPU...

Страница 54: ... this kind of recording system is called a magneto optical disc ATRAC Adaptive Transform Acoustic Coding Sound contains some elements which are not actually very audible For instance when the sound is soft it is hard to hear the bass and treble Also during or immediately after a passage of loud sound soft sounds cannot be heard even though they may be there A technique called ATRAC Adaptive Transf...

Страница 55: ...en inserted An attempt was made to digitally copy a CD ROM or video CD etc An attempt was made to record or edit a play only MD The track is protected An attempt was made to digitally record a digitally recorded source Remedy Replace with a pre recorded MD unless something is to be recorded onto the blank MD This is due to limitations on the MD system See page 54 Replace the MD Replace with anothe...

Страница 56: ...opy Management System This unit is designed to comply with this restriction The copyright laws allow recordings to be made for the personal enjoyment of the individual user but they do not allow such recordings to be used for other any purposes without permission from the holder of the copyrights MDs on which CD sound has been recorded using this unit cannot be digitally copied by other units The ...

Страница 57: ...be recorded always test record first to check that the recording turns out properly before proceeding with the actual recording The manufacturer assumes no liability whatsoever for any damages resulting from missed opportunities while conducting recording playback or CD play operations due to malfunctioning of or trouble in the unit or for any incidental damage Check out the points below before re...

Страница 58: ...l 23 dBm 15 dBm Microphone Minimum input level 3 mV Full scale 12 dB 600 10 kΩ matching impedance Dynamic range 1 kHz 88 dB during play Signal to noise ratio 88 dB during play Timer Section Timer system Once a day operation ON OFF timer Clock display 12 hour display Common Specifications Output connectors Analog LINE x 1 set 2 V 5 kΩ Full scale Headphones x 1 4 mW 32 Ω 8 Ω 1 kΩ matching impedance ...

Страница 59: ...VICTOR COMPANY OF JAPAN LIMITED J VC 0298IMMIDESAN EN FR ...

Отзывы: