background image

7

Engli

s

h

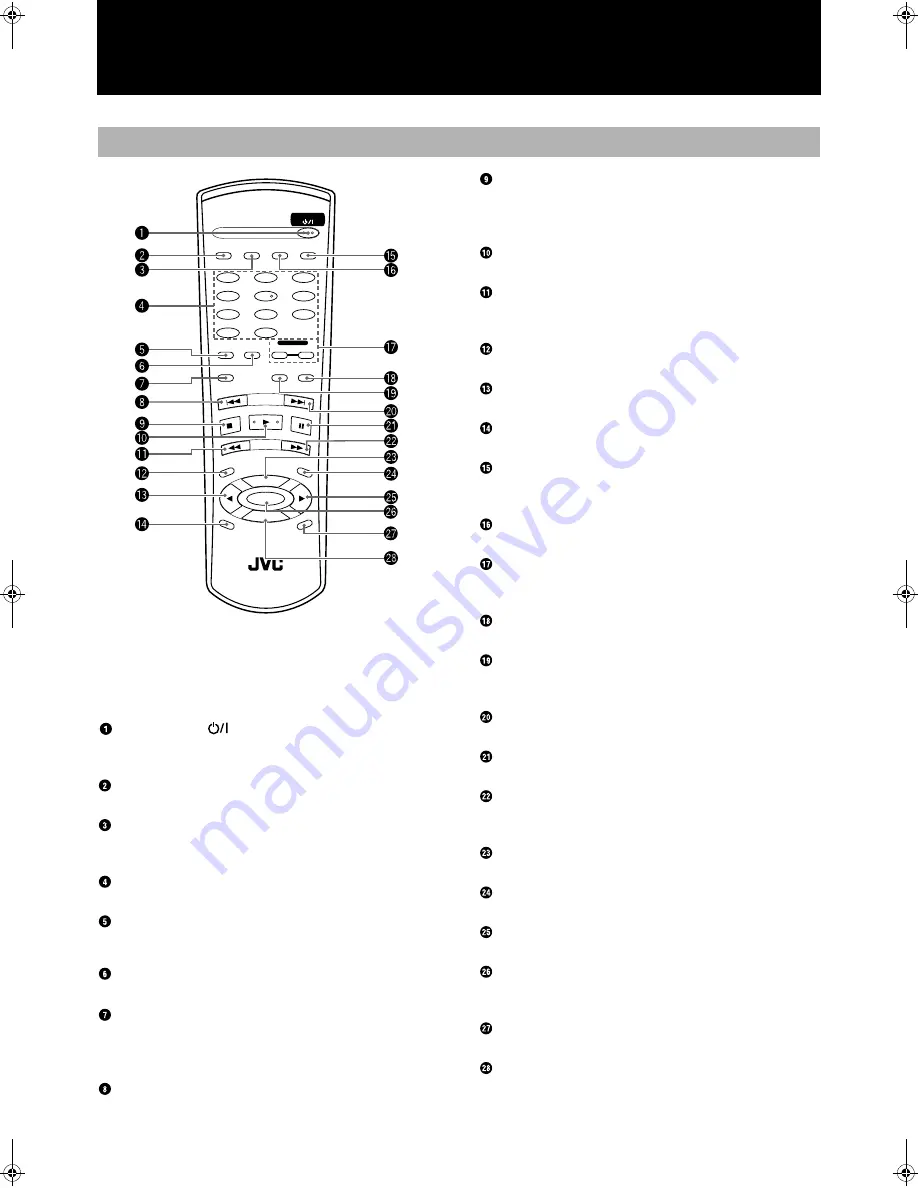
Using the Remote Control

When following the procedures in this manual, the
buttons on the remote control have the same func-
tion as the corresponding buttons on the main
unit.

STANDBY/ON  

 Button

Press to turn the power of this unit on or to put it in the standby
mode. (see page 9)

CD REC Button

Press to start the CD REC function. (see page 23)

CD EDIT Button

Press repeatedly to select Listening Edit or Program Edit functions.
(see page 25, 26)

Number Buttons

Press to select tracks for playback. (see page 12)

PLAY MODE Button

Press repeatedly to select a play mode for the CD player. (see page
14)


REPEAT Button

Press repeatedly to select one of the repeat play modes. (see page 14)

 REC/REC MUTING Button

Press to put the unit into recording pause mode from CDR stop
mode.
Press to mute recording signal during recording. (see page 21)

4

 (reverse skip) Button

Press to skip back to the beginning of previous tracks. (see page 13)

7

  (stop) Button

Press to stop playback of the currently selected disc in the CD
player or stop playback/recording of the disc in the CDR. (see page
12)

3

 (play) Button

Press to play the currently selected CD. (see page 12)

1

 (reverse) Button

Press to perform fast reverse search of the CD currently being
played. (see page 13)

REC SOURCE Button

Press to select the source for recording to the CDR.

2


MULTI JOG Control (menu) Button

Press to select menu operations.

Pitch 0 Button

Press to restore playback speed of the CD player to normal. 

DISPLAY Button

Press to change the type of information that is shown in the infor-
mation display (see page 23).

FINALIZE Button

Press to start finalization of a CD-R or CD-RW. (see page 34)

CD and CDR Deck Selection Buttons

Press to select the type of operation you want to use, CD player or
CDR. (see page 12)

SYNCHRO Button

Press to select synchronized recording. (see page 29)

FADE Button

Press to create fade-in and fade-out of data being recorded. (see
page 21)

¢

 (forward skip) Button

Press to skip forward to other tracks on the disc. (see page 13)

8

8

8

8

 (pause) Button

Press to pause playback of the currently selected disc. (see page 12)

¡

 (forward) Button

Press to perform fast forward search of the currently selected CD.
(see page 13)

PITCH+ Button

Press to increase the speed of CD playback.

MENU Button

Press to access Menu options.

MULTI JOG Control (menu) Button

Press to select menu operations.

SET Button

Press to enter a selection on the menu. Also used for registering
tracks in the program mode.

CANCEL Button

Press to cancel an operation. 

PITCH- Button

Press to decrease the speed of CD playback.

Remote Control

STANDBY/ON

CD REC

PLAY

MODE

REC

REC MUTING

REC

SOURCE

MENU

PITCH 

0

CANCEL

REPEAT

CD

PITCH

+

SET

PITCH–

RM–SXLR2010A

  REMOTE CONTROL

CDR

CD EDIT

FINALIZE

DISPLAY

1

2

4

5

7

8

3

6

9

10

+10

FADE

SYNCHRO

C O N T R O L

Eng.book  Page 7  Monday, May 28, 2001  9:46 AM

Содержание XL-R2010BK

Страница 1: ...TOP PLAY PAUSE REC SOURCE DIGITAL CD LINE MIC OPEN CLOSE OPEN CLOSE CANCEL SET MENU PAUSE REC REC MUTING PLAY STOP SYNCHRO FINALIZE MIX BLANCE CD LINE LINE MIC MIC STANDBY ON CD REC PLAY MODE REC RECMUTING REC SOURCE MENU PITCH 0 CHANCEL REPEAT CD PITCH SET PITCH RM SXLR2010A REMOTECONTROL CDR CD EDIT FINALIZE DISPLAY 1 2 4 5 7 8 3 6 9 10 10 FADE SYNCHRO C O N T R O L MULTI JOG REC LEVEL CD CDR MU...

Страница 2: ...ntended to alert the user to the presence of important operating and maintenance servicing instructions in the literature accompanying the appliance CAUTION IMPORTANT This equipment has been tested and found to comply with the specifications for a Class B digital device pursuant to Section 15 of the FCC Regulations The specifications are designed to provide reasonable protection against harmful in...

Страница 3: ...cording 20 Synchronized Recording of CD player Playback 22 1 Disc Dubbing 24 Listening Edit Recording 25 Program Edit Recording 26 CD player to CDR Recording Options 27 Setting the Unit for High speed Recording 28 Setting the Auto Track Spacing Function 28 Synchronized Recording from External Sources 29 Mixed Input Recording 30 Special Recording Edit Operations 32 Skipping a Recorded Track on a CD...

Страница 4: ... unit Compatibility between CD player and CDR assured High speed recording from source discs in the CD player to the target disc in the CDR unit 4x for CD R 2x for CD RW Digital optical and coaxial I O input output terminals analog I O termi nals and a microphone jack are provided for external audio signal source connections Sampling frequency converter capable of converting digital signals with s...

Страница 5: ...ture is only supported by other JVC products also equipped with the COMPU LINK feature Please check the manual s of your JVC product for compatibility Before selecting the COMPU LINK 4 MODE switch position CDR or TD turn off the power and disconnect the power cord from the wall socket The function cannot be reset while the power is on Alternatively if the COMPU LINK 4 MODE switch position CDR or T...

Страница 6: ... amplifier or receiver to the LINE OUT PLAY ter minal on this unit Depending on the device a digital device is connected to the DIGITAL OUT terminal of this unit may not correctly recog nize this unit UNLOCKED appears in the display of the attached device If this happens press the PLAY 3 button on this unit to check that the unit it is being recognized by the attached device Digital Connections CO...

Страница 7: ...rding see page 11 REC REC MUTING Use to start recording or when recording to mute the recording signal see page 21 26 27 Display Window Displays operation modes and system information see page 6 Remote Control Sensor This sensor receives commands from the remote control REC SOURCE SELECTOR Button Use to select the type of source the signal is to be recorded from CD Control Operation Buttons PLAY M...

Страница 8: ... Lights when the currently selected disc contains SKIP TRACK markers CDR indicator Lights when the CDR has been selected for play or recording CDR deck operation indicators Light to indicate the operation mode of the CDR Disc format indicators Light to indicate the type of disc that is loaded in the CDR and whether or not it is finalized AUTO TRACK indicator Lights when automatic track marking has...

Страница 9: ...ource for recording to the CDR 2 MULTI JOG Control menu Button Press to select menu operations Pitch 0 Button Press to restore playback speed of the CD player to normal DISPLAY Button Press to change the type of information that is shown in the infor mation display see page 23 FINALIZE Button Press to start finalization of a CD R or CD RW see page 34 CD and CDR Deck Selection Buttons Press to sele...

Страница 10: ...AA 15F batteries with new batter ies The dry cell batteries provided with the unit are for the purpose of checking system operations only Replace them with new batteries as soon as possible Do not drop the remote control or subject it to strong impact In order to ensure that the remote control does not fail to oper ate avoid the following conditions Exposure of the main unit and remote control to ...

Страница 11: ... is pressed the power is turned on and the tray opens but the currently selected function CD player or CDR does not change When the 3 play button on the remote control is pressed the power is turned on the last selected function CD player or CDR is recalled If a disc is loaded in the tray playback begins When the power is turned off the Play mode returns to normal If the power cord is unplugged fr...

Страница 12: ...opping CD playback To stop playback at any time Stop playback of a disc in the CD player by pressing the CD Control STOP 7 button The total number of tracks and playing time is shown in the information display When all the tracks on a CD have been played through play back stops automatically To stop playback temporarily If the CD Control PAUSE 8 button is pressed playback is paused temporarily Whe...

Страница 13: ... ended by press ing the CDR Control STOP 7 button before pressing the CDR Control OPEN CLOSE 0 button After pressing the CDR con trol OPEN CLOSE 0 button the tray will open and the CD can be removed Press the CDR control OPEN CLOSE 0 button once more to close the tray Notes When an unfinalized CD R or CD RW is loaded in the CDR and the CDR Control OPEN CLOSE 0 button is pressed to open the CDR dis...

Страница 14: ...n button corresponding to the tray holding the CD and track to be played 2 Press the number button s of the track you want to play The track number corresponding to the buttons pressed is shown in the information display and playback of that track starts To select tracks 1 through 10 Press the number button 1 through 10 corresponding to the track To select tracks 11 or above First press the 10 but...

Страница 15: ...te control Turn the MULTI JOG control counterclockwise one notch to return to the beginning of the current track or keep turning it until the track number you are searching for is shown in the information display Turn the MULTI JOG control clockwise one notch to move to the beginning of the next track or keep turning it until the track number you are searching for is shown in the information dis p...

Страница 16: ...ay The RND indicator will be shown in the PLAY MODE section of the display window Note The random playback mode cannot be used for the disc loaded in the CDR Random play is started by pressing the CD Control PLAY 3 button on the main unit or the 3 play button on the remote control When activated tracks are chosen randomly for playback from the CD loaded in the CD player The tracks chosen will be l...

Страница 17: ...of CD playback is changed using the pitch con trol buttons there is no signal output from the DIGITAL OUT OPTICAL terminal The Disc Lock function can be used to make it impossible for chil dren or anyone else to take CDs out of or load new ones into the CD player and CDR When the power is on press the CD Control OPEN CLOSE 0 button while holding down the CD Control STOP 7 button on the front panel...

Страница 18: ...ng func tion ends automatically Pressing the CD Control STOP 7 button on the main unit ends the programming function 6 Press the CD Control PLAY 3 button to start programmed play During playback track number and play time of the track are shown in the information display The numbers of the tracks that have been played are cleared from the music calendar They are displayed again when pro grammed pl...

Страница 19: ...u want to program and record tracks see Program Edit Recording on page 26 1 Load a CD into the tray of the CD player Only tracks on the CD loaded in the CD player can be registered into the program i e tracks on a CD loaded in the CDR cannot be selected for playback CD READ DISC will be shown in the information display as the unit reads the information from each disc 2 Press the CD Deck Selection ...

Страница 20: ...mation display Press the CANCEL button to erase the track from the program The step number for each track following the one erased is automatically reduced by one i e steps are renumbered To erase the entire pro gram press the CANCEL button until PG NO PROGRAM is shown in the information display To change the contents of the program In the CD stop mode press the SET button followed by the CAN CEL ...

Страница 21: ...dit recording see page 25 Select tracks to be recorded from the CD in the CD player while listening to them New to this feature is an automatic disc finaliza tion function that can be set before recording begins High speed recording CD R 4x CD RW 2x Program Edit recording see page 26 Program tracks to be recorded from the CD loaded in the CD player New to this feature is an automatic disc finaliza...

Страница 22: ...ensure that the original digital signals will be recorded regardless of the sampling frequency 32kHz 44 1kHz or 48kHz of the signal from the source Microphone connections Use a microphone equipped with a standard plug to connect to the MIC jack on this unit 1 Insert a recordable CD R or CD RW 2 Select a recording source Use the REC SOURCE SELECTOR button to select the recording source Press the bu...

Страница 23: ...hether or not the button is held down for fewer or more than four sec onds After the four seconds of silence the unit stops in the recording pause mode after the button is released The REC MUTING function cannot be used at the beginning of recording started from the recording pause mode Fade In Fade Out Recording analog only This feature can be used to record analog sound other than CD ANALOG Loca...

Страница 24: ...a track mark Notes Even if automatic track marking is turned off automatic track marking will be performed during synchronized one button recording When this occurs manual track marking is tempo rarily disabled Tracks must be at least four seconds in length Pressing the SET button less than four seconds after the previous track mark cre ates a new track mark once 4 seconds of recording has been pe...

Страница 25: ... display and the unit stops recording Notes There is no need to adjust the recording If the source CD being recorded from the CD player is itself a first generation digital copy digital recording cannot be per formed When this occurs the recording type will switch from digital to analog automatically This type of recording cannot be started during CD playback It must start from the beginning of th...

Страница 26: ... or CDR STOP 7 button on the main unit or the 7 stop button on the remote control to end recording The recording mode is released after STOP DUBBING is shown in the infor mation display Notes There is no need to adjust the recording level If the source CD being recorded from the CD player is itself a first generation digital copy digital recording cannot be per formed When this occurs the recordin...

Страница 27: ...ay Press the SET button on either the remote control or the main unit or press the PLAY button on the main unit to record the same programmed tracks Recording starts To program new tracks press the CANCEL button and then proceed to step 4 4 Program the tracks while the CD is playing by assigning a tag to each track on the disc This is done by pressing either the SET button main unit remote control...

Страница 28: ...rding at any time Press the CD Control STOP 7 CDR Control STOP 7 or CANCEL button on the main unit or the 7 stop or CANCEL button on the remote control to stop the recording process The recording mode is released after STOP DUBBING is shown in the information display Notes There is no need to adjust the recording level The last program information the most recently created pro gram still stored in...

Страница 29: ...disc unfinalized Note This message will not be shown if the menu FINALIZE func tion setting is OFF The default setting is ON When a blank disc is in the CDR tray UPDATE OPC is shown following ADD FINALIZE The recording process starts Only the tracks selected from the CDs in the CD player are recorded Playback starts from the first track seleted The playing time of the track and the remaining playi...

Страница 30: ...ng synchronized one button recording or using the listening edit or program edit modes to record from the CD player to the CDR 1 When the unit is in the stop mode press the MENU button main unit remote control 2 Turn the MULTI JOG control or press the 2 3 menu button on the remote control until TRACK SPACE is shown in the information display 3 Press the SET button main unit remote control The curr...

Страница 31: ...N is selected the LED lamp under DIGITAL IN selection will light 3 Press the SYNCHRO button main unit remote control The CDR is put into the synchronized recording pause mode The source device must be stopped cannot be playing at this time 4 Start playing of the source unit Note When recording with the SYNCHRO button recording starts when the input level is detected If the track starts very quietl...

Страница 32: ...igital CD or MD players This function is only for use with externally connected digital audio equipment It cannot be used with the CD player CAUTION When performing synchronized start recording from an external component it is possible that part of the signal at the beginning of the first track will not be recorded If this should occur please per form manual recording 1 Load a recordable CD R or C...

Страница 33: ...cording the pitch con trols may be used to adjust the speed of CD playback for mixing and recording purposes see page 15 If the microphone level is set too high a loud howling sound may be emitted from the speakers If this occurs turn down the volume of the microphone by turning down the volume of the amplifier receiver powering the speakers you are using to moni tor the sound When you have finish...

Страница 34: ...nd other CD players that support the track skip function You cannot use the track skip function when recording to unfi nalized CD R discs or CD RW discs from the CD player 1 Load the unfinalized CD RW to be edited in the CDR disc tray The number of tracks and play time are shown in the informa tion display 2 When the unit is in the stop mode press the MENU button main unit remote control 3 Turn th...

Страница 35: ...ther operations with the unit while ERASE DISC is flashing Please refer to the Glossary for a brief definition of acronyms see page 41 Caution If the disc is damaged or there is disc related trouble this function may not be possible 1 Load the CD RW to be erased in the CDR disc tray The number of tracks and play time are shown in the informa tion display 2 When the unit is in the stop mode press t...

Страница 36: ... the CD player nor is playback of CD loaded in the CD player possible Once a CD R disc has been finalized further recording on that disc cannot be performed However if you erase the TOC Table of Contents on a CD RW disc the disc can be recorded on again 1 Load a finalized CD RW disc into the CDR disc tray The CD RW and FINALIZED indicators will be shown in the display window if the CD RW disc that...

Страница 37: ...e following procedure see Step 4 1dts is trademark of Digital Theater Systems Inc 2HDCD is a registered trademark of Pacific Microsonic Inc Note When recording from the CD player the sampling rate con verter is always turned off 1 When the unit is in the stop mode press the MENU button main unit remote control 2 Turn the MULTI JOG control on the main unit or press the 2 3 menu button on the remote...

Страница 38: ...t are cleared and the unit is reset to the factory default settings 1 When the unit is in stop mode press the MENU button main unit remote control 2 Turn the MULTI JOG control on the main unit or press the 2 3 menu button on the remote control until SET DEFAULT is shown in the information display 3 Press the SET button main unit remote control SET DEFAULT is shown in the information display Press ...

Страница 39: ...ss the SET button The unit automatically switches the power to standby after the specified time interval Note This function operates when SLEEP is displayed in the infor mation display If you use operations that cause SLEEP to disappear from the information display the SLEEP Timer func tion is cancelled STANDBY STANDBY ON MAX MIN LEVEL PHONES PLAY MODE CD EDIT REC SOURCE SELECTOR CD REC STOP PLAY ...

Страница 40: ... amplifier receiver on Automatic Source Selection Selecting a source on the connected amplifier receiver automati cally starts its operation Similarly starting operation of a linked component will automatically selects the relevant source on the amplifier receiver When this unit is selected as the source a selected tray CD player or CDR will start to play Notes The type of interactive peration des...

Страница 41: ...g playback is possible Recording is possible if the disc has been recorded to by another unit and the adjustment information has been maintained Replace the disc with a CD R or CD RW that can be recorded on CDR NO DISC A CD CD R or CD RW has not been inserted Insert a CD CD R or CD RW BLANK DISC A CD R or CD RW with nothing recorded on it has been inserted Playback and erase functions are not poss...

Страница 42: ...alog connections and perform analog recording NOT AUDIO IN The digital signal is not an audio format Set the source component to output a digital audio signal For example if a data track on a CD is selected switch to a track that con tains audio data NOT REC MUTE The REC REC MUTING button has been pressed at a time when the function cannot be performed See page 21 for information on when the mutin...

Страница 43: ...hanged Glossary The following is a brief description of some of the acronyms used in this manual ATIP Absolute Time in Pregroove The reflected light returned from the pregroove of a CD R disc generates a carrier signal providing tracking motor control and focus signals Additional information including the Recommended Optimum Recording Power value is also encoded in a frequency modulation of the ca...

Страница 44: ...Play fails to start The CD has been inserted upside down Insert it properly with the label side facing up 10 Condensation has formed on the lens Turn on the power and wait for a couple of hours 2 Specific parts are not played properly The CD is scratched Replace the CD 10 CDR Recording is not possible The CD R or CD RW was loaded in the tray upside down Load the disc with the label side up 11 The ...

Страница 45: ...1kHz 48kHz Microphone Minimum input level 3mV Full scale 12dB 600Ω 10kΩ matching imped ance Signal to noise ratio 94dB during playback Dynamic range 1 kHz 91dB during playback Wow and flutter Less than measurable limit Total harmonic distortion 0 0063 during playback Common Specifications Output terminals Analog LINE x 1 set 2V 5kΩ Full scale Headphones x 1 4mW 32Ω 8Ω 1kΩ matching impedance Digita...

Страница 46: ...MEMO ...

Страница 47: ...VICTOR COMPANY OF JAPAN LIMITED J VC EN 0501SKMBWNJEM ...

Отзывы: