JVC VN-T216U Скачать руководство пользователя страница 30


29 

Table below elaborates the above figure. 

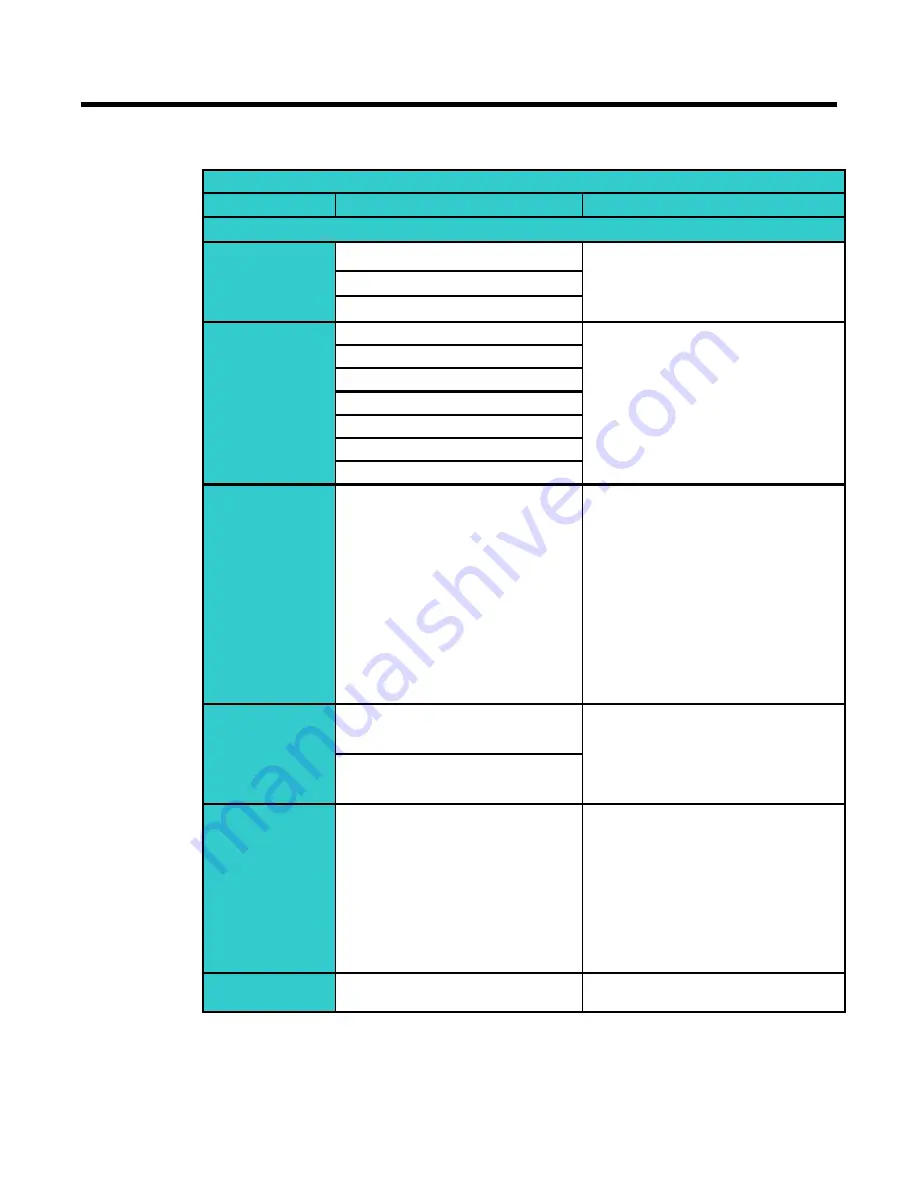
Table 4-1 Compression 

Compression   

Item 

Function Choice 

Remark 

Encoder No.1   

Compression 
Format 

MJPEG 

Set a default compression mode. 

MPEG4 

H.264 

Resolution 

1080P 

1080P is the highest resolution and, 
QVGA is the lowest resolution. 
1080p only support H.264. 

720P 

D1 

4CIF 

VGA 

CIF 

QVGA 

Frame Rate 

PAL:1

—25 

NTSC:1--30 

The frame rate is displayed per 
second. 
PAL: H.264 single stream: 1080P, 
720P, D1, 4CIF, CIF, VGA, QVGA 
@ max 25fps 
MPEG4/MJPEG: VGA, QVGA @ 
max 25fps 
NTSC: H.264 single stream: 
1080P, 720P, D1, 4CIF, CIF, VGA, 
QVGA @30fps 
MPEG4/MJPEG: VGA, QVGA @ 
max 30fps 

Rate control 
mode 

Variable bit rate 

Choose the Bit Rate control 
selection based on user 
requirements. 

Constant bit rate 

Compression 
Ratio 

Customized mode 

Low 

Mid-low 

Standard 

Mid-high 

High 

Low: this setting produces highest 
image quality while the file size 
increases. 
High: this setting produces lowest 
image quality while the file size 
decreases. 

Quality value 

MJPEG : 3-90 ; 

MPEG4 & H264 : 1-31 

Selectable 


Содержание VN-T216U

Страница 1: ... HD IP DOME CAMERA VN T216U INSTRUCTIONS Thank you for purchasing this product Before operating this unit please read the INSTRUCTIONS QUICK GUIDE and SAFETY PRECAUTIONS carefully to ensure the best possible performance ...

Страница 2: ... Connecting the Power Wiring 12 Adjusting the Camera Position 12 Adjusting Zoom and Focus 13 Mounting the Camera 13 Locking the Camera 15 Network Camera Diagram 16 Hardware Software Requirements 16 Connecting the Camera to a Personal Computer 17 Setting IP 17 Connecting the Camera to a Personal Computer 17 4 Overview of Navigation and Controls 22 Live View 22 Image Parameters 23 Basic 23 Compressi...

Страница 3: ...s and are omitted in this manual Design specifications and other contents described in this manual are subject to change for improvements without prior notice Cautions and Warnings Installation and servicing should be performed only by qualified and experienced technicians to conform to all local codes and to maintain your warranty AC24V models require the use of CSA Certified UL Listed Class 2 po...

Страница 4: ...esigned to provide reasonable protection against harmful interference in a residential installation This equipment generates uses and can radiate radio frequency energy and if not installed and used in accordance with the instruction manual may cause harmful interference to radio communications However there is no guarantee that interference will not occur in a particular installation If this equi...

Страница 5: ...RMATION MAY BE OBTAINED FROM MPEG LA L L C SEE HTTP WWW MPEGLA COM MPEG 4 Visual Patent Portfolio License THIS PRODUCT IS LICENSED UNDER THE MPEG 4 VISUAL PATENT PORTFOLIO LICENSE FOR THE PERSONAL AND NON COMMERCIAL USE OF A CONSUMER FOR i ENCODING VIDEO IN COMPLIANCE WITH THE MPEG 4 VISUAL STANDARD MPEG 4 VIDEO AND OR ii DECODING MPEG 4 VIDEO THAT WAS ENCODED BY A CONSUMER ENGAGED IN A PERSONAL A...

Страница 6: ...tree Overview of Contents This document contains the following chapters Chapter 2 Product Overview introduces the main functions and system requirements of the camera Chapter 3 Installation and Connections provides detailed instructions on installing the camera and connecting wires Chapter 4 Overview of Navigation and Controls introduces how to navigate in the main menu window and operate the cont...

Страница 7: ...rts and Definitions Camera Overview 0 70 18mm 0 62 16mm 4 92 125mm 4 17 106mm 3 25 82 5mm 3 64 92 5mm 4 17 106mm 4 92 125mm Camera Parts and Definitions The dome camera is fully integrated enclosure with camera and lens 1 2 3 4 5 6 ...

Страница 8: ...dry cloth to remove any fingerprints or dust Clean the camera housing with a soft dry cloth For more stubborn stains use a cloth dampened with a small quantity of neutral detergent then wipe dry Caution Do not use volatile solvents such as alcohol benzene or thinners to avoid damaging the surface finish Connector Pin Definition Return to factory default by pressing button for 5 seconds System re s...

Страница 9: ...D Au OUT Audio out GND AL IN Alarm in GND COM Alarm out AL OUT DC12V IP camera can operate on DC12V AC24V AC24V Caution For DC power supply use make sure the popularity is correct to avoid malfunction and or camera change ...

Страница 10: ...arefully before you install and operate the camera Unpack Everything FIXED HD IP DOME CAMERA WARRANTY CARD SAFETY PRECAUTIONS QUICK GUIDE 2 PIN TERMINAL BLOCK for power input 8 PIN TERMINAL BLOCK for alarm input output CD ROM containing INSTRUCTIONS and IP Finder software TEMPLATE mounting template 2 SCREW ANCHORs 2 SCREWs Equipment Required The following tools might help you to complete the insta...

Страница 11: ...e real time clock is initialized event log data in SD card and mail sent by the camera do not show correct time SD card SD card is fragile and not reliable for long term use Our company will not be liable for damages resulting from the use of SD card Frequent back up of data is recommended Data of SD card will be lost by troubles below Electrical or Mechanical Shock to SD card Power off or ejectin...

Страница 12: ... fluorescent light To reduce the flicker please select PAL mode if the power is 50Hz or NTSC mode if the power is 60Hz Refer to INSTRUCTIONS 4 Overview of Navigation and Controls Video Type Camera Installation Note All the installation and operations here should conform to your local electricity safety rules Disassembling the Camera Remove the inner liner 3 by pulling it free of the two notches 2 ...

Страница 13: ... AC24V PoE Connect the network cable to the RJ45 terminal using a switch Adjusting the Camera Position The dome camera has three axes for positioning the camera While monitoring the picture on the monitor adjust the camera position as follows Pan Adjustment A For Wall Mount and Tilted Ceilings Rotate the lens base maximum 360 until you are satisfied with the field of view Horizontal Rotation B Rot...

Страница 14: ...focus lever E locking screw Caution Securely retighten the locking screws to prevent loss of adjustment Mounting the Camera Place the mounting template supplied on the mounting surface and mark the holes Drill two holes and then insert the screw anchors into the holes Take off the camera housing Connect the Safety Wire fall prevention wire not supplied to the ceiling Secure the camera bottom case ...

Страница 15: ...as possible within the permissible range of the mounting length The wire should be strong enough to withstand the total weight of this product Pay also attention to the finishing at the end of the wire Caution Must be isolated camera and the wall ceiling which are connected by the Safety Wire Fall Prevention Wire Note Depending on the material of your mounting surface you may require different scr...

Страница 16: ...a Use soft lint free cloth to wipe the dome cover clean and remove fingerprints Attach the inner liner and camera housing Turn the power on after you have installed the camera Safety Wire Fall Prevention Wire not supplied ...

Страница 17: ...r equivalent AMD Memory 1G or above Display adapter Support DirectX9 for example NVIDIA GeForce 6 Series above ATI Mobility Radeon 9500 above Power Supply This camera requires a DC12V AC24V PoE power supply Please make sure you use the correct power supply before connecting to the camera Network Connector Please use the RJ45 network connector for connecting the camera to your computer or switch ...

Страница 18: ... an IP address can be assigned automatically from the DHCP server by enabling DHCP in the Network Settings page described later Connecting the Camera to a Personal Computer 1 Connect the network cable to the camera and then turn on the camera s power 2 Set the personal computer s IP address The camera s default IP address is 192 168 0 2 and sub mask is 255 255 255 0 3 Check that the camera and com...

Страница 19: ... tab click LAN settings button and set proxy server c Change Security in Internet options as shown below On tool menu click Internet Option Press the Security tab If the camera operates inside the Intranet click the Intranet icon If the camera operates on the Internet click the Internet icon Click Custom Level This will open the Security Settings Internet Zone screen Scroll down to the ActiveX con...

Страница 20: ...19 ...

Страница 21: ...ty Custom level Modify the configuration of IE s security setting as follow Download signed ActiveX controls Prompt recommended Download unsigned ActiveX controls Prompt Initialize and script ActiveX not marked as safe for scripting Prompt ...

Страница 22: ... ActiveX controls Enable Run ActiveX controls and plug ins Enable Script ActiveX controls marked safe for scripting Enable 6 Type your setting IP address into the browser 7 Then you should be able to see the camera image screen ...

Страница 23: ...In get audio and output from PC This menu is appeared by setting of Audio Audio Out send audio and output from camera This menu is appeared by setting of Audio Size 1 1 Encoder No 1 Three streams are available for selection among H 264 MPEG 4 and MJPEG by setting of Encoder No 1 Encoder No 2 This menu is appeared by setting of Encoder No 2 Live View Note Keep the zoom level of IE as 100 to display...

Страница 24: ...23 Image Parameters You can setup Basic Setting Image Compression Alarm FTP E mail SD Recording and Audio for your network IP camera by clicking on network setting on setting menu Basic Figure 4 1 Basic ...

Страница 25: ...controls shutter speed for automatic exposure Level Set Automatic Exposure target from 1 to10 This function is working on AES mode Day Night Settings Set DAY NIGHT function Move the cursor to select the Auto Color or BW mode If selected Color mode you can force the camera to stay in DAY COLOR mode at all day If selected BW mode you can force the camera to stay in BW NIGHT mode at all day Figure 4 ...

Страница 26: ...ment Contrast Saturation Shutter Speed Figure 4 5 Shutter Speed Set desired Shutter Speed from 1 25s to 1 10000s When video type is PAL the Shutter Speed can be set at 1 25 1 50 1 100 1 120 1 150 1 200 1 300 1 500 1 750 1 1500 1 5000 and 1 10000s When video type is NTSC the Shutter Speed can be set at 1 30 1 60 1 100 1 120 1 150 1 200 1 300 1 500 1 750 1 1500 1 5000 and 1 10000s Manual Gain Set Ma...

Страница 27: ...manual gain value of R Gain B Gain GR Gain GB Gain and D Gain from 0 to 255 This function is applied for manual lens only The red R gain is used to adjust the red color of the viewing image It allows adjusting red gain manually according to user requirement ranging from 0 to 255 The blue B gain is used to adjust the blue color of the viewing image It allows adjusting blue gain manually according t...

Страница 28: ...timum image level Due to the intense light coming from the back of objects in the area expected to view areas desired to see become dark and invisible Therefore this function is essential Picture Figure 4 12 Picture Picture Flip Set image to be upside or down Select ON or OFF to activate or deactivate the flip function Picture Mirror Set image to be left or right Select ON or OFF to activate or de...

Страница 29: ...t to the Web Client from the camera has a number of settings that can be edited which affects the video as it s displayed in the Web Client The Compression Settings view enables you to configure settings such as Resolution Frame Rate and Picture Quality Besides the network camera supports dual streams for display and storage should be configured separately 1 The user interface of Encoder No 1 is a...

Страница 30: ...d PAL H 264 single stream 1080P 720P D1 4CIF CIF VGA QVGA max 25fps MPEG4 MJPEG VGA QVGA max 25fps NTSC H 264 single stream 1080P 720P D1 4CIF CIF VGA QVGA 30fps MPEG4 MJPEG VGA QVGA max 30fps Rate control mode Variable bit rate Choose the Bit Rate control selection based on user requirements Constant bit rate Compression Ratio Customized mode Low Mid low Standard Mid high High Low this setting pr...

Страница 31: ... the maximum GOP 1 30 Select the GOP Group of pictures number from 1 to 30 If the number is bigger recovery of the lost frames will be more difficult If the number is smaller it will increase the bite rate obviously and aggravate the network loading The default value is 30 GOP will be differed by fps setting The maximum GOP is differed by Bit Rate setting Profile Baseline High Profile Selectable H...

Страница 32: ...31 2 The user interface of Encoder No 2 is as follows Figure 4 14 Encoder No 2 ...

Страница 33: ...Encoder No 2 D1 4CIF CIF Frame Rate PAL 1 25 NTSC 1 30 The frame rate that is displayed per second PAL H 264 MJPEG MPEG 4 D1 QVGA max 25fps NTSC H 264 MJPEG MPEG 4 D1 QVGA max 30fps Rate control mode variable bit rate Choose the Bit Rate control selection based on user requirements constant bit rate Compression Ratio Customized mode Low Mid low Standard Mid high High Low this setting produces high...

Страница 34: ...ore difficult If the number is smaller it will increase the bite rate obviously and aggravate the network load The default value is 30 GOP will be differed by fps setting The maximum GOP is differed by Bit Rate setting Profile Baseline High Profile Selectable H 264 only Note Please click the Save button to save your settings You can also click the left button Reset to Default to set all the data a...

Страница 35: ...34 Table 4 3 Compression correlations of resolution and stream ...

Страница 36: ... 256K OK OK OK OK OK Bit Rate vs Frame Rate Resolution D1 Bit Rate Frame rate 5 4 3 2 1 4M OK OK N A N A N A 3M OK OK N A N A N A 2M OK OK OK OK OK 1M OK OK OK OK OK 512K OK OK OK OK OK 256K OK OK OK OK OK When choosing VBR some conditions will be disabled based on different resolution setting Quality value vs Frame Rate Resolution 1080p 720p Quality value Frame rate 5 4 3 2 1 q 17 OK N A N A N A ...

Страница 37: ... to start mask setting Use mouse to drag a mask rectangle on the screen click OK to complete the selection Click Save to enable the mask setting Figure 4 15 Mask Zone Note Max 4 masks can be set on the screen The maximum size of a mask is 15 of the screen ...

Страница 38: ...n Settings This function is designed to record video when the camera detects a motion Figure 4 17 Motion Detection Settings Motion Detection Users can choose to use this function or not by selecting ON or OFF Area Set the area you want to trigger motion detection when there is something moving in your selected area Sensitivity Users can choose different levels of sensitivity which are 1 100 Object...

Страница 39: ...Default to set all the data and options as defaults SD Recording Confined SD recording priority alarm motion network loss This function is designed for storing video on the SD card Insert SD memory card before power on One stream of camera must be selected MPEG4 or H 264 Otherwise SD recording function will be set OFF automatically Figure 4 20 SD Recording ...

Страница 40: ...r No 2 are H 264 the stream will choose the Encoder No 2 as recording source If Encoder No 1 is 1080P or 720P SD recording can be enabled only when user choose the following 5 combinations NO Encoder No 1 Encoder No 2 1 H 264 1080p No streaming 2 H 264 720p H 264 D1 3 H 264 720p H 264 QVGA 4 H 264 720p No streaming 5 MPEG4 720p No streaming Notes of SD memory card FAT32 format is available After s...

Страница 41: ...ings Figure 4 23 Email Server Settings Select an authentication type 1 No Authentication no restrict rule 2 SMTP Simple Mail Transfer Protocol SMTP is an Internet standard for electronic mail E mail transmission across Internet Protocol IP networks 3 PLAIN PLAIN is the name of a registered SASL authentication mechanism which serves as a parameter to the AUTH command The PLAIN authentication mechan...

Страница 42: ...word Input your E mail account password Password Confirm Confirm your E mail password Administrator E mail Address Input the E mail address which you want the email to be sent to Press save test E mail button to save your setting and to test your E mail setting Figure 4 25 Email Information Mail to This function is designed to send multiple users when the alarm in or motion detection function is s...

Страница 43: ...tions as defaults Audio You can set up your audio setting by enabling audio input and output Figure 4 27 Audio Settings Audio Input Audio Input Set to ON when receiving audio from a Line in connected to the camera Audio Input Level Select among High Mid and Low Figure 4 28 Audio Input Audio Output Audio Output Set to ON when delivering audio as Line out to a speaker with amp connected to the camer...

Страница 44: ...l the data and options as defaults Caution When enabled audio output to ON there are audio issue of the sound is disconnected under a few part of Windows 7 environments In order to solve audio issue we suggest to you change a driver settings as follows 1 Jumbo Frame Set to Disable 2 Large Send Offload IPv4 Set to Disable ...

Страница 45: ...ame as above Live Stream Protocol This is used by Live View Users can select TCP or Http protocol Port Port This is Http port number of WEB server in the camera When Http is selected for Live Stream Protocol Live View also uses the port number We recommend using the default port if you need to change the default port please contact your system administrator Options 1025 to 65535 80 is the default ...

Страница 46: ... FTP function Enter a password associated with a login ID Re enter the password to confirm it Determine the number of maximum connections by selecting a number from the drop down list in the Max Simultaneous Connections field Note This parameter is the max of FTP Client connections not the max of IE Window s connections Enter ftp Login ID Password ip address in Windows Explorer then you will find ...

Страница 47: ...46 RTSP Authentication You should enter the Login ID Password and Password confirm if select ON Figure 4 32 Authentication Encoder No 1 Encoder No 2 Figure 4 33 Encoder No 1 Encoder No 2 ...

Страница 48: ... Gateway on Network setting Https Figure 4 34 Certificate File Upload Users can upload certificate here Click Browse it will pop out a window then you can choose the file that you want to upload ONVIF Figure 4 35 ONVIF There re 2 ONVIF Modes for your selection Standard or Genetec Omnicast 4 8 SR2 SR3 Admin Function Administrator Press the item Administrator Function on setting menu You can setup s...

Страница 49: ...strator guests can access the camera under authorization from system administrator by ID and password controller However User1 5 are allowed to review the live picture only Without authorization any operation will be forbidden The default guest s login name and password are user and jvc Enter a guest s User ID in the User ID field Enter a password associated with a guest s User ID Re enter the pas...

Страница 50: ...ate and Time by NTP Server 1 Time Zone Select the time zone where your camera is located 2 NTP Server Select NTP in the Synchronization Mode If NTP is selected the date and time will be synchronized by the NTP server Note Please make sure disable SD recording function before you enable NTP synchronization mode 3 Time Adjustment Period Users can choose time adjustment intervals 4 Finally click Save...

Страница 51: ...s will shut down during firmware update Close any other screens before starting a firmware update Never disconnect power and LAN cable during the firmware update process Rebooting the camera after firmware update may take approx 15 minutes After you finish FW update please reboot your computer first time Be careful power can t be shut down when you re updating firmware Otherwise it will cause FW u...

Страница 52: ...Configuration Settings Export Configuration Settings This function is designed to export configuration settings to the client computer Figure 4 46 Export Configuration Settings Set to Factory Default This function is designed to reset all configuration settings into factory default Figure 4 47 Set to Factory Default Network Camera Reboot This function is designed to reboot the camera Figure 4 48 N...

Страница 53: ...tons to display the desired logbooks or to delete all logs Figure 4 49 Log Browse This window is sample Information FW version and MAC address will be shown Figure 4 50 FW version and MAC address The displayed numbers are sample ...

Страница 54: ...e software which is developed by or for JVC KENWOOD Corporation 2 the software which is licensed under the below GNU GENERAL PUBLIC LICENSE Version 2 0 GPLv2 0 GNU LESSER GENERAL PUBLIC LICENSE Version 2 1 LGPLv2 1 Also this product includes 3 The software uses libraries from the FFmpeg project under the LGPLv2 1 4 This product includes software developed by the University of California Berkeley a...

Страница 55: ...lmco com GPSVME fixes 6 7 Karl Berry karl owl HQ ileaf com syslog to file option 7 8 Greg Brackley greg brackley bigfoot com Major rework of WINNT port Clean up recvbuf and iosignal code into separate modules 8 9 Marc Brett Marc Brett westgeo com Magnavox GPS clock driver 9 10 Piete Brooks Piete Brooks cl cam ac uk MSF clock driver Trimble PARSE support 10 11 Nelson B Bolyard nelson bolyard me upd...

Страница 56: ...l ntp org Bancomm refclock and config parse code maintenance 43 47 Rainer Pruy Rainer Pruy informatik uni erlangen de monitoring trap scripts statistics file handling 44 48 Dirce Richards dirce zk3 dec com Digital UNIX V4 0 port 45 49 Wilfredo S 嫕 chez wsanchez apple com added support for NetInfo 46 50 Nick Sayer mrapple quack kfu com SunOS streams modules 47 51 Jack Sasportas jack innovativeinter...

Страница 57: ... of the OpenSSL Project 6 Redistributions of any form whatsoever must retain the following acknowledgment This product includes software developed by the OpenSSL Project for use in the OpenSSL Toolkit http www openssl org THIS SOFTWARE IS PROVIDED BY THE OpenSSL PROJECT AS IS AND ANY EXPRESSED OR IMPLIED WARRANTIES INCLUDING BUT NOT LIMITED TO THE IMPLIED WARRANTIES OF MERCHANTABILITY AND FITNESS ...

Страница 58: ...the routines from the library being used are not cryptographic related 4 If you include any Windows specific code or a derivative thereof from the apps directory application code you must include an acknowledgement This product includes software written by Tim Hudson tjh cryptsoft com THIS SOFTWARE IS PROVIDED BY ERIC YOUNG AS IS AND ANY EXPRESS OR IMPLIED WARRANTIES INCLUDING BUT NOT LIMITED TO T...

Страница 59: ...g This program is released under the GPL with the additional exemption that compiling linking and or using OpenSSL is allowed A commercial use license is available from Genivia Inc contact genivia com SOFTWARE LICENSE AGREEMENT The software embedded in the Product hereinafter the Licensed Software provided by JVC KENWOOD Corporation is copyrighted to or sublicensable by JVC KENWOOD Corporation and...

Страница 60: ...rt 3 The use of the Licensed Software shall be limited to personal purpose and the Licensed Software shall not be distributed licensed or sub licensed whether it is for commercial purpose or not 4 The User shall use the Licensed Software according to the directions described in the operation manual or help file and is prohibited to use or duplicate any data in a manner violating the Copyright Law ...

Страница 61: ...ntee for the merchantability convertibility and consistency with certain objective of the Licensed Software Article 6 Liability to Third Party If any dispute has arisen with any third party due to an infringement upon a copyright patent or any other intellectual property right that was caused by the User s use of the Licensed Software the User shall settle such dispute at its own cost and hold JVC...

Страница 62: ...guity or question raised in the construction of this Agreement shall be provided or settled upon good faith consultation between JVC KENWOOD Corporation and the User 3 JVC KENWOOD Corporation and the User hereby agree that this Agreement is governed by the laws of Japan and any dispute arising from and relating to the rights and obligations under this Agreement shall be submitted to the exclusive ...

Страница 63: ...uto Gain Control Off On selectable Auto Iris Control AES Automatic Electric Shutter White Balance ATW 2800K 8500K and Manual Electric Shutter PAL 1 25 1 10000 sec NTSC 1 30 1 10000 sec Noise Reduction Yes 3 Axis Gimbals Yes Motion detection Yes Lens Type 1 3 type 3 9 mm F 1 2 BLC Yes Audio Line in out Alarm 1 in 1 out Alarm out spec 0 5 A AC 120 V max ...

Страница 64: ...ps NTSC Up to 30 fps Security Multiple user access levels with password protection Users 1 Administrator 5 users Video Access from Web Browser Full control of all camera settings available to administrator Minimum Web Browsing Requirements Windows XP or Windows 7 as OS Internet Explorer Version 6 0 9 0 CPU Intel Pentium 4 2 4 GHz or equivalent AMD Memory 1 GB or above Network interface RJ 45 100BA...

Страница 65: ...550 mA Mechanical Dimension Ø 125 mm x 106 mm Weight 490 g Connectors Power Input removable terminal block Network RJ45 connector Audio In out removable terminal block Alarm In out removable terminal block Environmental Operating Temperature 10 C to 50 C Operating Humidity 20 to 90 without condensation Storage Temperature 20 C to 60 C ...

Отзывы: