1-11
UX-V30
<<Cassette Mechanism Section>>
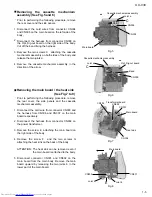
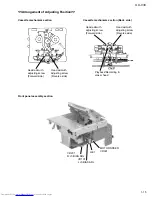
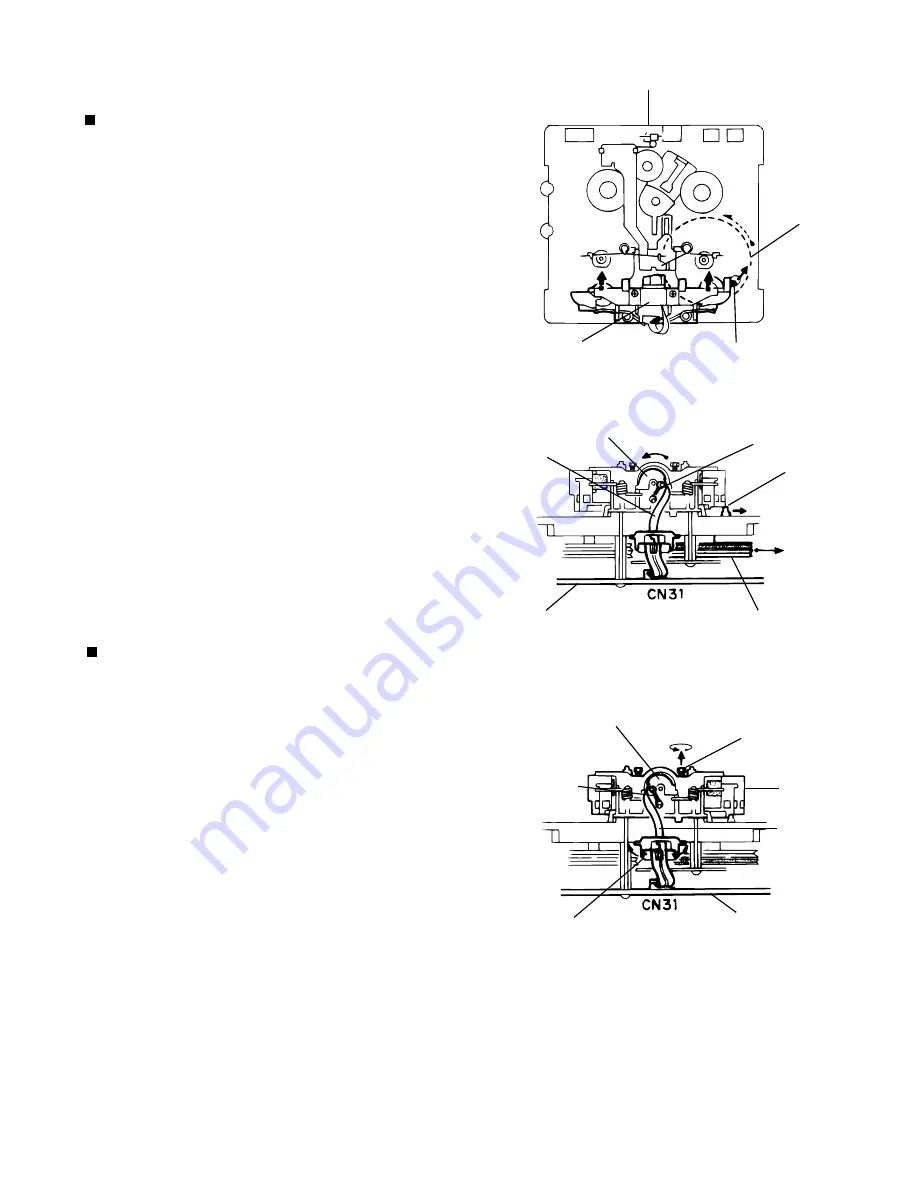
Removing the Playback/Recording & Eraser
Head ( See Figs. 1 and 2 )
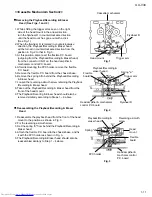
1. While shifting the trigger arms seen on the right
side of the head mount in the arrow direction,
turn the flywheel R in counterclockwise direction
until the head mount has gone out with a click
(See Fig. 1).
2. When the flywheel R is rotated in counterclockwise
direction, the Playback/Recording & Eraser head
will be turned in counterclockwise direction from the
position in Fig. 2 to that in Fig. 3.
3. At this position, disconnect the flexible P.C. board
(outgoing from the Playback/Recording & Eraser head)
from the connector CN31 on the head amplifier &
mechanism control P.C. board.
4. After dismounting the FPC holder, remove the flexible
P.C. board.
5. Remove the flexible P.C. board from the chassis base.
6. Remove the spring Afro behind the Playback/Recording
& Eraser head.
7. Loosen the reversing azimuth screw retaining the Playback
/Recording & Eraser head.
8. Take out the Playback/Recording & Eraser head from the
front of the head mount.
9. The Playback/Recoring & Eraser head should also be
removed similarly according to Steps 1 ~ 8 above.
Reassembling the Playback/Recording & Eraser
Head
1. Reassemble the playback head from the front of the head
mount to the position as shown in Fig. 3.
2. Fix the reversing azimuth screw.
3. Set the spring "a" from behind the Playback/Recording &
Eraser head.
4. Attach the flexible P.C. board to the chassis base, and fix
it with the FPC holder as shown in Fig. 3.
5. The Playback/Recording & Eraser head should also be
reassembled similarly to Step 1 ~ 4 above.
Cassette mechanism
Flywheel R
Trigger arm
Head mount
Fig. 1
Fig. 2
Playback/Recording &
eraser hyead
Frexible
board
Spring "a"
Trigger arm
Head amplifier & mechanism
control P.C. board
Flywheel R
Fig. 3
Playback/Recording &
eraser head
Reversing azimuth
screw
Head
mount
Frexible
board
Spring "a"
FPC holder
Head amplifier &
mechanis control
P.C. board
Содержание UX-V30
Страница 31: ...1 31 UX V30 LC75342 ...
Страница 34: ...1 34 UX V30 MEMO ...
Страница 35: ...2 1 UX V30 I H A B C D E F G 1 2 3 4 5 6 Block diagram ...
Страница 39: ...2 5 UX V30 I H A B C D E F G 1 2 3 4 5 6 Tuner circuit UX V30 FM TUNER MAIN SIGNAL AM SIGNAL ...
Страница 42: ...2 8 I H A B C D E F G 1 2 3 4 5 6 UX V30 UX V30 Printed circuit boards Main board ...
Страница 43: ...2 9 UX V30 I H A B C D E F G 1 2 3 4 5 6 Micon P C board ...
Страница 44: ...2 10 I H A B C D E F G 1 2 3 4 5 6 UX V30 UX V30 CD board ...
Страница 45: ...2 11 UX V30 I H A B C D E F G 1 2 3 4 5 6 Tuner P W B ...
Страница 46: ...2 12 I H A B C D E F G 1 2 3 4 5 6 UX V30 UX V30 MEMO ...
Страница 48: ...UX V30 3 2 MEMO ...


