background image

15

English

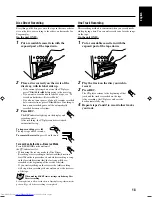
Prohibiting Disc Ejection—Tray Lock

You can lock the disc tray and prohibit to eject the disc.
• This is possible only while the unit is turned on.

On the unit ONLY:

To prohibit disc ejection,

 press 

 (standby/on)

while holding 

7

. (If the disc tray is opened, close

it first.)
“LOCKED” appears for a while, and the disc
tray is locked.

To cancel the prohibition and unlock the
disc,

 press 

 (standby/on) while holding 

7

.

“UNLOCKED” appears for a while, and the
disc tray is unlocked.

If you try to eject the disc

“LOCKED” appears to inform you that the disc tray is locked.

REPEAT

ALL

Canceled

Playing at Random—Random Play

The tracks will play in no particular order when you use this
mode.

On the remote control ONLY:

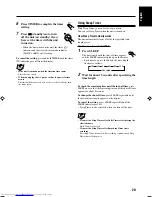
To use Random play mode,

 press RANDOM

before or during playing.
The RANDOM indicator lights up on the display.

The tracks are played at random.
Random play ends when all the tracks are played once.

To skip the current track,

 press 

¢

 or MULTI KEY >.

• You cannot go back to the previous track by pressing 

4

or MULTI KEY <.

To stop playing,

 press 

7

.

• Random play mode is also canceled.

To exit from Random play mode,

 press RANDOM again

before or during playing. Random play mode is canceled and
Normal play resumes.

Repeating Tracks—Repeat Play

You can have all the tracks, the program or individual track
currently playing to repeat as many times as you like.

On the remote control ONLY:

To repeat playing,

 press REPEAT before or

during playing.
• Each time you press the button, Repeat play

mode changes as follows, and the following
indicator lights up on the display:

:

Repeats one track.

ALL

:

In Normal play mode, repeat all the tracks.
In Program play mode, repeat all the tracks in
the program.
In Random play mode, repeats all the tracks in
random order.

To stop playing,

 press 

7

.

To cancel Repeat play,

 press REPEAT repeatedly until the

repeat indicator goes off from the display.
• In Random play 

 cannot be selected. If 

 is selected

when you press RANDOM, it is canceled (goes off).

• Repeat mode remains in effect even when you change the

play mode.

RANDOM

RANDOM

7

STANDBY

7

STANDBY

EN13-16_UX-P30[UW]f.pm6

03.6.4, 6:54 PM

15

Содержание UX-P30

Страница 1: ...UÇÕES CA UXP30 SLEEP STANDBY ON AUX FM AM TAPE CD DISPLAY REPEAT RANDOM PROG FM MODE AUTO PRESET SOUND MODE CD CANCEL MULTI KEY SET RM SUXP3U REMOTE CONTROL VOLUME AHB PRO VOLUME M I C R O C O M P O N E N T S Y S T E M U X P 3 0 STANDBY CLOCK TIMER CD 3 8 TAPE 2 3 FM AM AUX 4 7 PHONES REV MODE AHB PRO SOUND REC C D R R W P L A Y B A C K SP UXP30 SP UXP30 English Español Português ...

Страница 2: ... espera encendido Desconectar el cable de alimentación para desactivar la alimentación totalmente Cualquier que sea la posición de ajuste del interruptor en espera encendido la alimentación no es cortada completamente La alimentación puede ser controlada remotamente PRECAUÇÃO Botão standby on Desconectar o cabo de alimentação para desligar a alimentação por completo Qualquer que seja a posição de ...

Страница 3: ...ente los reglamentos o las leyes locales sobre disposición de las pilas No utilice este aparato en el cuarto de baño o en lugares donde hay agua Tampoco coloque ningún recipiente que contenga agua u otros líquidos frascos de cosméticos o medicinas floreros macetas vasos etc encima de este aparato PRECAUCIÓN Para reducir riesgos de choques eléctricos incendio etc 1 No extraiga los tornillos los cub...

Страница 4: ... aparato del modo siguiente 1 Parte delantera No ponga nada delante deje el espacio libre 2 Laterales parte superior parte trasera No se debería colocar nada en las áreas y las distancias que se detallan a continuación 3 Parte inferior Coloque el aparato sobre una superficie recta Debe haber buena circulación de aire para ello coloque el aparato sobre una base a una altura mínima de 10 cm Precauçã...

Страница 5: ...ärren är urkopplad Betrakta ej strålen s 1 PRODUCTO LASER CLASE 1 2 PRECAUCIÓN No abra la tapa superior En el interior de la unidad no existen piezas reparables por el usuario deje todo servicio técnico en manos de personal calificado 3 PRECAUCIÓN En el interior hay radiación láser invisible Evite el contacto directo con el haz 4 REPRODUCCIÓN DE ETIQUETAS ETIQUETA DE ADVERTENCIA PEGADA EN EL INTER...

Страница 6: ...between the unit and the TV Keep the speakers away from the TV to avoid interference with TV DO NOT install the unit in a location near heat sources or in a place subject to direct sunlight excessive dust or vibration We would like to thank you for purchasing one of our JVC products Before operating this unit read this manual carefully and thoroughly to obtain the best possible performance from yo...

Страница 7: ...nd 10 Selecting the Sound Modes 10 Listening to FM and AM Broadcasts 11 Tuning in a Station 11 Presetting Stations 11 Tuning in a Preset Station 12 Playing Back Discs CD CD R CD RW 13 Playing Back the Entire Disc Normal Play 13 Basic Disc Operations 14 Programming the Playing Order of the Tracks Program Play 14 Playing at Random Random Play 15 Repeating Tracks Repeat Play 15 Prohibiting Disc Eject...

Страница 8: ...0 STANDBY CLOCK TIMER CD 3 8 TAPE 2 3 FM AM AUX 4 7 PHONES REV MODE AHB PRO SOUND REC C D R R W P L A Y B A C K 1 2 3 5 4 6 7 8 9 e r t y u i w q p Location of the Buttons and Controls Become familiar with the buttons and controls on your unit Front Panel Front Panel ...

Страница 9: ...rch y cassette holder open portion 16 18 u REV MODE reverse mode button 16 18 i REC recording button 17 18 Display Window PRGM CLOCK RANDOM DAILY REC SLEEP REC ALL BASS SOUND MONOST 5 4 6 8 9 1 2 3 7 Display Window 1 Tape operation indicators 2 3 tape direction and reverse mode 2 Timer indicators timer DAILY Daily Timer REC Recording Timer and SLEEP Sleep Timer 3 REC indicator 4 CLOCK indicator 5 ...

Страница 10: ... turns on the unit y FM AM button 10 11 12 Pressing this button also turns on the unit u TAPE 2 3 play button 10 16 Pressing this button also turns on the unit i FM MODE button 11 o forward search button 11 14 16 SET button 12 14 a MULTI KEY buttons 12 14 15 s VOLUME buttons 10 SLEEP STANDBY ON AUX FM AM TAPE CD DISPLAY REPEAT RANDOM PROG FM MODE AUTO PRESET SOUND MODE CD CANCEL MULTI KEY SET RM S...

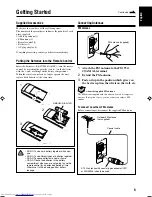
Страница 11: ...xpose batteries to heat or flame DO NOT leave the batteries in the battery compartment when you are not going to use the remote control for an extended period of time Otherwise it will be damaged from battery leakage R6 SUM 3 AA 15F 2 1 Attach the FM antenna to the FM 75 Ω COAXIAL terminal 2 Extend the FM antenna 3 Fasten it up in the position which gives you the best reception then fix it on the ...

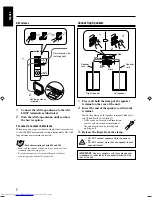
Страница 12: ...antenna Vinyl covered wire not supplied AM loop antenna supplied Connecting Speakers Right speaker Left speaker Black Red 1 Press and hold the clamp of the speaker terminal on the rear of the unit 2 Insert the end of the speaker cord into the terminal Match the polarity of the speaker terminals Red ª to red ª and black to black If the cords are covered with insulation remove a short section of ins...

Страница 13: ...sing audio cords not supplied Adjusting the Voltage Selector Before plugging in the unit set the correct voltage for your area with the voltage selector on the rear of the unit VOLTAGE SELECTOR 110V 127V 230V 220V Voltage mark Use a screwdriver to rotate the voltage selector so the voltage number the voltage mark is pointing at is the same as the voltage where you are plugging in the unit See the ...

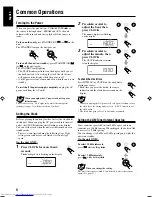
Страница 14: ...de There is a time limit in doing the following steps If the setting is canceled before you finish start from step 1 again On the unit ONLY 1 Press CLOCK for more than 2 seconds The hour digits start flashing on the display 2 Press or 4 to adjust the hour then press CLOCK The minute digits start flashing on the display 3 Press or 4 to adjust the minute then press CLOCK The CLOCK indicator remains ...

Страница 15: ...re Good for acoustic music FLAT The sound mode is canceled The SOUND indicator goes off Selecting the Sources and Starting Play To play back CDs press CD 3 8 See pages 13 15 To play back tapes press TAPE 2 3 See page 16 To listen to the FM AM broadcasts press FM AM See pages 11 12 To select the external equipment as the source press AUX Adjusting the Volume You can adjust the volume level only whi...

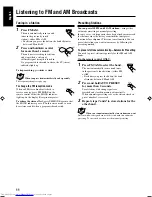
Страница 16: ... 30 FM and 15 AM stations using either automatic presetting or manual presetting In some cases test frequencies have been already memorized for the tuner since the factory examined the tuner preset function before shipment This is not a malfunction You can preset the stations you want into memory by following the presetting method To preset stations automatically Automatic Presetting You need to p...

Страница 17: ...ollowing steps If the setting is canceled before you finish start from step 2 again On the remote control ONLY 1 Tune in the station you want to preset See Tuning in a Station on page 11 2 Press SET 3 Press MULTI KEY or MULTI KEY to select a preset number 4 Press SET again The tuned station in step 1 is stored in the preset number selected in step 3 Storing a new station on a used number erases th...

Страница 18: ...istics damage or stain on them or if the player s lens is dirty CD RWs may require a longer readout time This is caused by the fact that the reflectance of CD RWs is lower than for regular CDs Playing Back the Entire Disc Normal Play 1 Press CD 0 or 0 on the unit The unit automatically turns on and the disc tray comes out 2 Place a disc correctly on the circle of the disc tray with its label side ...

Страница 19: ...stored in memory the program is called up 3 Press MULTI KEY or MULTI KEY to select the track number then press SET 4 Repeat step 3 to program other tracks you want 5 Press CD 3 8 The tracks are played in the order you have programed To stop playing press 7 To exit from Program play mode press 7 before or after playing The PRGM program indicator goes off All the programed tracks will be cleared Dis...

Страница 20: ... press or MULTI KEY You cannot go back to the previous track by pressing 4 or MULTI KEY To stop playing press 7 Random play mode is also canceled To exit from Random play mode press RANDOM again before or during playing Random play mode is canceled and Normal play resumes Repeating Tracks Repeat Play You can have all the tracks the program or individual track currently playing to repeat as many ti...

Страница 21: ...not running The tape direction indicator 3 or 2 starts flashing quickly on the display To remove the cassette press on the unit To play both sides Reverse Mode You can set the deck to play just one side of a tape both sides once or both sides continuously On the unit ONLY Press REV MODE Each time you press the button reverse mode changes as follows The deck automatically stops after playing both s...

Страница 22: ...ected by the VOLUME AHB Active Hyper Bass PRO and SOUND MODE settings Thus during recording you can adjust the sound you are actually listening to without affecting the recording level If recordings you have made have excessive noise or static the unit may be too close to a TV Increase the distance between the TV and the unit You can use type I tapes for recording To protect your recording Cassett...

Страница 23: ...ODE on the unit until the indicator is lit When using the reverse mode for Disc Direct Recording start recording in the forward 3 direction first When the tape reaches its end while recording a song in the forward direction 3 the last song will be re recorded at the beginning of the reverse side 2 If you start recording on the reverse side 2 recording will stop when recording is done only on one s...

Страница 24: ...sh start from step 1 again On the unit ONLY 1 Press and hold TIMER for more than 3 seconds The timer indicator lights up and the timer mode indicator DAILY or REC and the current on time flash on the display The unit enters on time setting mode 2 Set the on time you want the unit to turn on at 1 Press or 4 to set the hour then press TIMER 2 Press or 4 to set the minute then press TIMER The unit en...

Страница 25: ...The unit automatically turns off after the specified time length passes On the remote control ONLY 1 Press SLEEP The time length until the shut off time appears and the SLEEP indicator lights up on the display Each time you press the button the time length changes as follows 2 Wait for about 5 seconds after specifying the time length To check the remaining time until the shut off time press SLEEP ...

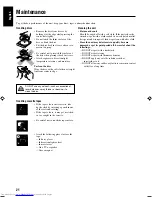
Страница 26: ...ng Be careful not to scratch the surface of the disc when placing it back in its case Avoid exposure to direct sunlight temperature extremes and moisture To clean the disc Wipe the disc with a soft cloth in a straight line from center to edge DO NOT use any solvent such as conventional record cleaner spray thinner or benzine to clean the disc Cleaning the unit Stains on the unit Should be wiped of...

Страница 27: ...ons and make corrections See pages 6 to 8 Disconnect the headphones Reconnect the antennas correctly and securely Change the position and direction of the AM loop antenna Extend the FM antenna at the best position Plug the AC power cord Place the disc with the label side up Clean or replace the disc See page 21 Turn on the unit Cover the holes with adhesive tape Unplug the AC power cord and then p...

Страница 28: ...tage selector switch provided on the outside of this equipment and if different reset the voltage selector switch to prevent from a damage or risk of fire electric shock IMPORTANTE para la línea de la red CA ANTES DE ENCHUFAR EL EQUIPO compruebe si la tensión de la línea de la red CA corresponde con la posición del selector de tensión situado en la parte exterior del equipo y si es diferente reaju...

Отзывы: