background image

9

English

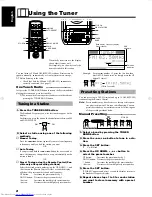
To cancel the presetting,

 press the CANCEL button in step 

3 or 4.

To change the preset stations,

 repeat the same steps as 

above.

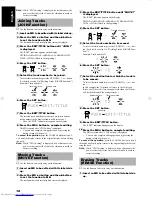
Auto Presetting

——————————

In each band, you can automatically preset FM-30, AM (MW/LW)-
15 stations. Preset numbers will be allocated as stations are found,
starting from the lowest station and moving up the frequency.

1. Select a band by pressing the TUNER 

BAND button.

2. Press the AUTO PRESET button on the 

Remote Control for more than two sec-
onds.

3. Repeat steps 1-2 for the other band.

If you want to change the preset stations, carry out the Manual 
Presetting for the desired preset numbers.

CAUTION: If the System is unplugged or if a pow-
er failure occurs, the preset stations will be 
erased after about 24 hours. If this happens, you 
will need to preset the stations again.

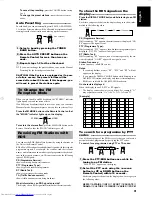
When you are tuned in an FM broadcast, the "STEREO" indicator
lights up and you can hear stereo effects. 
If an FM stereo broadcast is hard to receive or noisy, you can select
Monaural mode. Reception improves, but you lose any stereo effect.

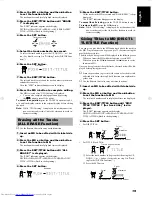
Press the FM MODE button on the Remote Control so that 
the "MONO" indicator lights up on the display.

To restore the stereo effect,

 press the FM MODE button on the

Remote Control so that the "MONO" indicator goes off.

<RXýFDQýXVHýWKHý5'6ýõ5DGLRý'DWDý6\VWHPôýE\ýXVLQJýWKHýEXWWRQVýRQ

WKHý8QLWýRUýWKHý5HPRWHý&RQWUROï

5'6ýDOORZVý)0ýVWDWLRQVýWRýVHQGýDGGLWLRQDOýVLJQDOVýZLWKýWKHLUýUHJXODU

SURJUDPPHý VLJQDOVïý )RUý H[DPSOHñý WKHý VWDWLRQVý VHQGý WKHLUý VWDWLRQ

QDPHVñýDQGýLQIRUPDWLRQýDERXWýZKDWýW\SHýRIýSURJUDPPHVýWKH\ýEURDGð

FDVWñýVXFKýDVýVSRUWVýRUýPXVLFñýHWFïý7KLVýXQLWýFDQýUHFHLYHýWKHýIROORZLQJ

W\SHVýRIý5'6ýVLJQDOVã

PS (Programme Service):

VKRZVýFRPPRQO\ýNQRZQýVWDWLRQýQDPHVï

PTY (Programme Type):

VKRZVýW\SHVýRIýEURDGFDVWýSURJUDPPHVï

RT (Radio Text):

VKRZVýWH[WýPHVVDJHVýWKHýVWDWLRQýVHQGVï

TA (Traffic Announcement):

VKRZVýWUDIILFýDQQRXQFHPHQWVýEHLQJýEURDGFDVWï

What information can RDS signals provide?

7KHýGLVSOD\ýVKRZVý5'6ýVLJQDOýLQIRUPDWLRQýWKDWýWKHýVWDWLRQýVHQGVï

To show the RDS signals on the 
display ————————————————

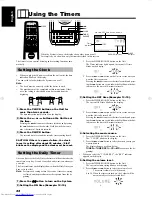
Press the DISPLAY MODE button while listening to an FM
station.

(DFKýWLPHý\RXýSUHVVýWKHýEXWWRQñýWKHýGLVSOD\ýFKDQJHVýWRýVKRZýLQIRUð

PDWLRQýLQýWKHýIROORZLQJýRUGHUã

PS (Programme Service):

:KLOHýVHDUFKLQJñý¦36§ýDSSHDUVñýWKHQýVWDWLRQýQDPHýLVýGLVSOD\HGïý¦12

36§ýDSSHDUVýLIýQRýVLJQDOýLVýVHQWï

PTY (Programme Type):

:KLOHýVHDUFKLQJñý¦37<§ýDSSHDUVñýWKHQýEURDGFDVWýSURJUDPPHýW\SHýLV

GLVSOD\HGïý¦12ýý37<§ýDSSHDUVýLIýQRýVLJQDOýLVýVHQWï

RT (Radio Text):

:KLOHýVHDUFKLQJñý¦57§ýDSSHDUVñýWKHQýDýWH[WýPHVVDJHýVHQWýE\ýWKHýVWDð

WLRQýLVýGLVSOD\HGïý¦12ý57§ýDSSHDUVýLIýQRýVLJQDOýLVýVHQWï

Station Frequency:

6WDWLRQýIUHTXHQF\ýõQRQð5'6ýVHUYLFHô

Notes:

‡ ,IýVHDUFKLQJýILQLVKHVýDWýRQFHñý¦36§ñý¦37<§ýDQGý¦57§ýZLOOýQRW

DSSHDUýRQýWKHýGLVSOD\ï

‡ ,Iý\RXýSUHVVýWKHý',63/$<ý02'(ýEXWWRQýZKLOHýOLVWHQLQJýWRýDQ

$0ýõ0:î/:ôýVWDWLRQñýWKHýGLVSOD\ýRQO\ýVKRZVýVWDWLRQýIUHTXHQF\ï

‡ 5'6ýLVýQRWýDYDLODEOHýIRUý$0ýõ0:î/:ôýEURDGFDVWVï

On characters displayed

:KHQýWKHýGLVSOD\ýVKRZVý36ñý37<ýRUý57ýVLJQDOVã

‡ 7KHý GLVSOD\ý FDQQRWý VKRZý DFFHQWHGý OHWWHUVâý )RUý H[DPSOHñý ¦$§

PD\ýUHSUHVHQWýDFFHQWHGý¦$©V§ýOLNHý¦·ñýµñý ñýŸñýbýDQGýc§ï

[Example]

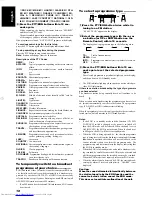
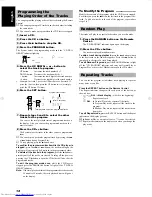
To search for a programme by PTY 
codes ————————————————

2QHýRIýWKHýDGYDQWDJHVýRIýWKHý5'6ýVHUYLFHýLVýWKDWý\RXýFDQýORFDWHýD

SDUWLFXODUýNLQGýRIýSURJUDPPHýE\ýVSHFLI\LQJýWKHý37<ýFRGHVï

To search for a programme using PTY or TA codes:

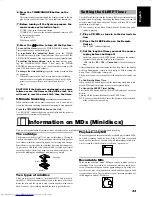
1. Press the PTY/EON button once while lis-

tening to an FM station.

“SELECT PTY” appears on the display.

2. Select the PTY code using the 

4

 or 

¢


button (or UP or DOWN button on the 
Remote Control) within 10 seconds.

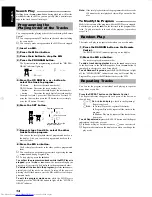
(DFKýWLPHý\RXýSUHVVýWKHýEXWWRQñýWKHýGLVSOD\ýVKRZVýDýFDWHJRU\ýLQ

WKHýIROORZLQJýRUGHUã

NEWS

ý

↔ 

AFFAIRS

ý

↔ 

INFO 

↔ 

SPORT

ý

↔ 

EDUCATE

ý

DRAMA

ý

↔ 

CULTURE

ý

↔ 

SCIENCE

ý

↔ 

VARIED

ý

↔ 

POP M

To Change the FM 
Reception Mode

Receiving FM Stations with 
RDS

TUNER

BAND

AUTO

PRESET

(for 2 seconds)

MONO

STEREO

FM MODE

DISPLAY

MODE

PTY/EON

PTY/EON

UP

MULTI CONTROL

DOWN

Ux-MD9000-e.fm  Page 9  Tuesday, June 23, 1998  9:38 AM

Содержание UX-MD9000R

Страница 1: ...ULTRA MICRO COMPONENT SYSTEM PHONES STANDBY UX MD9000R For Customer Use Enter below the Model No and Serial No which are located either on the rear bot tom or side of the cabinet Retain this information for future reference Model No Serial No INSTRUCTIONS BEDIENUNGSANLEITUNG MANUEL D INSTRUCTIONS GEBRUIKSAANWIJZING MANUAL DE INSTRUCCIONES ISTRUZIONI LVT0053 001B E ULTRA MICRO COMPONENT SYSTEM ULTR...

Страница 2: ...er controlada remotamente Attenzione L interruttore Disinserire la spina del cavo di alimentazione dalla presa della rete elettrica per staccare completamente l alimentazione L interruttore in nessuna posizione stacca la linea di alimentazione elettrica princi pale È possibile il controllo remoto dell alimentazione Per l Italia Si dichiara che il questo prodotto di marca JVC è conforme alle prescr...

Страница 3: ...t toestel als volgt opstellen 1 Voorkant Geen belemmeringen en voldoende ruimte 2 Zijkanten boven onderkant Geen belemmeringen plaatsen in de hieronder aangegeven zones 3 Onderkant Op vlakke ondergrond plaatsen Voldoende ventilatieruimte voorz ien door het toestel op een onderstel met een hoogte van 10 cm of meer te plaatsen Precaucion ventilación correcta Para evitar el riesgo de descargas eléctr...

Страница 4: ...hler hafter oder beschädigter Spre Direkten Kontakt mit dem Strahl vermeiden 3 ACHTUNG Das Gehäuse nicht öffnen Das Gerät enthält keiner lei Teile die vom Benutzer gewartet werden können Überlassen Sie Wartungsarbeiten bitte qualifizierten Kundendienst Fachleu ten 1 PRODUIT LASER CLASSE 1 2 ATTENTION Radiation laser invisible quand l appareil est ouvert ou que le verrouillage est en panne ou désac...

Страница 5: ...ous external units such as a CD player tape deck etc Basic information that is the same for many different functions e g setting the volume is given in the section Common Operations and not repeated under each function The names of buttons controls and display messages are written in all capital letters e g TUNER BAND NO DISC System functions are written with an initial capital letter only e g Nor...

Страница 6: ... battery leakage or explosion Remove batteries when the Remote Control will not be used for a long time When you need to replace the batteries replace both batteries at the same time with new ones Don t use an old battery with a new one Don t use different types of batteries together The Remote Control makes it easy to use many of the functions of the System from a distance of up to 7m 23 feet awa...

Страница 7: ...nd wire going to an outside antenna disconnect the sup plied FM Wire Antenna CAUTION To avoid noise keep antennas away from the System the connecting cord and the AC power cord Connecting the FM Antenna AC IN R OPTICAL DIGITAL IN AUX2 SUB WOOFER OUT L FM wire antenna supplied Coaxial cable FM outdoor antenna Not Supplied Connecting the AM MW LW Antenna AC IN R OPTICAL DIGITAL IN AUX2 SUB WOOFER OU...

Страница 8: ...speaker grilles The speaker grilles can be removed When removing Attaching the speaker grille 1 Insert your fingers at the top and pull towards you 2 Also pull the bottom towards you Connecting a Tape Deck etc Connect not supplied signal cords between the System s LINE IN AUX1 OUT terminals and the output input terminals of the external tape deck etc You can listen to one of these sources Also you...

Страница 9: ...ofer system etc Firmly insert the supplied AC power cord into the AC inlet on the back of the Unit CAUTIONS ONLY USE THE JVC POWER CORD PROVIDED WITH THIS SYSTEM TO AVOID MALFUNCTION OR DAM AGE TO THE SYSTEM BE SURE TO UNPLUG THE POWER CORD FROM THE OUTLET WHEN GOING OUT OR WHEN THE SYS TEM IS NOT IN USE FOR AN EXTENDED PERIOD OF TIME Now you can plug the AC power cord into the wall outlet and you...

Страница 10: ...AND CD MD CD MD OPEN CLOSE TIMER SNOOZE CLOCK UP MULTI CONTROL DOWN U L T R A M ICRO COMPONENT S Y S T E M UX MD9000R REC PAUSE CD SYNCHRO REC UP DOWN EJECT ULTRA MICRO COMPONENT SYSTEM PHONES STANDBY UX MD9000R STANDBY indicator PHONES DIMMER BASS TREBLE VOLUME VOLUME UP DOWN CLOCK CLOCK Minidisc indicator AHB SUPER PRO Turning the System On Press the button The display comes on and the STANDBY i...

Страница 11: ...To cancel the effect press the button again The BASS indicator goes out You can control the tone by changing the bass and treble BASS Control You can adjust the bass level low frequency range level between 6 and 6 0 Flat 1 Press the BASS button on the Remote Con trol 2 Press the UP or DOWN button on the Remote Control to adjust the bass level TREBLE Control You can adjust the treble level high fre...

Страница 12: ...uning If you press and hold the 4 or button for one second or more the frequency changes down or up automatically until a station is found OR Preset Tuning using the Remote Control Pos sible only after presetting stations Select the desired preset number using the UP DOWN and buttons on the Remote Control After 1 second the display will show the preset number s band and frequency UP button Increas...

Страница 13: ... Traffic Announcement VKRZVýWUDIILFýDQQRXQFHPHQWVýEHLQJýEURDGFDVWï What information can RDS signals provide 7KHýGLVSOD ýVKRZVý5 6ýVLJQDOýLQIRUPDWLRQýWKDWýWKHýVWDWLRQýVHQGVï To show the RDS signals on the display Press the DISPLAY MODE button while listening to an FM station DFKýWLPHý RXýSUHVVýWKHýEXWWRQñýWKHýGLVSOD ýFKDQJHVýWRýVKRZýLQIRUð PDWLRQýLQýWKHýIROORZLQJýRUGHUã PS Programme Service KLOHýVH...

Страница 14: ...ýRIý RXUýFKRLFHýõ1 6ñý7 ýRUý 1 2ôýIURPýWKHýFXUUHQWO VHOHFWHGýVWDWLRQñýH FHSWýLIý RXýDUHýOLVWHQLQJýWRýDýQRQð5 6ýVWDWLRQýõDOO 0ýõ0 î ôýVWDWLRQVýRUýVRPHý 0ýVWDWLRQVôï IýDQý 0ýVWDWLRQýGRHVýEURDGFDVWý 21ýLQIRUPDWLRQñý 21ýFDQQRWý EHýDFWLYDWHGï To select a programme type 1 Press the PTY EON button twice while lis tening to an FM station ý 6 7ý 21 ýDSSHDUVýRQýWKHýGLVSOD ï 2 Select the programme type with ...

Страница 15: ...bel side up as shown below 3 Press the CD 0 button again to close the CD holder To close the CD holder and play the CD you can press the CD 38 button You can place an 8 cm 3 CD without an adaptor If the CD cannot be read correctly because it is scratched for example 0 0 00 appears on the display You can insert a CD while listening to the other source To Play a CD 1 Insert a CD 2 Press the CD 38 bu...

Страница 16: ...ce while the CD Player is stopped press the PROGRAM button to light off the CD PRO GRAM indicator Note If the total playback time of the programmed tracks exceeds 99 minutes 59 seconds the total playback time will go out on the display To Modify the Program Modify the contents of the program while the CD Player is stopped Each time you press the 7 button the last track in the program is de leted T...

Страница 17: ... blinks on the display To cancel pause press the same button again Play continues from the point where it was paused Displaying the Disc Title You can display the disc title of the MD during Stop mode If the disc title is not given yet NO TITLE appears During Stop mode press the DISPLAY CHARA button on the Remote Control Each time you press the button the display changes as follow Total track numb...

Страница 18: ...button to eject the MD will also clear the pro grammed tracks To exit the program mode once while the MD Player is stopped press the PROGRAM button to light off the MD PRO GRAM indicator Note If the total playback time of the programmed tracks exceeds 150 minutes the total playback time will go out on the dis play To Modify the Program Modify the contents of the program while the MD Player is stop...

Страница 19: ...ecording It must be set to the close position beforehand When you stick an adhesive label onto the MD cartridge adhere it securely If it peels off ejection trouble etc will occur Preparation Before Recording Be sure that the MD is not the Play only type one Be sure that the accidental erasure prevention knob of the MD cartridge is set to the close position Otherwise DISC PRO TECTED will appear whe...

Страница 20: ...leted Then the MD and the CD stops When the MD becomes full before the CD Player finishes play back the MD stops after indicating UTOCwriting One Track Recording 1 Insert an MD with its label side up 2 Play the track on the CD you wish to record 3 Press the CD SYNCHRO REC button on the Unit The CD Player returns to the beginning of that track and the track is recorded on the MD After recording the...

Страница 21: ...E ERASE ALL ERASE DISC TITLE TITLE Back to the beginning 4 Press the SET button 5 Select the track number to be divided The selected track is automatically played To select the track number press the UP DOWN or but ton UP button Increases the track number by 1 DOWN button Decreases the track number by 1 button Rapidly increases the track number button Rapidly decreases the track number Example for...

Страница 22: ...abel side up 2 Press the MD 38 button and then 7 button to set the function to MD The track numbers and total playback time are displayed 3 Press the EDIT TITLE button until MOVE is displayed The EDIT indicator appears on the display DIVIDE JOIN MOVE ERASE ALL ERASE DISC TITLE TITLE Back to the beginning 4 Press the SET button 5 Select the track number to be moved To select the track number press ...

Страница 23: ...ator disappears on the display To cancel the all erasing press the CANCEL button in step 4 To remove the MD press the MD0 button Note While UTOCwriting is displayed do not disconnect the power cord or subject the Unit to the vibration to avoid in correct recording You can give a disc title to the MD and a track title to the tracks in the MD Any title name can be given up to 32 characters using the...

Страница 24: ...pears on the display 8 Press the MD0 button to complete editing The MD is ejected after UTOCwriting is displayed You can also complete editing operation by pressing the button to turn off the power To cancel the operation press the CANCEL button in step 6 Note While UTOCwriting is displayed do not disconnect the power cord or subject the Unit to the vibration to avoid in correct recording Button F...

Страница 25: ...quipment start playing the exter nal equipment When the AUX 2 DIGITAL IN is selected You can use the external equipment connected to the OPTICAL DIGITAL IN AUX2 terminal of the System such as CD play er etc To listen to the external equipment start playing the exter nal equipment 3 Adjust the VOLUME control to the desired listening level 4 Apply sound effects if you wish Press the AHB Super PRO bu...

Страница 26: ...e Daily Timer the timer will be activated at the same time every day It can be cancelled and re activate whenever you wish The Timer indicator on the display shows when the Daily Timer you have set is in effect Note Perform each setting within 30 seconds Otherwise setting is cleared and the procedure must be repeated from the be ginning 1 Press the button to turn on the System 2 Setting the ON tim...

Страница 27: ... SLEEP button it changes the number of minutes shown on the display in this sequence 30 60 90 120 Cancelled back to the begin ning After setting the number of minutes for the Sleep Timer the display will stop blinking and return to the display as before setting the Sleep Timer The display is dimmed The System is now set to turn off after the number of minutes you set To Confirm the Sleep Time When...

Страница 28: ...range High Sound range and sensitivity of our ears Sharp Sensitivity of our ears Dull STOP Optical pickup Sound jump guard menory During normal play When vibration has occurred UTOC Track details Contents 1 Track A Page 9 2 Track B Page 6 3 Track C Page 10 MD Minidisc Error Messages Error messsage Meaning Action BLANK DISC A disc has been inserted with nothing recorded on it Except when making a n...

Страница 29: ...yed even though the possible recording time is not used up With the minidisc there is a maximum number of tracks which can be recorded regardless of time More than 254 tracks cannot be recorded on a disc DISC FULL is displayed even though the number of tracks and recording time are not at the limit When parts of the disc are erased and re recorded blank spots are created on the disc When recording...

Страница 30: ...on 0RLVWXUHýPD ýFRQGHQVHýRQýWKHýOHQVýLQVLGHýWKHý 6 VWHPýLQýWKHýIROORZLQJýFDVHVã IWHUýWXUQLQJýRQýKHDWLQJýLQýWKHýURRPï QýDýGDPSýURRPï IýWKHý6 VWHPýLVýEURXJKWýGLUHFWO ýIURPýDýFROGý WRýDýZDUPýSODFHï 6KRXOGýWKLVýRFFXUñýWKHý6 VWHPýPD ýPDOIXQFWLRQïý QýWKLVýFDVHñýOHDYHýWKHý6 VWHPýWXUQHGýRQýIRUýDý IHZýKRXUVýXQWLOýWKHýPRLVWXUHýHYDSRUDWHVñýXQSOXJý WKHý ýSRZHUýFRUGñýDQGýWKHQýSOXJýLWýLQýDJDLQï General Notes Qý...

Страница 31: ...WLRQýRIýWKHý 0ý RRSý QWHQQDï WHQGý 0ý LUHý QWHQQDýWRýWKHýEHVWý UHFHSWLRQýSRVLWLRQï 7KHý ýVNLSVï 7KHý ýLVýGLUW ýRUýVFUDWFKHGï OHDQýRUýUHSODFHýWKHý ï 7KHý ýGRHVýQRWýSOD ï 7KHý ýLVýXSVLGHýGRZQï 3XWýWKHý ýLQýZLWKýWKHýODEHOýVLGHýXSï 7KHý0 ýFDQQRWýEHýLQVHUWHGï Qý0 ýKDVýDOUHDG ýEHHQýLQVHUWHGï 3UHVVýWKHý0 0ýEXWWRQýWRýHMHFWýWKHýLQVHUWHGý 0 ýDQGýLQVHUWýDýQHZý0 ï 5HFRUGLQJýFDQQRWýEHýPDGHýRQý0 ï 7KHýDFFLGHQWD...

Страница 32: ... Tuner 0ý7XQHU 7XQLQJý5DQJH åæïèýðýìíåïíý0 0ý7XQHU 7XQLQJý5DQJHý õ0 ôýèëëýðýìñçëäýN õ ôýìééýðýëååýN Speaker Specifications õHDFKýXQLWôý6SHDNHUV åýFPýFRQH PSHGDQFH éýRKPV LPHQVLRQV ìëíý ýìçíý ýìäíýPPýõ î î ôý 0DVV SSUR ïýìïêýNJ General LPHQVLRQV êåíý ýìçéý ýêíìýPPýõ î î ôý 0DVV SSUR ïýçïéýNJ Accessories 3RZHUý RUGýõìô 0ý RRSý QWHQQDýõìô 5HPRWHý RQWUROýõìô DWWHULHVý5ç3ýõ680ðêôî ýõìè ôýõëô 0ý LUHý QW...

Страница 33: ...VICTOR COMPANY OF JAPAN LIMITED EN GE FR NL SP IT 0598MNMCREOZK ...

Отзывы: