background image

12

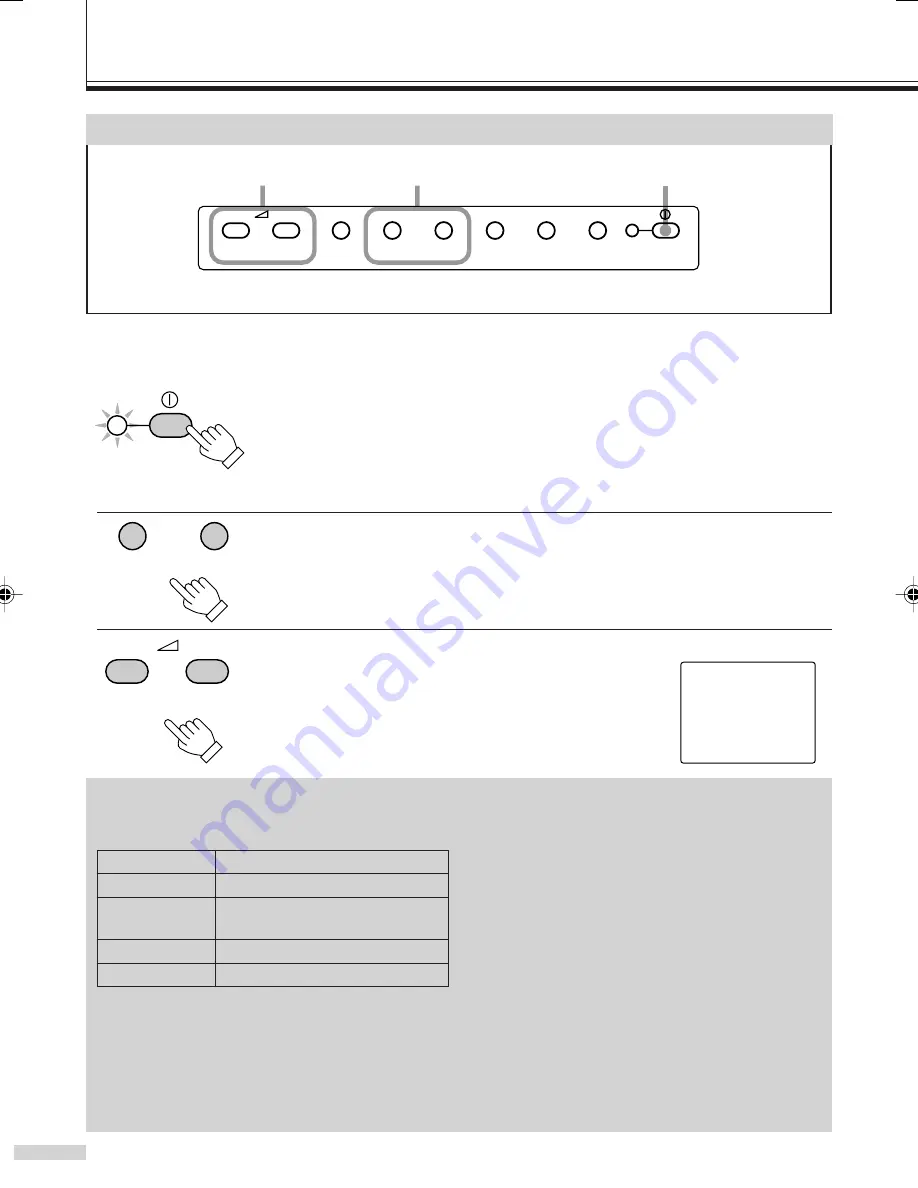
1

  Press the power button to turn

the power ON.

The power indicator lights in green.

 To turn the power OFF, press the power

button again.

2

Select a video input with the
VIDEO A or VIDEO B button.

The button pressed lights in green.

3

Adjust the volume with the
VOLUME (CHANNEL) –/+
buttons.

BASIC OPERATIONS

POWER Indicator
The status of the POWER indicator varies
depending on the following conditions:

*1: The color of the POWER indicator does not

show the exact status of the battery. Depending
on the battery type, the power may be cut off
even before the POWER indicator lights in
orange/red. This is due to characteristics of the
battery or the operation of the battery protection
circuit, and is not a malfunction. If this occurs,
recharge the battery.

VOLUME(CHANNEL)

TV

+

VIDEO A

VIDEO B

MENU

POWER

BLUE

CHECK

SIZE

SELECT

1

2

3

POWER

VIDEO A

VIDEO B

VOLUME(CHANNEL)

+

VOLUME                          13

Precautions

Connect video components properly to the connection terminals on the rear of the monitor. (

 pages 8

and 9)

Screen indication

Unlit

Power OFF

Lights in green Power ON, usual operation

Lights in orange Low voltage from DC power
*1

supply (battery, etc.)

Lights in red *1 Battery protection circuit active

Blinks in green Power save function active

Screen Indication
The screen indication disappears about 8
seconds after button operation.

Unsuitable Environments for Viewing

Watching the monitor in a room that is too dark
can damage your eyes. Keep the room
properly lit.
Watching the monitor for long periods can also
damage your eyes. Be sure to take occasional
breaks.

The picture may appear distorted depending
on the environment around the monitor. If it
does, DO NOT use the monitor as it could
damage your eyes.

Front operation panel

MONITORING THE  PICTURE

Содержание TM-L450TU - Lccs Color Monitor

Страница 1: ...W 6 REAR VIEW 8 BASIC CONNECTION EXAMPLES 9 PREPARING POWER SUPPLY 10 INDOOR USAGE AC Power Supply 10 OUTDOOR USAGE DC Power Supply 11 BASIC OPERATIONS 12 MONITORING THE PICTURE 12 WATCHING TV 13 SETTINGS AND ADJUSTMENTS 14 BASIC MENU OPERATION 14 MENU CONTENTS 15 SCREEN SIZE ADJUSTMENTS 16 BLUE CHECK FUNCTION 16 SETTING TV CHANNELS 17 TROUBLESHOOTING 18 CHARACTERISTICS OF LCCS VIDEO MONITOR SYSTE...

Страница 2: ... a service technician Do not attempt to repair it yourself or remove the cover Changes or modifications not approved by JVC could void the warranty When you don t use this Appliance for a long period of time be sure to disconnect both the power plug from the AC outlet and antenna for your safety CAUTION RISK OF ELECTRIC SHOCK DO NOT OPEN CAUTION To reduce the risk of electric shock do not remove c...

Страница 3: ... are not sure of the type of power supply to your home consult your Appliance dealer or local power company For battery operation refer to the operating instructions 3 Overloaded AC outlets and extension cords are dangerous and so are frayed power cords and broken plugs They may result in a shock or fire hazard Call your service technician for replacement 4 Do not allow anything to rest on or roll...

Страница 4: ...casters across thresholds or deep pile carpets Wall or shelf mounting should follow the manufacturer s instructions and should use a mounting kit approved by the manufacturer USE 10 Caution children about dropping or pushing objects into the Appliance through cabinet openings Some internal parts carry hazardous voltages and contact can result in a fire or electrical shock 11 Unplug the Appliance f...

Страница 5: ...on E If the Appliance has been dropped or damaged in any way F When the Appliance exhibits a distinct change in performance this indicates a need for service 16 Do not attempt to service this Appliance yourself as opening or removing covers may expose you to dangerous voltage or other hazards Refer all servicing to qualified service personnel 17 When replacement parts are required have the service...

Страница 6: ...OLS AND FEATURES FRONT VIEW RIGHT VIEW VOLUME CHANNEL TV VIDEO A VIDEO B MENU POWER BLUE CHECK SIZE SELECT VOLUME CHANNEL TV VIDEO A VIDEO B MENU POWER BLUE CHECK SIZE SELECT EAR PHONE PRODUCT FRONT RIGHT VIEW ...

Страница 7: ... to the VIDEO A terminal and the audio signal input to the AUDIO IN A terminal The button lights in green when VIDEO A is selected VIDEO B Button Press this button to select the video signal input to the VIDEO B terminal and the audio signal input to the AUDIO IN B terminal The button lights in green when VIDEO B is selected 1 2 MENU Button Press this button to access the menu for performing setti...

Страница 8: ... video camera etc OUT Connect to the composite video signal input terminal of a VCR etc REMOTE IN DC IN 19V AC ADAPTER A B DC IN 12V ANT IN IN OUT IN OUT 75 VHF UHF VIDEO A VIDEO B AUDIO IN AC IN REMOTE IN DC IN 19V AC ADAPTER A B DC IN 12V ANT IN IN OUT IN OUT 75 VHF UHF VIDEO A VIDEO B AUDIO IN AUDIO IN A Terminal RCA pin monaural audio signal input terminal Connect it to the audio signal output...

Страница 9: ...t to the same pair of video input VIDEO IN and video output VIDEO OUT terminals Also refer to the instructions of the equipment being connected VIDEO A Connection Example VIDEO B Connection Example Signal Flow REMOTE IN DC IN 19V AC ADAPTER A B DC IN 12V ANT IN IN OUT IN OUT 75 VHF UHF VIDEO A VIDEO B AUDIO IN AC IN REMOTE IN A B ANT IN IN OUT IN OUT 75 VHF UHF VIDEO A VIDEO B AUDIO IN Video Camer...

Страница 10: ...DEO A VIDEO B AUDIO IN REMOTE IN DC IN 19V AC ADAPTER Precautions Use one of the following power supplies AC power supply 120 V AC 60 Hz Use the provided power cord DC power supply 12 V DC Use any brand of external DC battery pack commercial or other DC power supply Connect the provided power cord to the AC IN AC power input terminal and an AC outlet When AC power supply is used the power from the...

Страница 11: ...forming the following be sure to unplug the power cord The DC battery pack fits into the attachment holes on the back of the monitor The screw holes for fixing the DC battery are M4 size and have a depth of 12 mm The fixing screws must be less than 12 mm long 1 Remove the AC Adapter Notes Do not leave the monitor connected to a battery via the DC IN 12 V DC power input terminal for long periods wh...

Страница 12: ...VIDEO A VIDEO B MENU POWER BLUE CHECK SIZE SELECT 1 2 3 POWER VIDEO A VIDEO B VOLUME CHANNEL VOLUME 13 Precautions Connect video components properly to the connection terminals on the rear of the monitor 墌 pages 8 and 9 Screen indication Unlit Power OFF Lights in green Power ON usual operation Lights in orange Low voltage from DC power 1 supply battery etc Lights in red 1 Battery protection circui...

Страница 13: ...inking in green select the TV station channel you want to watch 4 After the TV button finishes blinking and lights in green adjust the volume with the VOLUME CHANNEL buttons Precautions Connect the TV antenna cable 墌 page 9 Set TV channels 墌 pages 14 15 and 17 If you want to adjust the volume immediately after selecting TV Press the TV button again The button stop blinking and then lights in green...

Страница 14: ...is displayed on the monitor Some items may not be displayed depending on which input mode is selected Items that are not displayed cannot be adjusted set 2 Adjust set the item selected in procedure 1 with the VOLUME CHANNEL buttons When adjusting the help indicator disappears It is displayed again 2 seconds after adjustment is complete 3 Repeat procedures 1 and 2 to adjust set more items CONTRAST ...

Страница 15: ...d when TV is selected 7 POWER SAVE Power Save With the power save function set to ON active the monitor automatically enters standby mode when no video signal is input When the power save function is active the POWER indicator blinks in green When a video signal is input the power save function becomes inactive and the monitor is restored to normal operation Pressing any buttons on the front opera...

Страница 16: ...ay appear different from the original If you place this monitor in a public space e g coffee shop hotel lobby etc for commercial purposes or for public exhibition and if you use a screen mode adjustment SIZE SELECT function on the video image it may be a violation of copyright law BLUE CHECK FUNCTION The blue check function cuts the red and green signal and displays only the blue signal The blue c...

Страница 17: ...monitor is factory preset to tune all VHF 2 to 13 and UHF 14 to 69 TV channels To perform the following press the TV button to select TV When you want to reset the memorized TV channels perform CH SEARCH START initiate channel search from the menu screen refer to pages 14 and 15 The monitor automatically searches for broadcasting stations VHF UHF and memorizes them You can also delete channels you...

Страница 18: ... strong magnetic field Has COLOR SW been set to OFF Has the picture control setting CONTRAST BRIGHTNESS CHROMA or PHASE been changed Is the monitor close to a speaker or magnet Did you move a speaker or magnet close to the monitor Is the screen size set to 16 9 Measures remedy Firmly insert the power plug Charge the battery or replace the charged battery refer to the battery charger you are using ...

Страница 19: ...ture Spots are displayed and noise is heard Interference This may be caused by interfering radio waves generated by dryers automobiles motorcycles or fluorescent lights Stripes are displayed and noise is heard Radio Interference This may be caused by radio interference generated by radio stations personal computers AV equipment or microwave ovens The following are not malfunctions The monitor emit...

Страница 20: ...light High Resolution The use of a black and white cathode ray tube which has no picture elements and a liquid crystal color shutter LCCS allows it to display images at high resolution No Irregular Color Caused By Magnetic Interference Unlike with color cathode ray tubes irregular color does not occur on the display because the monitor does not have any color elements No Moire Patterns Horizontal ...

Страница 21: ... lbs 3 3 k not including AC adapter Dimensions W x H x D 5 3 4 x 7 1 4 x 11 1 2 146 mm x 181 3 mm x 291 8 mm Including AC adapter carrying handle feet and stand stored power cord not included Provided Accessories AC power cord 5 91 ft 1 8 m x 1 AC adapter model ADP 50VB REV D attached to monitor x 1 SPECIFICATIONS Dimensions and weight are approximate E O E Design and specifications are subject to...

Страница 22: ...22 䡵 Dimensions Unit inch mm SPECIFICATIONS cont d VOLUME CHANNEL TV VIDEO A VIDEO B MENU POWER BLUE CHECK SIZE SELECT 5 3 4 146 9 7 8 250 11 1 2 291 8 3 1 16 77 7 3 16 181 3 5 1 4 132 1 5 8 40 3 8 9 3 ...

Страница 23: ...23 ...

Страница 24: ...UCTS COMPANY DIVISION OF US JVC CORP 1700 Vallery Road Wayne NJ07470 JVC CANADA INC 21 Finchdene Square Scarborough Ontario M1X 1A7 2000 VICTOR COMPANY OF JAPAN LIMITED LCT0793 001B 0400 Tu U DE TM L450TU LCCS VIDEO MONITOR ...

Отзывы: