background image

Safety Warnings - Soundbar with wired subwoofer

Ventilation
•  To prevent the risk of electric shock or 

fire hazard due to overheating, ensure 

that curtains and other materials do not 

obstruct the ventilation vents.

•  A minimum distance of 5 cm around the 

unit should be maintained to allow for 

sufficient ventilation.

•  Do not install or place this unit in a 

bookcase, built-in cabinet or in another 

confined space. Ensure the unit is well 

ventilated.

Safety
•  Always disconnect the unit from the mains 

supply before connecting / disconnecting 

other devices or moving the unit.

•  Unplug the unit from the mains socket 

during a lightning storm.

•  In the interests of safety and to avoid 

unnecessary energy consumption, 

never leave the unit switched on while 

unattended for long periods of time, e.g. 

overnight, while on holiday or while out of 

the house. Switch it off and disconnect the 

mains plug from the mains socket.

Mains Cable
•  Make sure the unit or unit stand is not 

resting on top of the mains cable, as the 

weight of the unit may damage the mains 

cable and create a safety hazard.

•  If the mains cable is damaged it must be 

replaced by the manufacturer, its service 

agent, or similarly qualified persons in 

order to avoid a hazard.

The mains plug is used as disconnect 

device, the disconnect device shall 

remain readily operable.

Interference
•  Do not place the unit on or near appliances 

which may cause electromagnetic 

interference. If you do, it may adversely 

affect the operating performance of the 

unit, and cause a distorted picture or 

sound.

Batteries
•  Batteries used in the remote control for this 

unit are easily swallowed by young children 

and this is dangerous.

•  Keep loose batteries away from young 

children and make sure that the battery 

holder tray is secure in the remote control. 

Seek medical advice if you believe a cell 

has been swallowed.

•  Read all the instructions carefully before 

using the unit and keep them for future 

reference.

•  Retain the manual. If you pass the unit 

onto a third party make sure to include this 

manual.

•  Check that the voltage marked on the 

rating label matches your mains voltage.

Damage
•  Please inspect the unit for damage after 

unpacking.

•  Do not continue to operate the unit if you 

are in any doubt about it working normally, 

or if it is damaged in any way - switch off, 

withdraw the mains plug and consult your 

dealer.

Location of Unit
•  The unit must be placed on a flat stable 

surface and should not be subjected to 

vibrations.

•  Do not place the unit on sloped or unstable 

surfaces as the unit may fall off or tip over.

•  The mains socket must be located near the 

unit and should be easily accessible.

•  This unit is designed for indoor, domestic 

use only.

Temperature
•  Avoid extreme degrees of temperature, 

either hot or cold. Place the unit well away 

from heat sources such as radiators or gas / 

electric fires.

•  Avoid exposure to direct sunlight and other 

sources of heat.

•  Attention should be drawn to the use of 

apparatus in moderate climates.

Naked Flames
•  Never place any type of candle or naked 

flame on the top of or near the unit.

Moisture
•  To reduce the risk of fire, electric shock or 

product damage, do not expose this unit 

to rain, moisture, dripping or splashing. 

No objects filled with liquids, such as 

vases, should be placed on the unit. Do 

not operate the unit with wet hands, near 

water or other liquid.

•  If you spill any liquid into the unit, it can 

cause serious damage. Switch it off at the 

mains immediately. Withdraw the mains 

plug and consult your dealer.

Soundbar_wired_subwoorfer_Safety_Final200610V1.indd   1

10/6/2020   2:12 PM

Содержание TH-D337B

Страница 1: ...s away from young children and make sure that the battery holder tray is secure in the remote control Seek medical advice if you believe a cell has been swallowed Read all the instructions carefully before using the unit and keep them for future reference Retain the manual If you pass the unit onto a third party make sure to include this manual Check that the voltage marked on the rating label mat...

Страница 2: ... of important operating and maintenance servicing instructions in the manual accompanying the unit Service To reduce the risk of electric shock do not remove screws The unit does not contain any user serviceable parts Please leave all maintenance work to qualified personnel Do not open any fixed covers as this may expose dangerous voltages Maintenance Ensure to unplug the unit from the mains socke...

Страница 3: ...ironment To preserve our environment dispose of used batteries according to your local laws or regulations Do not dispose of batteries with normal household waste For more information please contact the local authority or your retailer where you purchased the product The Bluetooth word mark and logos are registered trademarks owned by the Bluetooth SIG Inc and any use of such marks by DSG Retail L...

Страница 4: ...on used by DSG Retail Ltd under license For Help and Support Call UK 0344 561 1234 Ireland 1890 818 575 DSG Retail Ltd co no 504877 1 Portal Way London W3 6RS UK EU Representative DSG Retail Ireland Ltd 259460 3rd Floor Office Suite Omni Park SC Santry Dublin 9 Republic of Ireland Soundbar_wired_subwoorfer_Safety_Final200610V1 indd 4 10 6 2020 2 12 PM ...

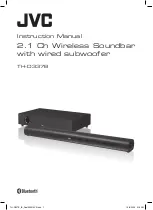
Страница 5: ...Instruction Manual 2 1 Ch Wireless Soundbar with wired subwoofer TH D337B TH D337B_IB_Final200610V5 indd 1 10 6 2020 2 19 PM ...

Страница 6: ...TH D337B_IB_Final200610V5 indd 2 10 6 2020 2 19 PM ...

Страница 7: ... Method 1 Optical Coaxial Connection 11 Method 2 AUX Connection 12 Connecting the Subwoofer to the Soundbar 13 Connecting to the Mains Supply 14 General Operation 15 Standby ON 15 Automatic Power Off Function 15 Selecting Modes 15 Adjusting the Speaker Level Settings and Effects 15 OPTICAL COAXIAL AUX IN Operation 16 Bluetooth Operation 17 Maintenance 18 Hints and Tips 18 Product Fiche and Specifi...

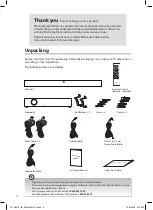
Страница 8: ...ding this instruction manual in order that you fully understand all the operational features it offers You will also find some hints and tips to help you resolve any issues Read all the safety instructions carefully before use and keep this instruction manual for future reference Screw 4 Dowel 4 To get the most from this product you may need to buy an Optical cable If items are missing or damaged ...

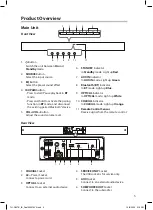
Страница 9: ...de Light up Blue 9 OPTICAL Indicator In OPTICAL mode Light up White 10 COAXIAL Indicator In COAXIAL mode Light up Orange 11 Remote Control Sensor Receive signal from the remote control 1 2 3 4 VOL VOL EQ PAIR SOURCE 6 7 8 9 10 11 5 1 COAXIAL Socket 2 AC Power Socket Connect a power cord 3 OPTICAL Socket Connect to an external audio device 4 SERVICE ONLY Socket The USB socket is for service only 5 ...

Страница 10: ... Button Mute the unit or resume the sound 7 MOVIE Button Press to select MOVIE EQ effect 8 CUSTOM Button Press to resume the default sound effect setting 9 MUSIC Button Press to select MUSIC EQ effect 10 BASS Buttons Press to activate bass setup in default EQ mode 11 TREBLE Buttons Press to activate treble setup in default EQ mode Remote Control SUBWOOFER IN AC 1 3 10 4 11 5 2 1 AC Socket Connect ...

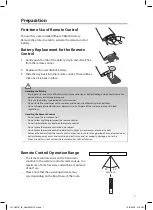
Страница 11: ...se of them in accordance with local regulations Handling the Remote Control Do not drop the remote control Do not allow anything to impact the remote control Do not spill water or any liquid on the remote control Do not place the remote control on a wet object Do not place the remote control under direct sunlight or near sources of excessive heat Remove the battery from the remote control when not...

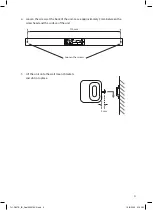
Страница 12: ...nstallation Do not overtighten screws Keep this instruction manual for future reference Use an electronic stud finder to check the wall type before drilling and mounting 1 Drill 4 parallel holes Ø 3 8 mm each according to wall type in the wall The distance between the holes should be 710 mm 3 Tighten the wall mount brackets on the wall with screws included and screwdriver not included Make sure th...

Страница 13: ...SERVICE ONLY AUX BD DVD SUBWOOFER OUT 4 Loosen the screws at the back of the unit Leave approximately 3 mm between the screw head and the surface of the unit 5 Lift the unit onto the wall mount brackets and slot into place TH D337B_IB_Final200610V5 indd 9 10 6 2020 2 19 PM ...

Страница 14: ...he TV screen Subwoofer A subwoofer is designed to reproduce powerful low bass effects explosions the rumble of spaceships etc The performance of a subwoofer is directly related to its placement in the listening room Experiment with placement before choosing a final location for your subwoofer Find the location where the bass performance is best The subwoofer should be within 5 metres of the soundb...

Страница 15: ...ctions of the unit are connected before connecting to the mains power socket The unit may not be able to decode all digital audio formats from the input source In this case the Optical Coaxial indicator will flash quickly and the unit will prompt Unsupported sound format please refer to the Instruction Book This is NOT a defect Ensure that the audio setting of the input source e g TV game console ...

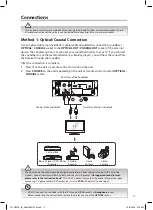
Страница 16: ... After the connection is complete 1 Press on the unit or remote control to switch on the unit 2 Press SOURCE on the unit or remote control repeatedly to select AUX IN mode to play audio from your input device COAXIAL TV BD DVD OPTICAL TV BD DVD AC SERVICE ONLY AUX BD DVD SUBWOOFER OUT Rear View of the Soundbar Blu ray Player DVD Player Recorder Set top Box Satellite Receiver Game Console Video Cam...

Страница 17: ...AL TV BD DVD AC SERVICE ONLY AUX BD DVD SUBWOOFER OUT Rear View of the Subwoofer Rear View of the Soundbar For optimal sound always use the supplied subwoofer Make sure that the Subwoofer cable is connected firmly with the main unit and subwoofer If there is no connection between the main unit and the subwoofer the subwoofer indicator will flash Subwoofer cable TH D337B_IB_Final200610V5 indd 13 10...

Страница 18: ...and subwoofer are designed to operate with the supplied mains cables Soundbar Unwind the mains cable to its full length Connect the end of the cable to the AC socket at the rear of the unit and then connect the mains plug to the mains socket SUBWOOFER IN AC COAXIAL TV BD DVD OPTICAL TV BD DVD AC SERVICE ONLY AUX BD DVD SUBWOOFER OUT To the mains socket Rear View of the Soundbar Subwoofer Connect t...

Страница 19: ...AUX BT OPTICAL and COXIAL mode Adjusting the Speaker Level Settings and Effects Adjusting the Volume Press VOL VOL on the unit or remote control to adjust the volume If you wish to turn the sound off press MUTE on the remote control Press MUTE again or press VOL VOL on the unit or on the remote control to resume normal listening Select Equaliser EQ Effect Press the EQ button on the unit or the CUS...

Страница 20: ...adjustment EQ Mode Adjusting Bass Level Adjusting Treble Level CUSTOM 3 3 Movie N A N A Music N A N A OPTICAL COAXIAL AUX IN Operation There are OPTICAL COAXIAL AUX IN sockets located at the rear of the unit 1 Before connecting to the mains socket ensure all the connections are completed 2 While in the On mode press SOURCE on the unit or remote control to select OPTICAL COAXIAL AUX IN mode 3 Opera...

Страница 21: ... the Disconnected voice prompt Press and hold PAIR on the unit or on the remote control The Bluetooth device will be disconnected from the soundbar after the Pairing voice prompt If your Bluetooth device supports AVRCP use the supplied remote control to control play To pause resume playback press on the unit or PAIR on remote control To skip to a track press The operational range between the unit ...

Страница 22: ...e is heard The plugs and sockets are dirty Wipe them with a cloth slightly moistened with alcohol No sound from the soundbar and subwoofer Please try either one of the solutions below Make sure that the unit is not muted Press MUTE or VOL VOL button to resume normal listening Press on the unit or on the remote control to switch the soundbar to standby mode Then press the button again to switch the...

Страница 23: ...witch to networked standby mode within 15 minutes after intended use Power consumption in network standby if all wireless network ports are activated 4 2 W How to activate wireless network port Connect the unit with power Switch to wireless mode e g Bluetooth wifi etc How to deactivate wireless network port Press the Standby button Problem Solution I cannot find TH D337B on my Bluetooth device Ens...

Страница 24: ...etwork standby if all wireless network ports are activated N A How to activate wireless network port N A How to deactivate wireless network port N A Net Weight 3 15 kg Dimension 465 mm W x 94 mm H x 255 mm D Features and specifications are subject to change without prior notice IB TH D337B 200610V5 Hereby DSG Retail Ltd declares that this product is in compliance with Directive 2014 53 EU The full...

Отзывы: