background image

33

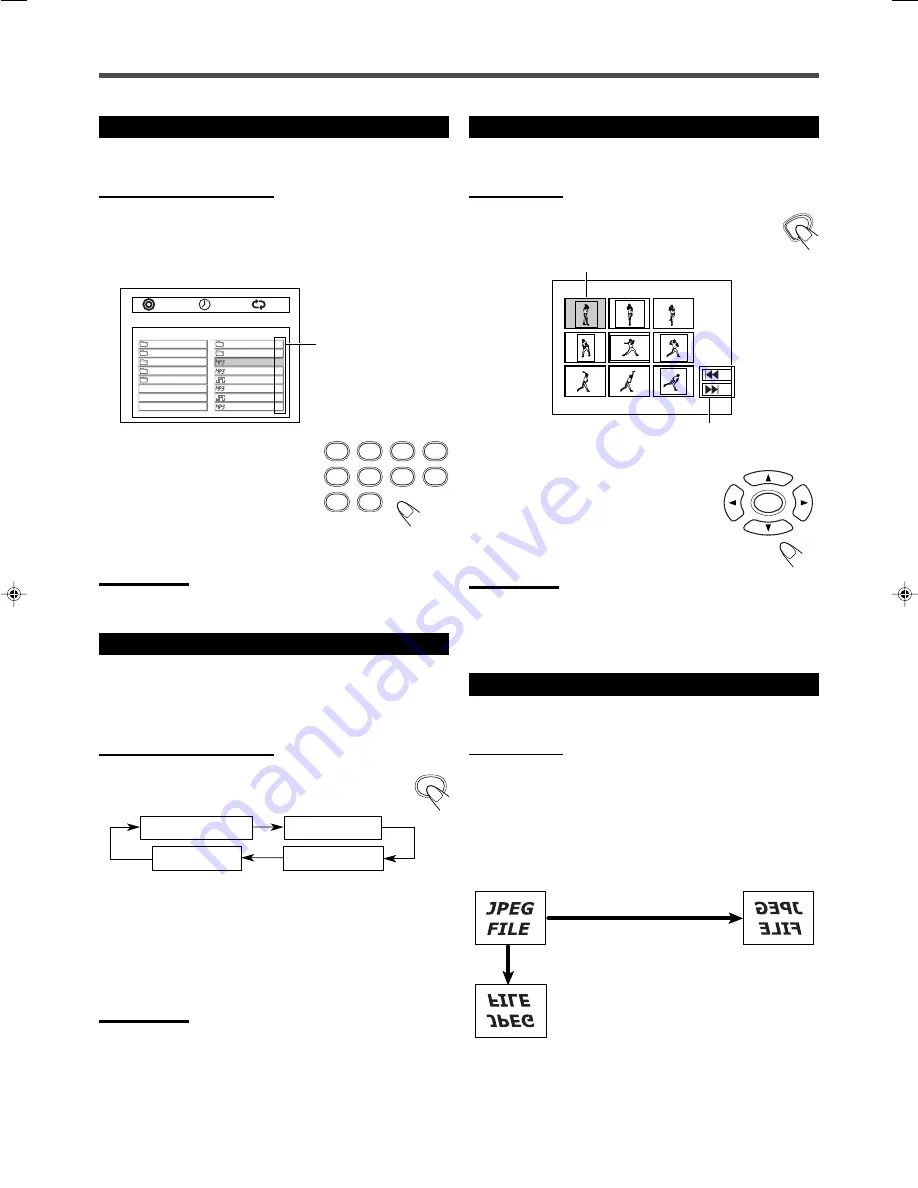
Selecting a Particular File/Folder Directly

You can move to a particular file/folder in the current folder directly.

From the remote control ONLY:

Press the number buttons to select a file/folder
number (item number) you want, then press
ENTER.

The system starts playback from the selected file.

• To select number 5, press 5, then

ENTER.

• To select number 10, press 1, 0, then

ENTER.

• To select number 23, press 2, 3, then

ENTER.

• To select number 123, press 1, 2, 3, then ENTER.

Notes:

When selecting the number of a folder, the contents of the folder
appear on the content column.

1

2

3

4

5

6

7

8

9

0

..

..

ALPHA

BETA
GAMMA
DELTA

AAA

0
1
2
3

ANT01
BULL02
COOT03
DOG04
ELEPHANT05
FOX06

4
5
6
7

0001/0003

OFF

0:00:28

Item numbers

Repeating Playback

A–B repeat cannot be used when MP3 or JPEG files are played
back. You can enjoy only repeat play.

To repeat playback—Repeat Play

From the remote control ONLY:
Press REPEAT repeatedly.

• Each time you press the button, repeat mode changes and

appears on the TV screen as follows:

REPEAT:TRACK

: Current file will be repeated. The picture

stand still when playing back a JPEG file.

REPEAT:DIR

:

Files in the current folder (directory) will
be repeated.

REPEAT:DISC

:

All files on the disc will be repeated.

REPEAT:OFF

:

Repeat play is canceled. (Normal play is
resumed.)

Notes:

You can check the repeat mode with on-screen bar. See “Showing the
On-Screen Bar” on page 31 for the detail.

FM MOD

REPEAT

REPEAT:TRACK

REPEAT:DIR

REPEAT:OFF

REPEAT:DISC

Rotating and Flipping a Picture

You can rotate/flip a picture during JPEG file playback.

JPEG file ONLY:
Press 

3

/

2

/

5

/

.

The picture rotates/flips each time you press the buttons.

3

:

Rotate the picture 90˚ clockwise.

2

:

Rotate the picture 90˚ counter-clockwise.

5

:

Flip the picture vertically.

:

Flip the picture horizontally.

Ex.: Flipping a picture

Pressing 

 once

Pressing 

5

 once

Browsing Pictures in the Current Folder

You can browse pictures in the current folder in smaller size.

JPEG file ONLY:

1

Press MENU.

JPEG files in the current folder are shown on nine
windows.

2

Press 

3

/

2

/

5

/

 to select the

desired picture, then press
ENTER.

Normal playback starts from the file you
select.

Notes:

• The pictures appearing on the windows at first vary with the picture

you have selected or played back before pressing MENU.

• It requires a longer time to show pictures on the windows. The time

varies with the number and size of items in the current folder.

Selected picture

Select to go to the previous page (

4

)

or the next page (

¢

).

ENTER

MENU

30_33_TH_A25[J].p65

03.8.31, 2:09 PM

33

Содержание TH-A25

Страница 1: ...THA25 and SP THA25 SOUND VOLUME SOURCE STANDBY STANDBY ON DVD DIGITAL THEATER SYSTEM TH A25 For Customer Use Enter below the Model No and Serial No which are located either on the rear bot tom or side of the cabinet Retain this information for future reference Model No Serial No ...

Страница 2: ...nterference will not occur in a particular installation If this equipment does cause harmful interference to radio or television reception which can be determined by turning the equipment off and on the user is encouraged to try to correct the interference by one or more of the following measures Reorient or relocate the receiving antenna Increase the separation between the equipment and receiver ...

Страница 3: ...ck 22 Using the On Screen Bar 22 7 Showing the On Screen Bar 22 7 Basic operation through the On Screen Bar 23 Selecting the Audio Languages 24 Selecting the Subtitles 24 Selecting the Playback Channel 25 Selecting the Multi Angle Views 25 Checking the Remaining Time 25 Disc Menu Driven Playback 26 Moving to a Particular Portion Directly 27 Searching for a Particular Point 27 Repeating Playback 28...

Страница 4: ...olby PRO LOGIC II indicator 13 19 20 p Main display q Frequency unit indicators kHz for AM band station and MHz for FM band station Display Center Unit See pages in the parentheses for details Front Panel 1 STANDBY ON button and STANDBY lamp 12 15 2 Disc tray 12 3 Remote sensor 4 Display 5 VOLUME control 13 15 6 0 open close button 12 14 Pressing this button also turns on the power and changes the...

Страница 5: ... CONTROL TV button 11 IMPORTANT When you press CONTROL TV some buttons on the remote control cannot work for operating the center unit To operate the center unit press DVD FM AM or AUX depending on your target operation d MUTING button 13 f TV VIDEO button 11 12 g MENU button 26 33 h ON SCREEN button 22 28 31 j STEP button 29 k 1 and buttons TUNING UP and DOWN buttons 15 34 l ZOOM button 29 ANGLE ...

Страница 6: ...tected from moisture The temperature around the center unit must be between 5 C and 35 C Make sure there is good ventilation around the center unit Poor ventilation could cause overheating and damage the center unit Handling the center unit DO NOT touch the power cord with wet hands DO NOT pull on the power cord to unplug the cord When unplugging the cord always grasp the plug so as not to damage ...

Страница 7: ... Connect the supplied FM antenna to the COAXIAL FM 75 Ω terminal as temporary measure Extend the supplied FM antenna horizontally If reception is poor connect an outdoor antenna Before attaching a 75 Ω coaxial cable with a standard type connector disconnect the supplied FM antenna Center unit About the cooling fan A cooling fan is mounted on the rear panel of the center unit to prevent abnormal te...

Страница 8: ...UME SOURCE STANDBY STANDBY ON DVD DIGITAL THEATER SYSTEM TH A25 L R CENTER WOOFER FRONT L R REAR AUDIO IN AUX L R CENTER WOOFER FRONT L R REAR AUDIO IN AUX L R CENTER WOOFER FRONT L R REAR AUDIO IN AUX L R CENTER WOOFER FRONT L R REAR AUDIO IN AUX To the speaker on right front Red connector To the speaker on left rear Blue connector IMPEDANCE WOOFER MIN 3 FRONT CENTER MIN 6 REAR MIN 6 To the speak...

Страница 9: ...ll the speakers except the subwoofer at the same distance from the listening position with each front faced toward the listener Since bass sound is non directional you can place a subwoofer wherever you like Normally place it in front of you Left front speaker Right front speaker Right rear speaker Subwoofer Left rear speaker Center speaker If your speakers cannot be placed at the same distance fr...

Страница 10: ...ponents or purchase them at an electric appliance store You can select one of three connection types A B and C If your TV has S video Y C separation and or component video Y PB PR jacks connect them using an S video cord not supplied B and or component video cord not supplied C By using these jacks you can get a better picture quality in the order Component video S video Composite video If your TV...

Страница 11: ...other component or purchase one at an electric appliance store Audio cord not supplied Notes Keep the power cord away from the connecting cords and the antenna The power cord may cause noise or screen interference Connecting to a TV through a VCR or to a TV with a built in VCR may cause distortion of picture Audio component connection Now you can plug the power cord of the center unit into the AC ...

Страница 12: ...ive scanning system scans all horizontal lines at a time so you can double the number of scanning lines displayed at a time resulting in a flicker free high density picture To enjoy the progressive scanned picture a monitor or TV or projector connected to the system must support the progressive video inputs Depending on the material source format DVD video can be classified into two types film sou...

Страница 13: ...ctly at the remote sensor on the TV TV TV VIDEO CONTROL TV TV CH IMPORTANT When you press CONTROL TV some buttons on the remote control cannot work for operating the system To operate the system press DVD FM AM or AUX TV VOL Number Buttons MEMORY To operate a JVC s TV You can perform the following operations on the TV TV Turn on or off the TV TV VOL Adjust the volume TV VIDEO Set the input mode ei...

Страница 14: ... changing the OSD messages the information on the TV screen into the desired language see Setting the System Preferences on page 36 Press AUDIO or STANDBY ON on the front panel The STANDBY lamp goes off The source indication selected previously appears on the display 2Select the Source From the remote control Press DVD The source changes to the DVD CD player On the front panel Press SOURCE repeate...

Страница 15: ...me you turn on the unit 6Activate Surround You can enjoy two kinds of surround Digital Multichannel Surround Dolby Digital and DTS Digital Surround and Dolby Pro Logic II Digital Multichannel Surround Dolby Digital and DTS Digital Surround Dolby Digital or DTS Digital Surround takes effect only when you play back a disc encoded with these signals To activate Dolby Digital or DTS Digital Surround W...

Страница 16: ...Y ON on the front panel The STANDBY lamp lights up If you press AUDIO or STANDBY ON on the front panel while the disc tray is kept open the disc tray closes automatically then the system is turned off A small amount of power is consumed even in standby mode To turn the power off completely unplug the AC power cord To prohibit disc ejection On the front panel ONLY 1 Press STANDBY ON or AUDIO on the...

Страница 17: ... volume turn VOLUME control clockwise To decrease the volume turn VOLUME control counterclockwise 4 Tune into a Station From the remote control Press and hold TUNING UP or DOWN until the station frequency starts changing continuously on the display The system starts searching for a station When a station of sufficient signal strength is tuned in the system stops searching and the indicator lights ...

Страница 18: ...hen the shut off time comes the system turns off automatically To check or change the time remaining until the shut off time Press SLEEP once The remaining time in minutes appears on the display By pressing SLEEP you can change the shut off time To cancel the Sleep Timer Press SLEEP repeatedly until OFF appears on the display Turning off the power also cancels the Sleep Timer Adjusting the Display...

Страница 19: ...OFF CEN LEVEL To adjust the output level of the center speaker from 06 dB to 06 dB REAR LEVEL To adjust the output level of the rear speakers from 06 dB to 06 dB S W LEVEL To adjust the output level of the subwoofer from 06 dB to 06 dB BASS To adjust the output level of the bass tone from 10 dB to 10 dB at 2 dB step TREBLE To adjust the output level of the treble tone from 10 dB to 10 dB at 2 dB s...

Страница 20: ...inish press SOUND and start from step 2 again 3 Press 3 or 2 to adjust the output balance 00 to 06 OFF 3 Decreases the left speaker output or restores the right speaker output 2 Decreases the right speaker output or restores the left speaker output L C R SW LS RS Sound adjustment indication on the display Ex Front balance Left front level Right front level ENTER C DLY 1 2 R DLY 1 3 REAR BALANCE CE...

Страница 21: ...TS Digital Surround To enjoy surround effectively all the speakers need to be connected and activated Dolby Digital Used to reproduce multichannel sound tracks of the software encoded with Dolby Digital Dolby Digital encoding method so called discrete 5 1 channel digital audio format records and digitally compresses the left front channel right front channel center channel left surround channel ri...

Страница 22: ...or DTS multichannel disc the system detects it and activate Multichannel Surround automatically When Dolby Digital is detected the indicator lights up on the display When DTS Digital Surround is detected the indicator lights up on the display To activate Dolby Pro Logic II modes You can use Dolby Pro Logic II when you playback any 2 channel sources either digital or analog Press PL II The current ...

Страница 23: ...and a VCD SVCD CD consists of Tracks See Example 2 In general each song has its own track number On some discs each track may also be divided by Indexes When playing back a VCD SVCD with Playback Control PBC function you can select what to view using the menu shown on the TV screen While operating a VCD SVCD using the menu some of the functions such as Repeat and Track Search may not work Notes on...

Страница 24: ...ach section Using the On Screen Bar You can check the following information on a disc while the disc is loaded and you can use some functions through the on screen bar 7 Showing the On Screen Bar From the remote control ONLY Press ON SCREEN Each time you press the button the following on screen bar appears on the TV screen in sequence AUDIO TV SLEEP DIMMER DVD FM AM TV CH AUX TV VIDEO MUTING CONTR...

Страница 25: ... 24 D Sound signal icon Ex Dolby Digital When the sound signal is Dolby Digital or DTS the sound signal icon appears Subtitle language icon Shows current subtitle language and total number of languages in the current chapter or track See page 24 Sound channel icon Shows current output sound channel See page 25 Repeat mode icon Shows current Repeat Play mode See page 28 1 Press ON SCREEN The follow...

Страница 26: ...an set your favorite subtitle language as the initial language shown on the screen See page 38 Press SUBTITLE The on screen bar appears on the TV screen for a while Each time you press the button the subtitle language changes as follows Notes You can also change the subtitle by using the on screen bar Ex When the DVD has 3 selections English French Spanish and no subtitle OFF SUBTITLE 4 Press ENTE...

Страница 27: ...te control ONLY Press ANGLE Each time you press the button the view angle changes Notes You can also change the view angle by using the on screen bar When the on screen bar is shown on the TV screen Multi angle view indication also changes as follows You cannot change the view angle in the chapter where does not appear even if the on screen bar indicate multi angle view the on screen bar shows the...

Страница 28: ...esponding to the item numbers listed PBC operation concept Notes While operating a VCD SVCD using menu some of the functions such as repeat play may not work For VCD SVCD Some VCDs and SVCDs have menus for interactive operations or a contents search function The Play Back Control function PBC allows you to operate the VCD SVCD using such menus When you start playing a VCD SVCD with PBC function a ...

Страница 29: ...s ENTER to start playback from the selected elapsed playing time To input time 00 45 23 press 4 5 2 3 To input time 01 23 45 press 1 2 3 4 5 To cancel a mis entry press CANCEL Each time you press the button the last entry will be erased About 3 seconds after you pressed number buttons playback starts automatically from the selected time without pressing ENTER Searching for a Particular Point You c...

Страница 30: ...changes to A on the on screen bar 5 Press ENTER again to select the end point REPEAT A changes to REPEAT A B and A changes to A B then A B repeat begins The unit automatically locates point A and starts repeated playback between points A and B For VCD SVCD CD REPEAT TRACK Current track will be repeated REPEAT DISC All the disc will be repeated REPEAT OFF Repeat play is canceled Normal play is resu...

Страница 31: ...their disc structures and not a malfunction of the unit SLOW PROGRESSIVE ZOOM ENTER ENTER ZOOM x1 5 ZOOM x1 5 ZOOM x2 ZOOM x2 ZOOM x3 ZOOM OFF SELECT ZOOM POSITION Zoom indicator STEP 7 Slow Motion Playback You can enjoy slow motion playback while playing a DVD VCD or SVCD From the remote control ONLY Press SLOW repeatedly during playback or pause Each time you press the button slow motion speed c...

Страница 32: ...e root Playback order files search order and directory search order of the MP3 files recorded on a disc are determined by the writing or encoding application therefore playback order may be different from the one you have intended while recording the folders directories and the files Note on MP3 discs MP3 discs either CD R or CD RW require a longer readout time It differs due to the complexity of ...

Страница 33: ...creen You cannot zoom a JPEG picture To go to another file Press or 4 during playback Skip to the beginning of the next file 4 Skip to the beginning of the current or previous file Notes It requires a longer time to read out data when playback moves to files in another folder It is not malfunction The time varies with the number and type of files in the folder 3 8 7 4 ENTER ON SCREEN 1 Current fil...

Страница 34: ...the current folder by selecting the top cell of either column 5 Current file Ex MP3 file The name of the current file is highlighted 6 Item number Use this number when you select a particular file or folder with the number buttons 7 Item type indicator The item type folder MP3 file or JPEG file is shown Operations Using the On Screen Display You can select the file to play back on the on screen di...

Страница 35: ...nt folder directory will be repeated REPEAT DISC All files on the disc will be repeated REPEAT OFF Repeat play is canceled Normal play is resumed Notes You can check the repeat mode with on screen bar See Showing the On Screen Bar on page 31 for the detail FMMOD REPEAT REPEAT TRACK REPEAT DIR REPEAT OFF REPEAT DISC Rotating and Flipping a Picture You can rotate flip a picture during JPEG file play...

Страница 36: ...ET and MANUAL PRESET Select this for using and 4 as the buttons to select the preset station MANUAL Select this for using and 4 as the buttons to change the frequency manually 3 Press and hold or 4 Increases the frequency 4 Decreases the frequency The system starts searching for stations and stops when a station of sufficient signal strength is tuned in When you press the button repeatedly the fre...

Страница 37: ...or 4 repeatedly until the desired preset station appears on the display Increases the preset number 4 Decreases the preset number Press and hold or 4 to change the preset number continuously On the front panel 1 Press SOURCE repeatedly until the desired band appears on the display 2 Press 7 so that PRESET appears on the display Each time you press the button the operation mode of and 4 buttons alt...

Страница 38: ... PAUSE etc You can select the following languages English French German Italian Spanish BLACK LEVEL Select the TV screen brightness ON Make the screen brightness darker OFF Make the screen brightness normal DRC Dynamic Range Compression You can enjoy a powerful sound at night even at a low volume when listening to the sound with Dolby Digital The higher the tab is set the deeper the effect becomes...

Страница 39: ...elected highlighted item is shown on the right column 3 Press 5 to select highlight the menu item you want to adjust Select TV DISPLAY here The sub menu for TV DISPLAY appears on the right column 4 Press 3 The current setting on the sub menu is highlighted 5 Press 5 to select the desired setting 6 Press ENTER The selected setting is highlighted 7 Press 2 and repeat steps 3 to 6 to set up other ite...

Страница 40: ...E AUDIO SUBTITLE DISC MENU PARENTAL PASSWORD JAPANESE ENGLISH FRENCH SPANISH CHINESE GERMAN ITALIAN OTHERS MAIN PAGE PREFERENCES PAGE CHOICE TIME ENTER ENTER Setting Up the DVD Preferences Languages you can select on this menu You can select the following languages separately for AUDIO SUBTITLE and DISC MENU English Japanese French Spanish Chinese German and Italian You can set languages other tha...

Страница 41: ...arental level is highlighted When shipped from the factory the password is 7890 To clear the password entry press ENTER You can enter the password again from the first digit A wrong password is automatically cleared after entering the last digit To erase the setup menu Press CHOICE TIME To change the password 1 Repeat steps 1 to 5 of The basic procedure to set up preferences select PASSWORD in ste...

Страница 42: ...ltese 7789 Burmese 7865 Nauru 7869 Nepali 7876 Dutch 7879 Norwegian 7982 Oriya 8065 Panjabi 8076 Polish 8083 Pashto Pushto 8084 Portuguese 8185 Quechua 8277 Rhaeto Romance 8279 Rumanian 8285 Russian 8365 Sanskrit 8368 Sindhi 8372 Serbo Croatian 8373 Singhalese Code Language 8375 Slovak 8376 Slovenian 8377 Samoan 8378 Shona 8379 Somali 8381 Albanian 8382 Serbian 8385 Sudanese 8386 Swedish 8387 Swah...

Страница 43: ...direct sunlight temperature extremes and moisture To clean the disc Wipe the disc with a soft cloth in a straight line from center to edge Maintenance Cleaning the unit Stains on the unit Should be wiped off with a soft cloth If the system is heavily stained wipe it with a cloth soaked in water diluted neutral detergent and wrung well then wipe clean with a dry cloth Since the system may deteriora...

Страница 44: ...s scratched The disc is dirty A VCR is connected between the center unit and the TV Initial setup TV screen size is incorrect The scanning mode is set to PROGRESSIVE TV though the system is connected to the TV which does not support the progressive video input The received signal is too weak The station is too far away The antenna is not connected correctly Lightning or electronic noise interferes...

Страница 45: ...Tuning Range FM 87 50 MHz 108 00 MHz AM 530 kHz 1 710 kHz Usable Sensitivity FM 8 0 dBf 0 9 µV 75 Ω AM loop antenna 650 µV m General Readable Discs DVD VIDEO Video CD Super Video CD Audio CD CD R RW Audio CD Video CD Super Video CD MP3 JPEG DVD R RW Video format Power Requirements AC 120 V 60 Hz Power Consumption 110 W at operation 2 W in standby mode Dimensions W H D 360 mm 65 mm 404 mm 14 3 16 i...

Страница 46: ...ge that occurs in shipment due to act of God and cosmetic damage 5 Signal reception problems and failures due to line power surge 6 Video Pick up Tubes CCD Image Sensor Cartridge Stylus Needle are covered for 90 days from the date of purchase 7 Accessories 8 Batteries except that Rechargeable Batteries are covered for 90 days from the date of purchase There are no express warranties except as list...

Страница 47: ...rized servicer or visit our website at www JVC com Remember to retain your Bill of Sale for Warranty Service Do not service the television yourself Caution To prevent electrical shock do not open the cabinet There are no user serviceable parts inside Please refer to qualified service personnel for repairs Accessories To purchase accessories for your JVC product please call toll free 1 800 882 2345...

Страница 48: ...TH A25 DVD DIGITAL THEATER SYSTEM VICTOR COMPANY OF JAPAN LIMITED EN 0803TMMMDWSAM 2003 VICTOR COMPANY OF JAPAN LIMITED ...

Страница 49: ...D INSTRUCTIONS DVD DIGITAL THEATER SYSTEM SYSTÈME CINÈMA NUMÉRIQUE DVD TH A25 Consists of XV THA25 and SP THA25 Se compose de XV THA25 et SP THA25 SOUND VOLUME SOURCE STANDBY STANDBY ON DVD DIGITAL THEATER SYSTEM TH A25 English Français ...

Страница 50: ...rature accompanying the appliance CAUTION CAUTION To reduce the risk of electrical shocks fire etc 1 Do not remove screws covers or cabinet 2 Do not expose this appliance to rain or moisture ATTENTION Afin d éviter tout risque d électrocution d incendie etc 1 Nepasenleverlesvisnilespanneauxetnepasouvrirlecoffret de l appareil 2 Ne pas exposer l appareil à la pluie ni à l humidité WARNING TO REDUCE...

Страница 51: ... connected Consult the dealer or an experienced radio TV technician for help Note to CATV system installer This reminder is provided to call the CATV system installer s attention to Section 820 40 of the NEC which provides guidelines for proper grounding and in particular specifies that the cable ground shall be connected to the grounding system of the building as close to the point of cable entry...

Страница 52: ...érieur Arrière Laisser 15 cm de dégagement arrière Dessous Rien ne doit obstruer par dessous poser l appareil sur une surface plate Veiller également à ce que l air circule le mieux possible comme illustré IMPORTANT FOR LASER PRODUCTS 1 CLASS 1 LASER PRODUCT 2 CAUTION Do not open the top cover There are no user serviceable parts inside the Unit leave all servicing to qualified service personnel 3 ...

Страница 53: ...ayback 22 Using the On Screen Bar 22 7 Showing the On Screen Bar 22 7 Basic operation through the On Screen Bar 23 Selecting the Audio Languages 24 Selecting the Subtitles 24 Selecting the Playback Channel 25 Selecting the Multi Angle Views 25 Checking the Remaining Time 25 Disc Menu Driven Playback 26 Moving to a Particular Portion Directly 27 Searching for a Particular Point 27 Repeating Playbac...

Страница 54: ... 9 Dolby PRO LOGIC II indicator 13 19 20 p Main display q Frequency unit indicators kHz for AM band station and MHz for FM band station Display Center Unit See pages in the parentheses for details Front Panel 1 STANDBY ON button and STANDBY lamp 12 15 2 Disc tray 12 3 Remote sensor 4 Display 5 VOLUME control 13 15 6 0 open close button 12 14 Pressing this button also turns on the power and changes...

Страница 55: ...17 s CONTROL TV button 11 IMPORTANT When you press CONTROL TV some buttons on the remote control cannot work for operating the center unit To operate the center unit press DVD FM AM or AUX depending on your target operation d MUTING button 13 f TV VIDEO button 11 12 g MENU button 26 33 h ON SCREEN button 22 28 31 j STEP button 29 k 1 and buttons TUNING UP and DOWN buttons 15 34 l ZOOM button 29 AN...

Страница 56: ... protected from moisture The temperature around the center unit must be between 5 C and 35 C Make sure there is good ventilation around the center unit Poor ventilation could cause overheating and damage the center unit Handling the center unit DO NOT touch the power cord with wet hands DO NOT pull on the power cord to unplug the cord When unplugging the cord always grasp the plug so as not to dam...

Страница 57: ...tion Connect the supplied FM antenna to the COAXIAL FM 75 Ω terminal as temporary measure Extend the supplied FM antenna horizontally If reception is poor connect an outdoor antenna Before attaching a 75 Ω coaxial cable with a standard type connector disconnect the supplied FM antenna Center unit About the cooling fan A cooling fan is mounted on the rear panel of the center unit to prevent abnorma...

Страница 58: ... VOLUME SOURCE STANDBY STANDBY ON DVD DIGITAL THEATER SYSTEM TH A25 L R CENTER WOOFER FRONT L R REAR AUDIO IN AUX L R CENTER WOOFER FRONT L R REAR AUDIO IN AUX L R CENTER WOOFER FRONT L R REAR AUDIO IN AUX L R CENTER WOOFER FRONT L R REAR AUDIO IN AUX To the speaker on right front Red connector To the speaker on left rear Blue connector IMPEDANCE WOOFER MIN 3 FRONT CENTER MIN 6 REAR MIN 6 To the s...

Страница 59: ...ce all the speakers except the subwoofer at the same distance from the listening position with each front faced toward the listener Since bass sound is non directional you can place a subwoofer wherever you like Normally place it in front of you Left front speaker Right front speaker Right rear speaker Subwoofer Left rear speaker Center speaker If your speakers cannot be placed at the same distanc...

Страница 60: ... components or purchase them at an electric appliance store You can select one of three connection types A B and C If your TV has S video Y C separation and or component video Y PB PR jacks connect them using an S video cord not supplied B and or component video cord not supplied C By using these jacks you can get a better picture quality in the order Component video S video Composite video If you...

Страница 61: ...the other component or purchase one at an electric appliance store Audio cord not supplied Notes Keep the power cord away from the connecting cords and the antenna The power cord may cause noise or screen interference Connecting to a TV through a VCR or to a TV with a built in VCR may cause distortion of picture Audio component connection Now you can plug the power cord of the center unit into the...

Страница 62: ...ressive scanning system scans all horizontal lines at a time so you can double the number of scanning lines displayed at a time resulting in a flicker free high density picture To enjoy the progressive scanned picture a monitor or TV or projector connected to the system must support the progressive video inputs Depending on the material source format DVD video can be classified into two types film...

Страница 63: ...directly at the remote sensor on the TV TV TV VIDEO CONTROL TV TV CH IMPORTANT When you press CONTROL TV some buttons on the remote control cannot work for operating the system To operate the system press DVD FM AM or AUX TV VOL Number Buttons MEMORY To operate a JVC s TV You can perform the following operations on the TV TV Turn on or off the TV TV VOL Adjust the volume TV VIDEO Set the input mod...

Страница 64: ... For changing the OSD messages the information on the TV screen into the desired language see Setting the System Preferences on page 36 Press AUDIO or STANDBY ON on the front panel The STANDBY lamp goes off The source indication selected previously appears on the display 2Select the Source From the remote control Press DVD The source changes to the DVD CD player On the front panel Press SOURCE rep...

Страница 65: ...t time you turn on the unit 6Activate Surround You can enjoy two kinds of surround Digital Multichannel Surround Dolby Digital and DTS Digital Surround and Dolby Pro Logic II Digital Multichannel Surround Dolby Digital and DTS Digital Surround Dolby Digital or DTS Digital Surround takes effect only when you play back a disc encoded with these signals To activate Dolby Digital or DTS Digital Surrou...

Страница 66: ...ANDBY ON on the front panel The STANDBY lamp lights up If you press AUDIO or STANDBY ON on the front panel while the disc tray is kept open the disc tray closes automatically then the system is turned off A small amount of power is consumed even in standby mode To turn the power off completely unplug the AC power cord To prohibit disc ejection On the front panel ONLY 1 Press STANDBY ON or AUDIO on...

Страница 67: ... the volume turn VOLUME control clockwise To decrease the volume turn VOLUME control counterclockwise 4 Tune into a Station From the remote control Press and hold TUNING UP or DOWN until the station frequency starts changing continuously on the display The system starts searching for a station When a station of sufficient signal strength is tuned in the system stops searching and the indicator lig...

Страница 68: ...ws When the shut off time comes the system turns off automatically To check or change the time remaining until the shut off time Press SLEEP once The remaining time in minutes appears on the display By pressing SLEEP you can change the shut off time To cancel the Sleep Timer Press SLEEP repeatedly until OFF appears on the display Turning off the power also cancels the Sleep Timer Adjusting the Dis...

Страница 69: ... 06 OFF CEN LEVEL To adjust the output level of the center speaker from 06 dB to 06 dB REAR LEVEL To adjust the output level of the rear speakers from 06 dB to 06 dB S W LEVEL To adjust the output level of the subwoofer from 06 dB to 06 dB BASS To adjust the output level of the bass tone from 10 dB to 10 dB at 2 dB step TREBLE To adjust the output level of the treble tone from 10 dB to 10 dB at 2 ...

Страница 70: ...ou finish press SOUND and start from step 2 again 3 Press 3 or 2 to adjust the output balance 00 to 06 OFF 3 Decreases the left speaker output or restores the right speaker output 2 Decreases the right speaker output or restores the left speaker output L C R SW LS RS Sound adjustment indication on the display Ex Front balance Left front level Right front level ENTER C DLY 1 2 R DLY 1 3 REAR BALANC...

Страница 71: ...nd DTS Digital Surround To enjoy surround effectively all the speakers need to be connected and activated Dolby Digital Used to reproduce multichannel sound tracks of the software encoded with Dolby Digital Dolby Digital encoding method so called discrete 5 1 channel digital audio format records and digitally compresses the left front channel right front channel center channel left surround channe...

Страница 72: ...tal or DTS multichannel disc the system detects it and activate Multichannel Surround automatically When Dolby Digital is detected the indicator lights up on the display When DTS Digital Surround is detected the indicator lights up on the display To activate Dolby Pro Logic II modes You can use Dolby Pro Logic II when you playback any 2 channel sources either digital or analog Press PL II The curr...

Страница 73: ...er hand a VCD SVCD CD consists of Tracks See Example 2 In general each song has its own track number On some discs each track may also be divided by Indexes When playing back a VCD SVCD with Playback Control PBC function you can select what to view using the menu shown on the TV screen While operating a VCD SVCD using the menu some of the functions such as Repeat and Track Search may not work Note...

Страница 74: ...in each section Using the On Screen Bar You can check the following information on a disc while the disc is loaded and you can use some functions through the on screen bar 7 Showing the On Screen Bar From the remote control ONLY Press ON SCREEN Each time you press the button the following on screen bar appears on the TV screen in sequence AUDIO TV SLEEP DIMMER DVD FM AM TV CH AUX TV VIDEO MUTING C...

Страница 75: ...page 24 D Sound signal icon Ex Dolby Digital When the sound signal is Dolby Digital or DTS the sound signal icon appears Subtitle language icon Shows current subtitle language and total number of languages in the current chapter or track See page 24 Sound channel icon Shows current output sound channel See page 25 Repeat mode icon Shows current Repeat Play mode See page 28 1 Press ON SCREEN The fo...

Страница 76: ...ou can set your favorite subtitle language as the initial language shown on the screen See page 38 Press SUBTITLE The on screen bar appears on the TV screen for a while Each time you press the button the subtitle language changes as follows Notes You can also change the subtitle by using the on screen bar Ex When the DVD has 3 selections English French Spanish and no subtitle OFF SUBTITLE 4 Press ...

Страница 77: ...remote control ONLY Press ANGLE Each time you press the button the view angle changes Notes You can also change the view angle by using the on screen bar When the on screen bar is shown on the TV screen Multi angle view indication also changes as follows You cannot change the view angle in the chapter where does not appear even if the on screen bar indicate multi angle view the on screen bar shows...

Страница 78: ...corresponding to the item numbers listed PBC operation concept Notes While operating a VCD SVCD using menu some of the functions such as repeat play may not work For VCD SVCD Some VCDs and SVCDs have menus for interactive operations or a contents search function The Play Back Control function PBC allows you to operate the VCD SVCD using such menus When you start playing a VCD SVCD with PBC functio...

Страница 79: ...press ENTER to start playback from the selected elapsed playing time To input time 00 45 23 press 4 5 2 3 To input time 01 23 45 press 1 2 3 4 5 To cancel a mis entry press CANCEL Each time you press the button the last entry will be erased About 3 seconds after you pressed number buttons playback starts automatically from the selected time without pressing ENTER Searching for a Particular Point Y...

Страница 80: ...d A changes to A on the on screen bar 5 Press ENTER again to select the end point REPEAT A changes to REPEAT A B and A changes to A B then A B repeat begins The unit automatically locates point A and starts repeated playback between points A and B For VCD SVCD CD REPEAT TRACK Current track will be repeated REPEAT DISC All the disc will be repeated REPEAT OFF Repeat play is canceled Normal play is ...

Страница 81: ... to their disc structures and not a malfunction of the unit SLOW PROGRESSIVE ZOOM ENTER ENTER ZOOM x1 5 ZOOM x1 5 ZOOM x2 ZOOM x2 ZOOM x3 ZOOM OFF SELECT ZOOM POSITION Zoom indicator STEP 7 Slow Motion Playback You can enjoy slow motion playback while playing a DVD VCD or SVCD From the remote control ONLY Press SLOW repeatedly during playback or pause Each time you press the button slow motion spe...

Страница 82: ...f the root Playback order files search order and directory search order of the MP3 files recorded on a disc are determined by the writing or encoding application therefore playback order may be different from the one you have intended while recording the folders directories and the files Note on MP3 discs MP3 discs either CD R or CD RW require a longer readout time It differs due to the complexity...

Страница 83: ...V screen You cannot zoom a JPEG picture To go to another file Press or 4 during playback Skips to the beginning of the next file 4 Skips to the beginning of the current or previous file Notes It requires a longer time to read out data when playback moves to files in another folder It is not malfunction The time varies with the number and type of files in the folder 3 8 7 4 ENTER ON SCREEN 1 Curren...

Страница 84: ...ins the current folder by selecting the top cell of either column 5 Current file Ex MP3 file The name of the current file is highlighted 6 Item number Use this number when you select a particular file or folder with the number buttons 7 Item type indicator The item type folder MP3 file or JPEG file is shown Operations Using the On Screen Display You can select the file to play back on the on scree...

Страница 85: ...rent folder directory will be repeated REPEAT DISC All files on the disc will be repeated REPEAT OFF Repeat play is canceled Normal play is resumed Notes You can check the repeat mode with on screen bar See Showing the On Screen Bar on page 31 for the detail FMMOD REPEAT REPEAT TRACK REPEAT DIR REPEAT OFF REPEAT DISC Rotating and Flipping a Picture You can rotate flip a picture during JPEG file pl...

Страница 86: ...PRESET and MANUAL PRESET Select this for using and 4 as the buttons to select the preset station MANUAL Select this for using and 4 as the buttons to change the frequency manually 3 Press and hold or 4 Increases the frequency 4 Decreases the frequency The system starts searching for stations and stops when a station of sufficient signal strength is tuned in When you press the button repeatedly the...

Страница 87: ... you can change the FM reception mode to improve the reception From the remote control ONLY Press FM MODE The indicator goes off from the display and the program loses the stereo effect To resume the stereo effect press FM MODE again The stereo effect resumes Notes Be sure to change the FM reception mode to stereo when you change a station FM AM SOURCE FMMODE REPEAT Using Preset Tuning Once a stat...

Страница 88: ...STOP PAUSE etc You can select the following languages English French German Italian Spanish BLACK LEVEL Select the TV screen brightness ON Make the screen brightness darker OFF Make the screen brightness normal DRC Dynamic Range Compression You can enjoy a powerful sound at night even at a low volume when listening to the sound with Dolby Digital The higher the tab is set the deeper the effect bec...

Страница 89: ...e selected highlighted item is shown on the right column 3 Press 5 to select highlight the menu item you want to adjust Select TV DISPLAY here The sub menu for TV DISPLAY appears on the right column 4 Press 3 The current setting on the sub menu is highlighted 5 Press 5 to select the desired setting 6 Press ENTER The selected setting is highlighted 7 Press 2 and repeat steps 3 to 6 to set up other ...

Страница 90: ... PAGE AUDIO SUBTITLE DISC MENU PARENTAL PASSWORD JAPANESE ENGLISH FRENCH SPANISH CHINESE GERMAN ITALIAN OTHERS MAIN PAGE PREFERENCES PAGE CHOICE TIME ENTER ENTER Setting Up the DVD Preferences Languages you can select on this menu You can select the following languages separately for AUDIO SUBTITLE and DISC MENU English Japanese French Spanish Chinese German and Italian You can set languages other...

Страница 91: ...ed parental level is highlighted When shipped from the factory the password is 7890 To clear the password entry press ENTER You can enter the password again from the first digit A wrong password is automatically cleared after entering the last digit To erase the setup menu Press CHOICE TIME To change the password 1 Repeat steps 1 to 5 of The basic procedure to set up preferences select PASSWORD in...

Страница 92: ...4 Maltese 7789 Burmese 7865 Nauru 7869 Nepali 7876 Dutch 7879 Norwegian 7982 Oriya 8065 Panjabi 8076 Polish 8083 Pashto Pushto 8084 Portuguese 8185 Quechua 8277 Rhaeto Romance 8279 Rumanian 8285 Russian 8365 Sanskrit 8368 Sindhi 8372 Serbo Croatian 8373 Singhalese Code Language 8375 Slovak 8376 Slovenian 8377 Samoan 8378 Shona 8379 Somali 8381 Albanian 8382 Serbian 8385 Sudanese 8386 Swedish 8387 ...

Страница 93: ... to direct sunlight temperature extremes and moisture To clean the disc Wipe the disc with a soft cloth in a straight line from center to edge Maintenance Cleaning the unit Stains on the unit Should be wiped off with a soft cloth If the system is heavily stained wipe it with a cloth soaked in water diluted neutral detergent and wrung well then wipe clean with a dry cloth Since the system may deter...

Страница 94: ...sc is scratched The disc is dirty A VCR is connected between the center unit and the TV Initial setup TV screen size is incorrect The scanning mode is set to PROGRESSIVE TV though the system is connected to the TV which does not support the progressive video input The received signal is too weak The station is too far away The antenna is not connected correctly Lightning or electronic noise interf...

Страница 95: ...ion Tuning Range FM 87 50 MHz 108 00 MHz AM 530 kHz 1 710 kHz Usable Sensitivity FM 8 0 dBf 0 9 µV 75 Ω AM loop antenna 650 µV m General Readable Discs DVD VIDEO Video CD Super Video CD Audio CD CD R RW Audio CD Video CD Super Video CD MP3 JPEG DVD R RW Video format Power Requirements AC 120 V 60 Hz Power Consumption 110 W at operation 2 W in standby mode Dimensions W H D 360 mm 65 mm 404 mm 14 3 ...

Страница 96: ...TH A25 DVD DIGITAL THEATER SYSTEM VICTOR COMPANY OF JAPAN LIMITED EN FR 0903TMMMDWSAM 2003 VICTOR COMPANY OF JAPAN LIMITED ...

Отзывы: