background image

For Customer Use:

Enter below the Model No. and Serial 
No. which are located either on the rear, 
bottom or side of the cabinet. Retain this 
information for future reference.

Model No.

Serial No.

LVT0650-001A

[J]

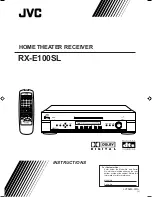
INSTRUCTIONS

RX-E100SL

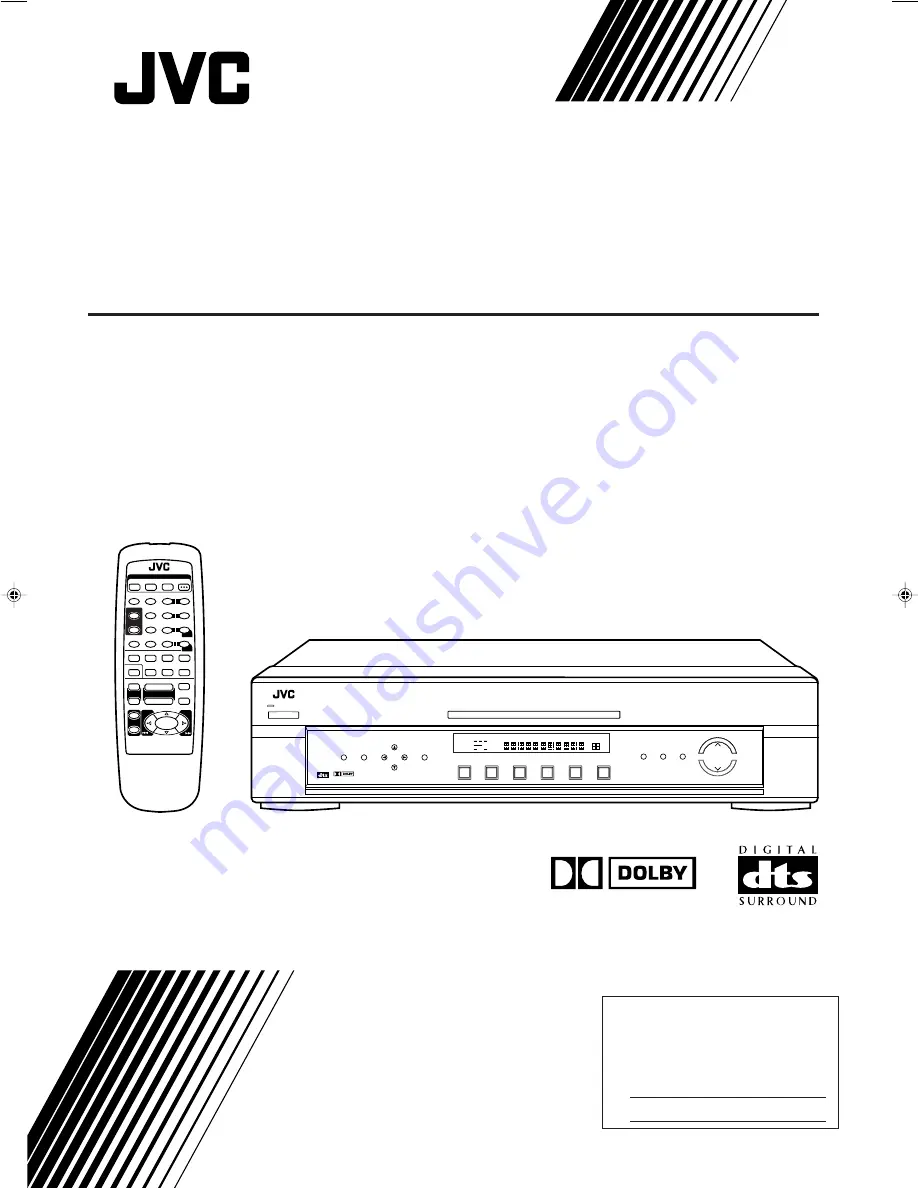
HOME THEATER  RECEIVER

D I G I T A L

DVD

TV

VCR

CD

FM

AM

RX-E100

HOME THEATER RECEIVER

TV   DILECT

DVD

MEMORY

CONTROL

ADJUST

SETTING

STANDBY

D I G I T A L

D I G I T A L

S U R R O U N D

INPUT

ANALOG/DIGITAL

INPUT  ATT

MASTER  VOLUME

SURROUND

ON/OFF

DSP

MODE

ANALOG

PRO LOGIC

SUBWFR LFE

SLEEP

ST

TUNED

MUTING

MH

Z

KH

Z

VOL

AUTO

DGTL AUTO

INPUT ATT

DSP

L

C

R

LS

S

RS

LPCM

DOLBY D

DTS

POWER

1

1

REMOTE CONTROL

SURROUND

DSP MODE

SOUND

1

5

– SUB

TEST

SLEEP

6

5

4

EFFECT

 –

5

9

8

 – REAR•L +

BASS

BOOST

5

 – REAR•R +

MENU

5

CD

AM

MUTING

TV/VIDEO

TV

VCR

FM

TV VOL

TV/VCR

 CH

DVD

+

+

VOLUME

POWER

8

7

RM-SRXE100J 

HOME THEATER  RECEIVER

3

2

INPUT A/D

ENTER

+10

0

10

+

+

7

£

TV

VCR

AUDIO

DVD

RX-E100SL[J]_COVER_f

01.3.7, 2:43 PM

1

Содержание RX-E100SL

Страница 1: ...DJUST SETTING STANDBY D I G I T A L D I G I T A L S U R R O U N D INPUT ANALOG DIGITAL INPUT ATT MASTER VOLUME SURROUND ON OFF DSP MODE ANALOG PRO LOGIC SUBWFR LFE SLEEP ST TUNED MUTING MHZ KHZ VOL AUTO DGTL AUTO INPUT ATT DSP L C R LS S RS LPCM DOLBY D DTS POWER 1 1 REMOTE CONTROL SURROUND DSP MODE SOUND 1 5 SUBWOOFER TEST SLEEP 6 5 4 EFFECT CENTER 5 9 8 REAR L BASS BOOST 5 REAR R MENU 5 CD AM MU...

Страница 2: ...e Dessous Rien ne doit obstruer par dessous poser l appareil sur une surface plate Veiller également à ce que l air circule le mieux possible comme illustré Front Avant RX E100SL Spacing 15 cm or more Dégagement de 15 cm ou plus Wall or obstructions Mur ou obstruction Floor Plancher Stand height 15 cm or more Hauteur du socle 15 cm ou plus For U S A This equipment has been tested and found to comp...

Страница 3: ... Output Balance 17 Reinforcing the Bass 18 Adjusting the Tone 19 Adjusting the Subwoofer Output Level 19 Tuner Operations 20 Tuning in Stations Manually 20 Using Preset Tuning 20 Selecting the FM Reception Mode 21 Creating Realistic Sound Fields 22 About Relations between Speaker Layout and DSP Modes 24 Using Surround Modes Remote Control 25 Using Theater Surround Remote Control 26 Using DAP Modes...

Страница 4: ...iver to rain or moisture Locations Install the receiver in a location that is level and protected from moisture The temperature around the receiver must be between 23 F and 95 F 5 C and 35 C Make sure there is good ventilation around the receiver Poor ventilation could cause overheating and damage the receiver Handling the receiver DO NOT touch the power cord with wet hands DO NOT pull on the powe...

Страница 5: ... with a standard type connector disconnect the supplied FM antenna Notes If the AM loop antenna wire is covered with vinyl remove the vinyl while twisting it as shown to the right Make sure the antenna conductors do not touch any other terminals connecting cords and power cord This could cause poor reception Getting Started Snap the tabs on the loop into the slots of the base to assemble the AM lo...

Страница 6: ...r panel to the and terminals marked on the speakers respectively 1 Cut twist and remove the insulation at the end of each speaker cord not supplied 2 Open the terminal then insert the speaker cord 3 Close the terminal Connecting the subwoofer By connecting a subwoofer you can enhance the bass or reproduce the original LFE signals recorded in the digital software Connect the input jack of a powered...

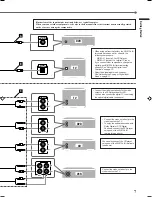
Страница 7: ... 1 DVD DIGITAL IN CENTER SP EAKER REAR SP EAKERS RIGHT LEFT FRON T SP EAKERS RIGHT LEFT SU BW OOFER OUT MEN U ENTE R 9 10 CAUTION SPEAKER IM PEDANCE 8 16 CENTER SPEAKER REAR SPEAKERS RIGHT LEFT FRONT SPEAKERS RIGHT LEFT Right front speaker Left front speaker Center speaker RX E100SL To center speaker To right front speaker To right rear speaker To left front speaker To left rear speaker ...

Страница 8: ...tective plug If you connect a sound enhancing device such as a graphic equalizer between the source components and this receiver the sound output through this receiver may be distorted Connecting the Power Cord Before plugging the receiver into an AC outlet make sure that all connections have been made Plug the power cord into an AC outlet Connecting Audio Video Components Turn the power off to al...

Страница 9: ...t directly to the video input on the TV Connect the video out directly to the video input on the TV To enjoy the software encoded with Dolby Digital or DTS Digital Surround connect the DVD player using one of the DIGITAL IN terminals see above You can also connect the CD player using one of the DIGITAL IN terminals see above Getting Started When shipped from the factory the DIGITAL IN terminals ha...

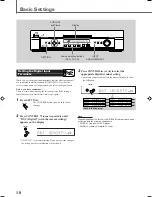
Страница 10: ... This manual mainly explains operations using the buttons and controls on the front panel You can also use the buttons on the remote control if they have the similar names or marks as those on the front panel If operations using the remote control are different from those using the front panel they are then explained You can also see Mastering Remote Operations on page 32 STANDBY POWER Note When y...

Страница 11: ...RS Lights up when the right rear channel signal comes in S Lights up when the monaural rear channel signal comes in LFE Lights up when the LFE channel signal comes in The speaker indicators light up as follows The subwoofer speaker indicator SUBWFR lights up when SUBWFR is set to YES see page 12 The other speaker indicators light up only when the corresponding speaker is activated AND when the cor...

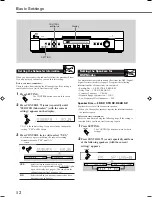
Страница 12: ... you start remember There is a time limit in doing the following steps If the setting is canceled before you finish start from step 1 again 1 Press SETTING The CONTROL buttons now work for basic settings 2 Press CONTROL or 5 repeatedly until DGT Digital with the current setting appears on the display 1DVD2TV is the initial setting If you have already changed the setting another combination will be...

Страница 13: ...tal DTS Lights when DTS Digital Surround signals come in Flashes when DGTL DTS is selected for software not encoded with DTS Digital Surround Note When DGTL AUTO cannot recognize the incoming signals no digital signal indicators light up on the display DVD TV VCR CD DVD INPUT ANALOG DIGITAL INPUT ATT DVD TV VCR CD DVD Remote NOT Selecting the Analog or Digital Input Mode When you have connected di...

Страница 14: ... you start remember There is a time limit in doing the following steps If the setting is canceled before you finish start from step 1 again 1 Press SETTING The CONTROL buttons now work for basic settings 2 Press CONTROL or 5 repeatedly until one of the following speakers with the current setting appears Remote NOT Setting the Subwoofer Information When you have connected a subwoofer follow the pro...

Страница 15: ...CTR DL REAR DL Adjust the delay time of the sounds from the center speaker and from the rear speakers comparing to that of the sounds from the front speakers If the distance to the center speaker and or the rear speakers from your listening point is almost the same as that to the front speakers select 0 msec 1 msec increase or decrease in delay time corresponds to 1 foot 30 cm increase or decrease...

Страница 16: ...speaker is about 4 3 4 inches 12 cm 100HZ Select this frequency when the cone speaker unit built in the speaker is about 3 15 16 inches 10 cm 120HZ Select this frequency when the cone speaker unit built in the speaker is about 3 3 16 inches 8 cm CONTROL ANALOG PRO LOGIC SUBWFR LFE VOL DGTL AUTO INPUT ATT DSP L C R LS S RS LPCM DOLBY D DTS CONTROL SETTING 3 Press CONTROL 3 or 2 to select the delay ...

Страница 17: ...he dynamic range a little MAX Select this when you want to apply the compression effect fully Useful at night SETTING CONTROL ANALOG PRO LOGIC SUBWFR LFE VOL DGTL AUTO INPUT ATT DSP L C R LS S RS LPCM DOLBY D DTS CONTROL IC VOL TO T Low Frequency Effect Attenuator LFE If the bass sound is distorted while playing back software using Dolby Digital or DTS Digital Surround follow the procedure below T...

Страница 18: ... NOT 3 Press CONTROL 3 or 2 to select ON Each time you press the button Auto Surround turns ON or OFF ON If multichannel signals come in an appropriate Surround mode will be turned on If Dolby Digital 2 channel or DTS 2 channel signals come in STEREO will be selected If linear PCM signals come in nothing will change OFF Select this to deactivate Auto Surround Notes This function does not take effe...

Страница 19: ...T INPUT ANALOG DIGITAL so that the INPUT ATT indicator lights up on the display Each time you press and hold the button the Input Attenuator turns on ATT ON or off ATT NORMAL Adjusting the Front Speaker Output Balance If the sounds you hear from the front right and left speakers are unequal you can adjust the speaker output balance You have to make this adjustment for each source Before you start ...

Страница 20: ...ed before you finish start from step 1 again 1 Press ADJUST The CONTROL buttons now work for sound adjustments 2 Press CONTROL or 5 repeatedly until B BOOST Bass Boost with the current setting appears on the display OFF is the initial setting If you have already changed the setting ON will be shown 3 Press CONTROL 3 or 2 to turn ON or OFF Bass Boost ON Select this to boost the bass level Bass Boos...

Страница 21: ...NPUT ATT DSP L C R LS S RS LPCM DOLBY D DTS Ex When adjusting the bass level Remote NOT Adjusting the Subwoofer Output Level You can adjust the subwoofer output level if you have connected a subwoofer and set the subwoofer information correctly YES You have to make this adjustment for each source Before you start remember There is a time limit in doing the following steps If the setting is cancele...

Страница 22: ...re the preset stations Before you start remember There is a time limit in doing the following steps If the setting is canceled before you finish start from step 1 again 1 Tune in the station you want to preset see Tuning in Stations Manually If you want to store the FM reception mode for this station select the FM reception mode you want See Selecting the FM Reception Mode on page 21 2 Press MEMOR...

Страница 23: ...mote NOT CONTROL Ex When selecting the FM band FM AM ST TUNED MUTING MHZ VOL AUTO ST TUNED MUTING MHZ VOL AUTO ST TUNED MUTING VOL AUTO Then ST TUNED MUTING MHZ VOL AUTO CONTROL ST TUNED MUTING MHZ VOL AUTO ANALOG TUNED MHZ VOL L R CONTROL 4 Press MEMORY again while the selected channel number is flashing on the display The selected channel number stops flashing The station is assigned to the sele...

Страница 24: ...o and surround effects In addition Dolby Digital enables stereo rear sounds and sets the cutoff frequency of the rear treble at 20 kHz compared to 7 kHz for Dolby Pro Logic These facts enhance the sound movement and being there feelings much more than Dolby Pro Logic DTS Digital Surround Used to reproduce multichannel sound tracks of the software encoded with DTS Digital Surround To enjoy the soft...

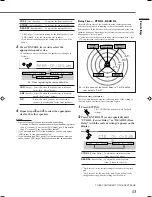
Страница 25: ...delayed by the distances of the ceiling and walls see the diagram to the right These indirect sounds are important elements of the acoustic surround effects The following DAP modes are provided with this receiver LIVE CLUB Gives the feeling of a live music club with a low ceiling DANCE CLUB Gives a throbbing bass beat HALL Gives clear vocal and the feeling of a concert hall PAVILION Gives the spac...

Страница 26: ... mode turns on or off STEREO TV Center speaker Front speaker Front speaker Rear speaker Rear speaker 5 Channels Front speaker TV Rear speaker Front speaker Rear speaker 4 Channels SUBWFR LFE VOL DGTL AUTO L C R LS RS DOLBY D DSP mode Each time you press DSP MODE the DSP modes Theater Surround and DAP modes change as follows Remote Front panel Dolby Digital Dolby Digital SURROUND DSP MODE Remote SU...

Страница 27: ... Digital or DTS Digital Surround If AUTO SR Auto Surround is set to ON Playing a digital source automatically activates an appropriate Surround mode See page 16 2 Press SURROUND to activate an appropriate Surround mode Pro Logic Dolby Digital or DTS Digital Surround Each time you press the button Surround mode turns on and off alternately Note When playing back an analog source SURROUND ON will no...

Страница 28: ...BWFR LFE VOL DGTL AUTO INPUT ATT DSP L C R LS S RS LPCM DOLBY D DTS ANALOG PRO LOGIC SUBWFR LFE VOL DGTL AUTO INPUT ATT DSP L C R LS S RS LPCM DOLBY D DTS 6 5 CENTER 5 9 8 REAR L 5 MENU REAR R ENTER 10 0 GIC VOL UTO TT 1 TEST To cancel Surround Mode Press SURROUND again so that STEREO appears on the display If Surround mode is canceled while playing back multichannel digital software all channel s...

Страница 29: ...enter speaker when CTR SP is set to NO 5 Adjust the following speaker output levels from 10 to 10 Make adjustments so that the sound level of the selected speaker is set at the same level as that of the front speakers To adjust the center speaker level press CENTER To adjust the left rear speaker level press REAR L To adjust the right rear speaker level press REAR R Creating Realistic Sound Fields...

Страница 30: ...e sound level of the selected speaker is set at the same level as that of the front speakers To adjust the left rear speaker level press REAR L To adjust the right rear speaker level press REAR R 5 Press EFFECT to select the DSP effect level 1 to 5 you want As the number increases the DSP effect becomes stronger normally set it to EFFECT 3 To cancel DAP Mode Press DSP MODE repeatedly so that STERE...

Страница 31: ... indications with the current setting appears Before you start remember Make sure that you have set the speaker information correctly see page 12 You cannot adjust the center speaker output level when you have set CTR SP to NO You cannot adjust the rear speaker output levels when you have set REAR SP to NO Using Surround Modes Front Panel Surround mode cannot be used with another DSP mode Once Sur...

Страница 32: ...anged the setting another setting will be shown 5 Press CONTROL 3 or 2 to adjust the speaker output level Make adjustments so that the sound level of the selected speaker is set at the same level as that of the front speakers 6 Repeat steps 4 and 5 to adjust the other speaker levels To cancel Surround Mode Press SURROUND ON OFF again so that STEREO appears on the display If Surround mode is cancel...

Страница 33: ...mber increases the effect becomes stronger normally set it to EFFECT 3 0 is the initial setting for the speaker output levels and EFFECT 3 is for the DSP effect level If you have already changed the setting another setting will be shown 5 Press CONTROL 3 or 2 to make an adjustment When adjusting the speaker output levels make adjustments so that the sound level of the selected speaker is set at th...

Страница 34: ...ound output Creating realistic sound fields SURROUND and DSP MODE buttons see also pages 24 28 SURROUND Turn on or off Surround mode DSP MODE Select the DSP modes Theater Surround and DAP modes Each time you press the button the DSP modes change Adjusting the sound SOUND button see also pages 18 19 25 27 28 Change the functions of 10 keys and make them work for sound adjustments Turning off the re...

Страница 35: ...ASS BOOST 5 REAR R MENU 5 7 3 2 ENTER 10 0 10 1 4 1 1 TV VCR CH 8 7 TV VIDEO TV VOL Adjusting the sound and operating other JVC products 10 keys After pressing SOUND you can use the 10 keys for sound adjustments See also pages 18 19 25 28 TEST Turn on or off the test tone output EFFECT Change the DSP effect level BASS BOOST Turn on or off Bass Boost SUBWOOFER Adjust the subwoofer level CENTER Adju...

Страница 36: ... the parentheses for details Front Panel 1 POWER button and STANDBY lamp 8 2 Remote sensor 3 Display 4 SETTING button 10 12 16 5 ADJUST button 17 19 29 31 6 CONTROL buttons 10 21 29 31 5 2 3 7 MEMORY button 20 21 8 Source selecting buttons 8 11 20 21 DVD TV VCR CD FM AM 9 INPUT ANALOG DIGITAL button 11 INPUT ATT button 17 p SURROUND ON OFF button 24 29 q DSP MODE button 24 30 31 w VOLUME buttons 8...

Страница 37: ...f speaker terminals The receiver is overloaded because of a high voltage The remote control is not ready for your intended operation There is an obstruction hiding the remote sensor on the receiver Batteries are weak SOLUTION Plug the power cord into an AC outlet Check speaker wiring and reconnect if necessary Select the correct source Press MUTING to cancel the mute Select the correct input mode ...

Страница 38: ...al to Noise Ratio 66 IHF 78 IHF CD TV VCR DVD 85 dB 75 dB Frequency Response 8 Ω CD TV VCR DVD 20 Hz to 20 kHz 1 dB Tone Control Bass 100 Hz 10 dB Treble 10 kHz 10 dB Bass Boost 6 dB 1 dB at 70 Hz FM tuner IHF Tuning Range 87 5 MHz to 108 0 MHz Usable Sensitivity Monaural 12 8 dBf 1 2 µV 75 Ω 50 dB Quieting Sensitivity Monaural 21 3 dBf 3 2 µV 75 Ω Stereo 41 3 dBf 31 5 µV 75 Ω Signal to Noise Rati...

Страница 39: ...evel Right rear level Effect level Analog digital input ANALOG DGTL AUTO Input Attenuator ON NORMAL Bass Boost ON OFF Tone adjustment Bass Treble Subwoofer level Balance Surround mode Theater Surround DAP modes Mode SURROUND THEATER LIVE CLUB DANCE CLUB HALL PAVILION STEREO Center level Left rear level Right rear level Effect level Source Name Analog digital input ANALOG DGTL AUTO Input Attenuator...

Страница 40: ...E CENTER LOCATIONS 10 New Maple Avenue Pine Brook NJ 07058 9641 973 396 1000 5665 Corporate Avenue Cypress CA 90630 0024 714 229 8011 13 Cummings Park Woburn MA 01801 781 376 9100 705 Enterprise Street Aurora IL 60504 8149 630 851 7855 10700 Hammerly Suite 110 Houston TX 77043 713 935 9331 890 Dubuque Avenue South San Francisco CA 94080 1804 650 871 2666 1500 Lakes Parkway Lawrenceville GA 30243 5...

Страница 41: ... attachment not provided with the products or if the model number or serial number has been altered tampered with defaced or removed 2 Initial installation and installation and removal for repair 3 Operational adjustments covered in the Owner s Manual normal maintenance video and audio head cleaning 4 Damage that occurs in shipment due to act of God and cosmetic damage 5 Signal reception problems ...

Страница 42: ...VICTOR COMPANY OF JAPAN LIMITED EN 0301NHMMDWJEIN J VC ...

Отзывы: