background image

40

4

Setting the Bass Sounds—SUBWOOFER

On this submenu, you can adjust
subwoofer and bass sounds
precisely according to your
preference.

7

SUBWFR OUT

You can select the type of the signal which can be transmitted
through the subwoofer. In other words, you can determine
whether or not the bass elements of the front speaker channels
are transmitted through the subwoofer regardless of the front
speaker size setting (either “SMALL” or “LARGE”).

Select one of the following:

LFE

:

Select to transmit only the LFE signals (while
playing Dolby Digital and DTS software) and
the bass elements of small speakers through the
subwoofer.

LFE+MAIN :

Select to always add the bass elements of the
front speaker channels (MAIN) to the above
(LFE) , and to transmit them through the
subwoofer.

Note:

If “SUBWOOFER” is set to “NO” on the SPEAKER SETTING
submenu, this function is not available.

7

LFE LEVEL

If the bass sound is distorted while playing back software
encoded with Dolby Digital or DTS, set the LFE level to
eliminate distortion.
• This setting is also valid for THX Ultra2 Cinema, THX

Music, DVD MULTI, and EXT 7.1CH.

Adjust the LFE level within the range of 

–20 dB

 to

 0 dB.

(Normally select “0 dB.”)
• Each time you press 

@

 (LEFT) or 

#

 (RIGHT), the LFE level

changes by ± 1 dB.

7

PHASE

If the sound output through the subwoofer is not satisfactory,
changing the phase will give you a different result.

Select one of the following:

NORMAL :

Normally select this.

REVERSE :

Select this to reverse the phase.

Note:

If “SUBWOOFER” is set to “NO” on the SPEAKER SETTING
submenu, this function is not available.

3

Setting the Speaker Distance
—SPEAKER DISTANCE

The distance from your listening
point to the speakers is another
important element to obtain the
best possible surround sound of
the Surround/THX/DSP modes.
You need to set the distance from
your listening point to the
speakers.

By referring to the speaker distance setting, this unit automatically
sets the delay time of the sound through each speaker so that sounds
through all the speakers can reach you with the same timing.

7

UNIT

Select one of the following as your measuring unit:

meter

:

Select to set the distance by meter.

feet

:

Select to set the distance by feet.

7

For each speaker

Set the distance from the listening point within the range of

0.30 m (1.0 ft)

 to

 9.00 m (30.0 ft)

, in 0.15 m (0.5 ft) intervals.

Notes:

• You cannot set the speaker distance for the speaker you have

selected “NO” or “NONE” for on the SPEAKER SETTING
submenu.

• This function does not take effect for the surround back channel

when the source is “EXT 7.1CH” (with Analog Direct turned off).

Continued on the next page.

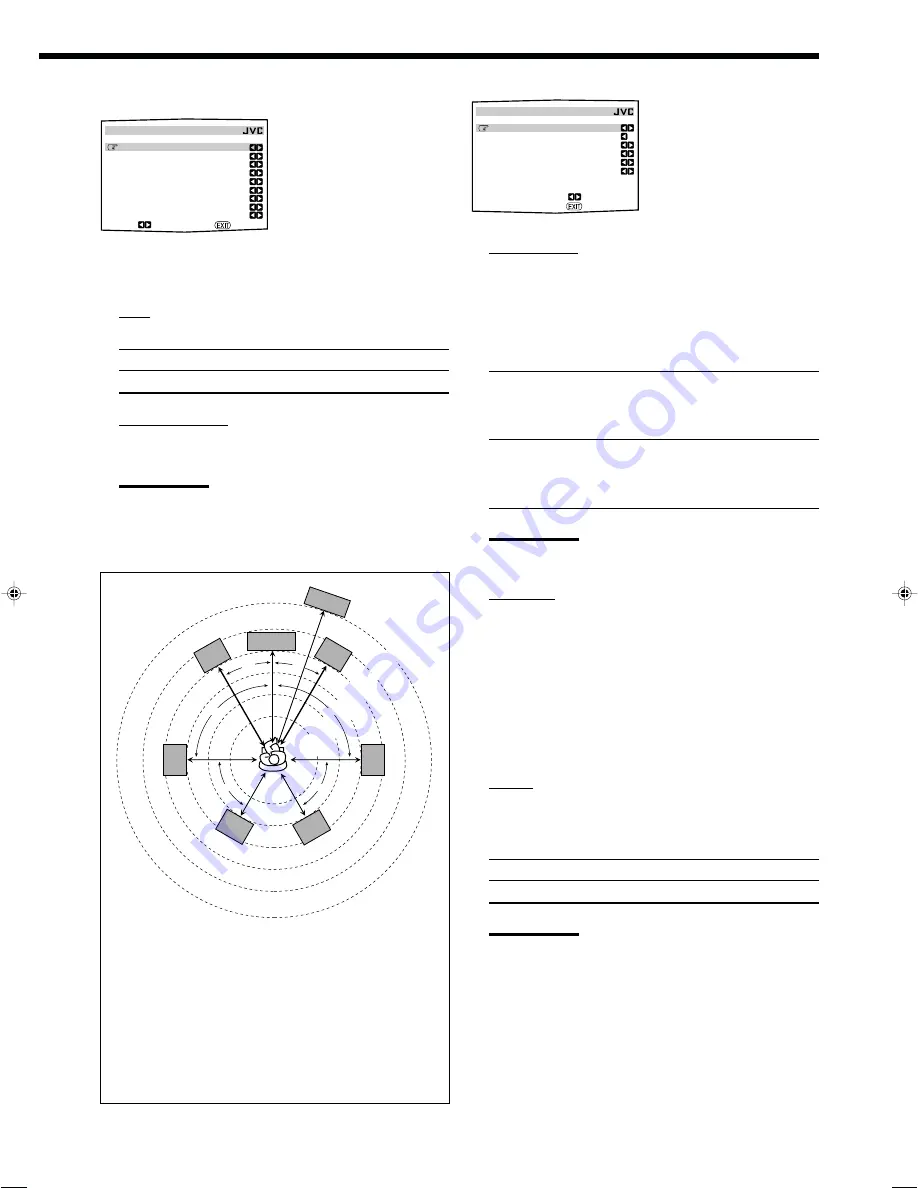
Ex. In the above case, set the speaker distance as follows:

Subwoofer (SUBWFR)

SUBWOOFER: 3.60 m (12.0 ft)

Left front (L)

FRONT L SP:

3.00 m (10.0 ft)

Right front (R)

FRONT R SP:

3.00 m (10.0 ft)

Center (C)

CENTER SP:

3.00 m (10.0 ft)

Left surround (LS)

SURR L SP:

2.70 m (9.0 ft)

Right surround (RS)

SURR R SP:

2.70 m (9.0 ft)

Left surround back (LSB)

SBACK L SP:

2.40 m (8.0 ft)

Right surround back (RSB) SBACK R SP:

2.40 m (8.0 ft)

 SUBWOOFER 

  SUBWFR OUT :LFE
  LFE LEVEL  :     0dB
  PHASE      : NORMAL
  BASS PEAK LIMIT: ON
  BASS TEST TONE : OFF
  BASS PEAK LVL: –10dB

:OPERATE
:BACK

:OPERATE    :BACK

 SPEAKER DISTANCE 

  UNIT        : meter
  SUBWOOFER   : 3.00m
  FRONT L SP  : 3.00m
  FRONT R SP  : 3.00m
  CENTER SP   : 3.00m
  SURR L SP   : 3.00m
  SURR R SP   : 3.00m
  SBACK L SP  : 3.00m
  SBACK R SP  : 3.00m

2.1 m

(7 ft)

2.4 m

(8 ft)

2.7 m

(9 ft)

3.0 m

(10 ft)

3.3 m

(11 ft)

3.6 m

(12 ft)

C

L

R

SUBWFR

LS

RS

LSB

RSB

30˚

90˚

60˚

60˚

90˚

30˚

35-44_RX-DP15B[J]f.pm6

04.3.15, 9:20 PM

40

Содержание RX-DP15B - AV Receiver

Страница 1: ...UDIO VIDEO CONTROL RECEIVER INSTRUCTIONS For Customer Use Enter below the Model No and Serial No which are located either on the rear bottom or side of the cabinet Retain this information for future reference Model No Serial No ...

Страница 2: ...UTION To avoid personal injury or accidentally dropping the unit have two persons unpack carry and install the unit ATTENTION Pour éviter toute blessure personnelle ou chute accidentelle de l appareil faites déballer transporter et installer l appareil par deux personnes WARNING TO REDUCE THE RISK OF FIRE OR ELECTRIC SHOCK DO NOT EXPOSE THIS APPLIANCE TO RAIN OR MOISTURE CAUTION TO REDUCE THE RISK...

Страница 3: ...ial installation This equipment generates uses and can radiate radio frequency energy and if not installed and used in accordance with the instructions may cause harmful interference to radio communications However there is no guarantee that interference will not occur in a particular installation If this equipment does cause harmful interference to radio or television reception which can be deter...

Страница 4: ...s These COMPU LINK remote control systems allow you to operate other JVC audio video components from this receiver Precautions Power sources When unplugging the receiver from the wall outlet always pull the plug not the AC power cord Do not handle the AC power cord with wet hands If you are not going to operate the receiver for an extended period of time unplug the AC power cord from the wall outl...

Страница 5: ...unds SUBWOOFER 40 5 Setting the THX Audio THX AUDIO SETUP 41 6 Setting the Surround Channel Output Speakers SURR CH OUT 42 7 Setting the Audio Delay Level AUDIO DELAY 42 8 Selecting the Dual Mono Sound DUAL MONO 42 9 Setting the Digital Input Output Terminals DIGITAL IN OUT 42 p Setting the Video Input Terminals VIDEO INPUT 43 q Turning On and Off the Video Output VIDEO POWER 43 w Setting the Zone...

Страница 6: ...O TAPE MD CDR FM AM EXT 7 1CH 1 2 3 4 5 6 7 8 9 i u y t r e w q p h x SPEAKERS 1 SURROUND THX RIGHT PRESET 5 EXIT FM MODE LEFT PRESET UP TUNING 5 SET MEMORY DOWN TUNING SURR DSP OFF ANALOG DIRECT SPEAKERS 2 ZONE 2 INPUT MODE INPUT ATT ZONE 2 CONTROL EX ES 7 1 DSP ADJUST MENU SETUP MENU DOOR DOWN Parts Identification Front Panel Display Window To open the front door press DOOR DOWN For more details...

Страница 7: ... digital signal format of incoming signals Main display Shows the source name station frequency Surround THX DSP mode etc PARAMETRIC EQ indicator 48 Lights up when Parametric Equalizer is in use VOLUME level indicator Indicates the volume level Goes off while muting sounds MIDNIGHT MODE indicator 49 Lights up when Midnight Mode is in use Refer to the pages in parentheses for details Front Panel 1 ...

Страница 8: ...1 ch Output TAPE MD OUT CDR OUT VCR 1 OUT VCR 2 OUT 4 S video composite video input output jacks 13 15 Input TV SOUND DBS IN VCR 1 IN VCR 2 IN DVD IN Output VCR 1 OUT VCR 2 OUT MONITOR OUT 5 Component video input output jacks 13 15 Input 1 IN DVD 2 IN 3 IN Output MONITOR OUT 6 EXT 7 1CH IN audio input jacks 12 7 RF REMOTE ANTENNA terminal and BAND 1 2 selector 17 8 FM AM ANTENNA terminals 7 8 EXT ...

Страница 9: ...ctor is set to LEARN This remote control cannot operate the receiver or other components but can memorize IR signals See page 78 4 Signal transmission indicator Lights up when transmitting the remote control signals 5 Remote control operation mode display Remote control operation mode such as DVD CD SOUND etc appears When the remote control operation mode changes it is shown on this display for ab...

Страница 10: ...Antenna 1 IR Signal Transmitter 1 Double Sided Adhesive Tape 1 Front Terminal Cover 1 If any item is missing contact your dealer immediately Getting Started This section explains how to connect audio video components and speakers to the receiver and how to connect the power supply Connecting the FM and AM Antennas FM Antenna Connections FM 75 COAXIAL ANTENNA AM EXT AM LOOP AM LOOP ANTENNA AM EXT F...

Страница 11: ...kers of the SPEAKER IMPEDANCE indicated by the speaker terminals When connecting to both of the FRONT 1 and FRONT 2 ZONE 2 SPEAKERS terminals use speakers with an impedance of 8 Ω to 16 Ω When connecting to either the FRONT 1 or FRONT 2 ZONE 2 SPEAKERS terminals use speakers with an impedance of 4 Ω to 16 Ω Basic connecting procedure 1 Cut twist and remove the insulation at the end of each speaker...

Страница 12: ...t the listener s ears Zone 1 speaker layout Ideal speaker layout varies depending on the conditions of your listening room The diagram below is a recommended typical example Center speaker Left front speaker s L Right front speaker s R Center speaker C Surround back speakers LSB RSB Left surround speaker LS Right surround speaker RS Note Ideal speaker layout requires that all speakers be placed at...

Страница 13: ...quency terminals To use the speaker with the above connection see w Setting the Zone 2 Speakers 2 Usage ZONE 2 SPEAKER 2 on pages 43 and 44 When this connection is used you cannot use the surround back speakers In this case no sounds come out of the PREOUT SURR BACK jacks Connecting a subwoofer You can enhance the bass by connecting a subwoofer Connect the input jack of a powered subwoofer to the ...

Страница 14: ...rder Turntable Rear view If an earth cable is provided for your turntable connect the cable to the screw marked H on the rear panel To audio output Turntable To audio output CD player RIGHT LEFT PHONO CD TAPE MD OUT REC IN PLAY AUDIO IN R L IN Cassette deck or MD recorder To audio output To audio input Cassette deck CD CDR TAPE MD OUT REC IN PLAY OUT REC IN R L R L MD recorder To audio output To a...

Страница 15: ...ct the video output jack on the external component directly to the TV and select the connected input on the TV Connect the video output jack on the external component to any one of unused video input jacks on the rear then 1 Select that video input as the video source 2 Select EXT 7 1CH as the audio source See Selecting different sources for picture and sound on page 24 Note If the external compon...

Страница 16: ...ideo output Ï To S video input Ì To composite video input D VHS S VHS VHS VCR VCR s Rear view Å To audio output ı To audio input Ç To composite video input Î To S video input To composite video output Ï To S video output VIDEO RIGHT LEFT DVD IN TV SOUND DBS IN OUT REC IN PLAY VCR 1 VCR 2 S VIDEO VIDEO Y PB PR 1IN DVD Y PB PR 3IN Y PB PR 2 IN FRONT IN PLAY OUT REC COMPONENT AUDIO A B C D E F G R L ...

Страница 17: ...eo or composite video connections DBS tuner Å To audio output ı To component video output Ç To S video output Î To composite video output VIDEO RIGHT LEFT TV SOUND DBS IN OUT REC IN PLAY VCR 1 S VIDEO VIDEO Y PB PR 1IN DVD Y PB PR 2 IN COMPONENT AUDIO DBS A B C D R L Notes When connecting the DBS tuner to the TV SOUND DBS IN jacks change the source name to DBS which will be shown on the display wh...

Страница 18: ... page 43 To view the pictures through the DVD player in Zone 2 connect it to either S video or composite video input jacks Notes If the DVD player has component video output jacks you can connect it to either the COMPONENT 1 IN DVD 2 IN or 3 IN jacks When connecting the DVD player to either one of the component input jacks make video input terminal setting correctly For details see p Setting the V...

Страница 19: ...see page 11 When you want to operate the VCR TV or DVD player using the AV COMPU LINK remote control system connect the target component also as described in Analog Connections see pages 13 to 15 To use the digital source components for Zone 2 connect them using analog connection methods as well Digital input terminals You can connect any digital components having a coaxial or optical digital outp...

Страница 20: ...l To avoid a failure in the reception from the remote control keep the connecting cables and the IR signal transmitter s cable away from the RF rod antenna If your neighbour uses the same or similar RF remote control system the receiver may happen to receive the RF signals sent from such an RF remote control system which could cause your receiver to be operated unintentionally If this happens set ...

Страница 21: ...t press any button for about 5 seconds the backlight will turn off CAUTIONS Follow these precautions to avoid leaking or cracking cells Place batteries in the remote control so they match the polarity to and to Use the correct type of batteries Batteries that look similar may differ in voltage Always replace both batteries at the same time Do not expose batteries to heat or flame 1 2 LR6 AM3 L40 1...

Страница 22: ... w Setting the Zone 2 Speakers 2 Usage ZONE 2 SPEAKER 2 on page 43 and Activating the Zone 2 Front Speakers on page 32 Note Usage of long speaker signal cables will deteriorate the signals and degrade the sound quality Merits This connection DOES allow you to always use the Surround THX DSP mode using the center surround and surround back speakers see pages 51 and 58 and to select EXT 7 1CH see pa...

Страница 23: ...T selector to ZONE 1 Now the buttons and controls on the remote control work for the Zone 1 operations 2 Press AUDIO ON The STANDBY lamp on the unit goes off and the ZONE 1 ON OFF lamp on the unit lights up The front door moves down For more details see Turning the Power On and Off Standby on page 22 3 Select and play a source The sound comes out of the Zone 1 front speakers If no sound comes out ...

Страница 24: ... ON The STANDBY lamp goes off and the ZONE 1 ON OFF lamp lights up The front door moves down so that the source selecting buttons appear and the buttons and controls on the unit work for the Zone 1 operations For more details see Turning the Power On and Off Standby and Selecting the Zone 2 Operations on page 29 2 Press ZONE 2 ON OFF so that the ZONE 2 ON OFF lamp lights up 3 Press DOOR DOWN so th...

Страница 25: ...ht s up on the display If neither speakers 1 nor 2 indicator is lit on the display see Activating the Zone 1 Front Speakers on page 25 STANDBY ON STANDBY To turn off the power into standby mode press STANDBY ON again The STANDBY lamp lights up and the front door automatically closes The ZONE 1 ON OFF and or ZONE 2 ON OFF lamp goes off A small amount of power is consumed in standby mode To turn the...

Страница 26: ...e EXT 7 1CH IN jacks To use the EXT 7 1CH playback mode see page 60 Notes When connecting an MD recorder to the TAPE MD IN jacks and a DBS tuner to the TV SOUND DBS IN jacks change the source names shown on the display For details see Changing the Source Name on page 27 When you press one of the audio source selecting buttons on the remote control marked with an asterisk the receiver automatically...

Страница 27: ... Lights up when the left channel signal comes in When analog input is selected Always lights up R When digital input is selected Lights up when the right channel signal comes in When analog input is selected Always lights up C Lights up when the center channel signal comes in LFE Lights up when the LFE channel signal comes in LS Lights up when the left surround channel signal comes in RS Lights up...

Страница 28: ...ir of headphones to the PHONES jack HEADPHONE appears on the unit s display You can enjoy the following sound effects through the headphones If the Surround THX mode is activated you can enjoy surround effect For details see 3D HEADPHONE Mode on page 57 If a DSP mode is activated you can enjoy the DSP effect For details see HEADPHONE Mode on page 58 CAUTION Be sure to turn down the volume before c...

Страница 29: ...gnal format of the incoming signal LINEAR PCM Lights up when Linear PCM signals come in DIGITAL Lights up when Dolby Digital or Dolby Digital EX signals come in Lights up when DTS or DTS ES signals come in No indicator lights up when the receiver cannot recognize the digital signal format of the incoming signals When playing software encoded with the Dolby Digital or DTS Surround the following sym...

Страница 30: ...Hz signals By using the CC Converter you can obtain a natural sound field from both digital and analog sources Press CC CONVERTER so that the CC CONVERTER lamp lights up Each time you press the button CC Converter turns on and off the lamp goes off alternately Notes This function is applied only to the Zone 1 sources You cannot use this function while Analog Direct or THX mode is in use If you tur...

Страница 31: ...power also cancels the Sleep Timer Recording a Source For analog to analog recording You can record any analog source through the receiver to the cassette deck or MD recorder connected to the TAPE MD OUT jacks the VCRs connected to the VCR 1 OUT and VCR 2 OUT jacks and the CD recorder connected to the CDR OUT jacks at the same time For digital to digital recording You can record the currently sele...

Страница 32: ... the FRONT 2 ZONE 2 SPEAKERS terminals see also w Setting the Zone 2 Speakers 2 Usage ZONE 2 SPEAKER 2 on page 43 and Activating the Zone 2 Front Speakers on page 32 3 Press ZONE 2 CONTROL inside the front door so that ZONE 2 and the previously selected Zone 2 source name appear on the display Now the buttons and controls on the unit work for Zone 2 operations Each time you press the button the bu...

Страница 33: ...e receiver Canceling the Zone 2 Operations On the unit To stop Zone 2 operations and sounds through the Zone 2 speakers press ZONE 2 ON OFF so that the ZONE 2 ON OFF lamp goes off No sound will be heard in Zone 2 and the display changes to show the Zone 1 source To use this receiver for Zone 2 operations again 1 Press ZONE 2 ON OFF again so that the ZONE 2 ON OFF lamp lights up 2 Press ZONE 2 CONT...

Страница 34: ...urce name From the remote control MASTER VOLUME Up Down VOLUME DVD DVD MULTI VCR 1 VCR 2 TV DBS CD VIDEO PHONO TAPE MD CDR FM AM EXT 7 1CH On the unit DVD DVD MULTI CD CDR PHONO TAPE MD EXT 7 1CH VCR 1 VCR 2 FM AM VIDEO TV DBS From the remote control Selecting different sources for picture and sound While watching pictures from a video source DVD player VCR or DBS tuner you can listen to sound of ...

Страница 35: ... MUTING to mute the sound through the Zone 2 front speakers To restore the sound press MUTING again so that the VOLUME level indicator appears on the display Turning MASTER VOLUME on the unit or pressing VOLUME on the remote control also restores the sound Note Sounds through the Zone 2 front speakers connected to the ZONE 2 PREOUT jacks through another amplifier are also muted when ZONE2PREOUT is...

Страница 36: ... ON OFF lamp on the unit is lit When using the unit For the Zone 1 operations ZONE 2 is not shown in the main display For the Zone 2 operations ZONE 2 is shown in the main display Press DOOR DOWN to use the buttons inside the front door To close the front door press DOOR UP When using the remote control When operating the receiver using the remote control the display on the unit always shows the Z...

Страница 37: ...the remote s display If not press FM AM first to select the FM band then press FM MODE L ANALOG STEREO TUNED SPEAKERS VOLUME 1 SUBWFR R dB AUTO MUTING dB Using Preset Tuning Once a station is assigned to a channel number the station can be quickly tuned in You can preset up to 30 FM and 15 AM stations To store the preset stations Before you start remember There is a time limit in doing the followi...

Страница 38: ...MONO See page 42 9 DIGITAL IN OUT See page 42 p VIDEO INPUT See page 43 w ZONE 2 SPEAKER 2 See page 43 q VIDEO POWER See page 43 e SUPERIMPOSE See page 44 r FL DISPLAY See page 44 t ONE TOUCH OPE See page 44 ENTER EXIT SETUP MENU 2 PREVIOUS PAGE DUAL MONO DIGITAL IN OUT VIDEO INPUT VIDEO POWER ZONE 2 SPEAKER 2 SUPERIMPOSE FL DISPLAY ONE TOUCH OPERATION DUAL MONO DUAL MONO MAIN DIGITAL IN OUT COAX ...

Страница 39: ...operation mode either ZONE 1 or ZONE 2 for a while The buttons for operating the menus are shown on the screen You can operate the menu with these buttons DOOR DOWN Ex When you press SETUP MENU with ZONE 1 ZONE 2 LEARN TRANSMIT selector set to ZONE 1 ZONE 2 TRANSMIT LEARN ZONE 1 ON OFF ON OFF STANDBY ON STANDBY ON STANDBY TV CATV DBS VCR 1 ON ZONE 2 TRANSMIT LEARN ZONE 1 ZONE 2 ZONE 1 ZONE 1 Usabl...

Страница 40: ...pressing or UP repeatedly on the SETUP MENU 2 you can go back to the SETUP MENU 1 To return to the previous screens Press EXIT Each time you press the button the on screen display menu returns to the one previously displayed On the main unit s display the indications also change accordingly To erase the menu to return to the regular screen Press SETUP MENU SETUP MENU 1 appears ENTER EXIT SETUP MEN...

Страница 41: ... SUBWOOFER is set to NO Select one of the crossover frequency levels according to the size of the small speaker connected 80Hz Select when the cone speaker unit built in the speaker system is about 12 cm 4 3 4 inches When using the THX certified speakers the crossover frequency should be set to 80 Hz 100Hz Select when the cone speaker unit built in the speaker system is about 10 cm 3 15 16 inches ...

Страница 42: ...vel SBACK L LEVEL Select to adjust the left surround back speaker output level SBACK R LEVEL Select to adjust the right surround back speaker output level SUBWOOFER Select to adjust the subwoofer output level Note When SURR BACK OUT is set to 1SPK on the SPEAKER SETTING submenu SBACK LEVEL will appear instead of these two level settings To adjust the sound output levels using the 10 keys You can a...

Страница 43: ... The distance from your listening point to the speakers is another important element to obtain the best possible surround sound of the Surround THX DSP modes You need to set the distance from your listening point to the speakers By referring to the speaker distance setting this unit automatically sets the delay time of the sound through each speaker so that sounds through all the speakers can reac...

Страница 44: ...setting is ON Bass Peak Limit functions so that sounds exceeding the preset peak level see below will be cut off When this setting is ON you can set the bass peak level using the bass test tone see below to eliminate bass sound distortion Select one of the following ON Normally select this OFF Select when not using Bass Peak Limit Note If THX ULTRA2 SUBWOOFER is set to YES this function is not ava...

Страница 45: ...can preset which surround speakers to use for 5 1 channel reproduction Note This submenu is not available in the following cases When SURR BACK OUT is set to 1SPK on the SPEAKER SETTING submenu SURR BACK SP is set to NONE on the SPEAKER SETTING submenu SPEAKER 2 is set to BI AMP OUT on the ZONE 2 SPEAKER 2 submenu or When the Zone 2 speakers are activated 7 SURROUND SP Select the surround channel ...

Страница 46: ...is set to dB In this case increasing the volume level will enable the sound output through the ZONE 2 PREOUT jacks 7 DIGITAL OUT Select the output digital signal format through the DIGITAL OUT optical terminal on the rear Each time you press the button the output signal format changes as follows THROUGH Select when connecting a digital signal processor or decoder The incoming digital signals are t...

Страница 47: ...ator goes off 7 SPEAKER 2 When using the FRONT 2 ZONE 2 SPEAKERS terminals determine the speaker terminal usage SPEAKER 2 Select to connect the second front speakers in Zone 1 ZONE 2 SPK Select to connect the front speakers in Zone 2 BI AMP OUT Select to connect the front speakers in Zone 1 using bi amplifier connection The BI AMP indicator as well as the front speaker 1 indicator will light up wh...

Страница 48: ...EQ OFF CENTER ALIGN OFF OPERATE BACK EFFECT ADJUST CENTER EQ OFF PANORAMA OFF CENTER WIDTH 3 DIMENSION 4 OPERATE BACK EFFECT ADJUST CENTER EQ OFF CENTER GAIN 0 2 EFFECT ADJUST CENTER EQ OFF CENTER ALIGN OFF OPERATE BACK Note When performing sound adjustments viewing the indications on the main unit s display the indications shown are slightly different from what are shown on the on screen display ...

Страница 49: ...pear On the unit From the remote control DOOR DOWN ZONE 2 TRANSMIT LEARN ZONE 1 ON OFF ON OFF STANDBY ON STANDBY ON STANDBY TV CATV DBS VCR 1 ON ZONE 2 TRANSMIT LEARN ZONE 1 ZONE 2 ZONE 1 ZONE 1 Ex When you press ADJUST MENU with ZONE 1 ZONE 2 LEARN TRANSMIT selector set to ZONE 1 The buttons for operating the menus are shown on the screen You can operate the menu with these buttons Button ADJUST ...

Страница 50: ...em In this example set LIVENESS to 5 Operations On the main unit s display Press the button until EFFECT ADJ appears To erase the menu to return to the regular screen Press ADJUST MENU To return to the previous screens Press EXIT Each time you press the button the on screen display menu returns to the one previously displayed On the main unit s display the indications also change accordingly The s...

Страница 51: ... channel speaker you want to adjust then move to its submenu Notes This function is applied only to Zone 1 sources If NO or NONE is selected for a speaker on the SPEAKER SETTING submenu see page 38 you cannot select the corresponding channel If THX is activated Parametric Equalizer is not available If EXT 7 1CH is selected as the source Parametric Equalizer for the surround back channel is not ava...

Страница 52: ...IN When one of the DSP modes except ALL CH STEREO is activated Select and adjust the following items EFFECT LEVEL Adjust the DSP effect level As the number increases the DSP effect becomes stronger Normally select 3 Adjustable range 1 to 5 ROOM SIZE Adjust the virtual room size As the number increases the interval between reflections increases so that you will feel as if you are in a larger room N...

Страница 53: ... a real movie theater Select OFF not to use this function CENTER GAIN Adjust the sound localization of the center channel As the number increases center channel will be localized clearly Normally select 0 2 Adjustable range 0 to 0 5 When one of the other Surround modes is activated or DVD MULTI or EXT 7 1CH is selected without DSP mode Select and adjust the following items CENTER EQ In movie theat...

Страница 54: ...st for playing any 5 1 channel encoded movie software this mode can stabilize the sound localization and enlarge the sound field Only selectable with a pair of surround back speakers THX Music Best for playing any 5 1 channel encoded music software Only selectable with a pair of surround back speakers THX Surround EX Best for playing Dolby Digital EX encoded software Only selectable with one or a ...

Страница 55: ... Extended Surround DTS ES DTS ES is another new multi channel digital encoding format It greatly improves the 360 degree surround impression and space expression by adding the third surround channel surround back channel DTS ES includes two signal formats with different surround signal recording methods DTS ES Discrete 6 1ch DTS ES DSCRT and DTS ES Matrix 6 1ch DTS ES MATRIX DTS ES Discrete 6 1ch ...

Страница 56: ...PK 1SPK AUTO DOLBY D EX 1 THX SURR EX ON DOLBY D EX 1 THX SURR EX OFF DOLBY DIGITAL THX CINEMA NONE Not available DOLBY DIGITAL THX CINEMA Dolby Digital ON Not available Not available DOLBY DIGITAL THX CINEMA 3 2 2 2 OFF 2SPK AUTO DOLBY DIGITAL THX U2 CINEMA THX MUSIC ON DOLBY D EX 1 THX SURR EX THX U2 CINEMA THX MUSIC OFF DOLBY DIGITAL THX CINEMA 1SPK AUTO DOLBY DIGITAL THX CINEMA ON DOLBY D EX T...

Страница 57: ...THX CINEMA NONE Not available DTS SURROUND THX CINEMA DTS ON Not available Not available DTS SURROUND THX CINEMA 3 1 2 1 OFF 2SPK AUTO DTS SURROUND THX U2 CINEMA THX MUSIC ON DTS SURROUND THX U2 CINEMA THX MUSIC OFF DTS SURROUND THX CINEMA 1SPK AUTO DTS SURROUND THX CINEMA ON DTS SURROUND THX CINEMA OFF DTS SURROUND THX CINEMA NONE Not available DTS SURROUND THX CINEMA DTS 1 0 3 0 ON OFF Not avail...

Страница 58: ...nnel reproduction is applied EXES7 1 ON Select to apply 7 1 channel reproduction to both 5 1 channel and 6 1 channel encoded software EXES7 1 OFF Select to cancel the 7 1 channel reproduction Notes When an analog or digital 2 channel source is playing with Surround activated you can adjust the 7 1 channel reproduction mode and store the setting but it will not affect the current source In the foll...

Страница 59: ...the remote control follow the procedure below When Analog Direct is in use you cannot adjust the speaker output levels without emitting the test tone see page 39 From the remote control ONLY 1 Press SOUND The 10 keys are activated for sound adjustments 2 Select the speaker you want to adjust The selected speaker name appears on the remote s display for a while To select the left front speaker pres...

Страница 60: ...THX Cinema mode together If Pro Logic II Music or Pro Logic II Movie is activated before activating the THX mode it also changes to this mode PROLOGICTHX Select to apply Pro Logic and THX Cinema mode together If Pro Logic is activated before activating the THX mode it also changes to this mode NEO 6 C THX Select to apply Neo 6 Cinema and THX Cinema mode together If Neo 6 Music or Neo 6 Cinema is a...

Страница 61: ...ng capacity is about 2000 LARGE HALL 2 Reproduces the spatial feeling of a large vineyard shaped hall designed primarily for classical concerts Its seating capacity is about 2000 RECITAL HALL Reproduces the spatial feeling of a small hall designed primarily for classical recitals Seating capacity is about 500 OPERA HOUSE Reproduces the spatial feeling of an opera house with a high ceiling and mult...

Страница 62: ...are not valid for ALL CH STEREO Stereo Film and Monaural Film modes In order to reproduce a more acoustic sound field in your listening room while viewing stereo sound or monaural sound video software analog and 2 channel digital signals you can use these modes The surround effect will be added and the sound localization of actor s words will be improved This mode cannot be used when the source is...

Страница 63: ...E 1 or ZONE 2 for a while 3 Apply the THX mode or the DSP mode if necessary Press THX to apply the THX mode Each time you press the button THX U2 CINEMA or THX MUSIC will be activated Note You cannot apply the THX mode in the following cases When Analog Direct is turned on When the Zone 2 speakers are activated or When the surround back speakers are deactivated or only one surround back speaker is...

Страница 64: ...ess PLAY on the remote control supplied for this receiver the receiver automatically turns on and changes the Zone 1 source or Zone 2 source to the target component depending on the ZONE 1 ZONE 2 LEARN TRANSMIT selector setting on the remote control When you select a new source on the receiver or on the remote control supplied for this receiver either for Zone 1 or Zone 2 the newly selected compon...

Страница 65: ...turn off the Zone 2 source by pressing ZONE 2 ON OFF the selected Zone 2 source component turns off unless the same component is selected as the Zone 1 source If the ZONE 1 ON OFF lamp is lit the Zone 2 source will stop playing but will not turn off Synchronized Recording This operation is only possible when the receiver is ready for Zone 1 operations Synchronized recording means the cassette deck...

Страница 66: ... the diagram on the left column TEXT COMPULINK SOURCE NOT CONNECTED appears on the display in the following cases When the connections explained on the left are not correctly done When you try to use the TEXT COMPU LINK function a few seconds after you turn on the connected equipment This is not a malfunction of the units Refer also to the manuals supplied with your CD player or MD recorder IMPORT...

Страница 67: ...music genre etc When this is selected in front you can change the disc information by pressing Each time you press the button disc information see Note on 7 changes 8 Select or then press SET to change the track 9 Usable buttons and their functions for the current selection Indication here will change according to what is currently selected in front on the screen See Note on 9 Note on 7 The follow...

Страница 68: ...arch Press fi until they appear Going back to the DISC TITLE SEARCH screen Press EXIT Searching for a Disc Only for the CD player Search for a disc by its performer 1 Press TEXT DISPLAY while CD is selected as the source The Disc Information screen appears on the TV 2 Press fi to move to SEARCH then press SET The DISC SEARCH screen appears 3 Press fi to move to PERFORMER then press SET The PERFORMER ...

Страница 69: ...rmation For a CD Player with disc memory function You can use the disc memory function through this receiver The disc information its performer disc title and music genre of normal audio CDs will be stored into the memory built in the CD player For the disc memory function refer to the manual supplied with your CD player The performer disc title and music genre information are usually recorded on ...

Страница 70: ...song appears You can enter a song title for the song currently selected 5 Enter the song title referring to steps 3 and 4 of For a CD Player with disc memory function on pages 66 and 67 You can enter up to 32 characters for the song title 6 Press fi to move to the song title you have just entered then press SET The song title is stored into the memory and the Disc Information screen appears again 4...

Страница 71: ... 13 to 15 for details 6 Plug the AC power cords of the components into the AC outlets 7 When turning on the TV for the first time after the AV COMPU LINK connection turn the TV volume to the minimum using the TV volume control on the TV 8 Turn on the other connected components first then turn on this receiver When turning on the VCR 1 use the remote control supplied with this receiver press VCR 1 ...

Страница 72: ...tions only The Zone 1 TV automatically turns on and changes the input mode to the appropriate position so that you can view the picture DVD TV VCR DVD player RX DP15B You can control the connected video components using this remote control Aim the remote control at the remote sensor s on the target video component s or on the receiver directly For details see page 73 CONNECTIONS 3 Video Cable Conn...

Страница 73: ...ideo Input 1 or Video Input 2 the receiver is connected to This function does not work when you connect this receiver and the TV with the AV COMPU LINK EX terminal using the component video cables To use this function connect this receiver and the TV using the S video or composite video cables Automatic Power On Off Standby Automatic Power On The Zone 1 TV VCR 1 the VCR connected to the VCR 1 jack...

Страница 74: ...nel speaker output level EFFECT Selects the effect level LIVENESS Selects the liveness Notes After adjusting sounds press the corresponding source selecting button to operate your target source by using the 10 keys otherwise the 10 keys cannot be used for operating your target source When you press LEVEL or LEVEL the corresponding speaker name appears on the remote s display IMPORTANT To operate J...

Страница 75: ... jacks change the source name to MD see page 27 Selecting TAPE will allow you to control the MD recorder CD player After pressing CD you can perform the following operations on the CD player PLAY Starts playing 4 Returns to the beginning of the current or previous track Skips to the beginning of the next track STOP Stops playing PAUSE Pauses playing To release press PLAY 1 10 10 Selects a track nu...

Страница 76: ... connected to the VCR 1 jacks You can always perform the following operations VCR 1 STANDBY ON Turns on or off the VCR After pressing VCR 1 or selecting VCR1 by pressing CONTROL repeatedly you can perform the following operations on the VCR 1 9 0 Selects the TV channels on the VCR PLAY Starts playing REW Rewinds a tape FF Fast winds a tape STOP Stops operations PAUSE Pauses playing To release pres...

Страница 77: ...s on or off you have entered the correct code If more than one code is listed for your brand of TV try each one until the correct one is entered IMPORTANT To operate the other component s using the RF signals emitted from this remote control the IR signal transmitter and the RF rod antenna must be connected to this receiver Place the IR signal transmitter so that it is aimed at the remote sensor s...

Страница 78: ...erter and DBS tuner at the same time To change the transmittable signals for operating another manufacturer s VCR 1 Press and hold VCR 1 STANDBY ON 2 Press VCR 1 3 Enter a manufacturer s code using buttons 1 9 and 0 See page 77 to find the code 4 Release VCR 1 STANDBY ON The following button can be used for operating the VCR VCR 1 STANDBY ON Turns on or off the VCR After pressing VCR 1 you can per...

Страница 79: ...t one is entered Manufactures codes for TV Manufacturer Codes JVC 00 13 74 Akai 01 02 Blaupunkt 03 04 Fisher 01 05 Grundig 03 06 07 Hitachi 08 09 10 49 78 Irradio 02 ITT Nokia 11 12 Loewe 06 15 16 Magnavox 08 17 49 Matsushita 86 87 Mets 50 51 52 53 Mitsubishi 08 18 19 20 Mivar 21 NEC 83 Nordmende 22 23 Okano 15 Panasonic 24 25 26 27 76 Philips 15 17 28 75 Pioneer 85 RCA Proscan 08 24 29 30 31 48 S...

Страница 80: ... 77 78 Mitsubishi 30 31 32 33 34 35 80 81 NEC 26 27 Nokia 03 36 Nordmende 38 Orion 09 Panasonic 19 24 39 40 79 Philips 04 19 21 24 41 42 Phonola 21 Pioneer 73 RCA Proscan 04 18 19 23 24 43 44 45 SABA 38 46 Samsung 45 47 59 61 62 63 Sanyo 03 48 49 Sharp 37 50 75 Siemens 03 51 Sony 52 53 54 68 69 70 Telefunken 55 60 Toshiba 43 44 71 72 Zenith 56 57 This figure is set to the remote control as the ini...

Страница 81: ...after called target remote control actually works 1 Set the LEARN TRANSMIT ZONE 1 ZONE 2 selector to LEARN 2 Place the two remote controls on a level surface with signal transmitting windows facing each other Leave a space of 5 cm to 10 cm 2 in to 4 in between the two remote controls otherwise storing may fail 3 Press one of the source selecting buttons except VCR 2 VIDEO FM AM and EXT 7 1CH The s...

Страница 82: ...the storing procedure has been successfully finished When replacing the batteries finish changing them without delay otherwise the stored signals are all erased 4 Press one of the learning buttons to which you want to assign a signal from the target remote control The LEARN indicator starts flashing If you have pressed DVD or DVD MULTI in step 3 you can store the signals into the following buttons...

Страница 83: ...et the TV operation mode selector correctly To use the following buttons you can skip step 2 above TV CATV DBS STANDBY ON VCR 1 STANDBY ON TV VOL TV VIDEO DVD MENU To use the following buttons press DVD MENU first SET fi IMPORTANT To operate the other component s using this remote control Aim directly at the remote sensor s on the target component s This remote control can send signals at a distanc...

Страница 84: ... Select the correct input mode analog or digital See page 25 Check connections For analog connections see pages 11 to 15 For digital connections see pages 12 and 16 Check speaker connection and reconnect if necessary See page 19 Set the Zone 1 2 setting for the speakers correctly to use them as the Zone 2 front speakers See page 44 Turn on the amplifier Select the correct Zone 2 source Press MUTIN...

Страница 85: ... FM reception Occasional cracking noise during FM reception Noise is heard during record playing Howling during record playing The STANDBY lamp starts flashing and the receiver turns off into standby mode The STANDBY lamp goes off after turning on the power but soon the receiver turns off again into standby mode Remote control does not work Remote control does not work properly FM AM POSSIBLE CAUS...

Страница 86: ...Impedance 1 kHz PHONO IN MM 2 5 mV 47 kΩ CD IN CDR IN TAPE MD IN EXT 7 1CH IN 200 mV 47 kΩ DVD IN VCR 1 IN VCR 2 IN TV SOUND DBS IN VIDEO 200 mV 47 kΩ Audio Input DIGITAL IN Coaxial 1 DVD 2 CD 3 TV DBS 0 5 V p p 75 Ω Optical 4 CDR 5 MD 6 VCR1 21 dBm to 15 dBm 660 nm 30 nm Corresponding to Linear PCM Dolby Digital and DTS Digital Surround with sampling frequency 32 kHz 44 1 kHz 48 kHz Audio Output ...

Страница 87: ...Range 87 5 MHz to 108 0 MHz Usable Sensitivity Monaural 12 8 dBf 1 2 µV 75 Ω 50 dB Quieting Sensitivity Monaural 18 2 dBf 2 2 µV 75 Ω Stereo 38 2 dBf 22 3 µV 75 Ω Signal to Noise Ratio IHF A weighted Monaural 78 dB at 85 dBf Stereo 73 dB at 85 dBf Total Harmonic Distortion Monaural 0 2 at 1 kHz Stereo 0 3 at 1 kHz Stereo Separation at REC OUT 40 dB at 1 kHz Alternate Channel Selectivity 60 dB 400 ...

Страница 88: ...cleaning 4 Damage that occurs in shipment due to act of God and cosmetic damage 5 Signal reception problems and failures due to line power surge 6 Video Pick up Tubes CCD Image Sensor Cartridge Stylus Needle are covered for 90 days from the date of purchase 7 Batteries except that Rechargeable Batteries are covered for 90 days from the date of purchase There are no express warranties except as lis...

Страница 89: ...rized servicer or visit our website at www JVC com Remember to retain your Bill of Sale for Warranty Service Do not service the television yourself Caution To prevent electrical shock do not open the cabinet There are no user serviceable parts inside Please refer to qualified service personnel for repairs Accessories To purchase accessories for your JVC product please call toll free 1 800 882 2345...

Страница 90: ...VICTOR COMPANY OF JAPAN LIMITED 0304RYMMDWJEIN EN 2004 VICTOR COMPANY OF JAPAN LIMITED AUDIO VIDEO CONTROL RECEIVER RX DP15B ...

Страница 91: ...English Français LVT1216 002A C RX DP15B AUDIO VIDEO CONTROL RECEIVER RECEPTEUR DE COMMANDE AUDIO VIDEO INSTRUCTIONS MANUEL D INSTRUCTIONS ...

Страница 92: ...UTION To avoid personal injury or accidentally dropping the unit have two persons unpack carry and install the unit ATTENTION Pour éviter toute blessure personnelle ou chute accidentelle de l appareil faites déballer transporter et installer l appareil par deux personnes WARNING TO REDUCE THE RISK OF FIRE OR ELECTRIC SHOCK DO NOT EXPOSE THIS APPLIANCE TO RAIN OR MOISTURE CAUTION TO REDUCE THE RISK...

Страница 93: ...ial installation This equipment generates uses and can radiate radio frequency energy and if not installed and used in accordance with the instructions may cause harmful interference to radio communications However there is no guarantee that interference will not occur in a particular installation If this equipment does cause harmful interference to radio or television reception which can be deter...

Страница 94: ...stems These COMPU LINK remote control systems allow you to operate other JVC audio video components from this receiver Precautions Power sources When unplugging the receiver from the wall outlet always pull the plug not the AC power cord Do not handle the AC power cord with wet hands If you are not going to operate the receiver for an extended period of time unplug the AC power cord from the wall ...

Страница 95: ...s Sounds SUBWOOFER 40 5 Setting the THX Audio THX AUDIO SETUP 41 6 Setting the Surround Channel Output Speakers SURR CH OUT 42 7 Setting the Audio Delay Level AUDIO DELAY 42 8 Selecting the Dual Mono Sound DUAL MONO 42 9 Setting the Digital Input Output Terminals DIGITAL IN OUT 42 p Setting the Video Input Terminals VIDEO INPUT 43 q Turning On and Off the Video Output VIDEO POWER 43 w Setting the ...

Страница 96: ...PHONO TAPE MD CDR FM AM EXT 7 1CH 1 2 3 4 5 6 7 8 9 i u y t r e w q p h x SPEAKERS 1 SURROUND THX RIGHT PRESET 5 EXIT FM MODE LEFT PRESET UP TUNING 5 SET MEMORY DOWN TUNING SURR DSP OFF ANALOG DIRECT SPEAKERS 2 ZONE 2 INPUT MODE INPUT ATT ZONE 2 CONTROL EX ES 7 1 DSP ADJUST MENU SETUP MENU DOOR DOWN Parts Identification Front Panel Display Window To open the front door press DOOR DOWN For more det...

Страница 97: ... the digital signal format of incoming signals Main display Shows the source name station frequency Surround THX DSP mode etc PARAMETRIC EQ indicator 48 Lights up when Parametric Equalizer is in use VOLUME level indicator Indicates the volume level Goes off while muting sounds MIDNIGHT MODE indicator 49 Lights up when Midnight Mode is in use Refer to the pages in parentheses for details Front Pane...

Страница 98: ...N 5 1 ch Output TAPE MD OUT CDR OUT VCR 1 OUT VCR 2 OUT 4 S video composite video input output jacks 13 15 Input TV SOUND DBS IN VCR 1 IN VCR 2 IN DVD IN Output VCR 1 OUT VCR 2 OUT MONITOR OUT 5 Component video input output jacks 13 15 Input 1 IN DVD 2 IN 3 IN Output MONITOR OUT 6 EXT 7 1CH IN audio input jacks 12 7 RF REMOTE ANTENNA terminal and BAND 1 2 selector 17 8 FM AM ANTENNA terminals 7 8 ...

Страница 99: ...selector is set to LEARN This remote control cannot operate the receiver or other components but can memorize IR signals See page 78 4 Signal transmission indicator Lights up when transmitting the remote control signals 5 Remote control operation mode display Remote control operation mode such as DVD CD SOUND etc appears When the remote control operation mode changes it is shown on this display fo...

Страница 100: ...enna 1 IR Signal Transmitter 1 Double Sided Adhesive Tape 1 Front Terminal Cover 1 If any item is missing contact your dealer immediately Getting Started This section explains how to connect audio video components and speakers to the receiver and how to connect the power supply Connecting the FM and AM Antennas FM Antenna Connections FM 75 COAXIAL ANTENNA AM EXT AM LOOP AM LOOP ANTENNA AM EXT FM 7...

Страница 101: ...eakers of the SPEAKER IMPEDANCE indicated by the speaker terminals When connecting to both of the FRONT 1 and FRONT 2 ZONE 2 SPEAKERS terminals use speakers with an impedance of 8 Ω to 16 Ω When connecting to either the FRONT 1 or FRONT 2 ZONE 2 SPEAKERS terminals use speakers with an impedance of 4 Ω to 16 Ω Basic connecting procedure 1 Cut twist and remove the insulation at the end of each speak...

Страница 102: ...the listener s ears Zone 1 speaker layout Ideal speaker layout varies depending on the conditions of your listening room The diagram below is a recommended typical example Center speaker Left front speaker s L Right front speaker s R Center speaker C Surround back speakers LSB RSB Left surround speaker LS Right surround speaker RS Note Ideal speaker layout requires that all speakers be placed at t...

Страница 103: ... frequency terminals To use the speaker with the above connection see w Setting the Zone 2 Speakers 2 Usage ZONE 2 SPEAKER 2 on pages 43 and 44 When this connection is used you cannot use the surround back speakers In this case no sounds come out of the PREOUT SURR BACK jacks Connecting a subwoofer You can enhance the bass by connecting a subwoofer Connect the input jack of a powered subwoofer to ...

Страница 104: ...recorder Turntable Rear view If an earth cable is provided for your turntable connect the cable to the screw marked H on the rear panel To audio output Turntable To audio output CD player RIGHT LEFT PHONO CD TAPE MD OUT REC IN PLAY AUDIO IN R L IN Cassette deck or MD recorder To audio output To audio input Cassette deck CD CDR TAPE MD OUT REC IN PLAY OUT REC IN R L R L MD recorder To audio output ...

Страница 105: ...onnect the video output jack on the external component directly to the TV and select the connected input on the TV Connect the video output jack on the external component to any one of unused video input jacks on the rear then 1 Select that video input as the video source 2 Select EXT 7 1CH as the audio source See Selecting different sources for picture and sound on page 24 Note If the external co...

Страница 106: ...te video output Ï To S video input Ì To composite video input D VHS S VHS VHS VCR VCR s Rear view Å To audio output ı To audio input Ç To composite video input Î To S video input To composite video output Ï To S video output VIDEO RIGHT LEFT DVD IN TV SOUND DBS IN OUT REC IN PLAY VCR 1 VCR 2 S VIDEO VIDEO Y PB PR 1IN DVD Y PB PR 3IN Y PB PR 2 IN FRONT IN PLAY OUT REC COMPONENT AUDIO A B C D E F G ...

Страница 107: ... video or composite video connections DBS tuner Å To audio output ı To component video output Ç To S video output Î To composite video output VIDEO RIGHT LEFT TV SOUND DBS IN OUT REC IN PLAY VCR 1 S VIDEO VIDEO Y PB PR 1IN DVD Y PB PR 2 IN COMPONENT AUDIO DBS A B C D R L Notes When connecting the DBS tuner to the TV SOUND DBS IN jacks change the source name to DBS which will be shown on the displa...

Страница 108: ...T on page 43 To view the pictures through the DVD player in Zone 2 connect it to either S video or composite video input jacks Notes If the DVD player has component video output jacks you can connect it to either the COMPONENT 1 IN DVD 2 IN or 3 IN jacks When connecting the DVD player to either one of the component input jacks make video input terminal setting correctly For details see p Setting t...

Страница 109: ...ons see page 11 When you want to operate the VCR TV or DVD player using the AV COMPU LINK remote control system connect the target component also as described in Analog Connections see pages 13 to 15 To use the digital source components for Zone 2 connect them using analog connection methods as well Digital input terminals You can connect any digital components having a coaxial or optical digital ...

Страница 110: ...l To avoid a failure in the reception from the remote control keep the connecting cables and the IR signal transmitter s cable away from the RF rod antenna If your neighbour uses the same or similar RF remote control system the receiver may happen to receive the RF signals sent from such an RF remote control system which could cause your receiver to be operated unintentionally If this happens set ...

Страница 111: ...t press any button for about 5 seconds the backlight will turn off CAUTIONS Follow these precautions to avoid leaking or cracking cells Place batteries in the remote control so they match the polarity to and to Use the correct type of batteries Batteries that look similar may differ in voltage Always replace both batteries at the same time Do not expose batteries to heat or flame 1 2 LR6 AM3 L40 1...

Страница 112: ... See w Setting the Zone 2 Speakers 2 Usage ZONE 2 SPEAKER 2 on page 43 and Activating the Zone 2 Front Speakers on page 32 Note Usage of long speaker signal cables will deteriorate the signals and degrade the sound quality Merits This connection DOES allow you to always use the Surround THX DSP mode using the center surround and surround back speakers see pages 51 and 58 and to select EXT 7 1CH se...

Страница 113: ...NSMIT selector to ZONE 1 Now the buttons and controls on the remote control work for the Zone 1 operations 2 Press AUDIO ON The STANDBY lamp on the unit goes off and the ZONE 1 ON OFF lamp on the unit lights up The front door moves down For more details see Turning the Power On and Off Standby on page 22 3 Select and play a source The sound comes out of the Zone 1 front speakers If no sound comes ...

Страница 114: ...NDBY ON The STANDBY lamp goes off and the ZONE 1 ON OFF lamp lights up The front door moves down so that the source selecting buttons appear and the buttons and controls on the unit work for the Zone 1 operations For more details see Turning the Power On and Off Standby and Selecting the Zone 2 Operations on page 29 2 Press ZONE 2 ON OFF so that the ZONE 2 ON OFF lamp lights up 3 Press DOOR DOWN s...

Страница 115: ... light s up on the display If neither speakers 1 nor 2 indicator is lit on the display see Activating the Zone 1 Front Speakers on page 25 STANDBY ON STANDBY To turn off the power into standby mode press STANDBY ON again The STANDBY lamp lights up and the front door automatically closes The ZONE 1 ON OFF and or ZONE 2 ON OFF lamp goes off A small amount of power is consumed in standby mode To turn...

Страница 116: ...o the EXT 7 1CH IN jacks To use the EXT 7 1CH playback mode see page 60 Notes When connecting an MD recorder to the TAPE MD IN jacks and a DBS tuner to the TV SOUND DBS IN jacks change the source names shown on the display For details see Changing the Source Name on page 27 When you press one of the audio source selecting buttons on the remote control marked with an asterisk the receiver automatic...

Страница 117: ...cted Lights up when the left channel signal comes in When analog input is selected Always lights up R When digital input is selected Lights up when the right channel signal comes in When analog input is selected Always lights up C Lights up when the center channel signal comes in LFE Lights up when the LFE channel signal comes in LS Lights up when the left surround channel signal comes in RS Light...

Страница 118: ...a pair of headphones to the PHONES jack HEADPHONE appears on the unit s display You can enjoy the following sound effects through the headphones If the Surround THX mode is activated you can enjoy surround effect For details see 3D HEADPHONE Mode on page 57 If a DSP mode is activated you can enjoy the DSP effect For details see HEADPHONE Mode on page 58 CAUTION Be sure to turn down the volume befo...

Страница 119: ...l signal format of the incoming signal LINEAR PCM Lights up when Linear PCM signals come in DIGITAL Lights up when Dolby Digital or Dolby Digital EX signals come in Lights up when DTS or DTS ES signals come in No indicator lights up when the receiver cannot recognize the digital signal format of the incoming signals When playing software encoded with the Dolby Digital or DTS Surround the following...

Страница 120: ...48 kHz signals By using the CC Converter you can obtain a natural sound field from both digital and analog sources Press CC CONVERTER so that the CC CONVERTER lamp lights up Each time you press the button CC Converter turns on and off the lamp goes off alternately Notes This function is applied only to the Zone 1 sources You cannot use this function while Analog Direct or THX mode is in use If you...

Страница 121: ...the power also cancels the Sleep Timer Recording a Source For analog to analog recording You can record any analog source through the receiver to the cassette deck or MD recorder connected to the TAPE MD OUT jacks the VCRs connected to the VCR 1 OUT and VCR 2 OUT jacks and the CD recorder connected to the CDR OUT jacks at the same time For digital to digital recording You can record the currently ...

Страница 122: ...s to the FRONT 2 ZONE 2 SPEAKERS terminals see also w Setting the Zone 2 Speakers 2 Usage ZONE 2 SPEAKER 2 on page 43 and Activating the Zone 2 Front Speakers on page 32 3 Press ZONE 2 CONTROL inside the front door so that ZONE 2 and the previously selected Zone 2 source name appear on the display Now the buttons and controls on the unit work for Zone 2 operations Each time you press the button th...

Страница 123: ...n the receiver Canceling the Zone 2 Operations On the unit To stop Zone 2 operations and sounds through the Zone 2 speakers press ZONE 2 ON OFF so that the ZONE 2 ON OFF lamp goes off No sound will be heard in Zone 2 and the display changes to show the Zone 1 source To use this receiver for Zone 2 operations again 1 Press ZONE 2 ON OFF again so that the ZONE 2 ON OFF lamp lights up 2 Press ZONE 2 ...

Страница 124: ...d source name From the remote control Selecting different sources for picture and sound While watching pictures from a video source DVD player VCR or DBS tuner you can listen to sound of an audio source Once you have selected a video source pictures of the selected source are sent to the TV until you select another video source Press one of the audio source selecting buttons PHONO CD TAPE MD CDR F...

Страница 125: ...ress MUTING to mute the sound through the Zone 2 front speakers To restore the sound press MUTING again so that the VOLUME level indicator appears on the display Turning MASTER VOLUME on the unit or pressing VOLUME on the remote control also restores the sound Note Sounds through the Zone 2 front speakers connected to the ZONE 2 PREOUT jacks through another amplifier are also muted when ZONE2PREOU...

Страница 126: ...NE 2 ON OFF lamp on the unit is lit When using the unit For the Zone 1 operations ZONE 2 is not shown in the main display For the Zone 2 operations ZONE 2 is shown in the main display Press DOOR DOWN to use the buttons inside the front door To close the front door press DOOR UP When using the remote control When operating the receiver using the remote control the display on the unit always shows t...

Страница 127: ... For channel number 5 press 5 For channel number 15 press 10 then 5 For channel number 20 press 10 then 10 For channel number 30 press 10 10 then 10 Note You can only select the same station of the same band FM or AM for both Zone 1 and Zone 2 operations If you change the station for Zone 2 it also changes for Zone 1 and vice versa indications in the main display also change This also means that i...

Страница 128: ...UAL MONO See page 42 9 DIGITAL IN OUT See page 42 p VIDEO INPUT See page 43 w ZONE 2 SPEAKER 2 See page 43 q VIDEO POWER See page 43 e SUPERIMPOSE See page 44 r FL DISPLAY See page 44 t ONE TOUCH OPE See page 44 ENTER EXIT SETUP MENU 2 PREVIOUS PAGE DUAL MONO DIGITAL IN OUT VIDEO INPUT VIDEO POWER ZONE 2 SPEAKER 2 SUPERIMPOSE FL DISPLAY ONE TOUCH OPERATION DUAL MONO DUAL MONO MAIN DIGITAL IN OUT C...

Страница 129: ...oom operation mode either ZONE 1 or ZONE 2 for a while The buttons for operating the menus are shown on the screen You can operate the menu with these buttons DOOR DOWN Ex When you press SETUP MENU with ZONE 1 ZONE 2 LEARN TRANSMIT selector set to ZONE 1 ZONE 2 TRANSMIT LEARN ZONE 1 ON OFF ON OFF STANDBY ON STANDBY ON STANDBY TV CATV DBS VCR 1 ON ZONE 2 TRANSMIT LEARN ZONE 1 ZONE 2 ZONE 1 ZONE 1 U...

Страница 130: ...ply pressing or UP repeatedly on the SETUP MENU 2 you can go back to the SETUP MENU 1 To return to the previous screens Press EXIT Each time you press the button the on screen display menu returns to the one previously displayed On the main unit s display the indications also change accordingly To erase the menu to return to the regular screen Press SETUP MENU SETUP MENU 1 appears ENTER EXIT SETUP...

Страница 131: ...peakers when SUBWOOFER is set to NO Select one of the crossover frequency levels according to the size of the small speaker connected 80Hz Select when the cone speaker unit built in the speaker system is about 12 cm When using the THX certified speakers the crossover frequency should be set to 80 Hz 100Hz Select when the cone speaker unit built in the speaker system is about 10 cm 120Hz Select whe...

Страница 132: ...t level SBACK L LEVEL Select to adjust the left surround back speaker output level SBACK R LEVEL Select to adjust the right surround back speaker output level SUBWOOFER Select to adjust the subwoofer output level Note When SURR BACK OUT is set to 1SPK on the SPEAKER SETTING submenu SBACK LEVEL will appear instead of these two level settings To adjust the sound output levels using the 10 keys You c...

Страница 133: ...ANCE The distance from your listening point to the speakers is another important element to obtain the best possible surround sound of the Surround THX DSP modes You need to set the distance from your listening point to the speakers By referring to the speaker distance setting this unit automatically sets the delay time of the sound through each speaker so that sounds through all the speakers can ...

Страница 134: ...his setting is ON Bass Peak Limit functions so that sounds exceeding the preset peak level see below will be cut off When this setting is ON you can set the bass peak level using the bass test tone see below to eliminate bass sound distortion Select one of the following ON Normally select this OFF Select when not using Bass Peak Limit Note If THX ULTRA2 SUBWOOFER is set to YES this function is not...

Страница 135: ...you can preset which surround speakers to use for 5 1 channel reproduction Note This submenu is not available in the following cases When SURR BACK OUT is set to 1SPK on the SPEAKER SETTING submenu SURR BACK SP is set to NONE on the SPEAKER SETTING submenu SPEAKER 2 is set to BI AMP OUT on the ZONE 2 SPEAKER 2 submenu or When the Zone 2 speakers are activated 7 SURROUND SP Select the surround chan...

Страница 136: ...vel is set to dB In this case increasing the volume level will enable the sound output through the ZONE 2 PREOUT jacks 7 DIGITAL OUT Select the output digital signal format through the DIGITAL OUT optical terminal on the rear Each time you press the button the output signal format changes as follows THROUGH Select when connecting a digital signal processor or decoder The incoming digital signals a...

Страница 137: ...ndicator goes off 7 SPEAKER 2 When using the FRONT 2 ZONE 2 SPEAKERS terminals determine the speaker terminal usage SPEAKER 2 Select to connect the second front speakers in Zone 1 ZONE 2 SPK Select to connect the front speakers in Zone 2 BI AMP OUT Select to connect the front speakers in Zone 1 using bi amplifier connection The BI AMP indicator as well as the front speaker 1 indicator will light u...

Страница 138: ...TER EQ OFF CENTER ALIGN OFF OPERATE BACK EFFECT ADJUST CENTER EQ OFF PANORAMA OFF CENTER WIDTH 3 DIMENSION 4 OPERATE BACK EFFECT ADJUST CENTER EQ OFF CENTER GAIN 0 2 EFFECT ADJUST CENTER EQ OFF CENTER ALIGN OFF OPERATE BACK Note When performing sound adjustments viewing the indications on the main unit s display the indications shown are slightly different from what are shown on the on screen disp...

Страница 139: ...isappear On the unit From the remote control DOOR DOWN ZONE 2 TRANSMIT LEARN ZONE 1 ON OFF ON OFF STANDBY ON STANDBY ON STANDBY TV CATV DBS VCR 1 ON ZONE 2 TRANSMIT LEARN ZONE 1 ZONE 2 ZONE 1 ZONE 1 Ex When you press ADJUST MENU with ZONE 1 ZONE 2 LEARN TRANSMIT selector set to ZONE 1 The buttons for operating the menus are shown on the screen You can operate the menu with these buttons Button ADJ...

Страница 140: ...e item In this example set LIVENESS to 5 Operations On the main unit s display Press the button until EFFECT ADJ appears To erase the menu to return to the regular screen Press ADJUST MENU To return to the previous screens Press EXIT Each time you press the button the on screen display menu returns to the one previously displayed On the main unit s display the indications also change accordingly T...

Страница 141: ...gnal channel speaker you want to adjust then move to its submenu Notes This function is applied only to Zone 1 sources If NO or NONE is selected for a speaker on the SPEAKER SETTING submenu see page 38 you cannot select the corresponding channel If THX is activated Parametric Equalizer is not available If EXT 7 1CH is selected as the source Parametric Equalizer for the surround back channel is not...

Страница 142: ...R GAIN When one of the DSP modes except ALL CH STEREO is activated Select and adjust the following items EFFECT LEVEL Adjust the DSP effect level As the number increases the DSP effect becomes stronger Normally select 3 Adjustable range 1 to 5 ROOM SIZE Adjust the virtual room size As the number increases the interval between reflections increases so that you will feel as if you are in a larger ro...

Страница 143: ...e in a real movie theater Select OFF not to use this function CENTER GAIN Adjust the sound localization of the center channel As the number increases center channel will be localized clearly Normally select 0 2 Adjustable range 0 to 0 5 When one of the other Surround modes is activated or DVD MULTI or EXT 7 1CH is selected without DSP mode Select and adjust the following items CENTER EQ In movie t...

Страница 144: ...a Best for playing any 5 1 channel encoded movie software this mode can stabilize the sound localization and enlarge the sound field Only selectable with a pair of surround back speakers THX Music Best for playing any 5 1 channel encoded music software Only selectable with a pair of surround back speakers THX Surround EX Best for playing Dolby Digital EX encoded software Only selectable with one o...

Страница 145: ... DTS Extended Surround DTS ES DTS ES is another new multi channel digital encoding format It greatly improves the 360 degree surround impression and space expression by adding the third surround channel surround back channel DTS ES includes two signal formats with different surround signal recording methods DTS ES Discrete 6 1ch DTS ES DSCRT and DTS ES Matrix 6 1ch DTS ES MATRIX DTS ES Discrete 6 ...

Страница 146: ...F 2SPK 1SPK AUTO DOLBY D EX 1 THX SURR EX ON DOLBY D EX 1 THX SURR EX OFF DOLBY DIGITAL THX CINEMA NONE Not available DOLBY DIGITAL THX CINEMA Dolby Digital ON Not available Not available DOLBY DIGITAL THX CINEMA 3 2 2 2 OFF 2SPK AUTO DOLBY DIGITAL THX U2 CINEMA THX MUSIC ON DOLBY D EX 1 THX SURR EX THX U2 CINEMA THX MUSIC OFF DOLBY DIGITAL THX CINEMA 1SPK AUTO DOLBY DIGITAL THX CINEMA ON DOLBY D ...

Страница 147: ...UND THX CINEMA NONE Not available DTS SURROUND THX CINEMA DTS ON Not available Not available DTS SURROUND THX CINEMA 3 1 2 1 OFF 2SPK AUTO DTS SURROUND THX U2 CINEMA THX MUSIC ON DTS SURROUND THX U2 CINEMA THX MUSIC OFF DTS SURROUND THX CINEMA 1SPK AUTO DTS SURROUND THX CINEMA ON DTS SURROUND THX CINEMA OFF DTS SURROUND THX CINEMA NONE Not available DTS SURROUND THX CINEMA DTS 1 0 3 0 ON OFF Not a...

Страница 148: ... channel reproduction is applied EXES7 1 ON Select to apply 7 1 channel reproduction to both 5 1 channel and 6 1 channel encoded software EXES7 1 OFF Select to cancel the 7 1 channel reproduction Notes When an analog or digital 2 channel source is playing with Surround activated you can adjust the 7 1 channel reproduction mode and store the setting but it will not affect the current source In the ...

Страница 149: ...ing the remote control follow the procedure below When Analog Direct is in use you cannot adjust the speaker output levels without emitting the test tone see page 39 From the remote control ONLY 1 Press SOUND The 10 keys are activated for sound adjustments 2 Select the speaker you want to adjust The selected speaker name appears on the remote s display for a while To select the left front speaker ...

Страница 150: ...and THX Cinema mode together If Pro Logic II Music or Pro Logic II Movie is activated before activating the THX mode it also changes to this mode PROLOGICTHX Select to apply Pro Logic and THX Cinema mode together If Pro Logic is activated before activating the THX mode it also changes to this mode NEO 6 C THX Select to apply Neo 6 Cinema and THX Cinema mode together If Neo 6 Music or Neo 6 Cinema ...

Страница 151: ...eating capacity is about 2000 LARGE HALL 2 Reproduces the spatial feeling of a large vineyard shaped hall designed primarily for classical concerts Its seating capacity is about 2000 RECITAL HALL Reproduces the spatial feeling of a small hall designed primarily for classical recitals Seating capacity is about 500 OPERA HOUSE Reproduces the spatial feeling of an opera house with a high ceiling and ...

Страница 152: ...enu are not valid for ALL CH STEREO Stereo Film and Monaural Film modes In order to reproduce a more acoustic sound field in your listening room while viewing stereo sound or monaural sound video software analog and 2 channel digital signals you can use these modes The surround effect will be added and the sound localization of actor s words will be improved This mode cannot be used when the sourc...

Страница 153: ... ZONE 1 or ZONE 2 for a while 3 Apply the THX mode or the DSP mode if necessary Press THX to apply the THX mode Each time you press the button THX U2 CINEMA or THX MUSIC will be activated Note You cannot apply the THX mode in the following cases When Analog Direct is turned on When the Zone 2 speakers are activated or When the surround back speakers are deactivated or only one surround back speake...

Страница 154: ...u press PLAY on the remote control supplied for this receiver the receiver automatically turns on and changes the Zone 1 source or Zone 2 source to the target component depending on the ZONE 1 ZONE 2 LEARN TRANSMIT selector setting on the remote control When you select a new source on the receiver or on the remote control supplied for this receiver either for Zone 1 or Zone 2 the newly selected co...

Страница 155: ...you turn off the Zone 2 source by pressing ZONE 2 ON OFF the selected Zone 2 source component turns off unless the same component is selected as the Zone 1 source If the ZONE 1 ON OFF lamp is lit the Zone 2 source will stop playing but will not turn off Synchronized Recording This operation is only possible when the receiver is ready for Zone 1 operations Synchronized recording means the cassette ...

Страница 156: ...r in the diagram on the left column TEXT COMPULINK SOURCE NOT CONNECTED appears on the display in the following cases When the connections explained on the left are not correctly done When you try to use the TEXT COMPU LINK function a few seconds after you turn on the connected equipment This is not a malfunction of the units Refer also to the manuals supplied with your CD player or MD recorder IM...

Страница 157: ...mer music genre etc When this is selected in front you can change the disc information by pressing Each time you press the button disc information see Note on 7 changes 8 Select or then press SET to change the track 9 Usable buttons and their functions for the current selection Indication here will change according to what is currently selected in front on the screen See Note on 9 Note on 7 The fo...

Страница 158: ...e search Press fi until they appear Going back to the DISC TITLE SEARCH screen Press EXIT Searching for a Disc Only for the CD player Search for a disc by its performer 1 Press TEXT DISPLAY while CD is selected as the source The Disc Information screen appears on the TV 2 Press fi to move to SEARCH then press SET The DISC SEARCH screen appears 3 Press fi to move to PERFORMER then press SET The PERFOR...

Страница 159: ...r a CD Player with disc memory function You can use the disc memory function through this receiver The disc information its performer disc title and music genre of normal audio CDs will be stored into the memory built in the CD player For the disc memory function refer to the manual supplied with your CD player The performer disc title and music genre information are usually recorded on a CD Text ...

Страница 160: ...ted song appears You can enter a song title for the song currently selected 5 Enter the song title referring to steps 3 and 4 of For a CD Player with disc memory function on pages 66 and 67 You can enter up to 32 characters for the song title 6 Press fi to move to the song title you have just entered then press SET The song title is stored into the memory and the Disc Information screen appears aga...

Страница 161: ...ages 13 to 15 for details 6 Plug the AC power cords of the components into the AC outlets 7 When turning on the TV for the first time after the AV COMPU LINK connection turn the TV volume to the minimum using the TV volume control on the TV 8 Turn on the other connected components first then turn on this receiver When turning on the VCR 1 use the remote control supplied with this receiver press VC...

Страница 162: ...tions only The Zone 1 TV automatically turns on and changes the input mode to the appropriate position so that you can view the picture DVD TV VCR DVD player RX DP15B You can control the connected video components using this remote control Aim the remote control at the remote sensor s on the target video component s or on the receiver directly For details see page 73 CONNECTIONS 3 Video Cable Conn...

Страница 163: ...er Video Input 1 or Video Input 2 the receiver is connected to This function does not work when you connect this receiver and the TV with the AV COMPU LINK EX terminal using the component video cables To use this function connect this receiver and the TV using the S video or composite video cables Automatic Power On Off Standby Automatic Power On The Zone 1 TV VCR 1 the VCR connected to the VCR 1 ...

Страница 164: ...channel speaker output level EFFECT Selects the effect level LIVENESS Selects the liveness Notes After adjusting sounds press the corresponding source selecting button to operate your target source by using the 10 keys otherwise the 10 keys cannot be used for operating your target source When you press LEVEL or LEVEL the corresponding speaker name appears on the remote s display IMPORTANT To opera...

Страница 165: ...D IN jacks change the source name to MD see page 27 Selecting TAPE will allow you to control the MD recorder CD player After pressing CD you can perform the following operations on the CD player PLAY Starts playing 4 Returns to the beginning of the current or previous track Skips to the beginning of the next track STOP Stops playing PAUSE Pauses playing To release press PLAY 1 10 10 Selects a trac...

Страница 166: ... connected to the VCR 1 jacks You can always perform the following operations VCR 1 STANDBY ON Turns on or off the VCR After pressing VCR 1 or selecting VCR1 by pressing CONTROL repeatedly you can perform the following operations on the VCR 1 9 0 Selects the TV channels on the VCR PLAY Starts playing REW Rewinds a tape FF Fast winds a tape STOP Stops operations PAUSE Pauses playing To release pres...

Страница 167: ... TV turns on or off you have entered the correct code If more than one code is listed for your brand of TV try each one until the correct one is entered IMPORTANT To operate the other component s using the RF signals emitted from this remote control the IR signal transmitter and the RF rod antenna must be connected to this receiver Place the IR signal transmitter so that it is aimed at the remote ...

Страница 168: ...converter and DBS tuner at the same time To change the transmittable signals for operating another manufacturer s VCR 1 Press and hold VCR 1 STANDBY ON 2 Press VCR 1 3 Enter a manufacturer s code using buttons 1 9 and 0 See page 77 to find the code 4 Release VCR 1 STANDBY ON The following button can be used for operating the VCR VCR 1 STANDBY ON Turns on or off the VCR After pressing VCR 1 you can...

Страница 169: ...rrect one is entered Manufactures codes for TV Manufacturer Codes JVC 00 13 74 Akai 01 02 Blaupunkt 03 04 Fisher 01 05 Grundig 03 06 07 Hitachi 08 09 10 49 78 Irradio 02 ITT Nokia 11 12 Loewe 06 15 16 Magnavox 08 17 49 Matsushita 86 87 Mets 50 51 52 53 Mitsubishi 08 18 19 20 Mivar 21 NEC 83 Nordmende 22 23 Okano 15 Panasonic 24 25 26 27 76 Philips 15 17 28 75 Pioneer 85 RCA Proscan 08 24 29 30 31 ...

Страница 170: ...hita 77 78 Mitsubishi 30 31 32 33 34 35 80 81 NEC 26 27 Nokia 03 36 Nordmende 38 Orion 09 Panasonic 19 24 39 40 79 Philips 04 19 21 24 41 42 Phonola 21 Pioneer 73 RCA Proscan 04 18 19 23 24 43 44 45 SABA 38 46 Samsung 45 47 59 61 62 63 Sanyo 03 48 49 Sharp 37 50 75 Siemens 03 51 Sony 52 53 54 68 69 70 Telefunken 55 60 Toshiba 43 44 71 72 Zenith 56 57 This figure is set to the remote control as the...

Страница 171: ...control unit hereafter called target remote control actually works 1 Set the LEARN TRANSMIT ZONE 1 ZONE 2 selector to LEARN 2 Place the two remote controls on a level surface with signal transmitting windows facing each other Leave a space of 5 cm to 10 cm between the two remote controls otherwise storing may fail 3 Press one of the source selecting buttons except VCR 2 VIDEO FM AM and EXT 7 1CH T...

Страница 172: ...ugh the storing procedure has been successfully finished When replacing the batteries finish changing them without delay otherwise the stored signals are all erased 4 Press one of the learning buttons to which you want to assign a signal from the target remote control The LEARN indicator starts flashing If you have pressed DVD or DVD MULTI in step 3 you can store the signals into the following but...

Страница 173: ...he stored signals for CD DISC first press CONTROL to select CD DISC then press CONTROL again while holding EXIT this time 3 Set the LEARN TRANSMIT ZONE 1 ZONE 2 selector to TRANSMIT ZONE 1 ZONE 2 to finish the erasing procedure IMPORTANT To operate the other component s using this remote control Aim directly at the remote sensor s on the target component s This remote control can send signals at a...

Страница 174: ...e 26 Select the correct input mode analog or digital See page 25 Check connections For analog connections see pages 11 to 15 For digital connections see pages 12 and 16 Check speaker connection and reconnect if necessary See page 19 Set the Zone 1 2 setting for the speakers correctly to use them as the Zone 2 front speakers See page 44 Turn on the amplifier Select the correct Zone 2 source Press M...

Страница 175: ...ring FM reception Occasional cracking noise during FM reception Noise is heard during record playing Howling during record playing The STANDBY lamp starts flashing and the receiver turns off into standby mode The STANDBY lamp goes off after turning on the power but soon the receiver turns off again into standby mode Remote control does not work Remote control does not work properly FM AM POSSIBLE ...

Страница 176: ...ity Impedance 1 kHz PHONO IN MM 2 5 mV 47 kΩ CD IN CDR IN TAPE MD IN EXT 7 1CH IN 200 mV 47 kΩ DVD IN VCR 1 IN VCR 2 IN TV SOUND DBS IN VIDEO 200 mV 47 kΩ Audio Input DIGITAL IN Coaxial 1 DVD 2 CD 3 TV DBS 0 5 V p p 75 Ω Optical 4 CDR 5 MD 6 VCR1 21 dBm to 15 dBm 660 nm 30 nm Corresponding to Linear PCM Dolby Digital and DTS Digital Surround with sampling frequency 32 kHz 44 1 kHz 48 kHz Audio Out...

Страница 177: ...dB FM tuner IHF Tuning Range 87 5 MHz to 108 0 MHz Usable Sensitivity Monaural 12 8 dBf 1 2 µV 75 Ω 50 dB Quieting Sensitivity Monaural 18 2 dBf 2 2 µV 75 Ω Stereo 38 2 dBf 22 3 µV 75 Ω Signal to Noise Ratio IHF A weighted Monaural 78 dB at 85 dBf Stereo 73 dB at 85 dBf Total Harmonic Distortion Monaural 0 2 at 1 kHz Stereo 0 3 at 1 kHz Stereo Separation at REC OUT 40 dB at 1 kHz Alternate Channel...

Страница 178: ...VICTOR COMPANY OF JAPAN LIMITED 0404RYMMDWJEIN EN FR 2004 VICTOR COMPANY OF JAPAN LIMITED ...

Отзывы: