background image

11

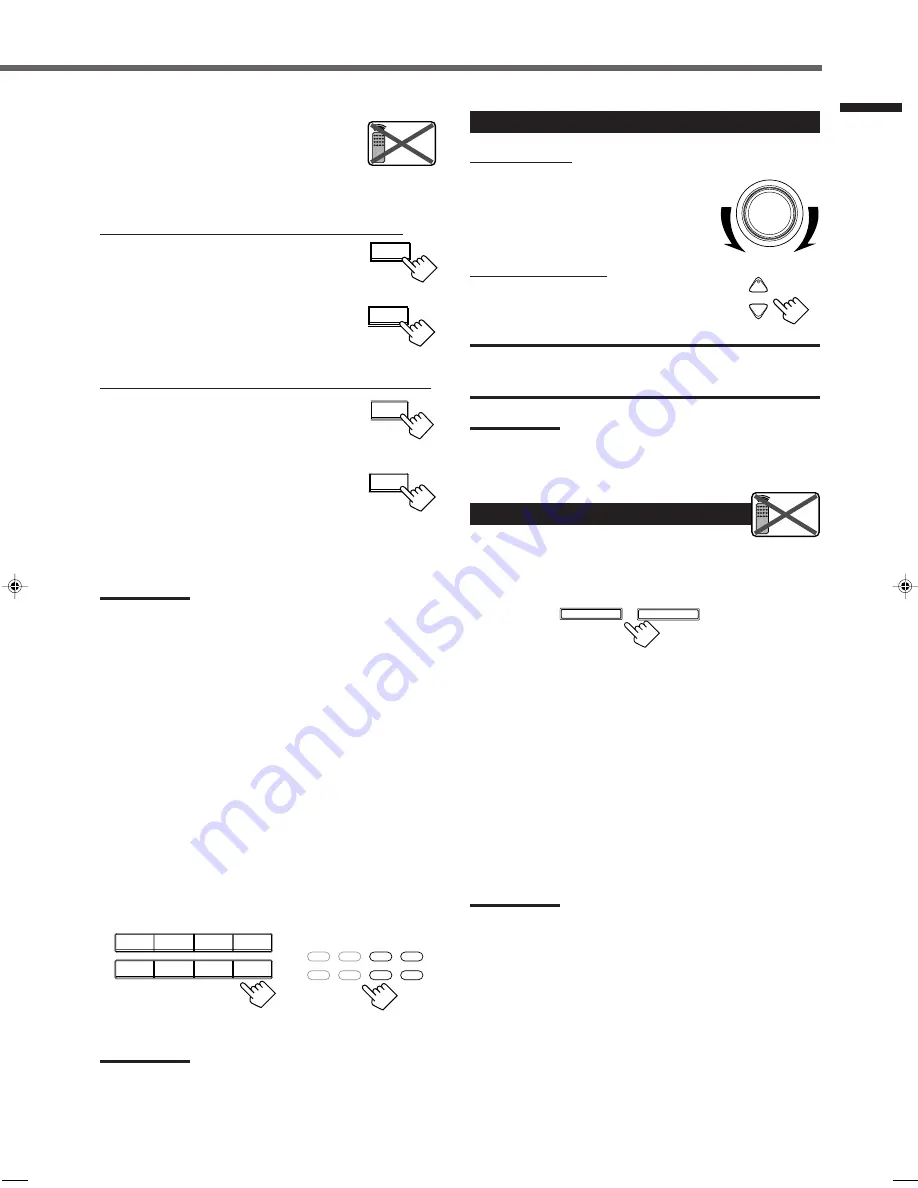
Changing the source name

When you have connected a CD recorder to the
TAPE/CDR jacks or the DBS tuner to the TV
SOUND/DBS jacks on the rear panel, change the
source name which will be shown on the display.

When changing the source name from “TAPE” to “CDR”:

1

Press TAPE/CDR (SOURCE NAME)
to select “TAPE” as the source.

2

Press and hold SOURCE NAME
(TAPE/CDR)  to assign “CDR.”

When changing the source name from “TV SOUND” to “DBS”:

1

Press TV SOUND/DBS (SOURCE
NAME) to select “TV SOUND” as
the source.

2

Press and hold SOURCE NAME
(TV SOUND/DBS) to assign “DBS.”

To change the source name to “TAPE” or “TV SOUND,”

 repeat

the same procedure above.

Notes:

• To watch the picture from DBS tuner, change the source name to

“DBS.” If “TV SOUND” is selected, you cannot watch the picture
from DBS tuner.

• Without changing the source name, you can still use the connected

components. However, there may be some inconvenience.
– “TAPE” or “TV SOUND” will appear on the display when you

select the CD recorder or DBS tuner.

– You cannot use the digital input (see page 15) for the CD

recorder.

– You cannot use the COMPU LINK remote control system (see

page 31) to operate the CD recorder.

Selecting different sources for picture and sound

You can watch picture from a video component while listening to
sound from another component.

Press one of the audio source selecting buttons —
CD,  TAPE/CDR, PHONO, FM/AM, while watching the picture
from a video component such as the VCR, DVD player, or DBS
tuner, etc.

Notes:

• Once you have selected a video source, pictures of the selected

source are sent to the TV until you select another video source.

• This function can use only when selecting the S-video or composite

video input  terminal.

Basic Operations

Adjusting the Volume

On the front panel:

To increase the volume,

turn MASTER VOLUME clockwise.

To decrease the volume,

turn it counterclockwise.

From the remote control:

To increase the volume,

 press .

To decrease the volume,

 press VOLUME –.

CAUTION:

Always set the volume to the minimum before starting any source. If
the volume is set at its high level, the sudden blast of sound energy
can permanently damage your hearing and/or ruin your speakers.

Note:

The volume level can be adjusted within the range of “0” (minimum) to
“50” (maximum).

Selecting the Front Speakers

When you have connected two pairs of the front speakers, you can
select which to use.

To use the speakers connected to the FRONT SPEAKERS 

1

terminals, 

press SPEAKERS ON/OFF 1 so that the SPK 1 indicator

lights up on the display. (Make sure that the SPK 2 is not lit on the
display.)

To use the speakers connected to the FRONT SPEAKERS 

2

terminals, 

press SPEAKERS ON/OFF 2 so that the SPK 2 indicator

lights up on the display. (Make sure that the SPK 1 is not lit on the
display.)

To use both sets of the speakers, 

press SPEAKERS ON/OFF 1 and 2

so that the SPK 1 and SPK 2 indicators light up on the display.

To use neither sets of the speakers, 

press SPEAKERS ON/OFF

1 and 2 so that the SPK 1 and SPK 2 indicators disappear from the
display.

Notes:

• If you select any of the Surround modes while using both the speakers

connected to the FRONT SPEAKERS 

1

 and 

2

 terminals, the

speakers connected to the FRONT SPEAKERS 

2

 terminals are

deactivated.

• While the surround mode is in use, you can only select either the

speakers connected to the FRONT SPEAKERS 

1

 or 

2

 terminals.

• If you select the source to DVD MULTI while using both the speakers

connected to the FRONT SPEAKERS 

1

 and 

2

 terminals, the

speakers connected to the FRONT SPEAKERS 

2

 terminals are

deactivated.

• When selecting “DVD MULTI” as the source, you can only select

either the speakers connected to the FRONT SPEAKERS 

1

 or 

2

terminals.

Remote

NOT

TAPE/CDR

SOURCE NAME

TV SOUND/DBS

SOURCE NAME

TAPE/CDR

SOURCE NAME

TV SOUND/DBS

SOURCE NAME

+

VOLUME

Remote

NOT

SPEAKERS ON/OFF

1

2

DVD MULTI

DVD

CD

TAPE/CDR

TV/DBS

VCR

PHONO

FM/AM

From the remote control

On the front panel

DVD

VCR

TV SOUND/DBS

CD

TAPE/CDR

SOURCE NAME

FM/AM

DVD MULTI

PHONO

SOURCE NAME

MASTER VOLUME

EN10-22.RX-7020V[J]f

02.1.16, 1:50 PM

11

Содержание RX-7020VBK

Страница 1: ...PUT ANALOG DIGITAL SPEAKERS ON OFF SURROUND MODE PHONES SURROUND ON OFF FM AM TUNING STANDBY STANDBY ON FM AM PRESET FM MODE MEMORY INPUT ATT FM AM DVD MULTI PHONO SOURCE NAME 1 2 COMPULINK Remote CONTROL 2 3 1 5 6 4 8 9 7 P 0 10 10 BASSBOOST EFFECT MENU ENTER TEST REAR L DIMMER SUBWOOFER REAR R MUTING CH TVVOL REW FF VOLUME CA TV DBS CONTROL TV VIDEO REC PAUSE RETURN FMMODE 100 CONTROL A V CONTRO...

Страница 2: ...r cabinet 2 Do not expose this appliance to rain or moisture ATTENTION Afin d éviter tout risque d électrocution d incendie etc 1 Ne pas enlever les vis ni les panneaux et ne pas ouvrir le coffret de l appareil 2 Ne pas exposer l appareil à la pluie ni à l humidité Warnings Cautions and Others Mises en garde précautions et indications diverses For U S A This equipment has been tested and found to ...

Страница 3: ...the Input Signal 19 Adjusting the Front Speakers Output Balance 19 Adjusting the Tone 20 Adjusting the Subwoofer Output Level 20 Reinforcing the Bass 20 Tuner Operations 21 Tuning in Stations Manually 21 Using Preset Tuning 21 Selecting the FM Reception Mode 22 Creating Realistic Sound Fields 23 About Relations between Speaker Layouts and Surround Modes 25 Using Dolby Pro Logic II Dolby Digital an...

Страница 4: ...DVD CD TAPE CDR TREBLE TV DBS VCR PHONO FM AM BASS SURROUND ANALOG DIGITAL SLEEP SUBWOOFER REAR R REAR L CENTER SOUND Remote Control 1 Display window a Remote control operation mode indicator b Signal transmission indicator Lights up when transmitting the remote control signal 2 Power buttons 10 36 39 CATV DBS VCR TV AUDIO 3 Source selecting buttons 10 11 15 21 22 30 34 39 DVD DVD MULTI CD FM AM T...

Страница 5: ...reset FM AM channels and sound adjustments may be erased in a few days Checking the Supplied Accessories Check to be sure you have all of the following supplied accessories The number in the parentheses indicates the quantity of the pieces supplied Remote Control 1 Batteries 2 AM Loop Antenna 1 FM Antenna 1 If anything is missing contact your dealer immediately Parts Identification Getting Started...

Страница 6: ...eption is poor connect an outdoor single vinyl covered wire not supplied to the AM EXT terminal Keep the AM loop antenna connected Notes If the AM loop antenna wire is covered with vinyl remove the vinyl while twisting it as shown to the right Make sure the antenna conductors do not touch any other terminals connecting cords and power cord This could cause poor reception Outdoor FM antenna not sup...

Страница 7: ... set the speaker setting information properly to obtain the best possible Surround effects For details see pages 16 to 18 CAUTION Use speakers with the SPEAKER IMPEDANCE indicated by the speaker terminals Connecting the front speakers You can connect two pairs of front speakers one pair to the FRONT SPEAKERS 1 terminals and the other pair to the FRONT SPEAKERS 2 terminals About the speaker impedan...

Страница 8: ... H terminal on the rear panel Audio Components Video Components Turntable VCR CD player TV Cassette deck or DBS tuner or CD recorder DVD player Note Any turntables incorporating a small output cartridge such as an MC moving coil type must be connected to this receiver through a commercial head amplifier or step up transformer Direct connection may result in insufficient volume To audio output Ex T...

Страница 9: ...TV and a playing video component are connected to the unit through the different types of video terminals you cannot view the playback picture from the playing component on the TV Å To left right channel audio output ı To left right channel audio input Ç To composite video output Î To S video output To S video input Ï To composite video input VCR AUDIO TV SOUND DBS VCR OUT REC IN PLAY TAPE CDR CD ...

Страница 10: ...A D F G B COMPONENT VIDEO MONITOR OUT DBS DVD Y PB CB PR CR VIDEO VCR OUT REC IN PLAY MONITOR OUT DVD DBS S VIDEO VIDEO DBS AUDIO TV SOUND DBS VCR OUT REC IN PLAY TAPE CDR CD PHONO OUT REC IN PLAY RIGHT LEFT REAR RIGHT LEFT FRONT CENTER DVD SUBWOOFER OUT SUB WOOFER RIGHT LEFT B A C D AUDIO Å To audio output ı To composite video output Ç To S video output Î To component video output Notes When conn...

Страница 11: ... plug so as not to damage the cord Digital connections This receiver is equipped with four DIGITAL IN terminals one digital coaxial terminal and three digital optical terminals and one DIGITAL OUT terminal You can connect any digital equipments such as DBS tuner Digital TV broadcast tuner DVD player CD player and CD recorder IMPORTANT When connecting the DVD player digital TV broadcast tuner or DB...

Страница 12: ... source name on page 11 When you have connected some digital source components using the digital terminals see page 9 you need to select the digital input mode see page 15 When you press one of the source selecting buttons on the remote control marked above with asterisks the receiver automatically turns on On the front panel From the remote control DVD VCR TV SOUND DBS CD TAPE CDR SOURCE NAME FM ...

Страница 13: ...ss VOLUME To decrease the volume press VOLUME CAUTION Always set the volume to the minimum before starting any source If the volume is set at its high level the sudden blast of sound energy can permanently damage your hearing and or ruin your speakers Note The volume level can be adjusted within the range of 0 minimum to 50 maximum Selecting the Front Speakers When you have connected two pairs of ...

Страница 14: ...HEADPHONE appears and H PHONE indicator lights up on the display This cancels the Surround modes currently selected and activates the HEADPHONE mode see below HEADPHONE mode When using the headphones following signals are output regardless of your speaker setting For 2 channel sources the front left right channel signals are output directly from the headphones For multichannel sources the front le...

Страница 15: ...nalog recordings are not possible The output volume level bass boost see page 20 tone adjustment see page 20 and Surround modes see page 23 cannot affect the recording The test tone signal see pages 26 and 27 does not come out through the DIGITAL OUT terminal Signal and speaker indicators on the display The following signal indicators light up L When digital input is selected Lights up when the le...

Страница 16: ... RECEIVER SETTING MASTER VOLUME CONTROL DOWN UP SURROUND MODE PHONES SURROUND ON OFF FM AM TUNING STANDBY FM AM PRESET FM MODE MEMORY STANDBY ON DVD VCR TV SOUND DBS CD TAPE CDR SOURCE NAME SOURCE NAME FM AM DVD MULTI PHONO BASS BOOST INPUT ANALOG DIGITAL SPEAKERS ON OFF INPUT ATT 1 2 L C S WFR LS RS CH S LFE SPK PROLOGIC ΙΙ DSP H PHONE AUTOMUTING TUNED STEREO VOLUME BASS BOOST INPUT ATT SLEEP DIG...

Страница 17: ...front panel From the remote control If the following symptoms occur while playing Dolby Digital or DTS Digital Surround software with DIGITAL AUTO selected follow the procedure below Sound does not come out at the beginning of playback Noise comes out while searching or skipping chapters or tracks 1 Press INPUT ANALOG DIGITAL or ANALOG DIGITAL INPUT on the remote control 2 Press CONTROL UP 5 DOWN ...

Страница 18: ...UTO LINEAR PCM 1 R Remote NOT ST SETTING NO for the subwoofer LARGE for the front speakers and SMALL for the center and rear speakers are initial settings To get best possible sound change the subwoofer and speaker settings to fit your listening conditions Setting the Speaker Information To obtain the best possible sound or effect from Surround modes see pages 26 to 29 register the following speak...

Страница 19: ... UP LARGE SMALL NONE ST SETTING Speaker distance Register the unit you use then the speaker distance from your listening point If you have set the unit before start from step 3 Speaker distance is not valid for the DVD MULTI playback mode T SETTING CONTROL DOWN UP L C S WFR LS RS CH S LFE SPK DIGITAL AUTO LINEAR PCM 1 R T SETTING CONTROL DOWN UP 3 0 m 10 feet Left front speaker Right front speaker...

Страница 20: ...rom small speaker to large speakers To use this function properly set this crossover frequency level according to the size of the small speaker connected If you have selected LARGE for all speakers this function will not take effect Crossover frequency is not valid for the DVD MULTI playback mode and HEADPHONE mode 1 Press SETTING repeatedly until CROSS Crossover with the current setting appears o...

Страница 21: ...EFFECT MENU ENTER TEST DIMMER MUTING CH TVVOL REW FF VOLUME CA TV DBS CONTROL TV VIDEO REC TUNING PAUSE RETURN FMMODE 100 CONTROL A V CONTROL RECEIVER RM SRX7020J REMOTE CONTROL CATV DBS VCR TV AUDIO SURROUND MODE INPUT ON OFF DVD MULTI DVD CD TAPE CDR TREBLE TV DBS VCR PHONO FM AM BASS SURROUND ANALOG DIGITAL SLEEP SUBWOOFER REAR R REAR L CENTER SOUND Basic Settings Sound Adjustments ADJUST CONTR...

Страница 22: ...e the bass boost function The BASS BOOST indicator lights up on the display Select BASSBOOST OFF to cancel it The indicator goes off Note This function affects the front speaker sounds only BASSBOOST From the remote control On the front panel BASS BOOST Sound Adjustments L C S WFR LS RS CH S LFE SPK DIGITAL AUTO LINEAR PCM 1 R Adjusting the Tone You can adjust the bass and treble sounds as you lik...

Страница 23: ...e frequency keeps changing until a station is tuned in When a station of sufficient signal strength is tuned in the TUNED indicator lights up on the display When an FM stereo program is received the STEREO indicator also lights up ADJUST RX 7020V AUDIO VIDEO CONTROL RECEIVER SETTING MASTER VOLUME CONTROL DOWN UP SURROUND MODE PHONES SURROUND ON OFF FM AM TUNING STANDBY FM AM PRESET FM MODE MEMORY ...

Страница 24: ... tune in a preset station On the front panel 1 Press FM AM to select the band FM or AM The last received station of the selected band is tuned in Each time you press the button the band alternates between FM and AM 2 Press FM AM PRESET 5 repeatedly until you find the channel you want Pressing FM AM PRESET 5 increases the channel numbers Pressing FM AM PRESET decreases the channel numbers From the ...

Страница 25: ...on the display Dolby Digital Used to reproduce multichannel sound tracks of the software encoded with Dolby Digital D I G I T A L To enjoy the software encoded with Dolby Digital connect the source component using the digital terminal on the rear of this receiver See page 9 Dolby Digital 5 1 ch encoding method so called discrete multichannel digital audio format records and digitally compresses th...

Страница 26: ...AP modes are provided with this receiver LIVE CLUB Gives the feeling of a live music club with a low ceiling DANCE CLUB Gives a throbbing bass beat HALL Gives clear vocal and the feeling of a concert hall PAVILION Gives the spacious feeling of a pavilion with a high ceiling These DAP modes can be used to add the acoustic surround effects while reproducing 2 channel stereo software either analog or...

Страница 27: ...IC MODE SURROUND SURROUND MODE Each time you press SURROUND ON OFF the Surround modes turn on or off L C S WFR LS RS S LFE SPK PROLOGIC ΙΙ DSP H PHONE AUTOMUTING TUNED STEREO INPUT ATT DIGITAL AUTO LINEAR PCM 1 R SURROUND OFF PL II MOVIE or PL II MUSIC ON OFF SURROUND SURROUND ON OFF Ex PL II MUSIC has been selected Turning on or off the Surround modes Front speaker Front speaker Each time you pre...

Страница 28: ...DE INPUT ON OFF DVD MULTI DVD CD TAPE CDR TREBLE TV DBS VCR PHONO FM AM BASS SURROUND SURROUND ANALOG DIGITAL SLEEP SUBWOOFER REAR R REAR L CENTER SOUND SURROUND ON OFF EFFECT SOUND TEST Using Dolby Pro Logic II Dolby Digital and DTS Digital Surround Once you have adjusted the Surround modes the adjustment is memorized for each source When playing back digital multichannel software Dolby Digital 5...

Страница 29: ...activate Surround mode Each time you press the button Surround mode turns on and off alternately If you are playing back software encoded with Dolby Digital multichannel DOLBY DIGITAL is selected If you are playing back software encoded with DTS Digital Surround DTS SURROUND is selected If you are playing back any software other than above you can select PL II MUSIC or PL II MOVIE according to the...

Страница 30: ... the DAP modes and All Channel Stereo if no rear speakers are connected You cannot adjust the effect level for ALL CH STEREO From the remote control It will be convenient for you to use the remote control for adjustments since you can make adjustments from your listening point 1 Start playing 2 channel software either analog or Linear PCM and select the source 2 Press SURROUND ON OFF to activate S...

Страница 31: ... adjust the center speaker output level 10 to 10 0 is the initial setting If you have already changed the setting another number level will be shown 2 Press CONTROL UP 5 DOWN to adjust the selected speaker output levels 3 Repeat steps 1 and 2 to adjust the other speaker levels Creating Realistic Sound Fields 5 Only for DAP modes Adjust the effect level 1 Press ADJUST repeatedly until EFFECT with t...

Страница 32: ... on the DVD player and start playing a DVD Refer also to the manual supplied with the DVD player If you need to make any adjustments go to the following steps 3 Adjust the speaker output levels 1 Press ADJUST repeatedly until one of the following indications appears on the display CENTER To adjust the center speaker output level 10 dB to 10 dB REAR L To adjust the left rear speaker output level 10...

Страница 33: ...em you need to connect JVC s audio components through the COMPU LINK 4 SYNCHRO jacks see below in addition to the connections using cables with RCA pin plugs see page 7 Make sure that the AC power cords of these components are unplugged before connection Plug the AC power cords only after all connections are completed Notes There are four versions of COMPU LINK remote control system This receiver ...

Страница 34: ...S video terminals connect also this receiver to the TV s Video Input 1 terminal using S video cables Note If you connect the DVD player and the DBS tuner to this receiver using the S video terminals change the video input terminal setting to S C see page 16 When connecting the source equipment to the receiver using the composite video terminals connect also this receiver to the TV s Video Input 2 ...

Страница 35: ...r will turn off Note If you turn off the receiver while recording on the VCR the VCR will not turn off but continue recording 1 If you have already plugged your VCR DVD player TV and this receiver into the AC outlets unplug their AC power cords first 2 Connect your VCR DVD player TV and this receiver as follows using the cables with the monaural mini plugs not supplied See CONNECTIONS 1 on the pre...

Страница 36: ...ar speaker output level EFFECT Select the DAP effect level TEST Turn on or off the test tone output Note After adjusting sounds press the corresponding source selecting button or CONTROL to operate your target source by using the 10 keys otherwise the 10 keys cannot be used for operating your target source Tuner You can always use the following buttons FM AM Alternate between FM and AM After press...

Страница 37: ... track number 12 and starting playback Press 1 0 5 then 1 2 then 3 Turntable After pressing PHONO you can perform the following operations on the turntable 3 Start playing 7 Stop operations Cassette deck After pressing TAPE CDR or CONTROL repeatedly until TAPE appears on the display window you can use the following buttons for cassette deck operations 3 3 3 3 3 Start playback FF Fast wind a tape f...

Страница 38: ...ss this button then 3 to start recording CH Change the TV channels on the VCR Note You can use either VCR button or CONTROL button to activate the buttons listed above If you press VCR the playing source also changes On the other hand if you press CONTROL repeatedly to select VCR the playing source does not change DVD player After pressing DVD or DVD MULTI source selecting button you can use the f...

Страница 39: ...ponents Operating Other Manufacturers Video Equipment Manufacturer Codes JVC 00 02 13 14 47 74 AKAI 01 02 BLAUPUNKT 03 04 FISHER 01 05 GRUNDIG 03 06 07 HITACHI 08 09 10 49 IRADDIO 02 ITT NOKIA 11 12 LOEWE 06 15 16 MAGNAVOX 08 17 49 METS 50 51 52 53 MITSUBISHI 08 18 19 20 MIVAR 21 NORDMENDE 22 23 OKANO 15 PANASONIC 24 25 26 27 76 PHILIPS 15 17 28 75 QUELLE 52 53 54 55 56 57 58 59 60 61 62 63 64 65 ...

Страница 40: ...ote Refer also to the manual supplied with your VCR 5 Try to operate your VCR by pressing VCR When your VCR turns on or off you have entered the correct codes If there are more than one code listed for your brand of VCR try each one until the correct one is entered Operating Other Manufacturers Video Equipment Manufacturers codes for CATV converter Manufacturer Codes GENERAL INSTRUMENT 06 07 08 09...

Страница 41: ...nt Manufacturers codes for VCR Manufacturer Codes JVC 00 26 27 28 29 58 AIWA 01 02 BELL HOWELL 03 BLAUPUNKT 04 05 CGM 06 07 EMERSON 08 10 11 12 64 65 FISHER 03 14 15 16 17 FUNAI 01 GE 18 19 20 GOLDSTAR 07 GOODMANS 13 21 GRUNDIG 06 22 HITACHI 18 23 24 25 66 LOEWE 07 21 MAGNAVOX 04 19 24 MITSUBISHI 30 31 32 33 34 35 NEC 26 27 NOKIA 03 36 NORDMENDE 38 ORION 09 PANASONIC 19 24 39 40 PHILIPS 04 19 21 2...

Страница 42: ... your dealer Remove the obstruction Replace batteries Press SOUND or source selecting buttons first then press the button you want to use See pages 34 39 POSSIBLE CAUSE The power cord is not plugged in Speaker signal cables are not connected The SPEAKERS ON OFF 1 and 2 button are not set correctly An incorrect source is selected Muting is activated An incorrect input mode analog or digital is sele...

Страница 43: ...tal Surround with sampling frequency 32 kHz 44 1 kHz 48 kHz Audio Output Level TAPE CDR VCR 220 mV Digital output Optical DIGITAL OUTPUT Signal wave length 660 nm Output level 21 dBm to 15 dBm Signal to Noise Ratio 66 IHF 78 IHF PHONO MM 70 dB 78 dB at REC OUT CD TAPE CDR VCR TV SOUND DBS DVD 87 dB 78 dB Frequency Response 8 Ω PHONO MM 20 Hz to 20 kHz 1 dB CD TAPE CDR VCR TV SOUND DBS DVD 20 Hz to...

Страница 44: ...t 1 kHz Stereo 0 6 at 1 kHz Stereo Separation at REC OUT 35 dB at 1 kHz Alternate Channel Selectivity 45 dB 400 kHz Frequency Response 30 Hz to 15 kHz 0 5 dB 3 dB AM tuner Tuning Range 530 kHz to 1 710 kHz Usable Sensitivity Loop antenna 400 µV m Signal to Noise Ratio 50 dB 100 mV m General Power Requirements AC 120V 60 Hz Power Consumption 180 W 230 VA at operation 2 W in standby mode Dimensions ...

Страница 45: ...rized servicer or visit our website at www JVC com Remember to retain your Bill of Sale for Warranty Service Do not service the television yourself Caution To prevent electrical shock do not open the cabinet There are no user serviceable parts inside Please refer to qualified service personnel for repairs Accessories To purchase accessories for your JVC product please call toll free 1 800 882 2345...

Страница 46: ...cleaning 4 Damage that occurs in shipment due to act of God and cosmetic damage 5 Signal reception problems and failures due to line power surge 6 Video Pick up Tubes CCD Image Sensor Cartridge Stylus Needle are covered for 90 days from the date of purchase 7 Batteries except that Rechargeable Batteries are covered for 90 days from the date of purchase There are no express warranties except as lis...

Страница 47: ...VICTOR COMPANY OF JAPAN LIMITED EN 1201NHMMDWJEIN J VC ...

Отзывы: