background image

11

ON/STANDBY

BEAT CUT

AUX

PRESET

TUNING

ONE TOUCH

REC

VOLUME

C D

TAPE TUNER

MULTI CONTROL

REW

AHB PRO

ACS

STOP

FF

BAND

STANDBY

AHB PRO

SPEAKER

ILLUMINATION

/ACS

SOUND

AUX

BAND

C D

TAPE

TUNER

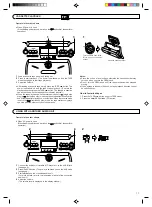
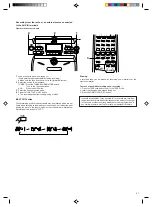
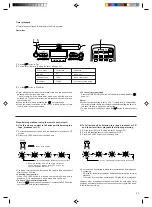
SWITCHING THE POWER ON/OFF

One touch operation (COMPU PLAY)

(only when AC power is used)

Even when the power is set to STANDBY, pressing the button shown
below switches on the power and selects the source.

Function mode

Operations

Switching the power on/off

÷

Switching on:

The STANDBY indicator goes out.

÷

 The display window lights. (when using DC power, it lights for only 5

seconds)

÷

Switching off:

The STANDBY indicator lights.

÷

 The display window light goes off and only the clock time is displayed.

When this button is pressed with a CD loaded, CD playback begins.

CD

TAPE

When this button is pressed with a tape loaded, tape playback begins.

TUNER

When this button is pressed, the tuner is engaged.

AUX

A sound source connected to the AUX IN terminal can be engaged.

Notes:

÷

COMPU PLAY doesn’t function when the unit is used with batteries or
a car adapter. Press the 

 button to turn on. To avoid battery

exhaustion, the display window normally doesn’t light. However, when
the 

 button is pressed to turn on or an operation button is pressed,

the display window lights for 5 seconds.

÷

When switching off the power, be sure to press the 

 button.

÷

The COMPU PLAY function on the remote control has the same function
as that on the main unit.

STANDBY

ON/STANDBY

STANDBY

ON/STANDBY

 button

TUNER/BAND button

AUX button

TAPE 

23

 button

CD 

3

/

8

 button

Содержание RV-B550 BU/RD

Страница 1: ...EM INSTRUCTIONS LVT0492 002A B SLEEP CLOCK TIMER TIMER ON OFF PROGRAM RANDOM REPEAT AUTO PRESET DISPLAY REVERSE MODE MULTI CONTROL REW FF RM RXVB55 REMOTE CONTROL TAPE TUNER BAND FM MODE C D DOWN UP SET AUX VOLUME AHB PRO SOUND ACS ...

Страница 2: ...power on off 11 Volume sound mode and other controls 12 Handling CDs 13 Playing CDs 14 Handling cassette tapes 16 Cassette playback 17 Using with another audio unit 17 Radio reception 18 Recording 20 Clock adjustment 22 Timer operations 23 Maintenance 26 Troubleshooting 27 Specifications 27 Warnings Cautions and Others IMPORTANT FOR LASER PRODUCTS REPRODUCTION OF LABELS 1 CLASSIFICATION LABEL PLAC...

Страница 3: ...luding the mains plug extension leads and interconnections between pieces of equipment are properly made and in accordance with the manufacturer s instructions Switch off and withdraw the mains plug when making or changing connections DO consult your dealer if you are ever in doubt about the installation operation or safety of your equipment DO be careful with glass panels or doors on equipment DO...

Страница 4: ...e outlet and consult your dealer 10 Do not block the unit s ventilation holes that allow heat to escape Do not install the unit in a badly ventilated place button When the power cord is connected to a household AC wall outlet the power indicator lights in red indicating the STANDBY mode only whenAC power is used When the button is pressed the power indicator goes out and the display window lights ...

Страница 5: ... it as required during play 5 Safety mechanism This unit incorporates a safety interlock mechanism which switches the laser beam on and off so that when the CD door is open the laser beam stops automatically 6 Do not place cassette tapes etc near the speakers Since there are magnets in the speakers do not place tapes or magnetic cards on them as recorded data could be erased 7 Keep this unit away ...

Страница 6: ... Do not install the unit near a TV otherwise the TV picture color will become distorted If this occurs move the TV away from the unit then turn off the TV and turn it on again after 15 to 30 minutes The TV s automatic degaussing circuit will correct the picture Power cord POWER SUPPLY A Operation on household AC Connect the AC power cord after all other connections have been made CAUTIONS 1 ONLY U...

Страница 7: ...VC model CA R120E to prevent mishaps or damage resulting from different polarity design For safety stop the car before performing operations Be sure to start the engine when you use the car adapter otherwise the car battery will be exhausted During transport stabilize the unit in a box etc This unit is not waterproof or dustproof To prevent malfunctions do not leave the unit in a car for long peri...

Страница 8: ...track during skip play Press to fast forward rewind during search play 7 Press to stop Press to cancel program play t Speaker illumination A light in each speaker flashes when SPEAKER ILLUMINATION is on 1 Shoulder strap hook 2 button 3 AHB Active Hyper Bass PRO button 4 SPEAKER ILLUMINATION ACS Active Clear Sound button 5 SOUND button 6 OPEN knob Turn the OPEN knob to the left to open the CD door ...

Страница 9: ...ward the tape When the mode is set to TUNER 4 Auto tuning Manual tuning 1 PRESET TUNING BEAT CUT button 2 Display window 1 Band display 2 Radio frequency display 3 Mode display during FM broadcast STEREO MONO 4 Tape TAPE display 5 Reverse mode indicator 6 Recording indicator REC 7 Tape direction indicators 2 3 3 TAPE 23 button Press to select the tape mode Press to select the tape direction Press ...

Страница 10: ...t 7 m approx 23 ft The remote control range is less when the unit is used at an angle Do not expose the remote sensor to strong direct sunlight or artificial lighting Make sure that there are no obstacles between the remote sensor and the unit If the radio reception is noisy move the remote control unit away from the main unit 1 TIMER button Press to change the mode to TIMER 2 CLOCK button Press t...

Страница 11: ...the clock time is displayed When this button is pressed with a CD loaded CD playback begins CD TAPE When this button is pressed with a tape loaded tape playback begins TUNER When this button is pressed the tuner is engaged AUX A sound source connected to the AUX IN terminal can be engaged Notes COMPU PLAY doesn t function when the unit is used with batteries or a car adapter Press the button to tu...

Страница 12: ...low volumes playback only Main unit Remote control unit The factory preset is FLAT Each time the SOUND button is pressed the display changes as shown Sound mode selection LIVE Set to this position for heavy metal or rock music POP Set to this position for light music including popular and vocal music CLEAR Set to this position for crisp and clear sounding music with transparent highs FLAT No sound...

Страница 13: ...Usable CDs Use CDs with the Compact Disc mark shown below 2 Notes on handling CDs Do not touch the reflective recorded surface Do not stick or write anything on the label side Do not bend CDs 3 Storage After removing a CD from the unit be sure to put it back in its case Do not expose CDs to direct sunlight high temperatures such as from a heater high humidity or dust 4 Cleaning CDs Before loading ...

Страница 14: ...h mode monitor the sound and release the button when the required position is located Search play to locate the required position on the CD The required position can be located using fast forward or reverse search while playing a CD To stop a CD temporarily Press the CD 3 8 button to stop play temporarily the play time display blinks When pressed again play resumes from the point where it was paus...

Страница 15: ...he beginning of the designated track To confirm the details of a program Press the PROGRAM button the tracks making up the program will be displayed in programmed order Program order number Track number Programmed play using the remote control unit Up to 20 tracks can be programmed to be played in any required order The total playing time of programmed tracks is displayed up to 99 minutes 59 secon...

Страница 16: ...it has anAuto Tape Select mechanism which distinguishes between different types of tape using detection holes in the cassette After the type of tape has been detected bias and equalization suitable for the tape are set Cassettes with detection holes Metal tape EQ 70 µs Type IV CrO2 chrome tape EQ 70 µs Type II Cassettes without detection holes Normal tape EQ 120 µs Type I Metal CrO2 tape detection...

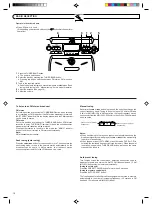
Страница 17: ...ay window 1 Load a cassette tape with side A facing out 2 Press to start playback The power is switched on and the TAPE mode is engaged to start tape playback 3 Adjust the volume After loading a cassette tape simply press the TAPE 23 button The power is switched on and the tape starts playback To select the playback direction press the TAPE 23 button The change in direction can be checked with the...

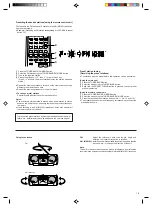
Страница 18: ...s the PRESET TUNING button for more than 2 seconds Using the remote control unit Press the AUTO PRESET button The frequencies of stations broadcasting signals are stored in memory automatically in the order of increasing frequency 30 stations in FM band and 15 stations in AM MW LW band Notes When seek tuning to the required station is not possible because the broadcast signal is too weak press the...

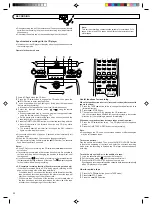
Страница 19: ... in memory When listening to an AM MW LW broadcast noise may be heard if the remote control unit is used To prevent the preset stations from being erased because of a power failure etc install memory back up batteries in the unit see page 6 Preset station tuning Receiving the preset stations The stations must be preset before this operation can be performed Using the main unit 1 Press the TUNER BA...

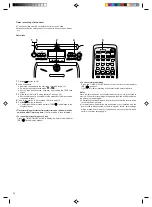
Страница 20: ...facing out 2 Set the reverse mode to with the remote control unit 3 Press the ONE TOUCH REC button on the main unit Synchronized recording starts and the cassette deck stops automatically when CD playback is completed 1 Load a CD and close the CD door 2 Press the CD 3 8 button to engage the CD mode then press the 7 STOP button to enter the stop mode 3 Load a cassette with side A facing out Wind pa...

Страница 21: ...liminated Normally set this button to CUT 1 Erasing A recorded tape can be erased by recording new material over the previous material To erase a tape without making a new recording 1 Press the TAPE 23 button to set to the TAPE mode 2 Insert the cassette to be erased facing out 3 Press the ONE TOUCH REC button It should be noted that it may be unlawful to re record pre recorded tapes records or di...

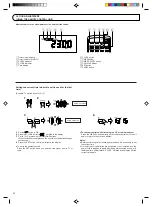
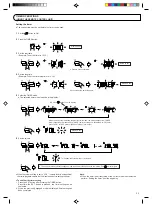
Страница 22: ...radio broadcast Press the DISPLAY button briefly on the remote control unit Press it again to return to the previous display Notes Before performing timer recording or playback it is necessary to set the current time If memory back up batteries are exhausted or not installed and the power cord is plugged in again after being disconnected or power is restored after a power failure CLOCK will blink ...

Страница 23: ...hanges from TUNER timer reception of a broadcast to TUNER timer recording of a broadcast to CD timer play of a CD to TAPE timer playback of a tape in this order Within 30 sec 6 Set the volume This shows that volume level 1 is selected The unit enters the previously engaged mode when timer setting has been completed The indicator lights When the volume setting is set to VOL volume level is not spec...

Страница 24: ...and stop times check that the tuner is tuned to the required frequency If memory back up batteries are exhausted or not installed and the power cord is disconnected or there is a power failure timer settings will be erased from memory If this happens set the current time and perform the timer setting again 1 Set the button to ON 2 Load a cassette Insert the cassette with the side to be recorded fa...

Страница 25: ...N OFF button so that the timer mode indicator goes out Notes When the volume setting is set to VOL volume level is not specified the timer playback volume is at the level used before setting the timer In this case the fade in mode does not function To stop during timer playback press the button to switch the unit off Timer mode CD TAPE TUNER Operations Load a disc Load a cassette tape Tune to the ...

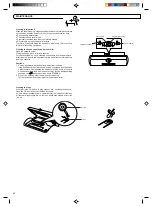
Страница 26: ... heads etc after every 10 hours of use for optimal recording conditions Cleaning the heads capstan and pinch roller Open the cassette holder Clean the heads pinch roller and capstan For effective cleaning use a cleaning kit available from an audio store After cleaning be sure that the cleaning fluid has dried completely before loading a cassette Cautions 1 Keep magnets and metallic objects away fr...

Страница 27: ...peration stops Switch to STANDBY and then to ON again Cassette Deck Section Playback sound is at a very low level Is the head dirty The ONE TOUCH REC button does not function Have the safety tabs of the cassette been broken off SPECIFICATIONS CD player section Type Compact disc player Signal detection system Non contact optical pickup Number of channels 2 channels Frequency response 20 Hz 20 000 H...

Страница 28: ...VICTOR COMPANY OF JAPAN LIMITED R C 0200MNMUIAJEIN EN ...

Отзывы: