background image

12

English

RADIO RECEPTION

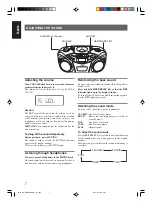
Tuning in a station

PUSH

PLA

Y/P

AU

SE

ST

OP

MUTING

HBS/

PRESET EQ

PROGRAM/
CLOCK SET

Add"/"

FM MO

DE

DISPLAY

TA

PE

CD

BAND

RANDO

M

TUNER

PRESET

CD REPEA

T

3

1,2

4

1

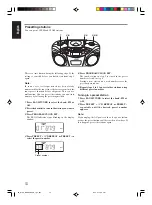
Press BAND/TUNER to enter the tuner mode.

2

Press BAND/TUNER to select the band, FM or
AM.

3

Press and hold 

4

 or 

¢

 for more than 1 second.

The unit starts searching and stops when a station of
sufficient signal strength is tuned in.
If you press 

4

 or 

¢

 briefly and repeatedly, the

frequency changes step by step.

4

Adjust the volume.

Changing the FM reception mode

When an FM stereo broadcast is hard to receive or noisy,
reception improves in monaural reception.

Press FM MODE so that the MONO indicator
appears in the display window.

To restore the stereo effect, press FM MODE again so
that the MONO indicator goes off.

FM MODE

Note:

The FM reception mode setting will be canceled when
you tune in another station.

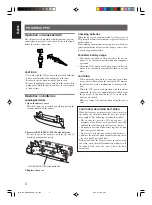
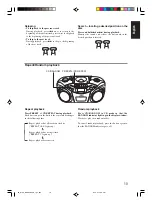
Using the antennas

FM

AM

PUSH

PLA

Y/P

AU

SE

ST

OP

MUTING

HBS/

PRESET EQ

PROGRAM/
CLOCK SET

Add"/"

FM M

ODE

DISPLAY

TA

PE

CD

BAND

RANDOM

TUN

ER

PRESET

CD REPEA

T

Note:

The built-in ferrite core antenna may pick up interference
from television receivers in the neighborhood disturbing
AM reception.

02_01-20_RC-EX20SAB_J_En.p65

04.4.21, 2:46 PM

12

Содержание RC-EX20A

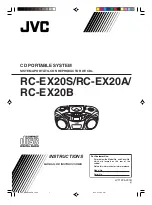
Страница 1: ...et Retain this information for future reference Model No Serial No RC EX20S RC EX20A RC EX20B LVT1225 001B J CD PORTABLE SYSTEM SISTEMA PORTÁTIL CON REPRODUCTOR DE CDs PUSH PLAY PA US E STOP MUTING HBS PRESET EQ PROGRAM CLOCK SET Add FM MODE DISPLAY TA PE CD BAND RA ND OM TUNER PRESET CD REPEAT 00_FCV_RC EX20SAB_J p65 04 4 21 2 45 PM 1 ...

Страница 2: ...is equipment generates uses and can radiate radio frequency energy and if not installed and used in accordance with the instructions may cause harmful interference to radio communications However there is no guarantee that interference will not occur in a particular installation If this equipment does cause harmful interference to radio or television reception which can be determined by turning th...

Страница 3: ... visible e invisible en caso de apertura o con interbloqueo averiado o defectuoso Evite la exposición directa a los haces 4 REPRODUCCIÓN DE LA ETIQUETA ETIQUETA DE PRECAUCIÓN COLOCADA EN EL INTERIOR DE LA UNIDAD Caution STANDBY ON button Disconnect the mains plug to shut the power off completely The STANDBY ON button in any position does not disconnect the mains line Precaución Interruptor STANDBY...

Страница 4: ...t modify the power cord in any manner Do not remove screws to disassemble the unit and do not touch anything inside the unit to avoid accidents Do not insert any metallic objects into the unit Unplug the power cord when there is a possibility of lightning If water gets inside the unit unplug the power cord from the outlet and consult your dealer Do not block the ventilation holes of the unit so th...

Страница 5: ... analog records the speakers could be damaged by a sudden blast of sound when playback starts Therefore turn down the volume before starting and adjust it as required while playing a CD 5 Safety mechanism The unit incorporates a safety interlock mechanism which switches off the laser beam when the disc door is opened 6 Do not place magnetic objects such as cassette tapes near the speakers Since th...

Страница 6: ...unit causes the battery power to be consumed quicker than noncontinuous operation Operation of the unit in a cold place causes the battery power to be consumed more quickly than in a warm place CAUTIONS When not using the unit for a long time more than two weeks or when using the household AC remove the batteries to avoid a malfunction or damage to the unit When the JVC power cord provided with th...

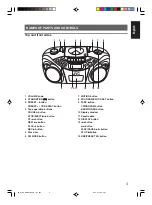
Страница 7: ... SET button 9 TAPE button CD RANDOM button BAND TUNER button 10 Display window 11 Casette deck 12 DISPLAY button 13 4 button button PLAY PAUSE 3 8 button STOP 7 button 14 HBS PRESET EQ button 1 VOLUME knob 2 STANDBY ON button 3 PRESET button PRESET CD REPEAT button 4 Tape operation buttons PAUSE 8 button STOP EJECT button FF 1 button REW button PLAY 2 button REC button 5 Disc door 6 FM MODE button...

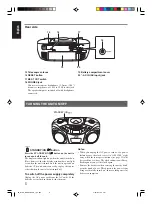
Страница 8: ...d on Note however that the display window does not light even when the unit is turned on if the unit is operated on batteries The unit comes on ready to play the source selected when the unit was last turned off To switch off the power supply completely Unplug the AC power cord from the AC outlet If the batteries are inserted in the unit take them out Notes When you unplug the AC power cord or if ...

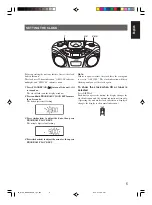
Страница 9: ... 2 seconds The hour digits start flashing AM 3 Press 4 or to adjust the hour then press PROGRAM CLOCK SET The minute digits start flashing PM 4 Press 4 or to adjust the minutes then press PROGRAM CLOCK SET Note If there is a power failure the clock loses the setting and is reset to AM 12 00 The clock indication will keep flashing until you set the clock again To show the clock when CD or tuner is ...

Страница 10: ...isplay window To restore the sound press MUTING again Listening through headphones Connect a pair of headphones to the PHONES jack No sound comes out of the speakers anymore Be sure to turn down the volume before connecting headphones Reinforcing the bass sound You can enjoy powerful bass sound with the Hyper Bass Sound effect Press and hold HBS PRESET EQ so that the HBS indicator lights up in the...

Страница 11: ... take longer time to read CD R and CD RW of MP3 format cannot be played back Handling discs Since dirty damaged or warped discs could damage the unit care should be taken of the following Do not touch the reflective recorded surface Do not stick or write anything on the label side Do not bend discs Storage After removing a disc from the unit be sure to put it back in its case Do not expose discs t...

Страница 12: ...st the volume Notes The following indication may be displayed when the disc is loaded upside down Reload the disc correctly CD If mistracking occurs during playback lower the volume Mistracking may occur if a strong shock is applied to the unit or if it is used in a place subject to vibrations e g in a car travelling on a rough road If you press CD RANDOM while in CD mode the unit enters the rando...

Страница 13: ...STOP MUTING HBS PRESET EQ PROGRAM CLOCK SET Add FM MOD E DISPLAY TAPE CD BAND RANDOM TU NE R PR ES ET CD REP EA T PRESET CD REPEAT CD RANDOM Repeat playback Press PRESET CD REPEAT during playback Each time you press the button the repeat mode changes in the following order Repeat playback of all tracks on the disc REPEAT ALL lights up Repeat playback of a single track REPEAT 1 lights up Repeat pla...

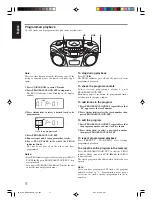
Страница 14: ...playback mode To stop during playback Press STOP 7 The PROG indicator goes off and the unit exits from programmed playback To check the program contents Before starting programmed playback press PROGRAM CLOCK SET Each time you press the button the programmed tracks are shown in the display window To add tracks in the program 1 Press PROGRAM CLOCK SET repeatedly so that 00 appears as the track numb...

Страница 15: ...nging the FM reception mode When an FM stereo broadcast is hard to receive or noisy reception improves in monaural reception Press FM MODE so that the MONO indicator appears in the display window To restore the stereo effect press FM MODE again so that the MONO indicator goes off FM MODE Note The FM reception mode setting will be canceled when you tune in another station Using the antennas FM AM P...

Страница 16: ...to tune in the station you want to preset 3 Press PROGRAM CLOCK SET The PROG indicator starts blinking in the display window TUNER PROG FM MHz 4 Press PRESET CD REPEAT or PRESET to select the preset number TUNER PROG FM MHz Preset number 5 Press PROGRAM CLOCK SET The tuned station in step 2 is stored in the preset number selected in step 4 Storing a new station on a used number erases the previous...

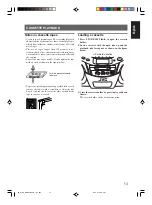
Страница 17: ...ape with a pencil as shown in the figure below To prevent recordings from being accidentally erased remove the tab s with a screwdriver After the tabs have been broken off reseal the slots with adhesive tape to erase or re record Loading a cassette 1 Press STOP EJECT to open the cassette holder 2 Load a cassette with the open side up and the playback side facing out as shown in the figure below Fo...

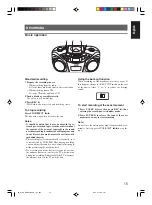
Страница 18: ... Press TAPE to enter the tape mode 2 Load a cassette Use only a type I normal tape 3 Press PLAY 2 to start playback 4 Adjust the volume To stop playback Press STOP EJECT The tape also stops when it reaches the end Fast winding a tape Press REW or FF 1 When the tape reaches the end press STOP EJECT to release REW or FF 1 02_01 20_RC EX20SAB_J_En p65 04 4 21 2 46 PM 15 ...

Страница 19: ...ical or artistic work embodied therein The recording level is automatically set correctly so it is not affected by VOLUME Thus during recording you can adjust the sound you are actually listening to without affecting the recording level If a recording you made has excessive noise or static the unit may have been too close to a TV which was on during the recording Either turn off the TV or increase...

Страница 20: ...lay the disc and pause at the desired point by pressing PLAY PAUSE 3 8 5 Press REC PLAY 2 is also depressed and synchronized recording starts The CD SYNC indicator appears in the display window during synchronized recording Erasing When the tape reaches the end first the CD player enters the pause mode Press PLAY PAUSE 3 8 to continue playback or press STOP 7 to stop playback When the CD player st...

Страница 21: ...n the cassette holder Clean the heads capstan and pinch roller For effective cleaning use a cleaning kit available at an audio store After cleaning make sure that the cleaning fluid has dried completely before loading a cassette Cautions Keep magnets and metallic objects away from the head If the head becomes magnetized noise will increase and the sound will deteriorate Demagnetize the recording p...

Страница 22: ... Batteries are run down The antenna is not properly adjusted Action Connect the power cord Press PAUSE 8 again to release it Replace the batteries with new ones Clean the head Reseal the slots with adhesive tape Load a cassette Load the disc with the label side facing up Clean the disc Replace the disc with a playable one Clean the lens Turn the unit on and wait one or two hours before use Disconn...

Страница 23: ...akers 9 cm 3 5 cone 2 Speaker impedance 4 Ω Output power 2 W per channel min RMS driven into 4 Ω at 1 kHz with no more than 10 total harmonic distortion Output terminals PHONES 1 Power supply AC 120 V Ó 60 Hz DC 9 V R20 SUM 1 D 13D size batteries 6 Power consumption 13 W at operation 3 W on standby Dimensions 420 mm 178 mm 250 mm W H D 169 16 71 16 97 8 Mass Approx 3 2 kg 7 1 lbs without batteries...

Страница 24: ...e ninguna forma No quite los tornillos para desarmar la unidad ni toque nada en el interior de la unidad para evitar accidentes No inserte ningún objeto metálico en la unidad Desenchufe el cable de alimentación si existe la posibilidad de que caiga un rayo Si entra agua dentro de la unidad desenchufe el cable de alimentación del tomacorriente y consulte con su distribuidor No bloquee los orificios...

Страница 25: ...l de los discos analógicos los altavoces pueden dañarse por una repentina subida de volumen al empezar la reproducción Por lo tanto baje el volumen antes de empezar y ajuste según sea necesario cuando reproduzca un CD 5 Mecanismo de seguridad La unidad contiene un mecanismo de seguridad de interbloqueo que desactiva el rayo láser cuando se abre la tapa del disco 6 No coloque objetos metálicos como...

Страница 26: ...ionamiento continuo de la unidad hace que la electricidad de las pilas se consuma más rápidamente que con un funcionamiento no continuo El funcionamiento de la unidad en un lugar frío hace que la electricidad de las pilas se consuma más rápidamente que en un lugar caliente PRECAUCIONES Si no utiliza la unidad durante un largo período de tiempo más de dos semanas o si utiliza la CA del hogar quite ...

Страница 27: ...M CLOCK SET 9 Botón TAPE Botón CD RANDOM Botón BAND TUNER 10 Visualizador 11 Platina de casetes 12 Botón DISPLAY 13 Botón 4 Botón Botón PLAY PAUSE 3 8 Botón STOP 7 14 Botón HBS PRESET EQ 1 Selector VOLUME 2 Botón STANDBY ON 3 Botón PRESET Botón PRESET CD REPEAT 4 Botones de funcionamiento de la cinta Botón PAUSE 8 Botón STOP EJECT Botón FF 1 Botón REW Botón PLAY 2 Botón REC 5 Tapa del disco 6 Botó...

Страница 28: ... si la unidad funciona con pilas el visualizador no se ilumina aunque la unidad esté encendida La unidad está lista para reproducir la fuente seleccionada cuando se desconectó por última vez la unidad Para desconectar por completo el suministro eléctrico Desenchufe el cable de alimentación de CA del tomacorriente de CA Si las pilas están colocadas en la unidad sáquelas Notas Cuando desenchufe el c...

Страница 29: ... parpadear AM 3 Presione 4 o para ajustar la hora y a continuación presione PROGRAM CLOCK SET Los dígitos de los minutos comienzan a parpadear PM 4 Presione 4 o para ajustar los minutos y a continuación presione PROGRAM CLOCK SET Nota Si se produce un corte de energía el reloj pierde el ajuste y se reajusta a AM 12 00 La indicación del reloj seguirá destellando hasta que vuelva a ajustar la hora P...

Страница 30: ...onido presione de nuevo MUTING Escucha por los auriculares Conecte un par de auriculares en la toma PHONES No se emite sonido por los altavoces Asegúrese de bajar el volumen antes de conectar los auriculares Refuerzo del sonido de graves Se puede disfrutar de potentes sonidos de graves con el efecto de sonido hipergrave Mantenga presionado el botón HBS PRESET EQ hasta que aparezca el indicador HBS...

Страница 31: ...empo en leer un CD RW Los discos CD R y CD RW de formato MP3 no pueden reproducirse Manejo de los discos Como los discos sucios dañados o deformados pueden dañar la unidad debe tener cuidado con lo siguiente No toque la superficie reflectora grabada No pegue ni escriba nada en la cara de la etiqueta No doble los discos Almacenamiento Después de sacar un disco de la unidad asegúrese de guardarlo en...

Страница 32: ...uede aparecer la siguiente indicación si se ha colocado el disco al revés Vuelva a colocar correctamente el disco CD Si se produce un mal seguimiento durante la reproducción baje el volumen Puede producirse un mal seguimiento si la unidad recibe un golpe fuerte o si se utiliza en un lugar expuesto a vibraciones por ejemplo en un coche que viaja por una carretera en mal estado Si presiona CD RANDOM...

Страница 33: ...RESET EQ PROGRAM CLOCK SET Add FM MOD E DISPLAY TAPE CD BAND RANDOM TU NE R PR ES ET CD REP EA T PRESET CD REPEAT CD RANDOM Reproducción repetida Presione PRESET CD REPEAT durante la reproducción Cada vez que presiona el botón el modo de repetición cambia en el siguiente orden Reproducción repetida de todas las pistas del disco Aparece REPEAT ALL Reproducción repetida de una sola pista Aparece REP...

Страница 34: ...ducción Presione STOP 7 El indicador PROG desaparece y la unidad sale de la reproducción programada Para comprobar el contenido del programa Antes de iniciar la reproducción programada presione PROGRAM CLOCK SET Cada vez que pulsa el botón las pistas programadas se muestran en el visualizador Para añadir pistas al programa 1 Presione repetidamente PROGRAM CLOCK SET hasta que 00 aparezca como el nú...

Страница 35: ... modo de recepción de FM Cuando apenas se reciben emisiones de FM en estéreo o si hay ruidos la recepción mejora en monoaural Presione FM MODE hasta que el indicador MONO aparezca en el visualizador Para recuperar el efecto estéreo presione de nuevo FM MODE de modo que el indicador MONO desaparezca FM MODE Nota El ajuste del modo de recepción de FM se cancelará cuando sintonice otra emisora Utiliz...

Страница 36: ...esee presintonizar 3 Presione PROGRAM CLOCK SET El indicador PROG comienza a parpadear en el visualizador TUNER PROG FM MHz 4 Presione PRESET CD REPEAT o PRESET para seleccionar el número presintonizado TUNER PROG FM MHz Número presintonizado 5 Presione PROGRAM CLOCK SET La emisora sintonizada en el paso 2 se almacena en el número presintonizado seleccionado en el paso 4 Si almacena una nueva emis...

Страница 37: ... suavemente la cinta con un lápiz tal como aparece en la siguiente figura Para evitar que se borren accidentalmente las grabaciones rompa la s lengüeta s con un destornillador Después de romper las lengüetas vuelva a tapar las ranuras con cinta adhesiva para borrar o volver a grabar la cinta Colocación de un casete 1 Presione STOP EJECT para abrir el casetero 2 Coloque un casete con el lado abiert...

Страница 38: ...do de cinta 2 Coloque un casete Utilice sólo cintas normales de tipo I 3 Presione PLAY 2 para iniciar la reproducción 4 Ajuste el volumen Para detener la reproducción Presione STOP EJECT La cinta también se detiene cuando llega al final Bobinado rápido de una cinta Presione REW o FF 1 Cuando la cinta llegue al final presione STOP EJECT para liberar REW o FF 1 03_01 20_RC EX20SAB_J_ES p65 04 4 21 2...

Страница 39: ...tico allí plasmado El nivel de grabación se ajusta automáticamente de modo correcto de manera que no se ve afectado por VOLUME Por lo tanto durante la grabación puede ajustar el sonido que está escuchando sin afectar al nivel de la grabación Si la grabación presenta mucho ruido o estática puede que la unidad estuviera demasiado cerca de un TV encendido durante la grabación Apague el TV o aumente l...

Страница 40: ...l disco y haga una pausa en el punto deseado presionando PLAY PAUSE 3 8 5 Presione REC PLAY 2 también se presiona y se inicia la grabación sincronizada El indicador CD SYNC aparece en el visualizador durante la grabación sincronizada Si la cinta llega primero al final el reproductor de CDs entra en modo de pausa Presione PLAY PAUSE 3 8 para continuar la reproducción o presione STOP 7 para detener ...

Страница 41: ... de uso Abra el casetero Limpie los cabezales cabrestante y rodillo Para una limpieza efectiva utilice un kit de limpieza disponible en las tiendas de audio Después de la limpieza asegúrese de que el líquido de limpieza se ha secado completamente antes de colocar un casete Precauciones Mantenga alejados los imanes y objetos metálicos del cabezal Si el cabezal se imanta el ruido aumenta y se deteri...

Страница 42: ...odillo o cabrestante está sucio Las pilas están agotadas La antena no está ajustada adecuadamente Solución Enchufe el cable de alimentación Presione de nuevo PAUSE 8 para soltarlo Cambie las pilas por unas nuevas Limpie el cabezal Vuelva a sellar las ranuras con cinta adhesiva Inserte un casete Inserte el disco con la cara de la etiqueta hacia arriba Limpie el disco Cambie el disco por uno que pue...

Страница 43: ...neral Altavoces Cono 9 cm 3 5 2 Impedancia de los altavoces 4 Ω Potencia de salida 2 W por canal mín RMS 4 Ω a 1 kHz con distorsión armónica total no superior al 10 Terminales de salida PHONES 1 Suministro eléctrico 120 V CA Ó 60 Hz 9 V CC pilas R20 SUM 1 D 13D 6 Consumo 13 W en funcionamiento 3 W en modo de espera Dimensiones 420 mm 178 mm 250 mm An Al Prf 169 16 71 16 97 8 Peso Aprox 3 2 kg 7 1 ...

Страница 44: ...THOD OF PAYMENT CHECK OR MONEY ORDER ENCLOSED REASON FOR RETURN BE SURE TO ENCLOSE COMPLETED FORM A COPY OF YOUR BILL OF SALE PAYMENT IF APPLI CABLE SUPPLIED ACCESSORIES TOGETHER WITH THE PRODUCT AND RETURN TO THE JVC REPAIR REPLACEMENT FACILITY NEAREST YOU TO OBTAIN THE ADDRESS OF THE LOCATION NEAREST YOU PLEASE CALL 800 252 5722 OR VISIT OUR WEBSITE AT HTTP WWW JVC COM CARD HOLDER SIGNATURE BT 5...

Страница 45: ...5 Signal reception problems and failures due to line power surge 6 Products used for commercial purposes including but not limited to rental 7 Accessories 8 Batteries except that Rechargeable Batteries are covered for 90 days from the date of purchase There are no express warranties except as listed above AFTER THE WARRANTY Please contact JVC s Customer Relations Department at 800 252 5722 to obta...

Страница 46: ...0504MZMBICORI EN SP 2004 Victor Company of Japan Limited 99_BCV_RC EX20SAB_J p65 04 4 21 2 47 PM 2 ...

Отзывы: