background image

16

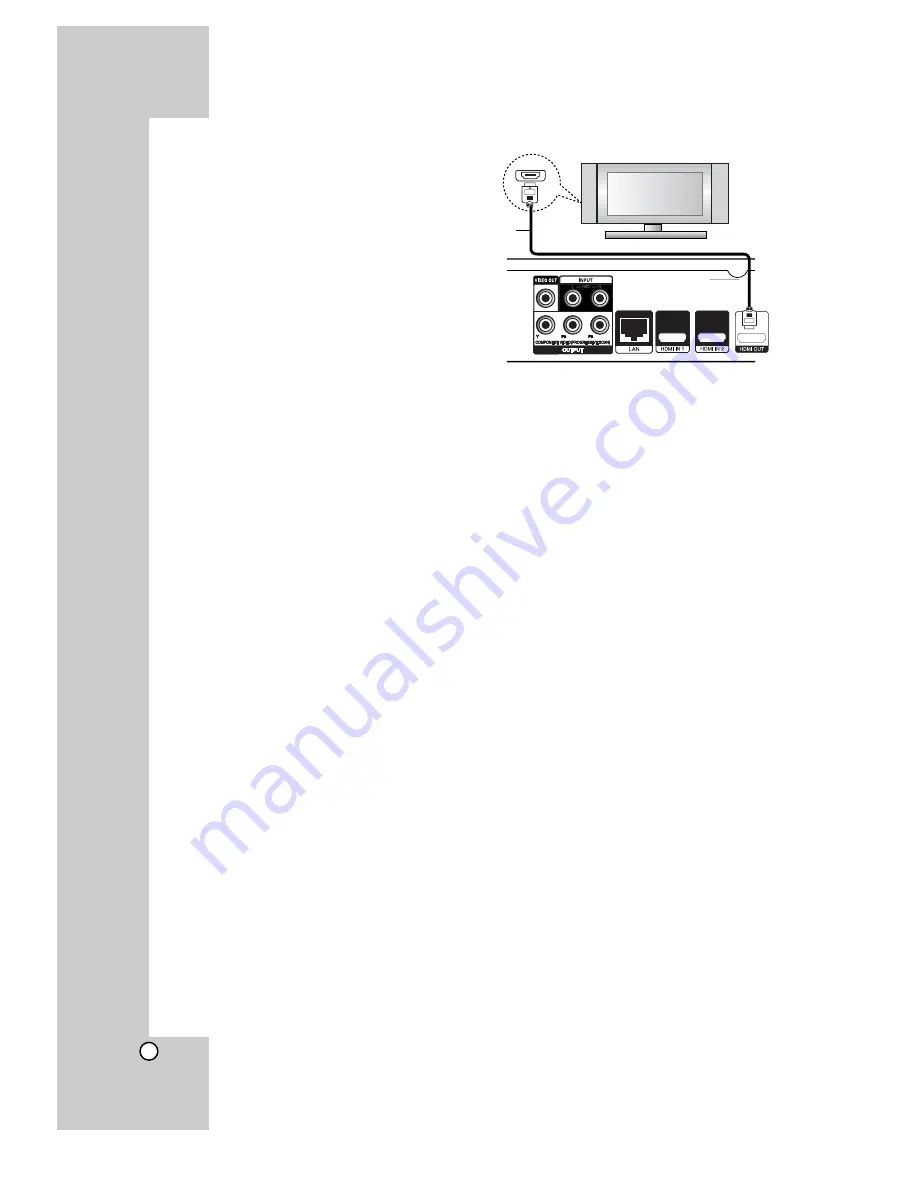
HDMI connection 

If you have a HDMI TV or monitor, you can connect
it to this player using a HDMI cable.

1. Connect the HDMI jack on the player to the HDMI

jack on a HDMI compatible TV or monitor 

(H)

.

2. Set the TV’s source to HDMI (refer to TV’s

Owner’s manual).

Notes:

z

You must select a HDMI audio output that your
TV accepts using [HDMI Audio] options on the
[Setup] menu (see page 23).

z

If a connected HDMI device does not accept the
audio output of the unit, the HDMI device’s audio
sound may be distorted or may not output. 

Tips:

• You can fully enjoy digital audio and video signals

together with this HDMI connection.

• When you use HDMI connection, you can change

the resolution for the HDMI output. (Refer to
“Resolution Setting” on page 18.)

• Select the type of video output from the HDMI

OUT jack using [HDMI Color Setting] option on the
[Setup] menu.
(Refer to “HDMI color Setting” on page 22.)

Cautions

z

Changing the resolution when the connection has
already been established may result in malfunc-
tions. To solve the problem, turn off the player and
then turn it on again.

z

When the HDMI connection with HDCP is not veri-
fied, TV screen is changed to black screen. In this
case, check the the HDMI connection, or discon-
nect the HDMI cable.

z

If there is noise or lines on the screen, please
check the HDMI cable (length is generally limited
to 4.5 m) 

and use a High Speed HDMI cable (Version

1.3).

Additional Information for HDMI

z

When you connect a HDMI or DVI compatible
device make sure of the following:
- Try switching off the HDMI/DVI device and this

player. Next, switch on the HDMI/DVI device
and leave it for around 30 seconds, then switch
on this player.

- The connected device’s video input is set cor-

rectly for this unit.

- The connected device is compatible with

720x480p, 1280x720p, 1920x1080i or
1920x1080p video input.

z

Not all HDCP-compatible HDMI or DVI devices
will work with this player.
- The picture will not be displayed properly with

non-HDCP device.

- This player does not playback and TV screen is

changed to black or green screen or the snow
noise may occur on the screen.

Rear of the player

HDMI IN

HDMI compatible TV

H

Содержание LVT2099-029A

Страница 1: ...TH BD50 Consist of XV THBD50 SP THBD50F SP THBD50C and SP THBD50W NETWORK MEDIA SYSTEM INSTRUCTIONS LVT2099 029A UJ ...

Страница 2: ... must be followed strictly Do not expose this apparatus to rain moisture dripping or splashing and that no objects filled with liquids such as vases shall be placed on the apparatus IMPORTANT FOR LASER PRODUCTS 1 CLASS 1 LASER PRODUCT 2 CAUTION Do not open the top cover or cabi net There are no user serviceable parts inside the unit leave all servicing to qualified service personnel 3 CAUTION CLAS...

Страница 3: ...reas shown by the dimensions below Bottom Place on the level surface Maintain adequate air path for ventilation by placing on a stand with a height of 10 cm or more In addition maintain the best possible air circulation 3 Introduction CAUTION Battery shall not be exposed to excessive heat such as sunshine fire or the like Front view of the main unit and speakers Side view of the main unit ...

Страница 4: ...4 European Union only ...

Страница 5: ... Java based trademarks and logos are trademarks or registered trademarks of Sun Microsystems Inc in the United States and other countries Manufactured under license from Dolby Laboratories Dolby Pro Logic and the double D symbol are trademarks of Dolby Laboratories Manufactured under license under U S Patent s 5 451 942 5 956 674 5 974 380 5 978 762 6 226 616 6 487 535 7 392 195 7 272 567 7 333 92...

Страница 6: ...NGUAGE Menu 23 AUDIO Menu 23 LOCK Menu Parental Control 24 NETWORK Menu 25 OTHERS Menu 26 Listening to music from your portable audio player 27 Listening to the sound from your component 27 Using HDMI IN jacks 28 Using DIGITAL AUDIO IN jacks 28 Antenna Connection 29 Operations 30 40 General playback features 30 31 Additional features 32 If a disc menu screen is displayed 32 Last Scene Memory 32 Ma...

Страница 7: ...picture quality and sound distortion Before playing clean the disc with a clean cloth Wipe the disc from the centre out Do not use strong solvents such as alcohol ben zine thinner commercially available cleaners or anti static spray intended for older vinyl records Moisture Condensation Never operate this product immediately after moving it from a cold location to a warm location Leave it for two ...

Страница 8: ...s unit has a regional code printed on the rear of the unit This unit can play only BD ROM or DVD discs labelled same as the rear of the unit or ALL Notes z Depending on the conditions of the recording equipment or the CD R RW or DVD R RW R RW disc itself some CD R RW or DVD R RW R RW discs cannot be played on the unit z Do not attach any seal or label to either side the labelled side or the record...

Страница 9: ...uttons or menus For both planes various wipes fades and scroll effects may be available Menu sounds When you highlight or select a menu option sounds can be heard such as button clicks or a voice over explaining the highlighted menu choice Multi page PopUp Menus With DVD Video playback is interrupted each time a new menu screen is accessed Due to BD ROM disc s ability to preload data from the disc...

Страница 10: ... related information including down loaded on line content The disc you are using will control how long this information is retained z Some BD ROM discs may not be played correctly unless a USB device is inserted Certain System Requirements For high definition video playback z High definition display that has COMPONENT or HDMI z BD ROM disc with high definition content z HDMI or HDCP capable DVI i...

Страница 11: ... button works as ENTER SKIP Go to next or previous file track chapter Searches backward or forward if you press and hold it SOURCE Changes the source VOLUME Adjusts speaker volume b 1 STANDBY Button Switches the unit ON or OFF c Disc Tray Insert a disc here d Remote Sensor Point the Remote Control here e Display Window Shows the current status of the player f USB Port Connect a USB Flash Drive Fro...

Страница 12: ... outputs h AM Antenna connector Connect the AM antenna i DIGITAL AUDIO IN OPTICAL Connect to digital optical audio equipment j PORT IN Connect to a portable player with audio outputs k COMPONENT VIDEO Y PB PR OUTPUT PROGRESSIVE SCAN Connect to a TV with Y Pb Pr inputs l LAN port Connect a network with an always on broadband connection m HDMI IN Type A 1 2 Connect to an external source with HDMI ou...

Страница 13: ...he stopped point will be clear N Starts playback X Pauses playback Go to next or previous chapter track file m M Searches backward or forward SPK LEVEL Sets the sound level of desired speaker SOUND Selects a sound mode AUDIO MUTING Press AUDIO MUT ING to mute your unit You can mute your unit in order for example to answer the telephone AUDIO VOL Adjusts speaker volume DRC Sets the late night funct...

Страница 14: ...n Be careful of the following Be careful to make sure children not to put their hands or any objects into the speaker duct Speaker duct A hole for plentiful bass sound on speaker cabinet enclosure Positioning the System The following illustration shows an example of posi tioning the system Note that the illustrations in these instructions differ from the actual unit for explanation purposes For th...

Страница 15: ... input channel Do not connect your player via your VCR The image could be distorted by the copy protection system Component Video Connection Connect the COMPONENT VIDEO OUT jacks on the player to the corresponding input jacks on the TV using Y Pb Pr cables C You can hear the sound through the system s speakers Tip When you use COMPONENT VIDEO OUT connec tion you can change the resolution for the o...

Страница 16: ...lished may result in malfunc tions To solve the problem turn off the player and then turn it on again z When the HDMI connection with HDCP is not veri fied TV screen is changed to black screen In this case check the the HDMI connection or discon nect the HDMI cable z If there is noise or lines on the screen please check the HDMI cable length is generally limited to 4 5 m and use a High Speed HDMI ...

Страница 17: ...or their functionality or continued availability Some disc related mate rial available by the Internet Connection may not be compatible with this player If you have ques tions about such content please contact the pro ducer of the disc Some internet contents may require a higher bandwidth connection Even if the player is properly connected and con figured some internet contents may not operate pro...

Страница 18: ...en press B to move to the second level 4 Use v V to select the Resolution option then press B to move to the third level 5 Use v V to select the desired resolution then press ENTER to confirm your selection Note If the video signal from the HDMI OUT jack is not output from the TV screen when Resolution is set to Auto change the video output resolution by pressing RESOLUTION button Available resolu...

Страница 19: ...e 1080p video output frame rate may be automatically set to either 24Hz or 60Hz depending both on the capability and preference of the connected TV and based on the native video frame rate of the content on the BD ROM disc Refer to 1080p Display Mode on page 22 COMPONENT VIDEO OUT connection For the 720p 1080i 1080p resolution setting with protected media real output resolution of COM PONENT VIDEO...

Страница 20: ... playing video games Concert mode Creates the sound of concert hall Music EXP mode When listening to MP3 files or other compressed music you can enhance the sound This mode is available only to 2 chan nel sources Note Only Bypass mode is available when HDMI IN s audio is a compressed bitstream of Dolby Digital Plus Dolby TrueHD and DTS HD Adjust the speaker level settings You can adjust the sound ...

Страница 21: ...nded to prevent data loss z If you use a Card Reader USB extension cable or USB HUB the USB Flash Drive may not be recognized z Some USB Flash Drives may not work with this unit z Digital camera and mobile phone are not supported z USB Port of the unit cannot be connected to PC The unit cannot be used as a storage device z When take off an active device connecting to USB port please take it off af...

Страница 22: ...V screen Both sides of the picture are cut off 16 9 Original Select when a 16 9 wide TV is connected The 4 3 picture is displayed with an original 4 3 aspect ratio with black bars appear ing at the left and right sides 16 9 Full Select when a 16 9 wide TV is con nected The 4 3 picture is adjusted horizontally in a linear proportion to fill the entire screen Notes You cannot select 4 3 Letter Box a...

Страница 23: ...output level of each speaker Be sure to set Test to All for easy adjustment Distance Adjust the distance between each speaker and the listening position Test The speakers will emit a test tone All The test tone is emitted from each speaker in sequence To save your settings press ENTER and select Yes by pressing b b B B HD AV Sync Sometimes Digital TV encounters a delay between picture and sound If...

Страница 24: ...n input the correct password If you forget your password If you forget your password you can clear it using the following steps 1 Remove any disc that might be in the player 2 Highlight Password in the LOCK option 3 Use Number buttons to enter 210499 The password is cleared DVD Rating Blocks playback of rated disc based on their con tent Not all discs are rated Rating 1 8 Rating one 1 has the most...

Страница 25: ...ing If you have connected this player to a local area network LAN the player needs to be set up for network communication See Internet connection on pages 17 Connection Status If you want to check the network status on this play er select the Connection Status options and press B or ENTER to check whether a connection to the network and the internet have been established BD LIVE connection You can...

Страница 26: ...Inc This is an official DivX Certified device that plays DivX video Visit www divx com for more information and software tools to convert your files into DivX videos ABOUT DIVX VIDEO ON DEMAND This DivX Certified device must be registered in order to play DivX Video on Demand VOD content To generate the registration code locate the DivX VOD section in the Setup menu Go to vod divx com with this co...

Страница 27: ...udio player on and start it playing 6 Adjust the volume of this unit and your portable audio player Listening to the sound from your component You can enjoy the sound of your component with the analog audio output jacks from the speakers of the system 1 Connect the analog audio output jacks of your component into the AUX L R INPUT on the rear panel of this unit 2 Press 1 to turn the power on 3 Pre...

Страница 28: ...the video output signal is abnormal when your personal computer is connected to HDMI IN 1 2 jack change the resolution of your personal computer to 480p 720p 1080i or 1080p Using DIGITAL AUDIO IN jacks You can enjoy the sound of your component with the digital optical or coaxial output jack from the speakers of the system 1 Connect the optical or coaxial output jack of your component into the OPTI...

Страница 29: ...na connector z z Connect the FM Wire antenna to the FM antenna connector connector Notes z z To prevent noise pickup keep the AM Loop antenna away from the unit and other components z z Be sure to fully extend the FM wire antenna z z After connecting the FM Wire antenna keep it as hori zontal as possible FM Wire Antenna supplied AM Loop Antenna supplied ...

Страница 30: ...l be in Complete Stop mode if you press x STOP once during playback X PAUSE During playback press X PAUSE to pause playback Tip During Audio CD or MP3 WMA playback press X PAUSE once again to resume playback Press X PAUSE repeatedly to play Frame by Frame SKIP During playback press or to go to the next chapter track file or to return to the beginning of the cur rent chapter track file Press twice ...

Страница 31: ...nds To return to normal playback press REPEAT repeatedly to select OFF Note You cannot select a portion less than 3 seconds SUBTITLE During playback press SUBTITLE repeatedly to select a desired subtitle language Note Some discs allow you to change subtitle selections only via the disc menu If this is the case press TITLE POP UP or DISC MENU button and choose the appropriate subtitle from the sele...

Страница 32: ...t disc is played This function may not work depending on the disc Marker Search To enter a Marker You can start playback from up to nine memorized points To enter a marker press MARKER at the desired point on the disc The Marker icon appears on the TV screen briefly Repeat to enter up to nine markers To Recall or Clear a Marked Scene Press SEARCH and the search menu appears on the screen Press a n...

Страница 33: ... press SEARCH to display the search menu Press b B to skip the playback 15 seconds forward or backward Tip You can select a point that you want to skip by pressing and holding b B button Notes This function may not work on some disc or titles Using Color R G Y B Buttons These buttons are available only during BD J contents playback Use the appropriate buttons as indicated by the display Depending ...

Страница 34: ...e discs with Internet This unit supports BD Live a new BD Video function that allows you to use the following interactive func tions when connected to the Internet The usable functions and the operating method may vary with each disc For details refer to the instructions for the disc Additional contents such as movie s trailer subtitles and BD J etc can be downloaded to the USB Flash Drive to play...

Страница 35: ...isabled to prevent skipping to sections that have not been downloaded etc AACS Online When discs supporting BD Live are played back the player or disc IDs may be sent to the content provider via the Internet Services and functions to be provided differ depend ing on the disc You can be introduced to other similar movies if you record your viewing history on the server by using these IDs Game score...

Страница 36: ...ntil the subtitle is displayed prop erly and then press ENTER Movie file requirement Movie file compatibility with this player is limited as follows Available resolution size 1920 x 1080 W x H pixels File extensions avi divx mpg mpeg mp4 mkv Playable subtitle SubRip srt txt SAMI smi SubStation Alpha ssa txt MicroDVD sub txt VobSub sub SubViewer 1 0 sub SubViewer 2 0 sub txt TMPlayer txt DVD Subtit...

Страница 37: ...o the desired directory On the MUSIC menu use red or blue button to move to the first or the last file or track and green or yellow button to move to the previous or next page The equalizer indicator is not coupled with the music in play back If there is impossible code to express in the file name it may be displayed as illegible MP3 WMA audio file requirement File extensions mp3 wma Sampling freq...

Страница 38: ...he remote control repeatedly To turn off the radio Press 1 to turn the unit off To listen to non preset radio stations z z Use manual or automatic tuning in the step 2 z z For manual tuning press TUNING repeatedly z z For automatic tuning press and hold TUNING for about two seconds To select a preset radio station directly You can use the number buttons on the remote control to select a preset rad...

Страница 39: ...st file and green or yel low button to move to the previous or next page You can change the content list view by pressing DISPLAY repeatedly Photo file requirement File extensions jpg jpeg png Recommended size Less than 4 000 x 3 000 x 24 bit pixel Less than 3 000 x 3 000 x 32 bit pixel CD R RW DVD R RW BD R RE Format ISO 9660 JOLIET UDF and UDF Bridge format Maximum Files Disc Less than 2000 tota...

Страница 40: ...otate the picture clockwise This option is not available during slide show f Use green or yellow buttons to zoom in or out the picture You can move through the zoomed picture using v V b B buttons Press RETURN to exit the Zoom menu and return to the normal picture size g Use v V to selects an option between Effect or Delay Use b B to adjusts and press ENTER to set the selected option Effects You c...

Страница 41: ... supplied Remote Control You can control your TV using the buttons below By pressing You can TV POWER Turn the TV on or off INPUT Switch the TV s input source between the TV and other input sources CH Scan up or down through memorized channels VOL Adjust the volume of the TV Note Some functions may not work correctly depending on TV TV Control Buttons ...

Страница 42: ...Byelorussian 6669 Cambodian 7577 Catalan 6765 Chinese 9072 Corsican 6779 Croatian 7282 Czech 6783 Danish 6865 Dutch 7876 English 6978 Esperanto 6979 Estonian 6984 Faroese 7079 Language Code Fiji 7074 Finnish 7073 French 7082 Frisian 7089 Galician 7176 Georgian 7565 German 6869 Greek 6976 Greenlandic 7576 Guarani 7178 Gujarati 7185 Hausa 7265 Hebrew 7387 Hindi 7273 Hungarian 7285 Icelandic 7383 Ind...

Страница 43: ...e enough space Internet connection is not established The BD LIVE connection option in the Setup menu is set to Prohibited Correction Plug the power cord into the wall outlet securely Insert a disc Check the disc indica tor in the display window is lit Select the appropriate video input mode on the TV Connect the video cable securely Select another resolution using RESOLUTION button Select the cor...

Страница 44: ... as follows Press and hold the STANDBY button for more than five seconds This will force the Player to power off Press the STANDBY button again to turn the Player back on Unplug the power cord and then plug the power cord again after more than five seconds Symptom Radio stations cannot be tuned in Possible Cause The signal strength of the stations is too weak when tuning in with automatic tuning C...

Страница 45: ...AUDIO IN 2 0 Vrms 1 kHz 0 dB 600 Ω RCA jack L R x 1 DIGITAL IN COAXIAL 0 5 V p p 75 Ω RCA jack x 1 DIGITAL IN OPTICAL 3 V p p Optical jack x 1 PORT IN 0 5 Vrms 3 5 stereo jack Bus power supply 5V 500 mA Tuner FM Tuning Range 87 5 108 0 MHz AM Tuning Range 522 1 620 kHz Amplifier Stereo mode PEAK Power 155 W 155 W 4Ω at 1 KHz RMS Power 130 W 130 W 4Ω at 1 KHz THD 10 Surround mode Front PEAK Power 1...

Страница 46: ...ers Front Rear speaker Type 1 Way 1 speaker Impedance Rated 4Ω Input Power 155 W Max Input power 310 W Net Dimensions W x H x D 111 x 209 x 83 mm Net Weight 0 8 kg Center speaker Type 1 Way 1 speaker Impedance Rated 4Ω Input Power 155 W Max Input power 310 W Net Dimensions W x H x D 301 x 118 x 83 mm Net Weight 0 9 kg Passive Subwoofer Type 1 Way 1 speaker Impedance Rated 3Ω Input Power 225 W Max ...

Страница 47: ...pyright 1991 1992 Paul Kranenburg pk cs few eur nl Copyright 1993 Branko Lankester branko hacktic nl Copyright 1993 Ulrich Pegelow pegelow moorea uni muenster de Copyright 1995 1996 Michael Elizabeth Chastain mec duracef shout net Copyright 1993 1994 1995 1996 Rick Sladkey jrs world std com Copyright 1999 2000 Wichert Akkerman wakkerma debian org All rights reserved Permission is hereby granted fr...

Страница 48: ...TH BD50 EN 0909SKMLGEEGL P N MFL62863582 ...

Отзывы: