background image

7

LT-Z26S2 (ASIA) / LCT1488-002A-H / English

ENGLISH

Initial settings

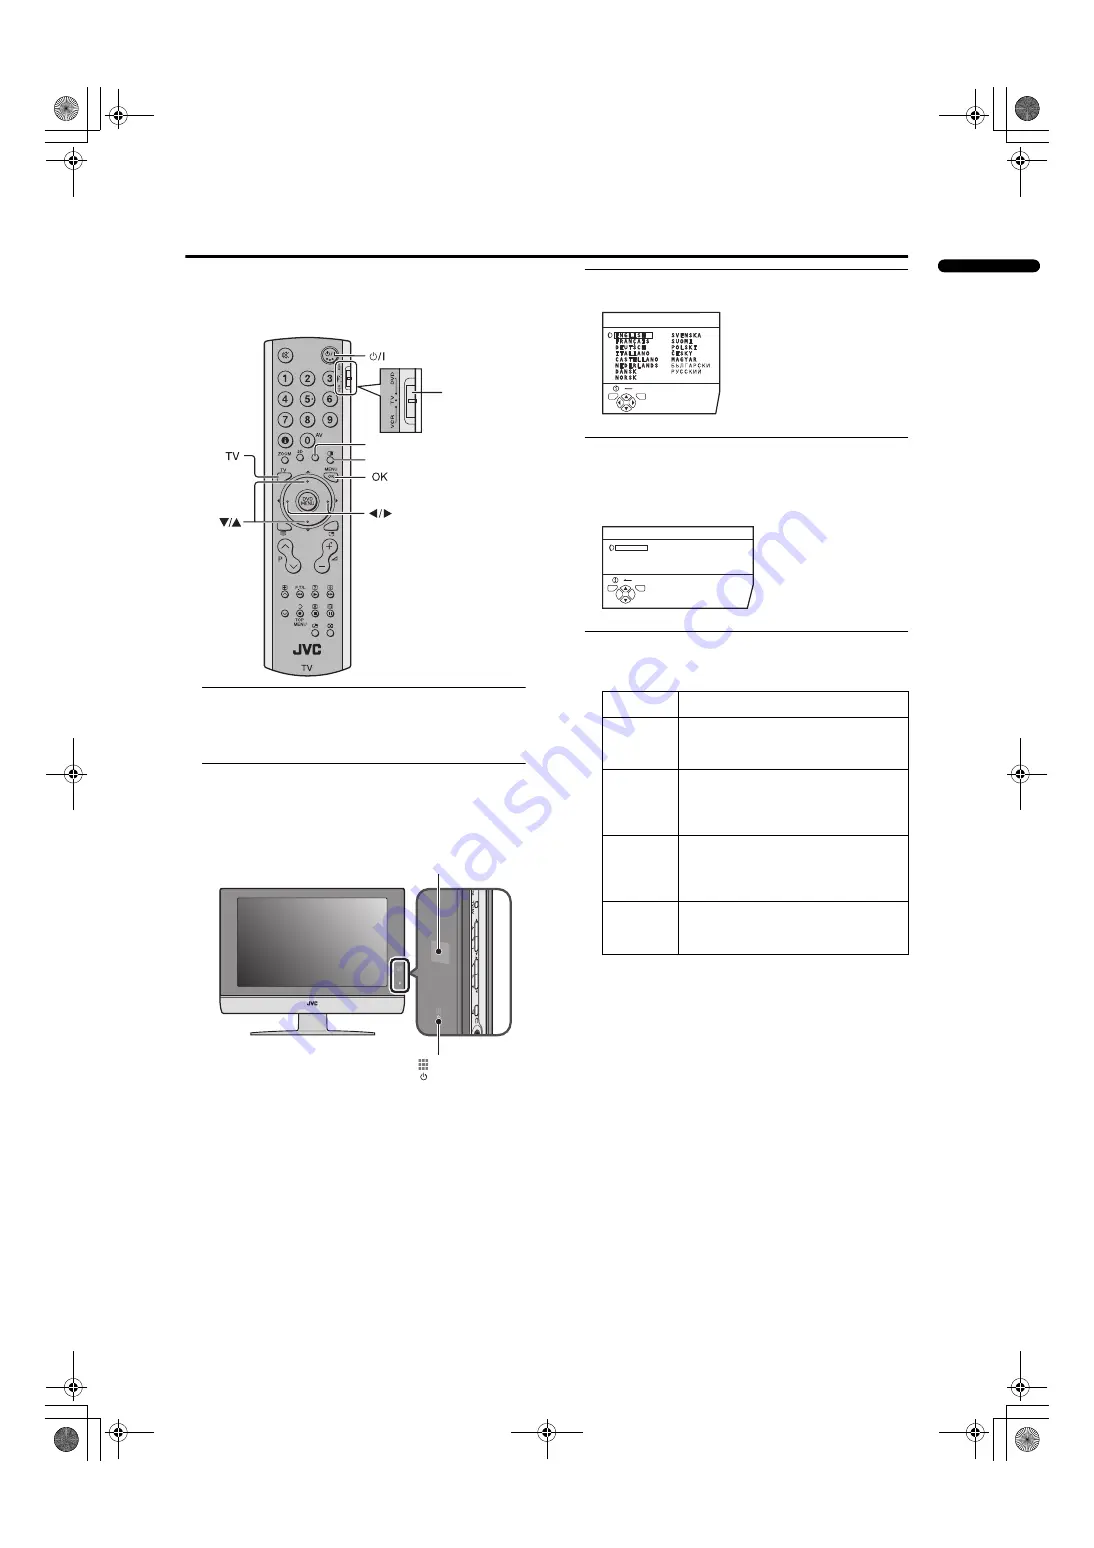
When the TV is first turned on, it enters the initial setting 
mode, and the JVC logo is displayed. Follow the 

instructions on the on-screen display to make the initial 
settings.

1 Make sure to set the VCR/TV/DVD switch to the 

TV position.

• You cannot turn the TV on when the VCR/TV/DVD 

switch is set to the VCR or DVD position.

2 Press the 

#

#

#

#

 button on the remote control

The TV turns on from standby mode and the JVC logo is 

displayed.

• Check that the AC plug on the power cord from the 

TV is connected to AC outlet.

• The JVC logo does not appear when your TV has 

been turned on once. In this case, use the 

“LANGUAGE” and “AUTO PROGRAM” functions 
to make the initial settings. For details, see 
“INSTALL” on page 25.

3 Press  the 

a

a

a

a

 button

The LANGUAGE menu appears.

4 Press  the 

5

5

5

5

 and 

6

6

6

6

 buttons to choose 

ENGLISH. Then press the 

a

a

a

a

 button

English is set for the on-screen display description. The 

TELETEXT LANGUAGE menu appears as a sub-menu 
of the AUTO PROGRAM function.

5 Press  the 

6

6

6

6

 buttons to choose the teletext 

language group that corresponds to language 

of teletext programme that you want to watch

VCR/TV/DVD 

Switch

Yellow button
Blue button

Remote control 

sensor

Power lamp

Group

Languages

GROUP-1

Turkish, Hungarian, English, German, 

French, Italian, Spanish, Portuguese, 

Greek, Swedish, Finnish

GROUP-2

Polish, Serbian, Croatian, Slovenian, 

Czech, Slovak, Rumanian, Hungarian, 

German, French, Italian, Swedish, 

Finnish

GROUP-3

Russian, Bulgarian, Lettish, Lithuanian, 

Estonian, Ukrainian, Serbian, Croatian, 

Slovenian, Czech, Slovak, English, 

German

GROUP-4

Arabic, Czech, Slovak, Hungarian, 

English, German, French, Italian, 

Spanish, Portuguese, Swedish, Finnish

D0002(E)-EN

BACK

 LANGUAGE

TV

OK

D1003-EN

TELETEXT LANGUAGE

GROUP-1

GROUP-2

GROUP-3

GROUP-4

BACK

TV

OK

LT-Z26S2_Eng.book  Page 7  Friday, October 17, 2003  10:48 AM

Содержание LT-Z26S2

Страница 1: ... LCT1488 002A H All cover WIDE LCD PANEL TV INSTRUCTIONS ENGLISH DEUTSCH FRANÇAIS NEDERLANDS CASTELLANO ITALIANO PORTUGUÊS Cover 1 LCT1488 002A H LT Z26S2 LCT1488 002A H_Cover fm Page 1 Friday October 17 2003 10 51 AM ...

Страница 2: ...2 LT Z26S2 ASIA LCT1488 002A H All cover Cover 2 LT Z26S2 ASIA LCT1488 002A H All cover LCT1488 002A H_Cover fm Page 2 Friday October 17 2003 10 51 AM ...

Страница 3: ...ING Fingers may be trapped under the TV causing injuries Hold the TV at the bottom in the middle and do not allow it to tilt up or down The TV may fall causing injuries Hold the bottom of the stand with your hand and tilt the TV up and down Do not allow children to hang from the TV place their elbows on the TV or lean against the TV Doing so may cause the TV to fall over and lead to injuries CAUTI...

Страница 4: ...of pixels may not light or may light all the time Distance recommendations Avoid improper installation and never position the unit where good ventilation is impossible When installing this TV distance recommendations must be maintained between the set and the wall as well as inside a tightly enclosed area or piece of furniture Keep to the minimum distance guidelines shown for safe operation The su...

Страница 5: ...he FREEZE function 13 Using the PIP function 13 Using the MULTI PICTURE function 14 Operating a JVC brand VCR or DVD player 14 Teletext function 15 Basic operation 15 Using the List Mode 15 Hold 15 Sub page 16 Reveal 16 Size 16 Index 16 Cancel 16 Using the TV s menu 17 Basic operation 17 PICTURE SETTING 18 PICTURE MODE 18 Picture Adjustment 18 WHITE BALANCE 18 PICTURE FEATURES 19 DIGITAL VNR 19 Su...

Страница 6: ...adjust the direction of the TV screen 5 up 10 down and 20 to the left or right Tilt the TV up and down While holding the bottom of the stand with one hand use your other hand to hold the middle of the top of the TV and slowly tilt the TV up and down As a safety measure the stand is constructed so that it requires a certain amount of force to tilt the TV Rotate the TV to the left and right While ho...

Страница 7: ...properly replace the batteries Remove the terminal cover There are connection terminals behind the covers on the left and right of the rear of the TV Remove these two covers before connecting an antenna or VCR The covers can be removed by removing the hook at the bottom and then pulling out while lifting slightly To replace the covers first connect the hook at the top of the cover to the TV and th...

Страница 8: ...o cable will be ignored in case you connect a VCR to the TV with both video cable and S VIDEO cable 3 Connect the VCR s VIDEO OUT audio L R output terminals and the TV s AUDIO terminals with an audio cable To connect additional external devices please see Connecting the external devices on page 29 Connecting the power cord to the AC outlet Insert the AC plug on the power cord from the TV into AC o...

Страница 9: ... 5 5 and 6 6 6 6 buttons to choose ENGLISH Then press the a a a a button English is set for the on screen display description The TELETEXT LANGUAGE menu appears as a sub menu of the AUTO PROGRAM function 5 Press the 6 6 6 6 buttons to choose the teletext language group that corresponds to language of teletext programme that you want to watch VCR TV DVD Switch Yellow button Blue button Remote contr...

Страница 10: ...en registered in the Programme numbers PR the EDIT menu appears You can proceed to edit the Programme numbers PR using the EDIT MANUAL function For details see EDIT MANUAL on page 25 If you do not need to use the EDIT MANUAL function go to the next step 7 Press the a a a a button BACK TV OK EDIT CH CC PR ID AV 01 02 03 04 05 06 07 08 09 CH CH CH CH CH CH CC CC CC 21 23 22 26 25 24 01 02 03 ID INSE...

Страница 11: ...ly AC outlet Choose a TV channel Press the P p p p p buttons to choose a programme number PR or an VIDEO terminal Watch images from external devices Press the TV AV button to choose a VIDEO terminal The leading character is changed from V to S e g V1 is changed to S1 when VIDEO 1 or VIDEO 2 is connected to the S terminal Adjust the volume Press the q q q q buttons The volume level indicator appear...

Страница 12: ...tion You cannot turn the TV on or off when the VCR TV DVD switch is set to the VCR or DVD position 2 Press the Standby button to turn the TV on or off When the TV is turned on the power lamp dims slightly The power can be turned on by pressing the b button p p buttons or Number buttons Check that the AC plug on the power cord from the TV is connected to AC outlet Choose a TV channel Use the number...

Страница 13: ...urn off the sound Pressing the l muting button again restores the previous volume level Watch images from external devices Use the o o o o button Press the o o o o button to choose a VIDEO terminal The leading character is changed from V to S eg V1 is changed to S1 when VIDEO 1 or VIDEO 2 is connected to the S terminal Use the p p p p p p p p buttons Press the p p p p p p p p buttons to choose a V...

Страница 14: ...zooms up the Wide Picture 16 9 Aspect Ratio with subtitles to the full screen FULL This mode uniformly stretches the left and right sides of a normal picture 4 3 aspect ratio to fill the wide TV screen Use for pictures with a 16 9 aspect ratio that have been squeezed into a normal picture 4 3 aspect ratio you can restore their original dimensions Choose the ZOOM mode 1 Press the c c c c button to ...

Страница 15: ...not be output from the TV The FREEZE function is cleared if no operation is performed for approximately one minute Using the PIP function You can view two pictures Main picture and sub picture A TV programme and a video programme from an external device can be watched at the same time 1 Press the R R R R button Pressing the R R R R button changes the PIP mode as follows 2 Press the p p p p buttons...

Страница 16: ...ulti picture mode 12 pictures multi 2 Press the p p p p buttons to choose the screen you want to see The chosen picture changes to a moving picture 3 Press the a a a a button The multi pictures disappear and the chosen picture appears Cancelling the multi pictures Press the b button the number buttons or the a button Pictures from external devices cannot be displayed in the 12 pictures multi mode ...

Страница 17: ...s For detail Changing the TELETEXT LANGUAGE setting on page 28 Using the List Mode You can store the numbers of your favourite teletext pages in memory and call them up quickly using the colour buttons To store the page numbers 1 Press B B B B button to engage the List mode The stored page numbers are displayed at the bottom of the screen 2 Press a Colour button to choose a position Then press the...

Страница 18: ...ay Press the F F F F Size button Index You can return to the index page instantly Press G G G G Index button Returns to page 100 or a previously specified page Cancel You can search for a teletext page while watching TV 1 Press the Number button to enter a page number or press a Colour button The TV searches for a teletext page 2 Press H H H H Cancel button The TV programme appears When the TV fin...

Страница 19: ...e 5 5 5 5 buttons to choose the setting of that function If you want to operate a function which appears only with its name follow the descriptions of that function on the following pages The display appearing at the bottom of a menu shows you a button on the remote control that you can use when you operate a chosen function 5 Press the a a a a button to complete the setting The menu disappears Wh...

Страница 20: ...NTSC 4 43 or a signal from the VIDEO 4 terminal However operation is not possible when the PIP function main picture is set to VIDEO 4 To return to the default settings in each PICTURE MODE Press the blue button This returns the picture settings in the PICTURE MODE mode you have chosen to the default settings and stores them in the PICTURE MODE mode WHITE BALANCE You can select one of three WHITE ...

Страница 21: ...ooking picture by eliminating unnecessary edges from high contrast and crisp images For images with low contrast edges are added to produce a sharper more detailed picture You can choose from the three DigiPure function settings of AUTO MIN and MAX If you set the DigiPure effect too high on a low quality picture that contains a lot of noise this may actually make the noise worse We recommend you u...

Страница 22: ...et to AUTO or ON the motion may appear unnatural when viewing images with the NTSC colour system You cannot select this function in the twin pictures mode or the picture in picture mode 4 3 AUTO ASPECT You can choose one of three ZOOM modes REGULAR PANORAMIC or 14 9 ZOOM as the ZOOM mode for the normal picture 4 3 aspect ratio 1 Choose 4 3 AUTO ASPECT then press the a a a a button 2 Press the 6 6 ...

Страница 23: ...p 3 turn the right speaker s volume level up SPEAKER You can turn off the sound from the TV speakers but you should only do this if an audio system is connected to the TV as a substitute for the TV speakers ON The TV speakers issue sound OFF The TV speakers does not issue sound BBE You can use the BBE function to enjoy easy to listen sound that is faithful to the original sound recorded ON This fu...

Страница 24: ...ON The sound comes from the TV s speakers when using the headphones OFF The sound does not come from the TV s speakers when using the headphones OUTPUT You can choose the sound output to the headphones MAIN You can listen to the sound of the main picture with your headphones SUB You can listen to the sound of the sub picture with your headphones When the sub picture is a television programme the s...

Страница 25: ... viewed Unless you enter a pre set ID number by a special operation the lock cannot be released and the child cannot view the TV channel programmes To set the CHANNEL GUARD function 1 Choose CHANNEL GUARD then press the o o o o button SET ID NO ID number setting screen appears 2 Set the ID number to your liking 1 Press the 6 6 6 6 buttons to choose a number 2 Press the 5 5 5 5 buttons to move the ...

Страница 26: ...hannel is cancelled The next time anyone attempts to view the TV channel it will be locked again When you would like to cancel the CHANNEL GUARD function you must perform the operation To set the CHANNEL GUARD function again To disable easy choosing of a Programme number PR in which a locked TV channel has been registered the Programme number PR has been set that it cannot be chosen by the 6 butto...

Страница 27: ...about these functions are as follows Caution Using the MOVE DELETE or INSERT function rewrites the current Programme numbers PR list Resultingly the Programme number PR of some of the TV channels will change Using the MANUAL function for a TV channel for which the CHANNEL GUARD function has been set cancels the CHANNEL GUARD function for the TV channel When a TV channel has already been registered...

Страница 28: ... changed over and the picture of the TV channel registered in the Programme number PR appears on the screen 2 Press the red button to start the ID function 3 Enter a channel name ID Press the 6 6 6 6 buttons to choose a character Press the 5 5 5 5 buttons to move the cursor To cancel the ID function Press the h Information button 4 Press the a a a a button to register a Channel name ID to a TV cha...

Страница 29: ...ou want to register Refer to the following table for the various international sound systems Sound system 4 Press the green or red button to search for a TV channel Scanning stops when the TV finds a TV channel Then the TV channel is displayed 5 Press the green or red button repeatedly until the TV channel you want appears If the TV channel reception is poor Press the blue or yellow button to fine...

Страница 30: ... function 3 Press the 6 6 6 6 buttons to choose a group 4 Press the b b b b button to complete the setting The menu disappears Group Languages GROUP 1 Turkish Hungarian English German French Italian Spanish Portuguese Greek Swedish Finnish GROUP 2 Polish Serbian Croatian Slovenian Czech Slovak Rumanian Hungarian German French Italian Swedish Finnish GROUP 3 Russian Bulgarian Lettish Lithuanian Est...

Страница 31: ...al Note that connecting cables are not supplied 1 VCR composite signal 2 VCR S VIDEO signal Y C 3 VCR for recording composite signal 4 DVD player composite signal 5 DVD player S VIDEO signal Y C 6 DVD player component video signals Pr Pb Y 7 TV game composite signal S VIDEO signal Y C 8 Audio Video cable 9 Camcorder composite signal S VIDEO signal Y C 0 Headphones Video cable Audio cable S VIDEO c...

Страница 32: ... 5 mm in diameter to the headphone jack at the TV The headphone volume is adjusted with the HEADPHONE menu see page 22 Connecting Speakers Amplifier See the Audio equipment connection diagram then connect the audio equipment you desire to the TV You can use external front speakers to listen to the TV sound instead of the TV speakers Before connecting anything Read the manuals provided with the amp...

Страница 33: ...8 CH39 US 39 W 54 E39 CH40 US 40 W 55 E40 CH41 US 41 W 56 E41 CH42 US 42 W 57 E42 CH43 US 43 W 58 E43 CH44 US 44 W 59 E44 CH45 US 45 W 60 E45 CH46 US 46 W 61 E46 CH47 US 47 W 62 E47 CH48 US 48 W 63 E48 CH49 US 49 W 64 E49 CH50 US 50 W 65 E50 CH51 US 51 W 66 E51 CH52 US 52 W 67 E52 CH53 US 53 W 68 E53 CH54 US 54 W 69 E54 CH55 US 55 W 70 E55 CH56 US 56 W 71 E56 CH57 US 57 W 72 E57 CH58 US 58 W 73 E5...

Страница 34: ...direction Is the aerial itself faulty If the TV or aerial receives interference from the other devices stripes or noise may appear in the picture Move such devices as an amplifier personal computer or a hair drier that can cause interference away from your TV or try changing its location If the aerial suffers interference from a radio tower or high voltage wire please contact your local dealer If ...

Страница 35: ... while you are viewing the TV other causes may be assumed For precautionary purposes request your service technician to inspect it In the twin pictures mode the sub picture may disappear when the external device is operated If this happens press the R button and display the sub picture again The headphone volume is adjusted with the HEADPHONE menu It cannot be adjusted with the r volume q buttons ...

Страница 36: ...8 Power requirements AC 110 to 240 V 50 60 Hz Power consumption 148 W Standby 2 8 W Screen size Viewable area 66 cm measured diagonally Display resolution 1280 768 W XGA Audio output Rated Power output 10 W 10 W Speakers 6 6 cm round 2 VIDEO 1 terminal RCA connectors 3 S VIDEO connector 1 Video input S VIDEO Y C input and Audio L R inputs are available VIDEO 2 terminal RCA connectors 3 S VIDEO con...

Страница 37: ...LT Z26S2 ASIA LCT1488 002A H All cover page 35 LCT1488 002A H_Cover fm Page 3 Friday October 17 2003 10 51 AM ...

Страница 38: ...LT Z26S2 ASIA LCT1488 002A H All cover page 36 LCT1488 002A H_Cover fm Page 4 Friday October 17 2003 10 51 AM ...

Страница 39: ...Cover 3 LT Z26S2 ASIA LCT1488 002A H All cover LCT1488 002A H_Cover fm Page 5 Friday October 17 2003 10 51 AM ...

Страница 40: ... 2003 VICTOR COMPANY OF JAPAN LIMITED 6 LT Z26S2 ASIA LCT1488 002A H All cover Cover 4 1003 MK CR JMT LCT1488 002A H_Cover fm Page 6 Friday October 17 2003 10 51 AM ...

Отзывы: