background image

11

ENGLISH

ENGLISH

12

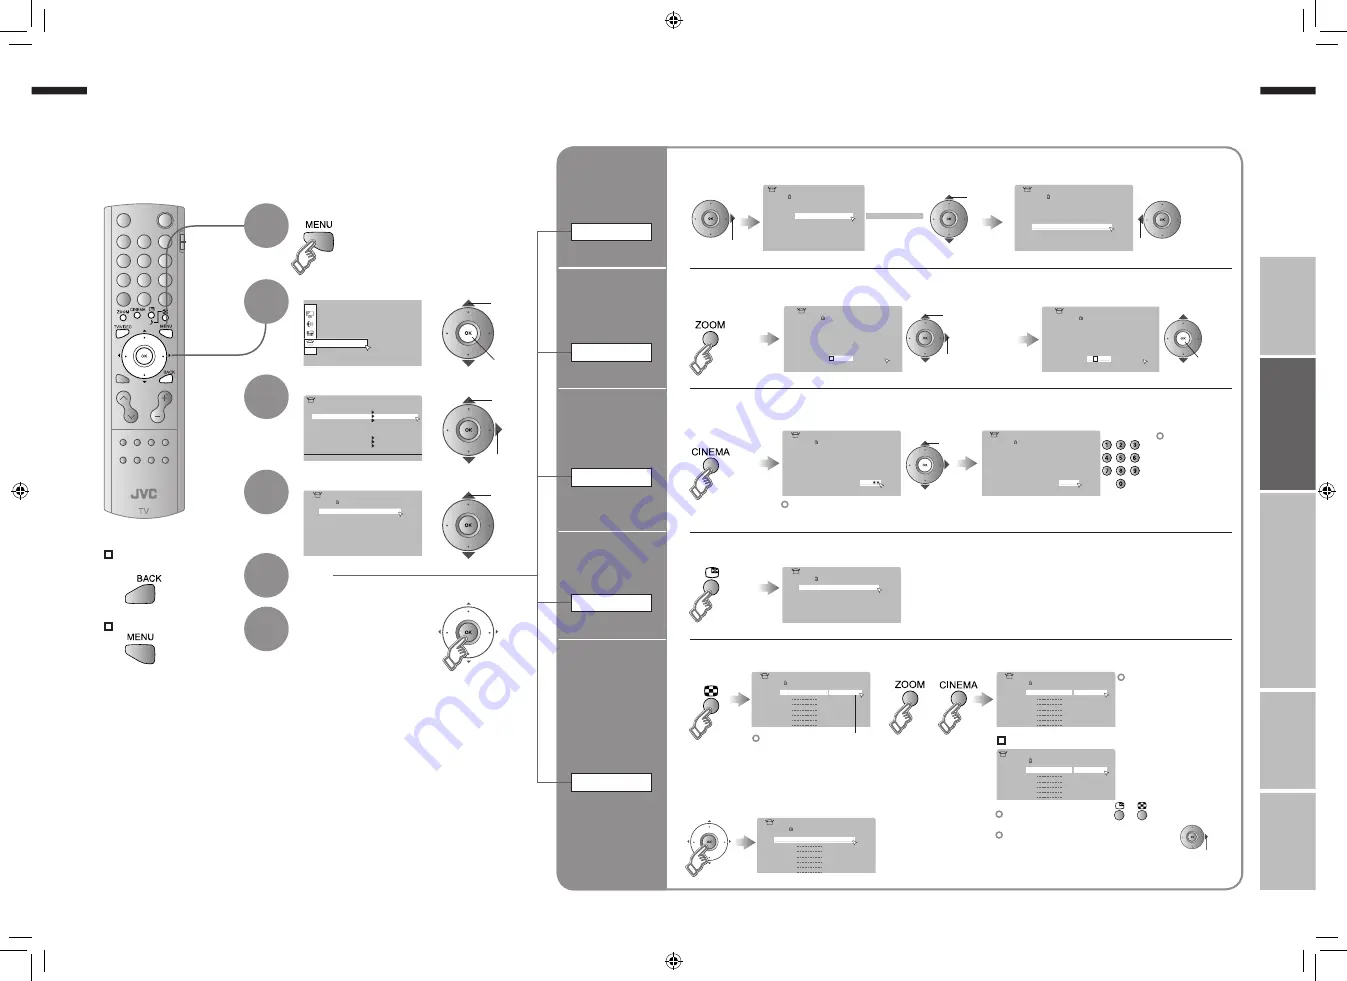
· Registering channels

Set Up

Set Up

Auto Program

Video-3 Setting
AI Volume

HDMI Setting
PC Position

Video
Off

Video

Teletext Language

Edit/Manual

Video-1 Setting

Language

01

AV

PR

02

03

04

05

06

07

08

09

CH/CC

CH

21

CH

22

CH

23

CH

24

CH

25

CC

02

CC

CC

04

CC

05

03

> Edit

ID

01

AV

PR

02

03

04

05

06

07

08

09

CH/CC

CH

21

CH

22

CH

23

CH

24

CH

25

CC

02

CC

03

CC

04

CC

05

> Edit

ID

> Edit

01

AV

PR

02

03

04

05

06

07

08

09

CH/CC

ID

CH

21

CH

22

CH

23

CH

24

CH

25

CC

03

CC

04

CC

05

01

AV

PR

02

03

04

05

06

07

08

09

CH/CC

CH

21

CH

22

CH

23

CH

24

CH

25

CC

02

CC

03

CC

04

CC

05

A

> Edit

ID

01

AV

PR

02

03

04

05

06

07

08

09

CH/CC

ID

CH

21

CH

22

CH

23

CH

24

CH

25

CC

02

CC

03

CC

04

CC

05

J V C

> Edit

01

AV

PR

02

03

04

05

06

07

08

09

CH/CC

CH

21

CH

22

CH

23

CH

24

CH

25

CC

02

CC

CC

03

CC

04

> Edit

ID

> Edit

01

AV

PR

02

03

04

05

06

07

08

09

CH/CC

ID

CH

21

CH

22

CH

23

CH

24

CH

25

CC

02

CC

CC

03

CC

04

12

>

01

AV

PR

02

03

04

05

06

07

08

09

CH/CC

CH

22

CH

23

CH

24

CH

25

CC

02

CC

03

CC

04

CC

05

Edit

ID

>

11

10

PR

12
13
14
15
16
17
18
19

CH/CC

CH

02 (B/G)

CC

06

Manual

ID

> Manual

11

10

PR

12

13

14

15

16

17

18

19

CH/CC

ID

CH

08 

(

B/G

)

CC

06

>

11

10

PR

12

13

14

15

16

17

18

19

CH/CC

CH

08

CC

06

Edit

ID

> Manual

11

10

PR

12

13

14

15

16

17

18

19

CH/CC

ID

CH

08

 (I)

CC

06

IMPORT

ANT!

PREP

ARE

USE

SETTINGS

TROUBLE?

To the previous 

screen

Exit

Display the menu bar

Select “Set Up”

Select “Edit / Manual”

Finish

When coming from “Initial settings” (P. 9), skip to 

.

Select a row

Edit

Move a 

channel’s 

position

MOVE

Editing channels

Edit the channels registered with “Auto Program” in “Initial settings” 

(P. 9)

.

1
2

3

4

5

6

Edit a 

channel 

name

ID

Insert a 

channel

INSERT

Delete a 

channel

DELETE

Register a 

new channel

MANUAL

select

move out

move in

select

1

 enter the first 

character

From high 

frequencies

or

/

select a system

Receives the 

broadcast 

signal.

If you can not receive the 

channel you want to view, 

press 

3

 to change the sound 

system.

 “Sound system in your 

country or region” (P. 35)

Auto-search begins, 

and the nearest 

frequency is imported.

 Repeat the previous 

steps until the 

desired channel is 

displayed

From low 

frequencies

“CH/CC” List 

 (P. 37)

1

 Begin

2

 Select a destination

3

 Finish

1

 Begin

2

 Enter a channel name

2

 Select a “CH / CC”

3

 Enter a number

2

 Beginning channel search

1

 Begin

3

 Set

Adjust

Channel fine tuning 

If the picture or sound is unnatural 

1

 select

2

 next

1

 select

2

 next

set

1

 Begin

select

1

 Delete

2

 next column

   11-12

7/14/2006   3:02:55 PM

Содержание LT-Z26EX6

Страница 1: ...r Company of Japan Limited 0706TKH CR MU LT Z26EX6 LT Z32EX6 GGT0125 001A H WIDE LCD PANEL TV INSTRUCTIONS LT Z26EX6 GGT0125 001A H_Cover indd 1 2 GGT0125 001A H_Cover indd 1 2 6 30 2006 11 21 12 AM 6 30 2006 11 21 12 AM ...

Страница 2: ...I 3 1 2 4 Introduction indd I II Introduction indd I II 6 19 2006 11 48 45 AM 6 19 2006 11 48 45 AM ...

Страница 3: ...gistering channels Connecting external devices 13 Let s try it out Enjoying your new TV 15 TV Teletext Video etc Watching TV 17 Viewing teletext 19 Watching videos DVDs 21 Try the advanced features Useful functions 23 Take a snapshot View and search in multi picture mode Sleep Timer Channel Guard Just the way you like it Customising your TV 27 Advanced picture adjustment 29 Reduce noise Watch a mo...

Страница 4: ...aked flames cloths paper etc on the TV may cause a fire Never insert objects into the cabinet openings It may cause a fatal electric shock Take care when children are near Unplug the power cord when going out The power buttons on the remote control and the TV unit cannot completely turn off the TV Make appropriate arrangements for bedridden people For more details on installation usage and safety Co...

Страница 5: ... Insert the batteries Use two AA R06 dry cell batteries Insert the batteries from the end making sure the and polarities are correct Return to channel you want to view Display on screen menu P 27 Power On Off Remote control sensor Power lamp ON Lit Blue OFF Unlit Power lamp lights while the TV is on Power Lamp P 28 To headphones P 13 Display on screen menu set Switch between TV AV devices Press to...

Страница 6: ...60Hz AC outlet When attaching the TV to the wall use the optional JVC wall mounting unit Consult a qualified technician See the included manual on mounting procedures JVC assumes no responsibility for damage due to improper mounting 200mm 200mm mount which conforms to VESA standards Installation requirements To avoid overheating ensure the unit has ample room Please read the user manuals of each de...

Страница 7: ...nels P 11 To the previous screen If the JVC logo does not appear or if you wish to make changes later Language Teletext language and Auto Program P 28 Exit MENU BACK TV Begin Select a language Select the teletext language group Check what was registered 1select Shown only when powering on for the first time The power on the unit can also be used Edit channels in Editing channels P 11 1 2 6 2set Con...

Страница 8: ...7 18 19 CH CC ID CH 08 B G CC 06 11 10 PR 12 13 14 15 16 17 18 19 CH CC CH 08 CC 06 Edit ID Manual 11 10 PR 12 13 14 15 16 17 18 19 CH CC ID CH 08 I CC 06 IMPORTANT PREPARE USE SETTINGS TROUBLE To the previous screen Exit Display the menu bar Select Set Up Select Edit Manual Finish When coming from Initial settings P 9 skip to Select a row Edit Move a channel s position MOVE Editing channels Edit ...

Страница 9: ...nal Component signal S VIDEO Sound L R Use Component signal Switch between video and component signal P 22 Use S VIDEO Using S VIDEO P 22 VIDEO 2 Watching videos Output Input Composite signal S VIDEO Sound L R Use S VIDEO Using S VIDEO P 22 VIDEO 3 Watching DVDs Output Input Composite signal Component signal Sound L R Use Component signal Switch between video and component signal P 22 HDMI Connect...

Страница 10: ...es Adjust the picture Adjust the sound Basic settings channel settings etc Advanced settings sleep timer channel guard etc Viewing teletext 19 PAGE Enlarge the text To the index page Hold the current page Switch briefly between teletext and TV Bookmark your favourite pages Reveal hidden pages 21 PAGE Watching videos DVDs Watch high quality video S VIDEO Switch between video and component signal PC ...

Страница 11: ...ication High For stereo sound Low For stereo sound when the sound distorts in High mode Mono For mono sound emulates a stereo like sound Off Turns off Cinema Surround select Select a page Channels registered in Initial settings will appear here Select and view a channel When set to Auto the aspect ratio will turn to the ratio obtained from the information the TV received Without receiving aspect i...

Страница 12: ...e up or down a page Bookmark your favourite page LIST MODE Recall your favourite page 2 View sub pages Hold the current page Display hidden information answers to quizzes etc Returns to page 100 or a previously designated page Double the size of the displayed text Leave the current page open while you switch to watch TV Hold the current page HOLD Switch briefly from teletext to TV CANCEL Release Us...

Страница 13: ...lect 3 4 Change settings 2set 1select Video For normal video signal Component For component video signal If both composite and S VIDEO cables are connected S VIDEO will be enable Display the menu bar Select Set Up Select PC Position 1select 2next PC position adjustment 1 2 1select 2next 3 1adjust 2set Shown only when PC is selected Reset position Using S VIDEO Component and PC signals does not out...

Страница 14: ...nnel in 12 screen mode All registered channels are displayed as still images Switch between the sound sources Change the channel Main Sub Watch in multi picture mode MULTI PICTURE 2set 1select 1select a channel 2watch 1 2 3 4 3 4 5 7 6 After steps 1 and 2 above Set a time for the TV to turn itself off SLEEP TIMER Cancel Set the time to 0 in step 4 Stop children from watching specific channels CHANN...

Страница 15: ...get saved as well Check your favourite channels Press and confirm that the channels you have registered have a d beside them Delete a favourite channel MENU Features Favourite Setting 1 2 select delete Set the power to turn off if no signal is received and no operation is performed AUTO SHUTOFF Prevent sudden in crease or decrease of sound when changing channels AI VOLUME MENU Features Blue Back Of...

Страница 16: ...UB2 MONO P 36 Bass Low tones Weaker Stronger Treble High tones Weaker Stronger Balance Speaker balance Left Stronger Right Stronger Cinema Surround Ambience level High Low Mono Off Tone Correction Make the sound more clear On Off Features Sleep Timer Timer for turning off the TV P 24 Channel Guard Stops children from watching specific channels P 24 Appearance Format for displaying the channel numbe...

Страница 17: ...e of inactivity 2 3 4 5 6 2next 1select 2next 1select 2next 1select select For natural looking outlines For smooth cinema film Off Function is turned off On Auto Automatically adjusts Function is always on For natural looking pictures Off Function is turned off On Maintain a natural colour balance Fix bright dark pictures Off Function is turned off On Make it easier to view bright dark pictures Whe...

Страница 18: ... the TV menu bar does not appear Depending on the stability of the signal there may be a time lag when changing channels Problem Actions page Unplug TV several minutes later plug it in again Remote control stops working Switch Child Lock to Off Front control buttons does not work 28 Unnatural colour Adjust Colour and Back Light Check your Colour System If Auto is selected select the specific colour...

Страница 19: ...ith HDMI Switch Audio in HDMI Setting to Digital or Auto for HDMI devices or Analogue or Auto for DVI devices No sound 28 Use the cable marked with HDMI logo No picture no sound Switch Size in HDMI Setting to 1 or 2 Wrong screen size 28 Problem Actions page Adjust the Bass and Treble If receiving a poor signal in Stereo t u switch to Mono Adjust the channel reception using Manual Poor sound 28 28 ...

Страница 20: ...an French Italian Spanish Portuguese Swedish Finnish Colour system in your country or region Area Country or Region System Asia Middle East Bahrain Kuwait Oman Qatar United Arab Emirates Yemen etc Indonesia Malaysia Singapore Thailand India etc PAL China Vietnam etc Hong Kong etc Islamic Republic of Iran Lebanon Saudi Arabia etc SECAM Philippines Taiwan Myanmar etc NTSC Europe Russia etc SECAM Cze...

Страница 21: ...hannel VH 147 25 to 423 25 MHz UHF channel U 431 25 to 863 25 MHz Receives cable channels in mid band X to Z 2 S1 to S10 super band S11 to S20 and hyper band S21 to S41 Sound multiplex systems NICAM I B G D K A2 B G D K Teletext systems FLOF Fastext WST standard system Power requirements AC 110 V 240 V 50 60Hz Audio output Rated power output 10 W 10 W Speakers 15 cm x 5 5 cm oblique x 2 12 cm x 5 ...

Страница 22: ...Logo_page indd 1 2 Logo_page indd 1 2 7 14 2006 11 56 52 AM 7 14 2006 11 56 52 AM ...

Отзывы: