background image

22

Customising your TV

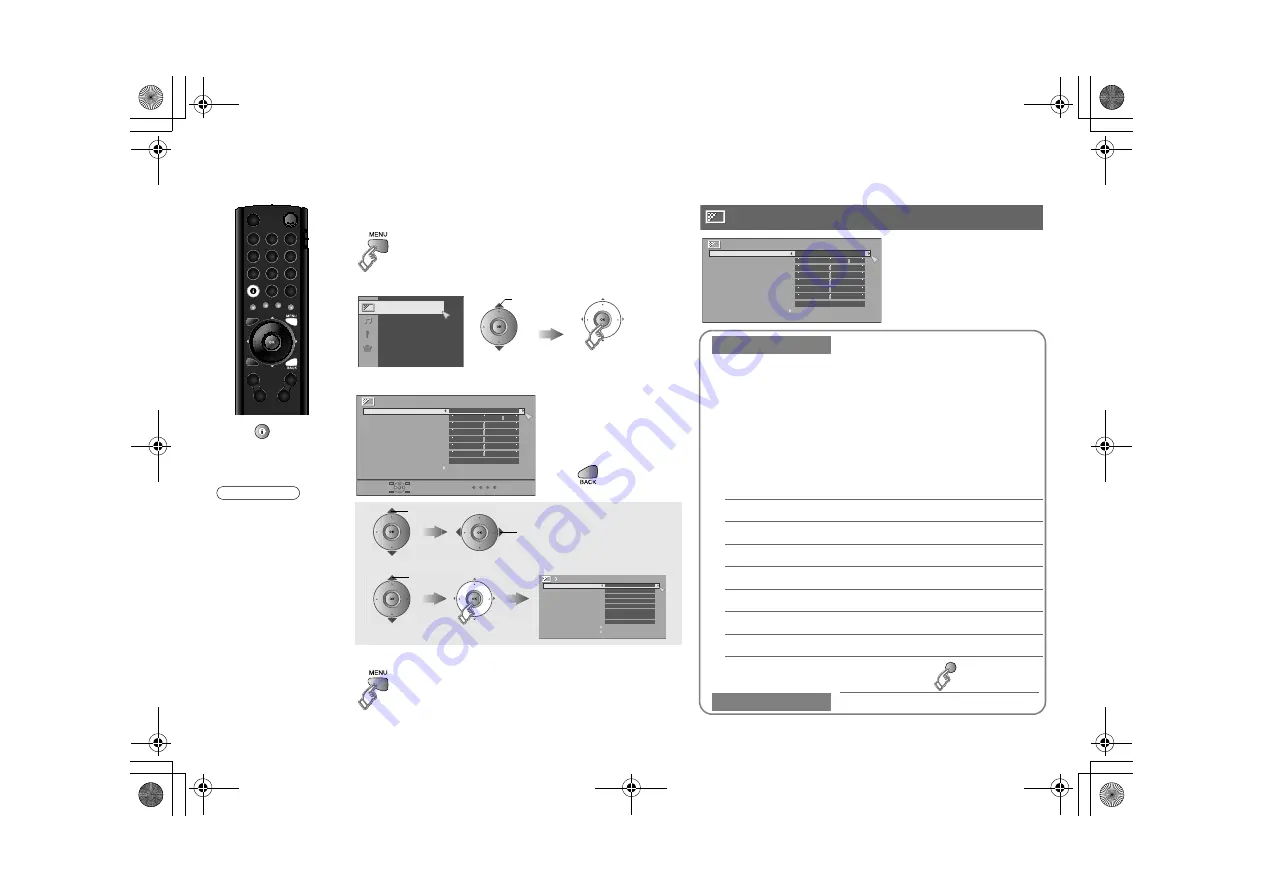
You can select a preset picture setting according to the 

brightness of your room or when playing video games.

You can make further adjustments to the selected preset 
“Picture Mode” to your liking.

To return to the default adjustments 

g


(blue)

1

Display the menu bar

2

Display the desired menu

3

Change or adjust the setting

z

The menu disappears 

after one minute of 

inactivity.

To the previous 

screen

g

4

Close the menu

Picture

select 

Picture

Picture Mode

Standard

Colour Temp.

Normal

Features

Backlight
Contrast
Brightness
Sharpness

Hue

Colour

select 

To enter an item’s menu

change / adjust

select 

(E.g. Features)

Features

Digital VNR

DigiPure
Movie Theatre
Colour Management
Picture Management
Smart Picture
Dynamic Backlight
MPEG Noise Reduction
Colour System
4:3 Auto Aspect

Off
Off

Auto

On
On
On
On
On

Picture Mode

Bright

:

in a fairly bright room

Soft

:

in a dark room

Standard :

in a room with standard brightness

Game Mode :

when playing video games

Backlight

Backlight brightness (Darker 

l

 Brighter)

Contrast

Contrast (Lower 

l

 Higher)

Brightness

Brightness (Darker 

l

 Brighter)

Sharpness

Sharpness (Softer 

l

 Sharper)

Colour

Colour (Lighter 

l

 Deeper)

Hue

Tint (Reddish 

l

 Greenish) (NTSC only)

Colour Temp.

Colour temperature (Warm / Normal / Cool)

Features

g

 “Features (sub menu)” (P. 23)

 Picture

Picture

Picture Mode

Standard

Colour Temp.

Normal

Features

Backlight
Contrast
Brightness
Sharpness

Hue

Colour

Press “

” to hide 

the bottom area of the 

menu. Press again to 

display it.

z

Depending on the 

situation (channels, 

video signal 

formats, external 

inputs, etc.), some 

items will be 

displayed in black 

colour and will not 

work. You will not 

be able to change 

their setting as 

well.

Note

LT-32FG5BU_EN.book  Page 22  Thursday, October 16, 2008  4:12 PM

Содержание LT-32FG5BU

Страница 1: ... WIDE LCD PANEL TV 16 9 LCD TV ШИРОКОЭКРАННЫЙ ЦВЕТНОЙ ТЕЛЕВИЗОР PANORAMICZNY TELEWIZOR LCD INSTRUCTIONS BEDIENUNGSANLEITUNG ИНСТРУКЦИЯ ПО ЗКСПЛУАТАЦИИ INSTRUKCJA OBSŁUGI GGT0297 001A L LT 32FG5BU_EN book Page 0 Thursday October 16 2008 4 12 PM ...

Страница 2: ...LT 32FG5BU_EN book Page 0 Thursday October 16 2008 4 12 PM ...

Страница 3: ...ng of these products For more information about collection points and recycling of these products please contact your local municipal office your household waste disposal service or the shop where you purchased the product Penalties may be applicable for incorrect disposal of this waste in accordance with national legislation Business users If you wish to dispose of this product please visit our w...

Страница 4: ...proper mounting Do not allow the TV to fall z Do not rest your elbows on or allow children to hang from the TV There is a risk that the TV will fall and cause injuries z Make use of the hole on the back of the stand to prevent the TV from falling easily P 8 If the TV is damaged or behaving strangely stop using it at once g Unplug the power cord and contact your retailer Take care when handling the...

Страница 5: ...s Magyar Polski 13 PAGE 14 PAGE First things first z Warning 2 Getting started z Remote control 4 z Names and functions of parts 6 z Getting started 8 Let s try it out Try the advanced features z Enjoy your new TV 16 z Watching TV 17 z Viewing teletext 18 z Watching videos DVDs 19 z Useful functions 20 Just the way you like it z Customising your TV 22 Picture 22 Features sub menu 23 Sound 24 Featu...

Страница 6: ...nctions in menus Switch between VCR TV DVD P 5 Return to TV Display on screen menu Customising your TV P 22 Select and confirm settings in menus Change channel page Volume control View teletext Viewing teletext P 18 To the previous channel Hold the current page when viewing teletext P 19 Display your favourite list when viewing teletext P 18 Display hidden information when viewing teletext P 19 Re...

Страница 7: ...ndex page when viewing teletext P 19 Change the aspect ratio P 20 Turn on 3D Cinema Sound P 20 Change the sound mode or language P 21 Set the sleep timer P 21 Operate JVC VCRs and other devices 1 2 Turn on the device 3 z Some models of JVC devices cannot be operated with this remote control Select a channel VCR mode Rewind Playback Fast forward Stop Pause Record Display DVD top menu Select a chapt...

Страница 8: ... glossy finish of the TV after the TV has been placed properly P 7 Remote control sensor Turn on off standby the TV Headphone jack stereo mini jack R3 5 mm Change channel EXT terminal To switch to an external input press P repeatedly Volume Note Change the direction of TV Names and functions of parts LT 32FG5BU_EN book Page 6 Thursday October 16 2008 4 12 PM ...

Страница 9: ...sheets off before use z Take care in handling the glossy frame and stand because these surfaces are delicate z If the glossy frame or stand becomes dirty first dust it off and then gently wipe with a soft cloth If you wipe without dusting off you may damage the surface Handling the frame and stand Frame Stand Attach the stand to the TV 1 2 LT 32FG5BU_EN book Page 7 Thursday October 16 2008 4 12 PM...

Страница 10: ...200 mm x 200 mm Depth of screw hole is 7 mm from the surface of the TV 䡵 Installation requirements z To avoid overheating ensure the unit has ample room z To prevent the TV from falling thread the belt through the hole on the back of the stand and secure it to the TV rack etc Use two AA R6 dry cell batteries Insert the batteries from the end making sure the and polarities are correct Check accesso...

Страница 11: ... Please read the user manuals of each device before setting up z Connecting cables are not supplied with this TV Connecting your external devices Note Audio system Satellite broadcast tuner VCR DVD recorder EXT 1 AUDIO OUT EXT 4 HDMI 1 EXT 5 HDMI 2 EXT 6 HDMI 3 HD Video camera Digital Satellite broadcast tuner DVD player Video camera Game consoles Not available For service adjustments DVD player D...

Страница 12: ...p 60Hz 720p 750p Audio L R If there is no sound change the HDMI 1 Audio Setting P 26 Please use a High Speed HDMITM Cable High Speed HDMITM Cables are tested to carry an HD signal up to 1080p and higher B DVI Audio DVI HDMI cable Audio cable EXT 4 EXT 3 L and R jacks Input z DVI digital ED 576p 625p 480p 525p HD 1080i 1125i 1080p 1125p 24Hz 1080p 1125p 50Hz 1080p 1125p 60Hz 720p 750p z Audio L R a...

Страница 13: ...R analogue If you want to input the S Video signal change the Ext Setting P 27 Select the dubbing source in Ext Setting P 27 Good E Video and audio Video and audio cable EXT 3 V L R jacks Input z Composite video analogue z Audio L R analogue Change the EXT 3 setting from component to composite P 27 Audio system Connecting cables Connect to your TV Available signals Notes F Audio input Audio cable ...

Страница 14: ...ade insert the plug into an AC outlet Connect the aerial AERIAL Connect a VCR DVD recorder z After all the connections have been made insert the plug into an AC outlet VCR DVD recorder EXT 2 EXT 1 Getting started LT 32FG5BU_EN book Page 12 Thursday October 16 2008 4 12 PM ...

Страница 15: ... make changes later g Language and Auto Program P 26 Suomi Română Türkçe Language Svenska Norsk Dansk Nederlands Castellano Italiano Deutsch Français English Català Português Magyar Polski B set A select 4 Select the country of installation z If the country you want to select is not available press the yellow button to check the next page 5 Automatically register channels z If ACI Start appears st...

Страница 16: ...it function ID Insert Delete Manual Move Next Move Move a channel s position PR ID Edit a channel name ID Insert Insert a new channel directly by entering the CH CC number Delete Delete a channel z Pressing the button deletes the channel set select 䡵 When selecting a preset name from the ID List B set A select character B move position C set A select enter the first character blue 䡵 Naming a chann...

Страница 17: ... g Repeat the previous steps until the desired channel is displayed A Search a channel Fine tune B Set Select a system z If necessary press X to change the broadcasting system g Receivable broadcast systems P 30 AV PR ID Manual CH CC 01 02 03 CH 03 04 CH 04 05 06 07 05 CH 06 CH 01 CC 02 CC B G ARD _ _ _ _ _ _ 02 CH LT 32FG5BU_EN book Page 15 Thursday October 16 2008 4 12 PM ...

Страница 18: ... _ _ _ AV PR ID 䡵 Picture settings Picture Mode Features etc 䡵 Sound settings Stereo t u 3D Cinema Sound etc 䡵 Set Up settings Auto Program Language etc 䡵 Features settings Sleep Timer Child Lock etc Customising your TV 䡵 Change the aspect ratio 䡵 Change the sound mode or language 䡵 3D Cinema Sound 䡵 Set the sleep timer LT 32FG5BU_EN book Page 16 Thursday October 16 2008 4 12 PM ...

Страница 19: ...select B view A select z Close PR List 䡵 Press a channel number 䡵 Move up or down a channel E g 15 1 up down Note While the channel is displayed Press the number to register it on The following Picture and Sound menu settings applied to the channel will be stored in the favourite channel as well z Picture Mode Digital VNR DigiPure P 22 23 z Surround Bass Boost P 24 䡵 Recall the favourite channel 䡵...

Страница 20: ...splay your favourites list 2 Select a coloured button to save your page to 3 Enter the number of the page to save 4 Save 䡵 Recall your favourite page 1 Display your favourites list 2 Press a coloured button red green yellow blue 䡵 Exit g red green yellow blue Viewing teletext 1 2 Enter a teletext page 䡵 Move up or down a page TEXT TV TEXT up down When watching TV LT 32FG5BU_EN book Page 18 Thursda...

Страница 21: ...ed text Leave the current page open while you switch to watch TV z Useful when running a page search Returns to page 100 or a previously designated page 䡵 To return to TV channels z Press the TV button or select ATV from the Ext Mode menu 1 Select the video source 2 Operate the connected device and play a video Ext Mode ATV EXT 1 EXT 2 EXT 3 HDMI1 HDMI2 HDMI3 0 1 2 3 4 5 6 E g For EXT 1 B watch A ...

Страница 22: ...d P 24 Ambient sound z Hyper Sound and 3D Cinema Sound cannot be set to On simultaneously z Hyper Sound does not work with headphones 1 2 Select the aspect ratio 3 z When Slim is selected a 4 3 image stretched out to 16 9 will revert back to its original aspect ratio with black bands z When Panoramic Zoom is selected a 4 3 image with black bands will be stretched out to 16 9 z Using Auto g Auto in...

Страница 23: ... the menus see Customising your TV P 22 27 1 2 Select the sound mode or language z When viewing a bilingual broadcast programme you can select either Bilingual I Sub I or Bilingual II Sub II sound z If the stereo broadcast reception is poor you can change to mono sound for clearer sound A select B set Sound Off Bass Treble Balance Hyper Sound 3D Cinema Sound 1 2 Set the time 䡵 Cancel g Set the tim...

Страница 24: ...uction Colour System 4 3 Auto Aspect Off Off Auto On On On On On Picture Mode Bright in a fairly bright room Soft in a dark room Standard in a room with standard brightness Game Mode when playing video games Backlight Backlight brightness Darker l Brighter Contrast Contrast Lower l Higher Brightness Brightness Darker l Brighter Sharpness Sharpness Softer l Sharper Colour Colour Lighter l Deeper Hu...

Страница 25: ...ic Backlight Reduce the brightness of the backlight when the screen is dark On Off Features sub menu Digital VNR DigiPure Movie Theatre Colour Management Picture Management Smart Picture Dynamic Backlight MPEG Noise Reduction Colour System 4 3 Auto Aspect Off Off Auto On On On On On Features MPEG Noise Reduction Reduce MPEG video noise On Off Colour System When there is no colour change the colour...

Страница 26: ...djust 3D Cinema Sound setting to your liking Surround Adjust the surround level Low Mid High Bass Boost Emphasize the bass sound Low Mid High Auto Volume Control Maintains a uniform sound volume even if the sound becomes loud suddenly during commercial breaks etc On Off z To turn on off the 3D Cinema Sound refer to 3D Cinema Sound P 20 z 3D Cinema Sound does not work with headphones 3D Cinema Soun...

Страница 27: ...p Timer Child Lock Blue Back Favourite Setting Power Lamp On On Set ID No 0 0 0 0 C set A select a number B to the next column ARD _ _ _ _ _ _ AV PR ID CH CC 01 02 CH 02 03 CH 03 04 CH 04 05 06 07 05 CH 06 CH 01 CC 02 CC Child Lock select blue Lock Release Blue Back Displays a blue screen and mutes the sound when the signal is weak or absent On Off Favourite Setting Remove a channel from the Favou...

Страница 28: ...lia España France Deutschland United Kingdom Country Norge Suomi Sverige Österreich Danmark Switzerland Ireland Auto Program blue Auto Program CH 02 0 ARD _ _ _ _ _ _ AV PR ID Edit CH CC 01 CH 02 CH 03 CH 04 05 06 07 CH CH CC CC 02 03 04 05 06 01 02 Edit Manual g Editing channels P 14 Language Select a language for the menus Ext Setting g Setting external terminals P 27 HDMI 1 Audio Setting Set to...

Страница 29: ...V ID List S In Arrow Select an EXT Select the arrow select select S In Switch to S Video input ID List Edit names of connected devices Dubbing Set up dubbing on EXT 2 A Select EXT 3 B Set to component input 䡵 Cancel this mode g Press yellow again z mark will appear at the selected EXT z The device selection display will change from E2 to S2 yellow A Show the name list B Select a name from the list...

Страница 30: ...t appears unnatural when receiving a signal from a DVD player etc with 576p 625p change the output setting of the external device to 576i 625i Troubleshooting Severe noise or snow z Is the TV connected correctly to the aerial z Change the direction of the aerial z Is the aerial or its cable damaged g Consult your retailer Patterns stripes or noise z Is the aerial receiving interference from high v...

Страница 31: ...tuation some function items will be displayed in black colour and will not work P 22 HDMI Wrong screen size z Read the user manual of the connected device and perform the following g Check if the output setting of the device is correct g Change the signal format of the device to other format No picture no sound z Use the cable marked with HDMI logo No sound z Check if the device is compliant with ...

Страница 32: ...ountry to France in Auto Program P 26 2 Press the BACK button to return to the menu and enter the channel using Insert or Manual P 14 15 When Auto is selected in Zoom the aspect ratio will turn to the ratio obtained from the information the TV received z The aspect ratio will turn to the ratio obtained from WSS Wide Screen Identification Signal video signal or control signal of the external device...

Страница 33: ...9 F59 CH 38 CH 238 E38 R38 CH 110 F10 CH 160 F60 CH 39 CH 239 E39 R39 CH 121 F21 CH 161 F61 CH 40 CH 240 E40 R40 CH 122 F22 CH 162 F62 CH 41 CH 241 E41 R41 CH 123 F23 CH 163 F63 CH 42 CH 242 E42 R42 CH 124 F24 CH 164 F64 CH 43 CH 243 E43 R43 CH 125 F25 CH 165 F65 CH 44 CH 244 E44 R44 CH 126 F26 CH 166 F66 CH 45 CH 245 E45 R45 CH 127 F27 CH 167 F67 CH 46 CH 246 E46 R46 CH 128 F28 CH 168 F68 CH 47 C...

Страница 34: ...wer output 6 W 6 W Speakers 4 cm x 16 cm oblique x 2 Power consumption standby 129 W 0 6 W Screen size visible area size measured diagonally 80 cm Connectors HDMI 1 x 3 RCA x 7 component or composite video audio L R Euroconnector SCART x 2 For details g P 10 11 Headphone jack Stereo mini jack 3 5 mm in diameter x 1 Dimensions W x H x D mm without stand 791 x 574 x 230 791 x 521 x 104 Weights witho...

Страница 35: ...A5_07_BlankPage fm Page 1 Wednesday October 22 2008 11 24 AM ...

Страница 36: ...1008GLT SW MU 2008 Victor Company of Japan Limited LT 32FG5BU_EN book Page 33 Thursday October 16 2008 4 12 PM ...

Отзывы: