(No.MA220)1-9
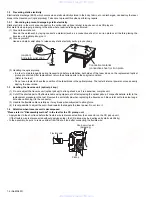
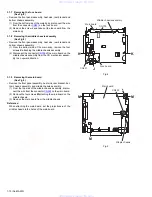
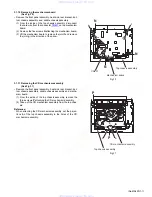
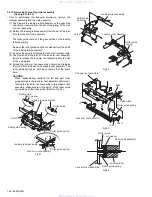
3.1.5 Removing the mechanism control board
(See Fig.6)
• Remove the front panel assembly, heat sink, rear bracket and
bottom chassis assembly.
(1) From the inside of the bottom chassis assembly, discon-
nect the card wire from the connector
CN403
on the mech-
anism control board.
(2) Disconnect the wire from the connector
CN402
on the
mechanism control board.
(3) Remove the three screws
G
attaching the mechanism con-
trol board.
(4) Take out the mechanism control board from the bottom
chassis assembly.
Reference:
• When attaching the mechanism control board, set the pro-
jections
d
of the bottom chassis assembly in the holes of the
mechanism control board.
• After attaching the mechanism control board, fix the wire
with the wire clamp as before.
Fig.6
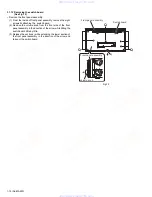
3.1.6 Removing the cassette mechanism assembly
(See Fig.7)
• Remove the front panel assembly, heat sink, rear bracket and
bottom chassis assembly.
(1) From the inside of the bottom chassis assembly, discon-
nect the card wire from the connector
CN403
on the mech-
anism board.
(2) Disconnect the wire from the connector
CN402
on the
mechanism board.
(3) Remove the four screws
H
attaching the cassette mecha-
nism assembly.
Reference:
After attaching the mechanism board, fix the wire with the wire
clamp as before.
Fig.7
G
G
d
d
d
CN403
CN402
Wire clamp
Mechanism control board
Bottom chassis assembly
CN403
CN402
Wire clamp
Mechanism control board
Bottom chassis assembly
H
H
H
Cassette mechanism assembly
www. xiaoyu163. com
QQ 376315150
9
9
2
8
9
4
2
9
8
TEL 13942296513
9
9
2
8
9
4
2
9
8
0
5
1
5
1
3
6
7
3
Q
Q
TEL 13942296513 QQ 376315150 892498299
TEL 13942296513 QQ 376315150 892498299

