(No.MA098)1-5
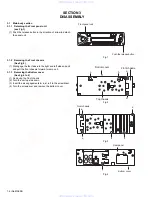
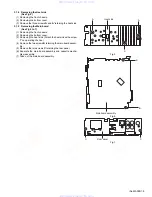
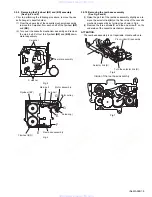
3.1.4 Removing the Heat sink
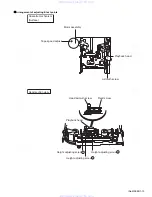
(See Fig.5)
(1) Removing the front chassis.
(2) Removing the bottom cover.
(3) Remove the three screws
A
and
A'
retaining the heat sink.
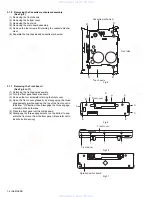
3.1.5 Removing the Main board
(See Fig.5 to 7)
(1) Removing the front chassis.
(2) Removing the bottom cover.
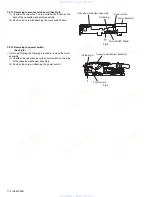
(3) Removing the heat sink. (Attach the heat sink with a screw
1'
on operating checks.)
(4) Remove the two screws
B
retaining the main board assem-
bly.
(5) Remove the two screws
C
retaining the rear panel.
(6) Separate the main board assembly and cassette mecha-
nism assembly.
(7) Take out the main board assembly.
Fig.5
Fig.6
Fig.7
Heat sink
A
A
A`
Main board assembly
B
B
Rear panel
C
C
www. xiaoyu163. com
QQ 376315150
9
9
2
8
9
4
2
9
8
TEL 13942296513
9
9
2
8
9
4
2
9
8
0
5
1
5
1
3
6
7
3
Q
Q
TEL 13942296513 QQ 376315150 892498299
TEL 13942296513 QQ 376315150 892498299

