background image

ENGLISH

6

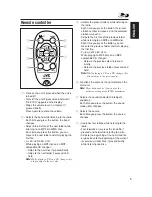
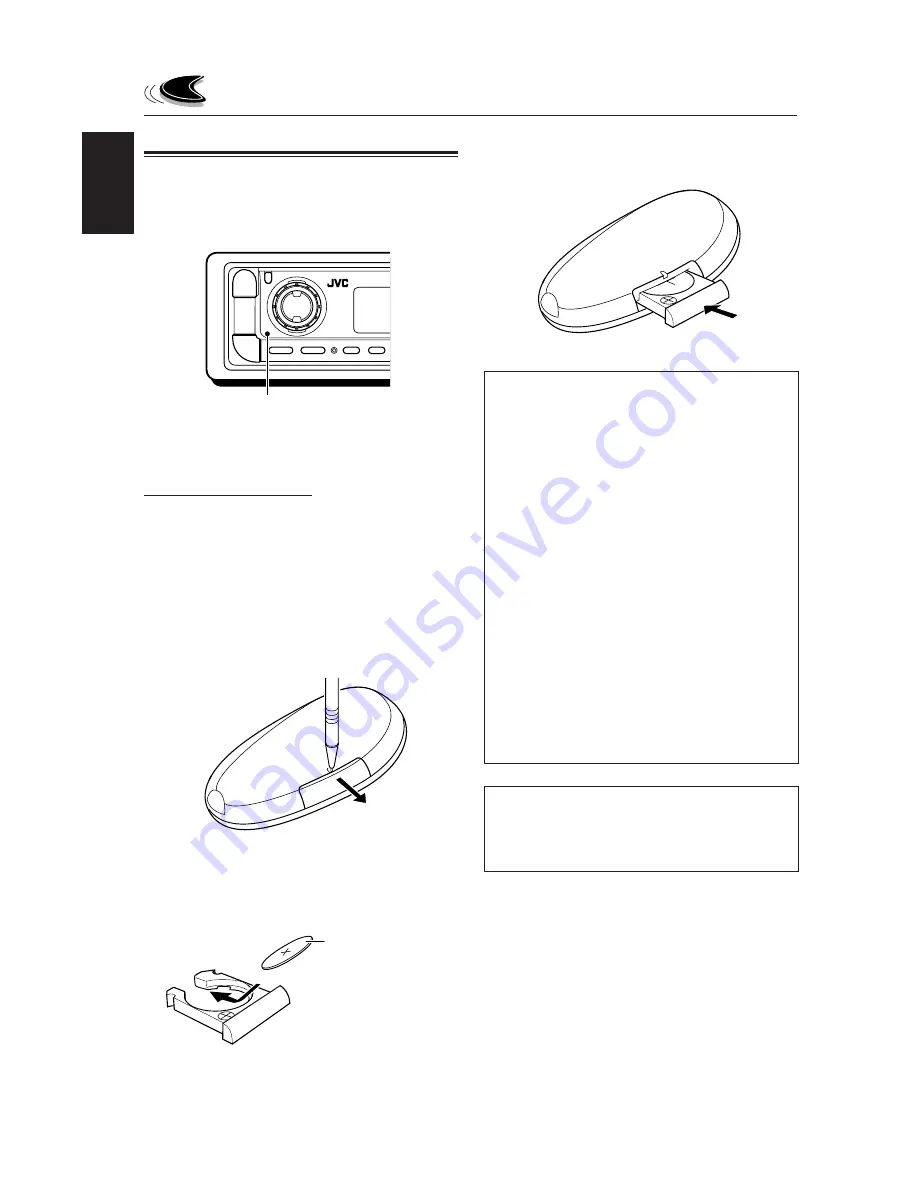
Preparing the remote controller

Before using the remote controller:
• Aim the remote controller directly at the remote

sensor on the main unit. Make sure there is no
obstacle in between.

• Do not expose the remote sensor to strong

light (direct sunlight or artificial lighting).

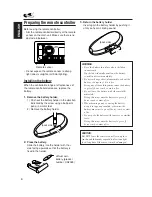
Installing the battery

When the controllable range or effectiveness of
the remote controller decreases, replace the
battery.

1.

Remove the battery holder.

1) Push out the battery holder in the direction

indicated by the arrow using a ball-point
pen or a similar tool.

2) Remove the battery holder.

2.

Place the battery.

Slide the battery into the holder with the +
side facing upwards so that the battery is
fixed in the holder.

Lithium coin
battery (product
number: CR2025)

Remote sensor

(back side)

(back side)

3.

Return the battery holder.

Insert again the battery holder by pushing it
until you hear a clicking sound.

WARNING:

• Store the battery in a place where children

cannot reach.
If a child accidentally swallows the battery,
consult a doctor immediately.

• Do not recharge, short, disassemble, or heat the

battery or dispose of it in a fire.
Doing any of these things may cause the battery
to give off heat, crack, or start a fire.

• Do not leave the battery with other metallic

materials.
Doing this may cause the battery to give off
heat, crack, or start a fire.

• When throwing away or saving the battery,

wrap it in tape and insulate; otherwise, the
battery may start to give off heat, crack, or start
a fire.

• Do not poke the battery with tweezers or similar

tools.
Doing this may cause the battery to give off
heat, crack, or start a fire.

CAUTION:

DO NOT leave the remote controller in a place
(such as dashboards) exposed to direct sunlight
for a long time. Otherwise, it may be damaged.

Содержание KD-AR800

Страница 1: ... KD G800 KD G700 For customer Use Enter below the Model No and Serial No which are located on the top or bottom of the cabinet Retain this information for future reference Model No Serial No This unit is equipped with the display demonstration To cancel it see page 8 Esta unidad está equipada con demostración en la pantalla Para cancelarla consulte la página 8 Cet appareil est équipé d une fonctio...

Страница 2: ...he separation between the equipment and receiver Connect the equipment into an outlet on a circuit different from that to which the receiver is connected Consult the dealer or an experienced radio TV technician for help Temperature inside the car If you have parked the car for a long time in hot or cold weather wait until the temperature in the car becomes normal before operating the unit BEFORE U...

Страница 3: ... functions mode then the number buttons and 5 buttons work as different function buttons Ex When number button 2 works as MO monaural button To use these buttons for original functions again after pressing MODE wait for 5 seconds without pressing any of these buttons until the functions mode is cleared Pressing MODE again also clears the functions mode MP3 WMA OPERATIONS 18 Playing a disc 18 Locat...

Страница 4: ...rce clock display LOUD loudness indicator P Audio level indicator Volume level indicator Control panel 1 For KD AR800 CD CD CH CD changer LINE button For KD G800 CD CD CH CD changer button For KD G700 CD button 2 standby on attenuator button 3 DISP display button 4 SEL select button 5 Control dial 6 Display window 7 angle button 8 0 eject button 9 5 up button 10 button p Remote sensor q MODE butto...

Страница 5: ...you press the button the source changes 7 Searches for stations while listening to the radio Fast forwards or reverses the track file if pressed and held while listening to a disc Skips to the beginning of the next track file or goes back to the beginning of the current or previous tracks files if pressed briefly while listening to a disc 1 Turns on the unit if pressed when the unit is turned off ...

Страница 6: ... back side 3 Return the battery holder Insert again the battery holder by pushing it until you hear a clicking sound WARNING Store the battery in a place where children cannot reach If a child accidentally swallows the battery consult a doctor immediately Do not recharge short disassemble or heat the battery or dispose of it in a fire Doing any of these things may cause the battery to give off hea...

Страница 7: ...disc play will start from where playback has been stopped previously next time you turn on the power Turning on the power 1 Turn on the power Note on One Touch Operation When you select a source in step 2 below the power automatically comes on You do not have to press this button to turn on the power 2 Select the source To operate the tuner FM or AM see pages 10 12 To play a CD see pages 13 16 To ...

Страница 8: ...stration before you use the unit for the first time To cancel the display demonstration follow the procedure below 1 Press and hold SEL select for more than 2 seconds so that one of the PSM items appears on the display PSM see pages 26 and 27 2 Select DEMO MODE if not shown on the display 3 Select DEMO OFF 4 Finish the setting To activate the display demonstration repeat the same procedure and sel...

Страница 9: ...t the hour 1 2 3 Set the minute 1 Select CLOCK MINUTE 2 Adjust the minute 1 2 4 Finish the setting Note To show the clock time on the display see page 28 To check other information during play press DISP display Each time you press the button the other information will be shown on the lower part of the display See page 28 for details Pressing DISP display with the unit turned off will show the clo...

Страница 10: ...s Lights up when receiving an FM stereo broadcast with sufficient signal strength 2 Start searching for a station When a station is received searching stops To stop searching before a station is received press the same button you have pressed for searching Searching for a station manually Manual search 1 Select the band FM1 3 AM Each time you press the button the band changes as follows Note This ...

Страница 11: ...wing two methods to store broadcasting stations in memory Automatic preset of FM stations SSM Strong station Sequential Memory Manual preset of both FM and AM stations FM station automatic preset SSM You can preset 6 local FM stations in each FM band FM1 FM2 and FM3 1 Select the FM band FM1 3 you want to store FM stations into Each time you press the button the band changes as follows 2 Press MODE...

Страница 12: ... number 1 6 for the preset station you want Note You can also use the 5 up or down button on the unit to select the next or previous preset stations Each time you press the 5 up or down button the next or previous preset station is tuned in Manual preset You can preset up to 6 stations in each band FM1 FM2 FM3 and AM manually Ex Storing FM station of 92 5 MHz into the preset number 1 of the FM1 ba...

Страница 13: ...will be played repeatedly until you stop playback The display changes to show the following When CLOCK DISP is set to CLK DISP ON see page 28 the current indication will soon change to the clock time Notes When a CD is inserted upside down the control panel moves down the CD automatically ejects from the loading slot The source changes to the previously selected source If there is no CD in the loa...

Страница 14: ... beginning of the previous tracks is located and played back To skip 10 tracks forwards to the last track To skip 10 tracks backwards to the first track To stop play and eject the CD Press 0 CD play stops and the control panel moves down The CD automatically ejects from the loading slot If you change the source or turn the power off CD play also stops without ejecting the CD Next time you select C...

Страница 15: ... repeatedly 1 Press MODE to enter the functions mode while playing a CD 2 Press RPT repeat while MODE is still on the display so that TRK RPT appears on the display Each time you press the button track repeat play mode turns on and off alternately When track repeat play is turned on the RPT indicator lights up on the display The current track starts playing repeatedly To play back only intros Trac...

Страница 16: ...shown automatically when you play a CD Text To change the CD Text information manually select text display mode while playing a CD Text Press DISP display repeatedly Each time you press the button the display changes as follows Notes The display shows up to 12 characters at one time and scrolls if there are more than 12 characters See also To select the scroll mode SCROLL MODE on page 29 Some char...

Страница 17: ...MA files tracks can be recorded in folders in PC terminology During recording the files and folders can be arranged in a way similar to arranging files and folders of computer data Root is similar to the root of a tree Every file and folder can be linked to and be accessed from the root The illustration below shows an example of how MP3 WMA files are recorded on a CD R or CD RW how they are played...

Страница 18: ...1 When CLOCK DISP is set to CLK DISP ON see page 28 the current indication will soon change to the clock time 2 WMA or MP3 indicator lights up depending on the first detected file Notes MP3 WMA discs require a longer readout time It differs due to the complexity of the folder file configuration When playback starts folder and file names or ID3 tags will automatically appear See also page 19 If you...

Страница 19: ... and scrolls if there are more than 12 characters See also To select the scroll mode SCROLL MODE on page 29 When file name is shown TRACK indicator and current track number also appear on the lower part of the display Locating a file or a particular portion on a disc To fast forward or reverse the file Note During this operation you can only hear intermittent sounds The elapsed playing time also c...

Страница 20: ...splay after you have selected a folder it means that the folder does not contain any MP3 WMA files You cannot directly select a folder with a number greater than 12 To select a particular file in a folder press or 4 after selecting the folder To go to a particular file quickly within the current folder 10 and 10 buttons 1 Press MODE to enter the functions mode while playing a disc 2 Press 10 or 10...

Страница 21: ...g the playback modes To play back files at random Folder Random Disc Random Play You can play back all files of the current folder or all files on the disc at random 1 Press MODE to enter the functions mode while playing a disc 2 Press RND random while MODE is still on the display so that FLDR RND or DISC RND appears on the display Each time you press the button the random play mode changes as fol...

Страница 22: ... up disc Ex When you select TRK INT while listening to an MP3 file To play back files repeatedly Track Repeat Folder Repeat Play You can play back the current file or all the files in the current folder repeatedly 1 Press MODE to enter the functions mode while playing a disc 2 Press RPT repeat while MODE is still on the display so that TRK RPT or FLDR RPT appears on the display Each time you press...

Страница 23: ...800 VOL 3 Adjust the 00 min volume 30 or 50 max 4 1 If you are using a two speaker system set the fader level to 00 2 This takes effect only when a subwoofer is connected 3 Normally the control dial works as the volume control So you do not have to select VOL to adjust the volume level 4 Depending on the amplifier gain control setting See page 30 for details 2 Adjust the setting 3 Repeat steps 1 a...

Страница 24: ...O POP O JAZZ O DANCE MUSIC O COUNTRY O REGGAE O CLASSIC O USER 1 O USER 2 O USER 3 O back to the beginning Ex When you select HARD ROCK To cancel the preset sound mode select FLAT in step 3 Notes You can adjust the preset sound modes temporarily However your temporary adjustments will be reset when you select another sound mode For details about the preset settings of each sound mode see table on ...

Страница 25: ...elements change as follows LOW LEVEL LOW FREQ LOW WIDTH MID LEVEL MID WIDTH HI high LEVEL HI high FREQ back to the beginning FREQ LOW HI Select the center frequency to adjust WIDTH LOW MID Select the band width level LEVEL LOW MID HI Adjust the enhancement level By pressing or 4 you can directly move as follows 5 Adjust the selected sound element 6 Repeat steps 4 and 5 to adjust the other sound el...

Страница 26: ...red Setting Mode control Basic Procedure 1 Press and hold SEL select for more than 2 seconds so that one of the PSM items appears on the display See page 27 2 Select the PSM item you want to adjust 3 Adjust the PSM item selected 4 Repeat steps 2 and 3 to adjust the other PSM items if necessary 5 Finish the setting Ex When you select DIMMER MODE ...

Страница 27: ...splay contrast SCROLL MODE Scroll mode WOOFER Subwoofer FREQ 1 cutofff requency LINE ADJ 2 Line input level adjustment EXTERNAL External IN 1 4 component TAG DISPLAY Tag display AMP GAIN 5 Amplifier gain control SLOT LIGHT Slot light CLK DISP OFF CLK DISP ON LEVEL 1 LEVEL 2 CLK DISP ON LEVEL 1 28 28 Preferred Setting Mode PSM items For detailed operations of each PSM items refer to the pages liste...

Страница 28: ...e dimmer mode to DIMMER ON or DIMMER OFF To set the clock display CLOCK DISP You can set the clock to be shown on the lower part of the display when the unit is turned on When shipped from the factory the clock is set to be shown on the display CLK DISP ON Clock display is turned on CLK DISP OFF Clock display is turned off When CLK DISP OFF is selected the current source name station band or disc ...

Страница 29: ...oll mode is set to SCROLL OFF you can scroll the display by pressing DISP display for more than 1 second To select the subwoofer cutoff frequency WOOFER FREQ Only for KD AR800 KD G800 When a subwoofer is connected to this unit select an appropriate cutoff frequency level for your subwoofer When shipped from the factory the subwoofer cutoff frequency is set to FREQ MID FREQ LOW Frequencies higher t...

Страница 30: ... rear using an adapter specially designed for the external component When shipped from the factory CD changer is selected as the external component CHANGER To use the CD changer LINE IN To use the external component other than CD changer only for KD G800 SIRIUS To use the JVC SIRIUS Radio Notes Only for KD G800 For connecting the Line Input Adapter KS U57 and the external component refer to the In...

Страница 31: ... KD G800 3 Select the character set you want while the first character position is flashing Each time you press the button the character set changes as follows 4 Select a character About the available characters see page 40 5 Move the cursor to the next or previous character position 6 Repeat steps 3 to 5 until you finish entering the name 7 Finish the procedure while the last selected character i...

Страница 32: ...e position you want The control panel angles changes as follows CAUTION NEVER insert your finger in between the control panel and the unit as it may get caught or hurt Note If you turn the power off the control panel automatically returns to the closed position Next time you turn on the power the control panel moves to its previous position ANGLE 01 ANGLE 02 ANGLE 03 ANGLE 04 ...

Страница 33: ...ors with a cotton swab or cloth moistened with alcohol being careful not to damage the connectors Detaching the control panel You can detach the control panel when leaving the car When detaching or attaching the control panel be careful not to damage the connectors on the back of the control panel and on the panel holder Detaching the control panel Before detaching the control panel be sure to tur...

Страница 34: ... play back MP3 discs You cannot use the KD MK series CD changers with this unit Before operating your CD changer Refer also to the Instructions supplied for your CD changer If no discs are in the magazine of the CD changer or the discs are inserted upside down NO DISC will appear on the display If this happens remove the magazine and set the discs correctly If no magazine is loaded in the CD chang...

Страница 35: ... you press the button consecutively the beginning of the previous tracks files is located and played back Press and hold during play to fast forward the track file When CLOCK DISP is set to CLK DISP ON see page 28 the current indication will soon change to the clock time Note Folder name appears on the display instead of ROOT if an MP3 disc contains a folder When the current disc is a CD Playback ...

Страница 36: ...20th 30th Then each time you press the button you can skip 10 tracks files see How to use the 10 and 10 buttons below After the last track file the first track file will be selected and vice versa Note If the current playing disc is an MP3 disc files are skipped within the same folder How to use the 10 and 10 buttons Ex 1 To select track file number 32 while playing track file number 6 Ex 2 To sel...

Страница 37: ... of the next folder and so on DISC RND and RND All tracks files of the indicators current or specified light up disc MAG RND RND indicator All tracks files of the lights up inserted discs FLDR RND is only applicable for MP3 disc To play back tracks files repeatedly Track Repeat Folder Repeat Disc Repeat Play 1 Press MODE to enter the functions mode while playing a disc 2 Press RPT repeat while MOD...

Страница 38: ... MODE to enter the functions mode while playing a disc 2 Press INT intro while MODE is still on the display Each time you press the button the intro scan mode changes as follows For MP3 discs For CDs Note MP3 indicator also lights up if the current playing disc is an MP3 disc FLDR INT is only applicable for MP3 disc Mode Active Plays the beginnings indicator 15 seconds of TRK INT INT indicator All...

Страница 39: ...e external component select the EXTERNAL IN setting correctly see page 30 To use the JVC SIRIUS Radio refer to the SIRIUS Radio Setup Manual separate volume 1 Select the external component LINE IN SIRIUS For KD AR800 Press CD CD CH LINE repeatedly To select LINE IN press and hold CD CD CH LINE For KD G800 Press CD CD CH repeatedly Note on One Touch Operation When you press CD CD CH LINE for KD AR8...

Страница 40: ...z 2 02 2 01 8kHz COUNTRY 02 60Hz 3 00 1 02 12kHz REGGAE 03 60Hz 1 02 1 02 12kHz CLASSIC 01 80Hz 1 00 1 03 10kHz USER 1 00 60Hz 1 00 1 00 8kHz USER 2 00 60Hz 1 00 1 00 8kHz USER 3 00 60Hz 1 00 1 00 8kHz ADDITIONAL INFORMATION Available characters You can use the following characters to assign names to station frequencies CDs both in this unit and in the CD changer and external component Line Input ...

Страница 41: ...t button does not work check the Installation Connection Manual separate volume Ex You have used a longer screw than specified Causes The volume level is set to the minimum level Connections are incorrect The built in microcomputer may have functioned incorrectly due to noise etc Signals are too weak The antenna is not connected firmly Disc is inserted upside down CD R CD RW is not finalized Disc ...

Страница 42: ... file although it has the extension code mp3 or wma Readout time varies due to the complexity of the folder file configuration Playback order is determined when the files are recorded This sometimes occurs during play This is caused by how the files are recorded on the disc The current folder does not contain any MP3 WMA file The current disc does not contain any MP3 WMA file This unit can only di...

Страница 43: ... down No magazine is loaded in the CD changer This unit is not connected to the CD changer correctly The built in microcomputer may function incorrectly due to noise etc Symptoms NO DISC appears on the display NO MAG appears on the display RESET 8 appears on the display RESET 1 RESET 7 appears on the display The CD changer does not work at all CD Changer About mistracking Mistracking may result fr...

Страница 44: ...their instructions or cautions carefully Use only finalized CD Rs or CD RWs Some CD Rs or CD RWs may not be played back on this unit because of their disc characteristics and for the following reasons Discs are dirty or scratched Moisture condensation on the lens inside the unit The pickup lens inside the unit is dirty CD RWs may require a longer readout time since the reflectance of CD RWs is low...

Страница 45: ...hop AUDIO AMPLIFIER SECTION Maximum Power Output Front 50 W per channel Rear 50 W per channel Continuous Power Output RMS Front 19 W per channel into 4 Ω 40 Hz to 20 000 Hz at no more than 0 8 total harmonic distortion Rear 19 W per channel into 4 Ω 40 Hz to 20 000 Hz at no more than 0 8 total harmonic distortion Load Impedance 4 Ω 4 Ω to 8 Ω allowance Equalizer Control Range Low 12 dB 60 Hz 80 Hz...

Страница 46: ... TROUBLE with operation Please reset your unit Refer to page of How to Reset Still having trouble USA ONLY Call 1 800 252 5722 http www jvc com We can help you http www jvcmobile com Visit us on line for Technical Support Customer Satisfaction Survey US RESIDENTS ONLY ...

Страница 47: ......

Страница 48: ......

Страница 49: ...stran las siguientes piezas Después de inspeccionarlas colóquelas correctamente Liste des pièces pour l installation et raccordement Les pièces suivantes sont fournies avec cet appareil Après vérification veuillez les placer correctement INSTALACION MONTAJE EN EL TABLERO DE INSTRUMENTOS La siguiente ilustración muestra una instalación típica Si tiene alguna pregunta o necesita información acerca d...

Страница 50: ...sa esta unidad al chasis del automóvil después de la instalación Notas Reemplace el fusible por uno con la corriente especificada Si el fusible se quemase frecuentemente consulte con su concesionario de JVC de equipos de audio para automóviles Se recomienda conectar los altavoces con una potencia máxima de más de 50 W tanto atrás como adelante con una impedancia de 4 Ω a 8 Ω Si la potencia máxima ...

Страница 51: ... may be different in color 1 Connect the colored leads of the power cord in the order specified in the illustration below 2 Connect the antenna cord 3 Finally connect the wiring harness to the unit Line out see diagram Salida de línea véase diagrama Sortie de ligne voir le diagramme A Left speaker rear Altavoz izquierdo trasero Enceinte gauche arrière Right speaker front Altavoz derecho frontal En...

Страница 52: ...performances de cet appareil Usted podrá conectar un amplificador y otros equipos para mejorar el sistema estéreo de su automóvil Conecte el conductor remoto azul con rayas blancas al conductor remoto del otro equipo para poderlo controlar a través de esta unidad Sólo para el amplificador Desconecte los altavoces de esta unidad y conéctelos al amplificador Los cables de los altavoces de esta unida...

Страница 53: ......

Страница 54: ......

Страница 55: ......

Страница 56: ......

Страница 57: ......

Страница 58: ......

Страница 59: ......

Страница 60: ......

Страница 61: ......

Страница 62: ......

Страница 63: ......

Страница 64: ......

Страница 65: ......

Страница 66: ......

Отзывы: