background image

ENGLISH

29

SETTINGS


3

  Turn the control dial to adjust the 

subwoofer output level. [0 to 8]


4

  Press number button 1 ( 

 ) to 

move to another setting level.


4


/

¢


: select the quality of 

LPF. [–12dB/oct or –24dB/oct]


Control dial: Turn the control dial to select 
the subwoofer phase. [0deg (normal) or 
180deg (reverse)]


If “Off” is selected in step 

2

, you can only 

adjust the subwoofer phase.


C


Hi Pass (Hi Pass Filter)


Turn the control dial to select the cutoff 
frequency to the front/rear speakers. Set this 
to match the LPF setting.


•  Off: 

All signals are sent to the front/rear 
speakers.


•  62Hz:  Frequencies lower than 62 Hz are 

cut off.


•  95Hz:  Frequencies lower than 95 Hz are 

cut off.


•  135Hz:  Frequencies lower than 135 Hz are 

cut off.


D


VolAdjust,

 [–5 to +5]


Turn the control dial to adjust the input level 
of each source (except FM).


Adjust to match the input level of the FM 
sound level.


•  Before making an adjustment, select the 

source you want to adjust.


E


Loudness,

 [Off or On]

Turn the control dial to select “Off” or 
“On.” When “On” is selected, low and high 
frequencies sound are boosted to produce a 
well-balanced sound at low volume level. 

4

  Exit from the setting.

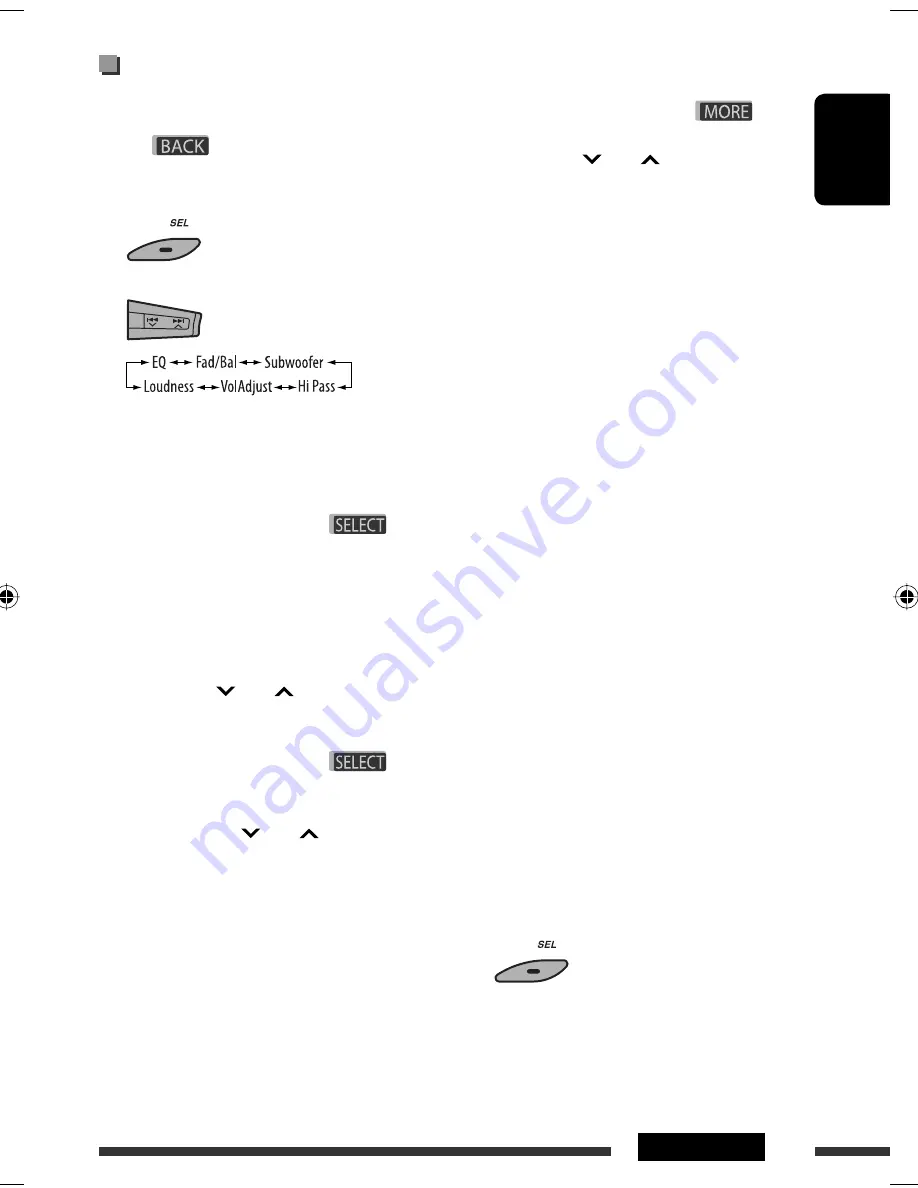
  Adjusting the sound 

You can adjust the sound characteristics to your 
preference.
•  When 

 is shown on the display, you can 

move back to the previous screen by pressing number 
button 3 or 6.

1


2


  •  For “EQ” setting, see page 28.

3

  Adjust the selected setting item.


A


Fad/Bal (Fader/Balance)


1

  Press number button 1 ( 

 ) 

to move to the “Fad/Bal” adjustment 
display.


2

  Adjust the speaker output balance by 

pressing:


5

 / 

: between the front and rear 

speakers. [F6 to R6]


4


/

¢


: between the left and 

right speakers. [L6 to R6]


B


Subwoofer


1

  Press number button 1 ( 

 ) to 

move to the “Subwoofer” adjustment 
display.


2

  Use 

4


/

¢


 to select the cutoff  

frequency to the subwoofer.


•  Off *:  All signals are sent to the 

subwoofer.


•  55Hz:  Frequencies higher than 55 Hz 

are cut off.


•  85Hz:  Frequencies higher than 85 Hz 

are cut off.


•  120Hz:  Frequencies higher than 120 Hz 

are cut off.

EN24-29_KD-ABT22[J]f.indd   29

EN24-29_KD-ABT22[J]f.indd   29

1/2/08   9:55:38 AM

1/2/08   9:55:38 AM

Содержание KD-ABT22

Страница 1: ...vous à la page 5 For installation and connections refer to the separate manual Para la instalación y las conexiones refiérase al manual separado Pour l installation et les raccordements se référer au manuel séparé INSTRUCTIONS MANUAL DE INSTRUCCIONES MANUEL D INSTRUCTIONS GET0527 001A J For customer Use Enter below the Model No and Serial No which are located on the top or bottom of the cabinet Re...

Страница 2: ...r is encouraged to try to correct the interference by one or more of the following measures Reorient or relocate the receiving antenna Increase the separation between the equipment and receiver Connect the equipment into an outlet on a circuit different from that to which the receiver is connected Consult the dealer or an experienced radio TV technician for help Caution Changes or modifications no...

Страница 3: ... the car becomes normal before operating the unit CONTENTS INTRODUCTIONS Preparation 5 OPERATIONS Basic operations 6 Using the control panel 6 Using the remote controller RM RK50 7 Listening to the radio 8 Disc operations 10 Listening to the USB device 12 Using the Bluetooth devices 13 Using the Bluetooth cellular phone 15 Using the Bluetooth audio player 18 EXTERNAL DEVICES Listening to the HD Ra...

Страница 4: ...al devices CD USB produce very little noise compared with other sources Lower the volume before playing these digital sources to avoid damaging the speakers by sudden increase of the output level How to use the M MODE and SEL buttons If you use M MODE or SEL select the display and some controls such as the number buttons 4 buttons 5 buttons and the control dial enter the corresponding control mode...

Страница 5: ...the hour Select Clock Min minute then adjust the minute Select 24H 12H then 24Hours or 12Hours 4 Finish the procedure Changing the display information and pattern When the power is turned off Check the current clock time Ex When tuner is selected as the source Source operation display If a station has been assigned a title station title appears after about 5 seconds To assign a title to a station ...

Страница 6: ...ten totheHDRadiobroadcast referto Listeningtothe radio onpage8 Formorefeatures seepages19and 20 2 Youcannotselectthesesourcesiftheyarenotready ornotconnected 3 Forstoringpresetphonenumber seepage17 1 TUNER Select preset station HD RADIO Select channel SIRIUS XM Select category CD USB CD CH Select folder USB iPod Enter the main menu Hold iPod Enter the main menu Pause playback Confirm selection 2 T...

Страница 7: ...e remote controller RM RK50 Remote sensor For USA California Only This product contains a CR Coin Cell Lithium Battery which contains Perchlorate Material special handling may apply See www dtsc ca gov hazardouswaste perchlorate 1 Turns the power on if pressed briefly or attenuates the sound when the power is on Turns the power off if pressed and held Switches the conversation media during a phone...

Страница 8: ...rsation 7 Searches for stations if pressed briefly Fast forwards or reverses the track if pressed and held Changes the tracks if pressed briefly 3 Exit from the setting While listening to the satellite SIRIUS or XM radio Changes the channels if pressed briefly Changes the channels rapidly if pressed and held While listening to an iPod in menu selecting mode Connected to KS PD100 Selects an item if...

Страница 9: ...M station of 92 5 MHz into preset number 4 of the FM1 band Using the number buttons 1 2 3 Using the Preset Station list When is shown on the display you can move back to the previous screen by pressing number button 3 1 Follow steps 1 and 2 of Using the number buttons on the left column By holding 5 the Preset Station List will also appear go to step 4 2 3 Display the Preset Station List 4 Select ...

Страница 10: ... source or eject the disc To stop play and eject the disc Press SOURCE to listen to another playback source Pressing or holding the following buttons allows you to Press Select track Hold Reverse fast forward track MP3 WMA AAC Select folder Number buttons 2 Locate particular folder 3 for MP3 WMA AAC or track directly 1 Byholdingeitheroneofthebuttons youcandisplay theFolderList seepage11 2 Presstos...

Страница 11: ...When File is selected in step 3 After pressing M MODE press the following buttons to Skip 10 tracks MP3 WMA AAC Within the same folder Repeat Track Repeat current track Repeat Folder MP3 WMA AAC Repeat current folder Random Folder MP3 WMA AAC Randomly play all tracks of current folder then tracks of next folders Random Disc Randomly play all tracks You can also cancel the playback mode by selectin...

Страница 12: ...ices You cannot connect a computer to the USB cable from the rear of the unit Make sure all important data has been backed up to avoid losing the data Do not leave a USB device in the car expose to direct sunlight or high temperature to avoid deformation or cause damages to the device Some USB devices may not work immediately after you turn on the power For more details about USB operations see pa...

Страница 13: ...xt message Play back a Bluetooth audio player Refer also to the instructions supplied with the Bluetooth device Connecting a Bluetooth device for the first time Pairing and PIN code When you connect a Bluetooth device to the unit for the first time make pairing between the unit and the device Pairing allows Bluetooth devices to communicate with each other To make pairing you may need to enter the ...

Страница 14: ...nnecting flashes then Pairing Ok or Connected Device Name appears on the display when the connection is established Now you can use the device through the unit appears when the connection is established The device remains registered even after you disconnect the device Use Cnnct Phone or Cnnct Audio or activate Auto Cnnct to connect the same device from next time on See the following and page 36 D...

Страница 15: ...wing step Received Shows the list of the received calls Go to the following step Phonebook Shows the name phone number of the phone book of the unit Go to the following step To copy the phone book memory see page 17 Preset Shows the list of preset numbers Go to the following step To preset numbers see page 17 Dial Number Shows the phone number entry screen See How to enter phone number on page 16 ...

Страница 16: ...old and answer the waiting call Press any button except control dial To restore the on hold call press any button except control dial again When you end one call you can connect to the other When a text message comes in If the cellular phone is compatible with Text Message and MSG Notice is set to On see page 36 the unit rings and Received Message appears on the display to inform you of the messag...

Страница 17: ...the Instructions manual supplied with your cellular phone Presetting the phone number You can preset up to six phone numbers When is shown on the display you can move back to the previous screen by pressing number button 3 1 Display the phone number you want to preset by using one of the Call items 2 Select a phone number You can also enter a new phone number see also How to enter phone number on ...

Страница 18: ...k Refer also to pages 14 and 15 for connecting disconnecting deleting a registered device Bluetooth Information If you wish to receive more information about Bluetooth visit the following JVC web site http www jvc victor co jp english car After pressing M MODE press the following buttons to Repeat Track Repeat current track Repeat All Repeat all tracks Repeat Group Repeat all tracks of current gro...

Страница 19: ...al sound AM digital will have FM like quality in stereo and FM digital will have CD like quality with static free and clear reception Furthermore stations can offer text and data such as artist names and song titles When the HD Radio tuner box is connected it can also receive conventional analog broadcasts Many HD Radio stations also offer more than one channel of programming This service is calle...

Страница 20: ...sc to start playing Press For selecting disc number 1 6 Hold For selecting disc number 7 12 Press Select track Hold Reverse fast forward track MP3 Select folders Byholdingeitheroneofthebuttons youcandisplay theDiscList seepage11 If no sound can be heard from the selected setting change the setting to Analog or Digital The setting automatically changes to Auto if you tuned in to or change to anothe...

Страница 21: ... the SIRIUS Satellite radio JVC Smart Digital Adapter XMDJVC100 for listening to the XM Satellite radio GCI Global Control Information update If channels are updated after subscription updating starts automatically The following appears and no sound can be heard For SIRIUS Satellite radio Updating XX Completed For XM Satellite radio UPDATING Update takes a few minutes to complete During update you...

Страница 22: ...the channels rapidly While searching invalid and unsubscribed channels are skipped XM If you do not select a channel within 15 seconds category selected in step 3 is canceled You can select all channels of all categories now including non categorised channels 3 Check your XM Satellite radio ID labelled on the casing of the XMDirect Universal Tuner Box or tune in to Channel 0 see page 23 4 Contact ...

Страница 23: ...hannels in memory You can preset six stations for each band When is shown on the display you can move back to the previous screen by pressing number button 3 When is shown on the display you can move to the other lists by pressing number button 5 or 6 repeatedly Ex Storing a SIRIUS channel into preset number 4 of the SR1 band 1 Tune in to a channel you want to listen to By holding BAND button the ...

Страница 24: ...n page 23 In step 4 select Category The first channel of the selected category is tuned in Holding 5 can also show the Category List while listening to a channel 2 Select a category Listening to the iPod You can play songs in an Apple iPod by Connecting it with the USB cable supplied with your iPod to the USB cable from the rear of the unit Connecting the Interface adapter for iPod KS PD100 separa...

Страница 25: ...s 28 30 Continuedonthenextpage Playback control from the unit Button For iPod connected through KS PD100 For iPod connected to the USB cable Press Go to the next or previous track Hold Fast forward or reverse the track during playback Press Go to the next or previous track Hold Fast forward or reverse the track during playback Press Enter main menu when you press 5 Pause resume playback when is pr...

Страница 26: ...g 5 you can fast skip in every layer of the main menu If a track is selected playback starts automatically If the selected item has another layer you will enter the layer Repeat steps 2 and 3 until the desired track is played The menu selecting mode will be canceled If no operations are performed for about 5 seconds for iPod connected through KS PD100 15 seconds for iPod connected to the USB cable...

Страница 27: ...apter KS U58 Preparation Make sure Ext In is selected for the external input setting see page 33 AUX auxiliary input jack on the control panel 1 Select EXT IN or AUX IN 2 Turn on the connected component and start playing the source 3 Adjust the volume 4 Adjust the sound as you want see pages 28 30 Connecting an external component to the AUX input jack 3 16 3 5 mm stereo mini plug not supplied Port...

Страница 28: ... 2 Select On If Bypass is selected you can listen to the original sound mode recorded lights up on the display 3 Select a preset sound mode Preset value setting for each sound mode Sound mode Preset value Band 1 100 Hz Band 2 320 Hz Band 3 1 kHz Band 4 3 2 kHz Band 5 10 kHz USER 0 0 0 0 0 ROCK 3 2 0 1 1 CLASSIC 2 2 0 1 0 POPS 0 1 0 1 2 HIP HOP 4 1 2 0 1 JAZZ 3 2 1 2 2 ...

Страница 29: ...stment select the source you want to adjust E Loudness Off or On Turn the control dial to select Off or On When On is selected low and high frequencies sound are boosted to produce a well balanced sound at low volume level 4 Exit from the setting Adjusting the sound You can adjust the sound characteristics to your preference When is shown on the display you can move back to the previous screen by ...

Страница 30: ...2 Press number button 5 then turn the control dial to select the frequency 3 Press number button 5 then turn the control dial to select the quality slope Q 6 Repeat steps 3 and 4 to adjust the other frequency bands 7 Store the adjustments Adjustable sound elements Sound elements Range selectable items Band 1 100 Hz Band 2 320 Hz Band 3 1 kHz Band 4 3 2 kHz Band 5 10 kHz Frequency 68 Hz 100 Hz 150 ...

Страница 31: ...ference page MOV movie Demo Display demonstration On Off Display demonstration will be activated automatically if no operation is done for about 20 seconds 5 Cancels LevelMeter Audio level meter Meter 1 Meter 2 Select the different level meter patterns Press DISP to show the selected level meter CLOCK Clock Disp 1 Clock display On Off Clock time is shown on the display when the power is turned off...

Страница 32: ...ential area is subject to DST Cancels DISP display Scroll 4 5 Scroll Once Auto Off Scrolls the track information once Repeats scrolling at 5 second intervals Cancels Holding DISP can scroll the display regardless of the setting Dimmer Dimmer From To 6 Auto Off On Time Set Dims the display when you turn on the headlights Cancels Dims the display and button illumination Set the timer for dimmer 34 A...

Страница 33: ...en using in South American countries where FM interval is 100 kHz AM interval is set to 10 kHz Sirius ID 8 SIRIUS ID The 12 digit SIRIUS identification number appears on the display 21 AUDIO Ext Input 9 External input Changer Ext In To use a JVC CD changer 20 or an Apple iPod 24 To use any other external component 27 Beep Key touch tone On Off Activates the key touch tone Deactivates the key touch...

Страница 34: ...ep 3 select Dimmer 2 Select Time Set 3 Adjust the dimmer start time 1 Turn the control dial to set the dimmer start time 2 Press to select To Then turn the control dial to set the dimmer end time Category Indication Item Initial Setting reference page COLOR Color Sel Color selection Initial All Source Color Pale Select your favorite display color for each source or for all sources 34 35 Color Set ...

Страница 35: ...In 2 Ô USB 3 Ô FM Ô AM Ô Sirius 3 XM 3 Ô iPod 3 Ô Aux In Ô BT Audio Ô back to the beginning 1 Whenyouselect AllSource youcanusethe samecolorforallthesources 2 Dependsonthe ExtInput setting seepage33 3 Displayedonlywhenthetargetcomponentis connected 4 Select a color Pale Ô Aqua Ô Sky Ô Sea Ô Leaves Ô Grass Ô Apple Ô Rose Ô Amber Ô Honey Ô Violet Ô Grape Ô Every 4 Ô User 5 Ô back to the beginning 4 ...

Страница 36: ...d the phone book of the Bluetooth phone to the unit You can load up to 50 phone numbers Before using this function make sure that the Bluetooth phone is connected Initialize Yes Initialize all settings you have made in the Bluetooth menu No Return to the previous screen Name Name of the unit as shown on Bluetooth devices Address Address of the unit You can change the settings listed below and on t...

Страница 37: ... station frequencies FM and AM using 10 characters maximum for each title When HD Radio tuner box is connected this feature will be disable When is shown on the display you can move back to the previous screen by pressing number button 3 1 Select TUNER 2 Show the title entry screen Version Hardware and software versions of the Bluetooth module Phone Device 2 Name of the connected Bluetooth phone A...

Страница 38: ... includes both audio CD CD DA files and MP3 WMA AAC files This unit can play back multi session discs however unclosed sessions will be skipped while playing Basic operations Turning on the power By pressing SOURCE on the unit you can also turn on the power If the source is ready playback also starts Turning off the power If you turn off the power while listening to a track playback will start fro...

Страница 39: ...ate 8 kbps 320 kbps Sampling frequency 48 kHz 44 1 kHz 32 kHz 24 kHz 22 05 kHz 16 kHz 12 kHz 11 025 kHz 8 kHz WMA Bit rate 32 kbps 192 kbps Sampling frequency 48 kHz 44 1 kHz 32 kHz AAC Bit rate 16 kbps 320 kbps Sampling frequency 48 kHz 44 1 kHz Disc format ISO 9660 Level 1 Level 2 Romeo Joliet Windows long file name The maximum number of characters for file folder names vary depending on the dis...

Страница 40: ...quency 8 kHz 48 kHz Channel 1 ch 2 ch AAC Bit rate 16 kbps 320 kbps Sampling frequency 48 kHz 44 1 kHz Channel 1 ch 2 ch WAV Bit rate Linear PCM at 705 kbps and 1 411 kbps Sampling frequency 44 1 kHz Channel 1 ch 2 ch This unit can play back MP3 files recorded in VBR variable bit rate The maximum number of characters for folder and file names is 25 characters 128 characters for MP3 WMA AAC WAV Tag...

Страница 41: ...d stored for the selected band Satellite radio You can also connect the JVC SIRIUS radio PnP Plug and Play using the JVC SIRIUS radio adapter KS U100K not supplied to the CD changer jack on the rear By turning on off the power of the unit you can turn on off the JVC PnP However you cannot control it from this unit To know more about SIRIUS Satellite radio or to sign up visit http www sirius com Fo...

Страница 42: ...e than 30 station frequencies Name Full appears Delete unwanted titles before assignment General settings PSM Auto setting for Dimmer may not work correctly on some vehicles particularly on those having a control dial for dimming In this case change the Dimmer setting to any other than Auto If LCD Type is set to Auto the display pattern will change to the Positive or Negative pattern depending on ...

Страница 43: ...anually Static noise while listening to the radio Connect the antenna firmly Disc playback Disc cannot be played back Insert the disc correctly CD R CD RW cannot be played back Tracks on the CD R CD RW cannot be skipped Insert a finalized CD R CD RW Finalize the CD R CD RW with the component which you used for recording Disc can neither be played back nor ejected Unlock the disc see page 10 Eject ...

Страница 44: ...s and folders Tracks do not play back in the order you have intended them to play The playback order is determined when the files are recorded The elapsed playing time is not correct This sometimes occurs during playback This is caused by how the tracks are recorded on the disc eg variable bit rate Please Eject appears on the display Insert a disc that contains MP3 WMA AAC tracks Not Support appea...

Страница 45: ...phisicallyemptyorfolderthatcontains databutdoesnotcontainvalidMP3 WMA AAC WAV track No File flashes on the display No USB appears on the display Connect a USB device that contains tracks encoded in an appropriate format Not Support appears on the display and track skips The track is unplayable Read failed appears on the display The connected USB device may be malfunctioning or may not have been fo...

Страница 46: ... restored Connect the player again The connected audio player cannot be controlled Check whether the connected audio player supports AVRCP Audio Video Remote Control Profile Operations depend on the connected audio player Disconnect and connect the Bluetooth player again The unit does not response when you tried to copy the phone book to the unit You may have tried to copy the same entries as stor...

Страница 47: ... area where signals are stronger No Antenna appears on the display Connect the antenna firmly Invalid Channel appears on the display for about 5 seconds then returns to the previous display while listening to the SIRIUS Satellite radio No broadcast on the selected channel Select another channel or continue listening to the previous channel No Name appears on the display while listening to the SIRI...

Страница 48: ...he battery The sound is distorted Deactivate the equalizer either on this unit or the iPod Disconnect appears on the display Check the connecting cable and its connection Charge the battery Playback stops The headphones are disconnected during playback Restart the playback operation see page 25 No sound can be heard when connecting an iPod nano Disconnect the headphones from the iPod nano Update t...

Страница 49: ...c out holding it by the edges Always hold the disc by the edges Do not touch its recording surface When storing a disc in its case gently insert the disc around the center holder with the printed surface facing up Make sure to store discs in cases after use Connectors Center holder To keep discs clean A dirty disc may not play correctly If a disc does become dirty wipe it with a soft cloth in a st...

Страница 50: ...pedance 5 0 V 20 kΩ load full scale Output Impedance 1 kΩ Other Terminal CD changer jack AUX auxiliary input jack USB cable Steering wheel remote input Antenna input TUNER SECTION Frequency Range FM with channel interval set to 100 kHz or 200 kHz 87 5 MHz to 107 9 MHz with channel interval set to 50 kHz 87 5 MHz to 108 0 MHz AM with channel interval set to 10 kHz 530 kHz to 1 710 kHz with channel ...

Страница 51: ...1 5 Mbps Compatible Device Mass storage class Compatible File System FAT 32 16 12 Playable Audio Format MP3 WMA AAC WAV Max Current 500 mA 5 V BLUETOOTH Version Bluetooth 1 2 certified Power Class Class 2 Radio possible distance 10 m Service Area 10 m Profile HFP 1 5 OPP 1 1 A2DP 1 2 AVRCP 1 3 GENERAL Power Requirement Operating Voltage DC 14 4 V 11 V to 16 V allowance Grounding System Negative gr...

Страница 52: ...th operation Please reset your unit Refer to page of How to reset your unit Still having trouble USA ONLY Call 1 800 252 5722 http www jvc com We can help you EN SP FR 0108DTSMDTJEIN 2008 Victor Company of Japan Limited ...

Страница 53: ...le câblage des enceintes de votre voiture 2008 Victor Company of Japan Limited WARNINGS To prevent short circuits we recommend that you disconnect the battery s negative terminal and make all electrical connections before installing the unit Be sure to ground this unit to the car s chassis again after installation Notes Replace the fuse with one of the specified rating If the fuse blows frequently...

Страница 54: ...without using the sleeve Instalación de la unidad sin utilizar la cubierta Lors de l installation de l appareil scans utiliser de manchon In a Toyota car for example first remove the car radio and install the unit in its place En un automóvil Toyota por ejemplo en primer lugar desmonte el autorradio e instale la unidad en su lugar Dans une voiture Toyota par exemple retirez d abord l autoradio et ...

Страница 55: ...tripe Gris con rayas negras Gris avec bande noire White Blanco Blanc White with black stripe Blanco con rayas negras Blanc avec bande noire Antes de la conexión Verifique atentamente el conexionado del vehículo Una conexión incorrecta podría producir daños graves en la unidad Los cordones del cable de alimentación y los del conector procedentes de la carrocería del automóvil podrían ser de diferen...

Страница 56: ...mponente JVC Nombre del modelo Cambiador de CD CD CH CH X1500 etc Sintonizador HD Radio KT HD300 También puede conectar los siguientes componentes mediante los diversos adaptadores JVC Puede ser necesario comprar los cables de conexión por separado Componente Adaptador Nombre del modelo iPod Adaptador de interfaz para iPod KS PD100 Sintonizador universal XMDirecto Adaptador digital inteligente XMD...

Страница 57: ...tions refer to the separate manual Pour l installation et les raccordements se référer au manuel séparé INSTRUCTIONS MANUEL D INSTRUCTIONS GET0529 003A EX EU For canceling the display demonstration see page 5 Pour annuler la démonstration des affichages référez vous à la page 5 ...

Страница 58: ...Richtlinie 1999 5 EG befindet Wien Con la presente JVC dichiara che questo KD BT22 è conforme ai requisiti essenziali ed alle altre disposizioni pertinenti stabilite dalla direttiva 1999 5 CE Français Malti Par la présente JVC déclare que l appareil KD BT22 est conforme aux exigences essentielles et aux autres dispositions pertinentes de la directive 1999 5 CE Hawnhekk JVC jiddikjara li dan KD BT2...

Страница 59: ...v og øvrige relevante krav i direktiv 1999 5 EF Niniejszym JVC oświadcza że KD BT22 jest zgodny z zasadniczymi wymogami oraz pozostałymi stosownymi postanowieniami Dyrektywy 1999 5 EC Cesky Slovensko JVC tímto prohlašuje že tento KD BT22 je ve shode se základními požadavky a dalšími príslušnými ustanoveními smernice 1999 5 ES JVC izjavlja da je ta KD BT22 v skladu z bistvenimi zahtevami in ostalim...

Страница 60: ...e performing any complicated operations Temperature inside the car If you have parked the car for a long time in hot or cold weather wait until the temperature in the car becomes normal before operating the unit Note Only for EX model users in UK and European countries For security reasons a numbered ID card is provided with this unit and the same ID number is imprinted on the unit s chassis Keep ...

Страница 61: ...isc operations 13 Listening to the USB device 15 Using the Bluetooth devices 16 Using the Bluetooth cellular phone 18 Using the Bluetooth audio player 21 EXTERNAL DEVICES Listening to the CD changer 22 Listening to the DAB tuner 23 Listening to the iPod 26 Listening to the other external components 28 SETTINGS Selecting a preset sound mode 29 General settings PSM 32 Bluetooth settings 36 REFERENCE...

Страница 62: ...ces Lower the volume before playing these digital sources to avoid damaging the speakers by sudden increase of the output level How to use the M MODE and SEL buttons If you use M MODE or SEL select the display and some controls such as the number buttons 4 buttons 5 buttons and the control dial enter the corresponding control mode Ex When you press number button 1 after pressing M MODE to operate ...

Страница 63: ...t Demo then Off Set the clock Select Clock Hr hour then adjust the hour Select Clock Min minute then adjust the minute Select 24H 12H then 24Hours or 12Hours 4 Finish the procedure Changing the display information and pattern When the power is turned off Check the current clock time Ex When tuner is selected as the source Source operation display Audio level meter display see LevelMeter on page 32...

Страница 64: ...20 1 DAB Select DAB service CD USB CD CH Select folder USB iPod Enter the main menu Hold iPod Enter the main menu Pause playback Confirm selection 2 Turn on the power Turn off the power Hold Attenuate the sound if the power is on Bluetooth Switch the conversation media during a phone call conversation 3 Display window 4 Enter exit Bluetooth menu Display the dialed list Hold 5 Flip down the control...

Страница 65: ...battery with tape and insulate when throwing away or saving it Using the remote controller RM RK50 Remote sensor 1 Turns the power on if pressed briefly or attenuates the sound when the power is on Turns the power off if pressed and held Switches the conversation media during a phone call conversation 2 Changes the FM AM DAB bands with 5 U Changes the preset stations or DAB services with D Changes...

Страница 66: ...Rejects calls if pressed and held Holds calls if pressed briefly during a phone call conversation 7 Searches for stations or DAB services if pressed briefly Searches for DAB ensembles if pressed and held Fast forwards or reverses the track if pressed and held Changes the tracks if pressed briefly 3 Exit from the setting While listening to an iPod in menu selecting mode Connected to KS PD100 Select...

Страница 67: ...he FM1 band Using the number buttons 1 2 3 Using the Preset Station list When is shown on the display you can move back to the previous screen by pressing number button 3 1 Follow steps 1 and 2 of Using the number buttons on the left column By holding 5 the Preset Station List will also appear go to step 4 2 3 Display the Preset Station List 4 Select the preset number you want to store into You ca...

Страница 68: ...n appears on the display you can move to the other lists by pressing number button 5 or 6 repeatedly 1 2 3 Select Search The three preset PTY codes appears on the display 4 Select a PTY code You can select a PTY code from the 29 preset PTY codes or from the six stored PTY codes To store your favorite programme types see the following and page 11 5 Start searching for your favorite programme If the...

Страница 69: ...tion 1 2 either lights up or flashes on the display If lights up the unit temporarily will switch to Traffic Announcement TA if available from any source other than AM The volume changes to the preset TA volume level if the current level is lower than the preset level see page 34 If flashes TA Standby reception is not yet activated Tune in to another station providing the RDS signals To deactivate...

Страница 70: ...olk M music Document Tracing the same programme Network Tracking Reception When driving in an area where FM reception is not sufficient enough this unit automatically tunes in to another FM RDS station of the same network possibly broadcasting the same programme with stronger signals see the illustration below Programme A broadcasting on different frequency areas 01 05 When shipped from the factor...

Страница 71: ...AAC or track directly 1 Byholdingeitheroneofthebuttons youcandisplay theFolderList seepage14 2 Presstoselectnumber1to6 holdtoselectnumber 7to12 3 Itisrequiredthatfoldersbeassignedwith2 digit numbersatthebeginningoftheirfoldernames 01 02 03 andsoon After pressing M MODE press the following buttons to Skip 10 tracks MP3 WMA AAC Within the same folder Repeat Track Repeat current track Repeat Folder M...

Страница 72: ...tem You can move to the other lists by pressing number button 5 or 6 repeatedly 5 Change to the selected item A If File List is selected The list disappears and playback starts B If Folder List is selected If the current folder is selected File List appears then repeat steps 4 and 5 A to start playback If another folder is selected playback starts from the 1st file of the selected folder Ex When F...

Страница 73: ... detach the USB device Straightly pull it out from the unit Press SOURCE to listen to another playback source You can operate the USB device in the same way you operate the files on a disc See pages 13 and 14 You can listen to WAV files by following the MP3 WMA AAC files operations listed on pages 13 and 14 Cautions Avoid using the USB device if it might hinder your safety driving Do not pull out ...

Страница 74: ... by preset numbers by voice command Informing you of the arrival of a text message Play back a Bluetooth audio player Connecting a Bluetooth device for the first time Pairing and PIN code When you connect a Bluetooth device to the unit for the first time make pairing between the unit and the device Pairing allows Bluetooth devices to communicate with each other To make pairing you may need to ente...

Страница 75: ... this unit Connecting flashes then Pairing Ok or Connected Device Name appears on the display when the connection is established Now you can use the device through the unit appears when the connection is established The device remains registered even after you disconnect the device Use Cnnct Phone or Cnnct Audio or activate Auto Cnnct to connect the same device from next time on See the following ...

Страница 76: ...e numbers you have dialed Go to the following step Received Shows the list of the received calls Go to the following step Phonebook Shows the name phone number of the phone book of the unit Go to the following step To copy the phone book memory see page 20 Preset Shows the list of preset numbers Go to the following step To preset numbers see page 20 Dial Number Shows the phone number entry screen ...

Страница 77: ...answer the waiting call Press any button except control dial To restore the on hold call press any button except control dial again When you end one call you can connect to the other When a SMS comes in If the cellular phone is compatible with SMS Short Message Service and MSG Notice is set to On see page 37 the unit rings and Received Message appears on the display to inform you of the message ar...

Страница 78: ...a the unit cellular phone During a phone call conversation Then continue your conversation using the other media Operations may be different according to the connected Bluetooth device How to copy phone book You can copy the phone book memory of a cellular phone into the unit When is shown on the display you can move back to the previous screen by pressing number button 3 1 2 Select Settings 3 Sel...

Страница 79: ...ause playback Refer also to pages 17 and 18 for connecting disconnecting deleting a registered device Bluetooth Information If you wish to receive more information about Bluetooth visit the following JVC web site http www jvc victor co jp english car After pressing M MODE press the following buttons to Repeat Track Repeat current track Repeat All Repeat all tracks Repeat Group Repeat all tracks of...

Страница 80: ...uttons youcandisplay theDiscList seepage14 To select a disc folder track on the list See Selecting a folder track on the list only for MP3 WMA AAC file on page 14 Select Disc in step 3 to display the Disc List of the CD changer After pressing M MODE press the following buttons to Skip 10 tracks MP3 Within the same folder Repeat Track Repeat current track Repeat Folder MP3 Repeat all tracks of curr...

Страница 81: ... becomes stronger 3 Exit from the setting appears on the display will be highlighted only when receiving DRC signals from the tuned service Before operating connect the JVC DAB tuner KT DB1000 separately purchased to the CD changer jack on the rear of the unit Preparation Make sure Changer is selected for the external input setting see page 34 1 Select DAB 2 Select the bands 3 Searching for an ens...

Страница 82: ...bands by pressing number button 5 or 6 repeatedly but you cannot store the selected service into these bands 5 Store the service Listening to the preset service using the Preset Service List 1 Display the Preset Service List then select the preset DAB service you want to listen to 2 Change to the selected DAB service Using the standby reception You can use three types of Standby Reception Road Tra...

Страница 83: ... remain lit To deactivate the Announcement Standby Reception Select Announce Off in step 2 goes off Announcement types Travel Warning News Weather Event Special Rad Inf Radio Information Sports Finance Tracing the same programme Alternative Frequency Reception DAB AF You can keep listening to the same programme by activating the Alternative Frequency Reception While receiving a DAB service When dr...

Страница 84: ...ear of the unit Preparation Make sure Changer is selected for the external input setting see page 34 You can control playback from the unit Disconnecting the iPod will stop playback Press SOURCE to listen to another playback source For details refer also to the manual supplied for your iPod Caution Avoid using the iPod if it might hinder your safety while driving Make sure all important data has b...

Страница 85: ...nd 2 8 can also select the preset top menus Press Pause resume playback Selecting a track from the menu No Operation For iPod connected through KS PD100 For iPod connected to the USB cable 1 Enter the main menu 2 Select the desired menu Playlists Ô Artists Ô Albums Ô Songs Ô Genres Ô Composers Playlists Ô Artists Ô Albums Ô Songs Ô Podcasts Ô Genres Ô Composers Ô Audiobooks 3 Confirm the selection...

Страница 86: ...nnected component and start playing the source 3 Adjust the volume 4 Adjust the sound as you want see pages 29 31 Connecting an external component to the AUX input jack The menu selecting mode will be canceled If no operations are performed for about 5 seconds for iPod connected through KS PD100 15 seconds for iPod connected to the USB cable When you confirm the selection of a track After pressing...

Страница 87: ...ting 2 Select EQ 3 Select On If Bypass is selected you can listen to the original sound mode recorded lights up on the display 4 Select a preset sound mode Preset value setting for each sound mode Sound mode Preset value Band 1 100 Hz Band 2 320 Hz Band 3 1 kHz Band 4 3 2 kHz Band 5 10 kHz USER 0 0 0 0 0 ROCK 3 2 0 1 1 CLASSIC 2 2 0 1 0 POPS 0 1 0 1 2 HIP HOP 4 1 2 0 1 JAZZ 3 2 1 2 2 ...

Страница 88: ...he control dial to select Off or On When On is selected low and high frequencies sound are boosted to produce a well balanced sound at low volume level 4 Exit from the setting Adjusting the sound You can adjust the sound characteristics to your preference When is shown on the display you can move back to the previous screen by pressing number button 3 or 6 1 2 For EQ setting see page 29 3 Adjust t...

Страница 89: ...d 6 to 6 2 Press number button 5 then turn the control dial to select the frequency 3 Press number button 5 then turn the control dial to select the quality slope Q 6 Repeat steps 3 and 4 to adjust the other frequency bands 7 Store the adjustments Adjustable sound elements Sound elements Range selectable items Band 1 100 Hz Band 2 320 Hz Band 3 1 kHz Band 4 3 2 kHz Band 5 10 kHz Frequency 68 Hz 10...

Страница 90: ...etting reference page MOVIE Demo Display demonstration On Off Display demonstration will be activated automatically if no operation is done for about 20 seconds 5 Cancels LevelMeter Audio level meter Meter 1 Meter 2 Select the different level meter patterns Press DISP to show the selected level meter CLOCK Clock Disp 1 Clock display On Off Clock time is shown on the display when the power is turne...

Страница 91: ...cels For DAB text shows only headline if any Pressing DISP for more than one second can scroll the display regardless of the setting Dimmer Dimmer From To 3 Auto Off On Time Set Dims the display when you turn on the headlights Cancels Dims the display and button illumination Set the timer for dimmer 35 Any hour Any hour Initial 18 7 Contrast Contrast 1 8 Initial 5 Adjust the display contrast to ma...

Страница 92: ... sound quality will not be degraded and the stereo effect will remain DAB AF 6 Alternative frequency reception On Off Traces the programme among DAB services and FM RDS stations 25 Cancels AUDIO Ext Input 7 External input Changer Ext In To use a JVC CD changer 22 JVC DAB tuner 23 or an Apple iPod 26 To use any other external component 28 Beep Key touch tone On Off Activates the key touch tone Deac...

Страница 93: ... select DISP In step 3 select Dimmer 2 Select Time Set 3 Adjust the dimmer start time 1 Turn the control dial to set the dimmer start time 2 Press to select To Then turn the control dial to set the dimmer end time Category Indication Item Initial Setting reference page COLOR Color Sel Color selection Initial All Source Color Pale Select your favorite display color for each source or for all source...

Страница 94: ...applied seetheright columnfordetails 5 Repeat steps 3 and 4 to select the color for each source except when selecting All Source in step 3 6 Exit from the setting Creating your own color User Color You can create your own colors Day Color or NightColor 1 Follow steps 1 to 3 on page 32 In step 2 select COLOR In step 3 select Color Set 2 Select Day Color or NightColor 3 Select a primary color 4 Adju...

Страница 95: ...fatext message 2 DisplayedonlywhenaBluetoothphone audioplayer isconnected 3 Select a setting item Auto Cnnct Ô Auto Answer Ô MSG Notice 1 Ô MIC Ô PhoneBook Ô Initialize Ô Name Ô Address Ô Version Ô Phone Device 2 Ô Audio Device 2 Ô back to the beginning 4 Change the setting accordingly If PhoneBook is selected in step 3 see page 20 for details Setting menu Initial Auto Cnnct connect When the unit ...

Страница 96: ... CD Texts and CD Rs Recordable CD RWs Rewritable in audio CD CD DA MP3 WMA AAC formats When a disc is inserted upside down Please Eject appears on the display Press OPEN then 0 to eject the disc In this manual words track and file are interchangeably used Basic operations Turning on the power By pressing SOURCE on the unit you can also turn on the power If the source is ready playback also starts ...

Страница 97: ...abels or a protective seal stuck to the surface Discs on which labels can be directly printed by an ink jet printer Using these discs under high temperature or high humidity may cause malfunctions or damage to the unit Playing an MP3 WMA AAC disc This unit can play back MP3 WMA AAC files with the extension code mp3 wma or m4a regardless of the letter case upper lower This unit can show the names o...

Страница 98: ...s device If you connect an MTP device featuring USB digital media streaming to this unit you can play back the WMA DRM10 Digital Right Management files purchased through the music distributing web sites through this unit This unit is compatible with the USB Full Speed If the connected USB device does not have the correct files No File appears This unit can show ID3 Tag Version 1 0 1 1 2 2 2 3 or 2...

Страница 99: ...as failed Use Connect to connect the device again See page 17 Error Try the operation again If Error appears again check if the device supports the function you have tried Please Wait The unit is preparing to use the Bluetooth function If the message does not disappear turn off and turn on the unit then connect the device again or reset the unit Please Reset Reset the unit and try the operation ag...

Страница 100: ... stable If the text information includes more than 16 characters it scrolls on the display This unit can display up to 128 characters Notice When operating an iPod some operations may not be performed correctly or as intended In this case visit the following JVC web site http www jvc co jp english car support ks pd100 index html General settings PSM Auto setting for Dimmer may not work correctly o...

Страница 101: ...ck Tracks on the CD R CD RW cannot be skipped Insert a finalized CD R CD RW Finalize the CD R CD RW with the component which you used for recording Disc can neither be played back nor ejected Unlock the disc see page 13 Eject the disc forcibly see page 3 Disc sound is sometimes interrupted Stop playback while driving on rough roads Change the disc Check the cords and connections Disc cannot be rec...

Страница 102: ...s generated The track played back is not a playable file format MP3 WMA AAC WAV Skip to another file Do not add the extension code mp3 wma m4a or wav to non MP3 WMA AAC WAV tracks Tracks cannot play back as you have intended them to play Playback order may differs from the one played back using other players Reading keeps flashing on the display Readout time varies depending on the USB device Do n...

Страница 103: ...tooth device Enter the same PIN code for both the unit and target device Phone sound quality is poor Reduce the distance between the unit and the Bluetooth cellular phone Move the car to a place where you can get a better signal reception The sound is interrupted or skipped during playback of a Bluetooth audio player Reduce the distance between the unit and the Bluetooth audio player Disconnect th...

Страница 104: ...ay Check the cords and connections iPod The iPod does not turn on or does not work Check the connecting cable and its connection Update the firmware version Charge the battery The sound is distorted Deactivate the equalizer either on this unit or the iPod Disconnect appears on the display Check the connecting cable and its connection Charge the battery Playback stops The headphones are disconnecte...

Страница 105: ... disc out holding it by the edges Always hold the disc by the edges Do not touch its recording surface When storing a disc in its case gently insert the disc around the center holder with the printed surface facing up Make sure to store discs in cases after use Connectors Center holder To keep discs clean A dirty disc may not play correctly If a disc does become dirty wipe it with a soft cloth in ...

Страница 106: ...se 40 Hz to 20 000 Hz Signal to Noise Ratio 70 dB Line Out Level Impedance 2 5 V 20 kΩ load full scale Output Impedance 1 kΩ Subwoofer Out Level Impedance 4 0 V 20 kΩ load full scale Other Terminal CD changer jack AUX auxiliary input jack USB cable Steering wheel remote input Aerial input TUNER SECTION Frequency Range FM 87 5 MHz to 108 0 MHz AM MW 522 kHz to 1 620 kHz LW 144 kHz to 279 kHz FM Tun...

Страница 107: ...ards USB 1 1 USB 2 0 Data Transfer Rate Full Speed Maximum 12 Mbps Low Speed Maximum 1 5 Mbps Compatible Device Mass storage class Compatible File System FAT 32 16 12 Playable Audio Format MP3 WMA AAC WAV Max Current 500 mA 5 V BLUETOOTH Version Bluetooth 1 2 certified Power Class Class 2 Radio possible distance 10 m Service Area 10 m Profile HFP 1 5 OPP 1 1 A2DP 1 2 AVRCP 1 3 GENERAL Power Requir...

Страница 108: ... compatibility and electrical safety European representative of Victor Company of Japan Limited is JVC Technology Centre Europe GmbH Company name changed in JVC Technical Services Europe GmbH Postfach 10 05 52 61145 Friedberg Germany Cher e client e Cet appareil est conforme aux directives et normes européennes en vigueur concernant la compatibilité électromagnétique et à la sécurité électrique Re...

Страница 109: ...ios JVC Il est recommandé de connecter des enceintes avec une puissance maximum de plus de 50 W à l arrière et à l avant et avec une impédance de 4 Ω à 8 Ω Si la puissance maximum est inférieure à 50 W changez Amp Gain pour éviter d endommager vos enceintes voir page 34 du MANUEL D INSTRUCTIONS Pour éviter les courts circuits recouvrez les extrémités des fils INUTILISÉS avec une bande isolante Le ...

Страница 110: ... longer screws are used they could damage the unit Remarque Lors de l installation de l appareil sur le support de montage s assurer d utiliser des vis d une longueur de 8 mm Si des vis plus longues sont utilisées elles peuvent endommager l appareil Screw option Vis en option Stay option Hauban en option Fire wall Cloison Dashboard Tableau de bord Install the unit at an angle of less than 30 Insta...

Страница 111: ... avant installation ce fil doit être raccordé sinon l appareil ne peut pas être mis sous tension Connecting to the steering wheel remote controller Connexion de la télécommande de volant If your car is equipped with the steering wheel remote controller you can operate this unit using the controller To do it a JVC s OE remote adapter not supplied which matches with your car is required Consult your...

Страница 112: ...s métallique de la voiture à un endroit qui n est pas recouvert de peinture s il est recouvert de peinture enlevez d abord la peinture avant d attacher le fil L appareil peut être endommagé si cela n est pas fait correctement 5 Coupez les fils des enceintes arrière du connecteur ISO de la voiture et connectez les à l amplificateur 6 Pour utiliser ces appareils réglez l entrée extérieure correcteme...

Страница 113: ... und die Anschlüsse siehe das eigenständige Handbuch Указания по установке и выполнению соединений приводятся в отдельной инструкции INSTRUCTIONS BEDIENUNGSANLEITUNG ИНСТРУКЦИИ ПО ЭКСПЛУАТАЦИИ GET0529 006A EY For canceling the display demonstration see page 5 Zum Abbrechen der Displaydemonstration siehe Seite 5 Информацию об отмене демонстрации функций дисплея см на стр 5 ...

Страница 114: ...Richtlinie 1999 5 EG befindet Wien Con la presente JVC dichiara che questo KD BT22 è conforme ai requisiti essenziali ed alle altre disposizioni pertinenti stabilite dalla direttiva 1999 5 CE Français Malti Par la présente JVC déclare que l appareil KD BT22 est conforme aux exigences essentielles et aux autres dispositions pertinentes de la directive 1999 5 CE Hawnhekk JVC jiddikjara li dan KD BT2...

Страница 115: ...v og øvrige relevante krav i direktiv 1999 5 EF Niniejszym JVC oświadcza że KD BT22 jest zgodny z zasadniczymi wymogami oraz pozostałymi stosownymi postanowieniami Dyrektywy 1999 5 EC Cesky Slovensko JVC tímto prohlašuje že tento KD BT22 je ve shode se základními požadavky a dalšími príslušnými ustanoveními smernice 1999 5 ES JVC izjavlja da je ta KD BT22 v skladu z bistvenimi zahtevami in ostalim...

Страница 116: ... dangerous Stop the car before performing any complicated operations Temperature inside the car If you have parked the car for a long time in hot or cold weather wait until the temperature in the car becomes normal before operating the unit For security reasons a numbered ID card is provided with this unit and the same ID number is imprinted on the unit s chassis Keep the card in a safe place as i...

Страница 117: ...isc operations 13 Listening to the USB device 15 Using the Bluetooth devices 16 Using the Bluetooth cellular phone 18 Using the Bluetooth audio player 21 EXTERNAL DEVICES Listening to the CD changer 22 Listening to the DAB tuner 23 Listening to the iPod 26 Listening to the other external components 28 SETTINGS Selecting a preset sound mode 29 General settings PSM 32 Bluetooth settings 36 REFERENCE...

Страница 118: ...ces Lower the volume before playing these digital sources to avoid damaging the speakers by sudden increase of the output level How to use the M MODE and SEL buttons If you use M MODE or SEL select the display and some controls such as the number buttons 4 buttons 5 buttons and the control dial enter the corresponding control mode Ex When you press number button 1 after pressing M MODE to operate ...

Страница 119: ...t Demo then Off Set the clock Select Clock Hr hour then adjust the hour Select Clock Min minute then adjust the minute Select 24H 12H then 24Hours or 12Hours 4 Finish the procedure Changing the display information and pattern When the power is turned off Check the current clock time Ex When tuner is selected as the source Source operation display Audio level meter display see LevelMeter on page 32...

Страница 120: ...20 1 DAB Select DAB service CD USB CD CH Select folder USB iPod Enter the main menu Hold iPod Enter the main menu Pause playback Confirm selection 2 Turn on the power Turn off the power Hold Attenuate the sound if the power is on Bluetooth Switch the conversation media during a phone call conversation 3 Display window 4 Enter exit Bluetooth menu Display the dialed list Hold 5 Flip down the control...

Страница 121: ...battery with tape and insulate when throwing away or saving it Using the remote controller RM RK50 Remote sensor 1 Turns the power on if pressed briefly or attenuates the sound when the power is on Turns the power off if pressed and held Switches the conversation media during a phone call conversation 2 Changes the FM AM DAB bands with 5 U Changes the preset stations or DAB services with D Changes...

Страница 122: ...Rejects calls if pressed and held Holds calls if pressed briefly during a phone call conversation 7 Searches for stations or DAB services if pressed briefly Searches for DAB ensembles if pressed and held Fast forwards or reverses the track if pressed and held Changes the tracks if pressed briefly 3 Exit from the setting While listening to an iPod in menu selecting mode Connected to KS PD100 Select...

Страница 123: ...he FM1 band Using the number buttons 1 2 3 Using the Preset Station list When is shown on the display you can move back to the previous screen by pressing number button 3 1 Follow steps 1 and 2 of Using the number buttons on the left column By holding 5 the Preset Station List will also appear go to step 4 2 3 Display the Preset Station List 4 Select the preset number you want to store into You ca...

Страница 124: ...n appears on the display you can move to the other lists by pressing number button 5 or 6 repeatedly 1 2 3 Select Search The three preset PTY codes appears on the display 4 Select a PTY code You can select a PTY code from the 29 preset PTY codes or from the six stored PTY codes To store your favorite programme types see the following and page 11 5 Start searching for your favorite programme If the...

Страница 125: ...tion 1 2 either lights up or flashes on the display If lights up the unit temporarily will switch to Traffic Announcement TA if available from any source other than AM The volume changes to the preset TA volume level if the current level is lower than the preset level see page 34 If flashes TA Standby reception is not yet activated Tune in to another station providing the RDS signals To deactivate...

Страница 126: ...olk M music Document Tracing the same programme Network Tracking Reception When driving in an area where FM reception is not sufficient enough this unit automatically tunes in to another FM RDS station of the same network possibly broadcasting the same programme with stronger signals see the illustration below Programme A broadcasting on different frequency areas 01 05 When shipped from the factor...

Страница 127: ...AAC or track directly 1 Byholdingeitheroneofthebuttons youcandisplay theFolderList seepage14 2 Presstoselectnumber1to6 holdtoselectnumber 7to12 3 Itisrequiredthatfoldersbeassignedwith2 digit numbersatthebeginningoftheirfoldernames 01 02 03 andsoon After pressing M MODE press the following buttons to Skip 10 tracks MP3 WMA AAC Within the same folder Repeat Track Repeat current track Repeat Folder M...

Страница 128: ...tem You can move to the other lists by pressing number button 5 or 6 repeatedly 5 Change to the selected item A If File List is selected The list disappears and playback starts B If Folder List is selected If the current folder is selected File List appears then repeat steps 4 and 5 A to start playback If another folder is selected playback starts from the 1st file of the selected folder Ex When F...

Страница 129: ... detach the USB device Straightly pull it out from the unit Press SOURCE to listen to another playback source You can operate the USB device in the same way you operate the files on a disc See pages 13 and 14 You can listen to WAV files by following the MP3 WMA AAC files operations listed on pages 13 and 14 Cautions Avoid using the USB device if it might hinder your safety driving Do not pull out ...

Страница 130: ... by preset numbers by voice command Informing you of the arrival of a text message Play back a Bluetooth audio player Connecting a Bluetooth device for the first time Pairing and PIN code When you connect a Bluetooth device to the unit for the first time make pairing between the unit and the device Pairing allows Bluetooth devices to communicate with each other To make pairing you may need to ente...

Страница 131: ... this unit Connecting flashes then Pairing Ok or Connected Device Name appears on the display when the connection is established Now you can use the device through the unit appears when the connection is established The device remains registered even after you disconnect the device Use Cnnct Phone or Cnnct Audio or activate Auto Cnnct to connect the same device from next time on See the following ...

Страница 132: ...e numbers you have dialed Go to the following step Received Shows the list of the received calls Go to the following step Phonebook Shows the name phone number of the phone book of the unit Go to the following step To copy the phone book memory see page 20 Preset Shows the list of preset numbers Go to the following step To preset numbers see page 20 Dial Number Shows the phone number entry screen ...

Страница 133: ...answer the waiting call Press any button except control dial To restore the on hold call press any button except control dial again When you end one call you can connect to the other When a SMS comes in If the cellular phone is compatible with SMS Short Message Service and MSG Notice is set to On see page 37 the unit rings and Received Message appears on the display to inform you of the message ar...

Страница 134: ...a the unit cellular phone During a phone call conversation Then continue your conversation using the other media Operations may be different according to the connected Bluetooth device How to copy phone book You can copy the phone book memory of a cellular phone into the unit When is shown on the display you can move back to the previous screen by pressing number button 3 1 2 Select Settings 3 Sel...

Страница 135: ...ause playback Refer also to pages 17 and 18 for connecting disconnecting deleting a registered device Bluetooth Information If you wish to receive more information about Bluetooth visit the following JVC web site http www jvc victor co jp english car After pressing M MODE press the following buttons to Repeat Track Repeat current track Repeat All Repeat all tracks Repeat Group Repeat all tracks of...

Страница 136: ...uttons youcandisplay theDiscList seepage14 To select a disc folder track on the list See Selecting a folder track on the list only for MP3 WMA AAC file on page 14 Select Disc in step 3 to display the Disc List of the CD changer After pressing M MODE press the following buttons to Skip 10 tracks MP3 Within the same folder Repeat Track Repeat current track Repeat Folder MP3 Repeat all tracks of curr...

Страница 137: ... becomes stronger 3 Exit from the setting appears on the display will be highlighted only when receiving DRC signals from the tuned service Before operating connect the JVC DAB tuner KT DB1000 separately purchased to the CD changer jack on the rear of the unit Preparation Make sure Changer is selected for the external input setting see page 34 1 Select DAB 2 Select the bands 3 Searching for an ens...

Страница 138: ...bands by pressing number button 5 or 6 repeatedly but you cannot store the selected service into these bands 5 Store the service Listening to the preset service using the Preset Service List 1 Display the Preset Service List then select the preset DAB service you want to listen to 2 Change to the selected DAB service Using the standby reception You can use three types of Standby Reception Road Tra...

Страница 139: ... remain lit To deactivate the Announcement Standby Reception Select Announce Off in step 2 goes off Announcement types Travel Warning News Weather Event Special Rad Inf Radio Information Sports Finance Tracing the same programme Alternative Frequency Reception DAB AF You can keep listening to the same programme by activating the Alternative Frequency Reception While receiving a DAB service When dr...

Страница 140: ...ear of the unit Preparation Make sure Changer is selected for the external input setting see page 34 You can control playback from the unit Disconnecting the iPod will stop playback Press SOURCE to listen to another playback source For details refer also to the manual supplied for your iPod Caution Avoid using the iPod if it might hinder your safety while driving Make sure all important data has b...

Страница 141: ...nd 2 8 can also select the preset top menus Press Pause resume playback Selecting a track from the menu No Operation For iPod connected through KS PD100 For iPod connected to the USB cable 1 Enter the main menu 2 Select the desired menu Playlists Ô Artists Ô Albums Ô Songs Ô Genres Ô Composers Playlists Ô Artists Ô Albums Ô Songs Ô Podcasts Ô Genres Ô Composers Ô Audiobooks 3 Confirm the selection...

Страница 142: ...nnected component and start playing the source 3 Adjust the volume 4 Adjust the sound as you want see pages 29 31 Connecting an external component to the AUX input jack The menu selecting mode will be canceled If no operations are performed for about 5 seconds for iPod connected through KS PD100 15 seconds for iPod connected to the USB cable When you confirm the selection of a track After pressing...

Страница 143: ...ting 2 Select EQ 3 Select On If Bypass is selected you can listen to the original sound mode recorded lights up on the display 4 Select a preset sound mode Preset value setting for each sound mode Sound mode Preset value Band 1 100 Hz Band 2 320 Hz Band 3 1 kHz Band 4 3 2 kHz Band 5 10 kHz USER 0 0 0 0 0 ROCK 3 2 0 1 1 CLASSIC 2 2 0 1 0 POPS 0 1 0 1 2 HIP HOP 4 1 2 0 1 JAZZ 3 2 1 2 2 ...

Страница 144: ...he control dial to select Off or On When On is selected low and high frequencies sound are boosted to produce a well balanced sound at low volume level 4 Exit from the setting Adjusting the sound You can adjust the sound characteristics to your preference When is shown on the display you can move back to the previous screen by pressing number button 3 or 6 1 2 For EQ setting see page 29 3 Adjust t...

Страница 145: ...d 6 to 6 2 Press number button 5 then turn the control dial to select the frequency 3 Press number button 5 then turn the control dial to select the quality slope Q 6 Repeat steps 3 and 4 to adjust the other frequency bands 7 Store the adjustments Adjustable sound elements Sound elements Range selectable items Band 1 100 Hz Band 2 320 Hz Band 3 1 kHz Band 4 3 2 kHz Band 5 10 kHz Frequency 68 Hz 10...

Страница 146: ...etting reference page MOVIE Demo Display demonstration On Off Display demonstration will be activated automatically if no operation is done for about 20 seconds 5 Cancels LevelMeter Audio level meter Meter 1 Meter 2 Select the different level meter patterns Press DISP to show the selected level meter CLOCK Clock Disp 1 Clock display On Off Clock time is shown on the display when the power is turne...

Страница 147: ...cels For DAB text shows only headline if any Pressing DISP for more than one second can scroll the display regardless of the setting Dimmer Dimmer From To 3 Auto Off On Time Set Dims the display when you turn on the headlights Cancels Dims the display and button illumination Set the timer for dimmer 35 Any hour Any hour Initial 18 7 Contrast Contrast 1 8 Initial 5 Adjust the display contrast to ma...

Страница 148: ... sound quality will not be degraded and the stereo effect will remain DAB AF 6 Alternative frequency reception On Off Traces the programme among DAB services and FM RDS stations 25 Cancels AUDIO Ext Input 7 External input Changer Ext In To use a JVC CD changer 22 JVC DAB tuner 23 or an Apple iPod 26 To use any other external component 28 Beep Key touch tone On Off Activates the key touch tone Deac...

Страница 149: ... select DISP In step 3 select Dimmer 2 Select Time Set 3 Adjust the dimmer start time 1 Turn the control dial to set the dimmer start time 2 Press to select To Then turn the control dial to set the dimmer end time Category Indication Item Initial Setting reference page COLOR Color Sel Color selection Initial All Source Color Pale Select your favorite display color for each source or for all source...

Страница 150: ...applied seetheright columnfordetails 5 Repeat steps 3 and 4 to select the color for each source except when selecting All Source in step 3 6 Exit from the setting Creating your own color User Color You can create your own colors Day Color or NightColor 1 Follow steps 1 to 3 on page 32 In step 2 select COLOR In step 3 select Color Set 2 Select Day Color or NightColor 3 Select a primary color 4 Adju...

Страница 151: ...fatext message 2 DisplayedonlywhenaBluetoothphone audioplayer isconnected 3 Select a setting item Auto Cnnct Ô Auto Answer Ô MSG Notice 1 Ô MIC Ô PhoneBook Ô Initialize Ô Name Ô Address Ô Version Ô Phone Device 2 Ô Audio Device 2 Ô back to the beginning 4 Change the setting accordingly If PhoneBook is selected in step 3 see page 20 for details Setting menu Initial Auto Cnnct connect When the unit ...

Страница 152: ... CD Texts and CD Rs Recordable CD RWs Rewritable in audio CD CD DA MP3 WMA AAC formats When a disc is inserted upside down Please Eject appears on the display Press OPEN then 0 to eject the disc In this manual words track and file are interchangeably used Basic operations Turning on the power By pressing SOURCE on the unit you can also turn on the power If the source is ready playback also starts ...

Страница 153: ...abels or a protective seal stuck to the surface Discs on which labels can be directly printed by an ink jet printer Using these discs under high temperature or high humidity may cause malfunctions or damage to the unit Playing an MP3 WMA AAC disc This unit can play back MP3 WMA AAC files with the extension code mp3 wma or m4a regardless of the letter case upper lower This unit can show the names o...

Страница 154: ...s device If you connect an MTP device featuring USB digital media streaming to this unit you can play back the WMA DRM10 Digital Right Management files purchased through the music distributing web sites through this unit This unit is compatible with the USB Full Speed If the connected USB device does not have the correct files No File appears This unit can show ID3 Tag Version 1 0 1 1 2 2 2 3 or 2...

Страница 155: ...as failed Use Connect to connect the device again See page 17 Error Try the operation again If Error appears again check if the device supports the function you have tried Please Wait The unit is preparing to use the Bluetooth function If the message does not disappear turn off and turn on the unit then connect the device again or reset the unit Please Reset Reset the unit and try the operation ag...

Страница 156: ... stable If the text information includes more than 16 characters it scrolls on the display This unit can display up to 128 characters Notice When operating an iPod some operations may not be performed correctly or as intended In this case visit the following JVC web site http www jvc co jp english car support ks pd100 index html General settings PSM Auto setting for Dimmer may not work correctly o...

Страница 157: ...ck Tracks on the CD R CD RW cannot be skipped Insert a finalized CD R CD RW Finalize the CD R CD RW with the component which you used for recording Disc can neither be played back nor ejected Unlock the disc see page 13 Eject the disc forcibly see page 3 Disc sound is sometimes interrupted Stop playback while driving on rough roads Change the disc Check the cords and connections Disc cannot be rec...

Страница 158: ...s generated The track played back is not a playable file format MP3 WMA AAC WAV Skip to another file Do not add the extension code mp3 wma m4a or wav to non MP3 WMA AAC WAV tracks Tracks cannot play back as you have intended them to play Playback order may differs from the one played back using other players Reading keeps flashing on the display Readout time varies depending on the USB device Do n...

Страница 159: ...tooth device Enter the same PIN code for both the unit and target device Phone sound quality is poor Reduce the distance between the unit and the Bluetooth cellular phone Move the car to a place where you can get a better signal reception The sound is interrupted or skipped during playback of a Bluetooth audio player Reduce the distance between the unit and the Bluetooth audio player Disconnect th...

Страница 160: ...ay Check the cords and connections iPod The iPod does not turn on or does not work Check the connecting cable and its connection Update the firmware version Charge the battery The sound is distorted Deactivate the equalizer either on this unit or the iPod Disconnect appears on the display Check the connecting cable and its connection Charge the battery Playback stops The headphones are disconnecte...

Страница 161: ... disc out holding it by the edges Always hold the disc by the edges Do not touch its recording surface When storing a disc in its case gently insert the disc around the center holder with the printed surface facing up Make sure to store discs in cases after use Connectors Center holder To keep discs clean A dirty disc may not play correctly If a disc does become dirty wipe it with a soft cloth in ...

Страница 162: ...se 40 Hz to 20 000 Hz Signal to Noise Ratio 70 dB Line Out Level Impedance 2 5 V 20 kΩ load full scale Output Impedance 1 kΩ Subwoofer Out Level Impedance 4 0 V 20 kΩ load full scale Other Terminal CD changer jack AUX auxiliary input jack USB cable Steering wheel remote input Aerial input TUNER SECTION Frequency Range FM 87 5 MHz to 108 0 MHz AM MW 522 kHz to 1 620 kHz LW 144 kHz to 279 kHz FM Tun...

Страница 163: ...ards USB 1 1 USB 2 0 Data Transfer Rate Full Speed Maximum 12 Mbps Low Speed Maximum 1 5 Mbps Compatible Device Mass storage class Compatible File System FAT 32 16 12 Playable Audio Format MP3 WMA AAC WAV Max Current 500 mA 5 V BLUETOOTH Version Bluetooth 1 2 certified Power Class Class 2 Radio possible distance 10 m Service Area 10 m Profile HFP 1 5 OPP 1 1 A2DP 1 2 AVRCP 1 3 GENERAL Power Requir...

Страница 164: ...pe GmbH Company name changed in JVC Technical Services Europe GmbH Postfach 10 05 52 61145 Friedberg Germany Sehr geehrter Kunde sehr geehrte Kundin dieses Gerät stimmt mit den gültigen europäischen Richtlinien und Normen bezüglich elektromagnetischer Verträglichkeit und elektrischer Sicherheit überein Die europäische Vertretung für die Victor Company of Japan Limited ist JVC Technology Centre Eur...

Страница 165: ...ger als 50 W beträgt stellen Sie Amp Gain anders ein um Schäden an den Lautsprechern zu vermeiden siehe Seite 34 der BEDIENUNGSANLEITUNG Um Kurzschlüsse zu verhindern die Klemmen der NICHT VERWENDETEN Leitungen mit Isolierband abdecken Der Kühlkörper erhitzt sich sehr stark Kabel dürfen nicht so platziert werden dass sie den Kühlkörper berühren Die Kabel mit dem mitgelieferten Kabelbinder zusammen...

Страница 166: ...iker einbauen УСТАНОВКА УСТАНОВКА В ПРИБОРНУЮ ПАНЕЛЬ На следующих иллюстрациях показана типовая установка Если у Вас есть какие либо вопросы касающиеся установки обратитесь к Вашему дилеру автомобилнего специалиста JVC или в компанию поставляющую соответствующие принадлежности Если Вы не знаете точно как следует устанавливать это устройство обратитесь к квалифицированному специалисту Ausbau des Ge...

Страница 167: ... схему соединений 2 Modified wiring 2 Modifizierte Verdrahtung 2 Преобразованная схема соединений 2 Vor dem Anschließen Die Verdrahtung im Fahrzeug sorgfältig überprüfen Falsche Anschlüsse können ernsthafte Schäden am Gerät hervorrufen Die Leiter des Stromkabels und die Leiter des Anschlusses im Fahrzeug können sich farblich unterscheiden 1 Schneiden Sie den ISO Steckverbinder auf 2 Die farbigen A...

Страница 168: ...m Streifen Провод внешнего устройства cиний с белой полосой To the remote lead of other equipment or power aerial if any Zum Zusatzkabel des anderen Geräts oder der Motorantenne sofern vorhanden К удаленному проводу другого оборудования или антенны Rear speakers Hintere Lautsprecher Задние громкоговорители Front speakers see diagram Vordere Lautsprecher siehe Schaltplan Передние громкоговорители с...

Страница 169: ... представлять опасность для жизни здоровья потребителя причинять вред его имуществу или окружающей среде составляет семь 7 лет со дня производства Этот срок является временем в течение которого потребитель данного товара может безопасно им пользоваться при условии соблюдения инструкции по эксплуатации данного товара проводя необходимое обслуживание включающее замену расходных материалов и или соот...

Страница 170: ...ing If you need to operate the unit while driving be sure to look around carefully or you may be involved in a traffic accident For safety Do not raise the volume level too much as this will block outside sounds making driving dangerous Stop the car before performing any complicated operations Temperature inside the car If you have parked the car for a long time in hot or cold weather wait until t...

Страница 171: ...rations 6 Using the control panel 6 Using the remote controller RM RK50 7 Listening to the radio 8 Disc operations 13 Listening to the USB device 15 Using the Bluetooth devices 16 Using the Bluetooth cellular phone 18 Using the Bluetooth audio player 21 EXTERNAL DEVICES Listening to the iPod 22 Listening to the other external components 24 SETTINGS Selecting a preset sound mode 25 General settings...

Страница 172: ...ces Lower the volume before playing these digital sources to avoid damaging the speakers by sudden increase of the output level How to use the M MODE and SEL buttons If you use M MODE or SEL select the display and some controls such as the number buttons 4 buttons 5 buttons and the control dial enter the corresponding control mode Ex When you press number button 1 after pressing M MODE to operate ...

Страница 173: ...t Demo then Off Set the clock Select Clock Hr hour then adjust the hour Select Clock Min minute then adjust the minute Select 24H 12H then 24Hours or 12Hours 4 Finish the procedure Changing the display information and pattern When the power is turned off Check the current clock time Ex When tuner is selected as the source Source operation display Audio level meter display see LevelMeter on page 28...

Страница 174: ...ted 2 Forstoringpresetphonenumber seepage20 1 TUNER Select preset station CD USB Select folder USB iPod Enter the main menu Hold 2 Turn on the power Turn off the power Hold Attenuate the sound if the power is on Bluetooth Switch the conversation media during a phone call conversation 3 Display window 4 Enter exit Bluetooth menu Display the dialed list Hold 5 Flip down the control panel To eject th...

Страница 175: ...similar tools Wrap the battery with tape and insulate when throwing away or saving it Using the remote controller RM RK50 Remote sensor 1 Turns the power on if pressed briefly or attenuates the sound when the power is on Turns the power off if pressed and held Switches the conversation media during a phone call conversation 2 Changes the FM AM bands with 5 U Changes the preset stations with D Chan...

Страница 176: ...ect the bands 3 Search for a station to listen Auto Search Manual Search Hold either one of the buttons until M lights up on the display then press it repeatedly When receiving an FM stereo broadcast with sufficient signal strength lights up on the display Note FM1 and FM2 87 5 MHz 108 0 MHz FM3 65 00 MHz 74 00 MHz While listening to an iPod in menu selecting mode Connected to the USB cable By hol...

Страница 177: ...er button 3 1 Follow steps 1 and 2 of Using the number buttons above By holding 5 the Preset Station List will also appear go to step 4 2 3 Display the Preset Station List 4 Select the preset number you want to store into You can move to the lists of the other FM bands by pressing number button 5 or 6 repeatedly 5 Store the station Listening to the preset station on the Preset Station List 1 Displ...

Страница 178: ...preset PTY codes appears on the display 4 Select a PTY code You can select a PTY code from the 29 preset PTY codes or from the six stored PTY codes To store your favorite programme types see the right column and page 11 5 Start searching for your favorite programme If there is a station broadcasting a programme of the same PTY code as you have selected that station is tuned in Storing your favorit...

Страница 179: ... If flashes TA Standby reception is not yet activated Tune in to another station providing the RDS signals To deactivate TA Standby Reception select Off in step 2 goes off PTY Standby Reception 1 2 3 Select a PTY code 4 Exit from the setting either lights up or flashes on the display If lights up the unit temporarily will switch to your favorite PTY programme from any source other than AM and FM3 ...

Страница 180: ...ing the same programme with stronger signals see the illustration below Programme A broadcasting on different frequency areas 01 05 When shipped from the factory Network Tracking Reception is activated To change the Network Tracking Reception setting see AF Regn l on page 30 Automatic station selection Programme Search Usually when you press the number buttons the preset station is tuned in If the...

Страница 181: ...AAC or track directly 1 Byholdingeitheroneofthebuttons youcandisplay theFolderList seepage14 2 Presstoselectnumber1to6 holdtoselectnumber 7to12 3 Itisrequiredthatfoldersbeassignedwith2 digit numbersatthebeginningoftheirfoldernames 01 02 03 andsoon After pressing M MODE press the following buttons to Skip 10 tracks MP3 WMA AAC Within the same folder Repeat Track Repeat current track Repeat Folder M...

Страница 182: ...t playback If another folder is selected playback starts from the 1st file of the selected folder Ex When File is selected in step 3 Selecting a folder track on the list only for MP3 WMA AAC file When is shown on the display you can move back to the previous screen by pressing number button 3 1 2 Select LIST 3 Select the list type 4 Select an item You can move to the other lists by pressing number...

Страница 183: ...ay and detach the USB device Straightly pull it out from the unit Press SOURCE to listen to another playback source You can operate the USB device in the same way you operate the files on a disc See pages 13 and 14 You can listen to WAV files by following the MP3 WMA AAC files operations listed on pages 13 and 14 Cautions Avoid using the USB device if it might hinder your safety driving Do not pul...

Страница 184: ... by preset numbers by voice command Informing you of the arrival of a text message Play back a Bluetooth audio player Connecting a Bluetooth device for the first time Pairing and PIN code When you connect a Bluetooth device to the unit for the first time make pairing between the unit and the device Pairing allows Bluetooth devices to communicate with each other To make pairing you may need to ente...

Страница 185: ... this unit Connecting flashes then Pairing Ok or Connected Device Name appears on the display when the connection is established Now you can use the device through the unit appears when the connection is established The device remains registered even after you disconnect the device Use Cnnct Phone or Cnnct Audio or activate Auto Cnnct to connect the same device from next time on See the following ...

Страница 186: ...eunit 4 Select the name phone number preset number you want to call When the sound is stopped or interrupted during the use of a Bluetooth device turn off then turn on the unit If the sound is not yet restored connect the device again See Connecting a registered device on page 17 You can set the unit to connect the Bluetooth device automatically when the unit is turned on See Auto Cnnct on page 33...

Страница 187: ...answer the waiting call Press any button except control dial To restore the on hold call press any button except control dial again When you end one call you can connect to the other When a SMS comes in If the cellular phone is compatible with SMS Short Message Service and MSG Notice is set to On see page 33 the unit rings and Received Message appears on the display to inform you of the message ar...

Страница 188: ...a the unit cellular phone During a phone call conversation Then continue your conversation using the other media Operations may be different according to the connected Bluetooth device How to copy phone book You can copy the phone book memory of a cellular phone into the unit When is shown on the display you can move back to the previous screen by pressing number button 3 1 2 Select Settings 3 Sel...

Страница 189: ...ause playback Refer also to pages 17 and 18 for connecting disconnecting deleting a registered device Bluetooth Information If you wish to receive more information about Bluetooth visit the following JVC web site http www jvc victor co jp english car After pressing M MODE press the following buttons to Repeat Track Repeat current track Repeat All Repeat all tracks Repeat Group Repeat all tracks of...

Страница 190: ...id losing the data 1 Connect an iPod to the USB cable from the rear of the unit Playback starts automatically from where it had been paused previously If an iPod has been connected press SOURCE to select USB iPod as the playback source 2 Select a track 3 Adjust the volume and sound as you want See pages 25 27 Playback control from the unit Press Go to the next or previous track Hold Fast forward o...

Страница 191: ... a track is selected playback starts automatically If the selected item has another layer you will enter the layer Repeat steps 2 and 3 until the desired track is played After pressing M MODE press the following buttons to Repeat One Same as Repeat One Repeat All Same as Repeat All Repeat Off Cancels Random Album Same as Shuffle Albums Random Song Same as Shuffle Songs Random Off Cancels Functions...

Страница 192: ...r external components You can connect an external component to the AUX auxiliary input jack on the control panel 1 Select AUX IN 2 Turn on the connected component and start playing the source 3 Adjust the volume 4 Adjust the sound as you want see pages 25 27 Connecting an external component to the AUX input jack ...

Страница 193: ...ting 2 Select EQ 3 Select On If Bypass is selected you can listen to the original sound mode recorded lights up on the display 4 Select a preset sound mode Preset value setting for each sound mode Sound mode Preset value Band 1 100 Hz Band 2 320 Hz Band 3 1 kHz Band 4 3 2 kHz Band 5 10 kHz USER 0 0 0 0 0 ROCK 3 2 0 1 1 CLASSIC 2 2 0 1 0 POPS 0 1 0 1 2 HIP HOP 4 1 2 0 1 JAZZ 3 2 1 2 2 ...

Страница 194: ...he control dial to select Off or On When On is selected low and high frequencies sound are boosted to produce a well balanced sound at low volume level 4 Exit from the setting Adjusting the sound You can adjust the sound characteristics to your preference When is shown on the display you can move back to the previous screen by pressing number button 3 or 6 1 2 For EQ setting see page 25 3 Adjust t...

Страница 195: ...d 6 to 6 2 Press number button 5 then turn the control dial to select the frequency 3 Press number button 5 then turn the control dial to select the quality slope Q 6 Repeat steps 3 and 4 to adjust the other frequency bands 7 Store the adjustments Adjustable sound elements Sound elements Range selectable items Band 1 100 Hz Band 2 320 Hz Band 3 1 kHz Band 4 3 2 kHz Band 5 10 kHz Frequency 68 Hz 10...

Страница 196: ...etting reference page MOVIE Demo Display demonstration On Off Display demonstration will be activated automatically if no operation is done for about 20 seconds 5 Cancels LevelMeter Audio level meter Meter 1 Meter 2 Select the different level meter patterns Press DISP to show the selected level meter CLOCK Clock Disp 1 Clock display On Off Clock time is shown on the display when the power is turne...

Страница 197: ...he display regardless of the setting Dimmer Dimmer From To 3 Auto Off On Time Set Dims the display when you turn on the headlights Cancels Dims the display and button illumination Set the timer for dimmer 31 Any hour Any hour Initial 18 7 Contrast Contrast 1 8 Initial 5 Adjust the display contrast to make the display indications clear and legible LCD Type Display type Auto Positive Negative Positi...

Страница 198: ...uto Wide Increases the tuner selectivity to reduce interference noises between adjacent stations Stereo effect may be lost Subject to interference noises from adjacent stations but sound quality will not be degraded and the stereo effect will remain AUDIO Beep Key touch tone On Off Activates the key touch tone Deactivates the key touch tone AudioBooks 6 Speed control of Audiobook Normal Faster Slo...

Страница 199: ... select DISP In step 3 select Dimmer 2 Select Time Set 3 Adjust the dimmer start time 1 Turn the control dial to set the dimmer start time 2 Press to select To Then turn the control dial to set the dimmer end time Category Indication Item Initial Setting reference page COLOR Color Sel Color selection Initial All Source Color Pale Select your favorite display color for each source or for all source...

Страница 200: ...peat steps 3 and 4 to select the color for each source except when selecting All Source in step 3 6 Exit from the setting Creating your own color User Color You can create your own colors Day Color or NightColor 1 Follow steps 1 to 3 on page 28 In step 2 select COLOR In step 3 select Color Set 2 Select Day Color or NightColor 3 Select a primary color 4 Adjust the level 00 to 11 of the selected pri...

Страница 201: ...fatext message 2 DisplayedonlywhenaBluetoothphone audioplayer isconnected 3 Select a setting item Auto Cnnct Ô Auto Answer Ô MSG Notice 1 Ô MIC Ô PhoneBook Ô Initialize Ô Name Ô Address Ô Version Ô Phone Device 2 Ô Audio Device 2 Ô back to the beginning 4 Change the setting accordingly If PhoneBook is selected in step 3 see page 20 for details Setting menu Initial Auto Cnnct connect When the unit ...

Страница 202: ...own Please Eject appears on the display Press OPEN then 0 to eject the disc In this manual words track and file are interchangeably used While fast forwarding or reversing on MP3 WMA AAC WAV files you can only hear intermittent sounds Basic operations Turning on the power By pressing SOURCE on the unit you can also turn on the power If the source is ready playback also starts Turning off the power...

Страница 203: ...cause malfunctions or damage to the unit Playing an MP3 WMA AAC disc This unit can play back MP3 WMA AAC files with the extension code mp3 wma or m4a regardless of the letter case upper lower This unit can show the names of albums artists performer and Tag Version 1 0 1 1 2 2 2 3 or 2 4 for MP3 files and show WMA AAC Tag This unit can display only one byte characters No other characters can be cor...

Страница 204: ...es through this unit This unit is compatible with the USB Full Speed If the connected USB device does not have the correct files No File appears This unit can show ID3 Tag Version 1 0 1 1 2 2 2 3 or 2 4 for MP3 and WMA AAC WAV Tag This unit can play back MP3 WMA AAC WAV files meeting the conditions below MP3 Bit rate 32 kbps 320 kbps MPEG 1 8 kbps 160 kbps MPEG 2 Sampling frequency 48 kHz 44 1 kHz...

Страница 205: ...and turn on the unit then connect the device again or reset the unit Please Reset Reset the unit and try the operation again If Please Reset appears again consult your nearest JVC IN CAR ENTERTAINMENT dealers iPod Controllable iPod connected through USB cable iPod nano 1st 2nd Generation iPod video 5th Generation Update your iPod to the latest software version before using it with this unit You ca...

Страница 206: ...tically changes the volume level to Volume 30 Troubleshooting What appears to be trouble is not always serious Check the following points before calling a service center Symptoms Remedies Causes General Sound cannot be heard from the speakers Adjust the volume to the optimum level Check the cords and connections The unit does not work at all Reset the unit see page 3 Connect Error appears on the d...

Страница 207: ...rack or change the disc Do not add the extension code mp3 wma m4a to non MP3 WMA AAC tracks A longer readout time is required Reading keeps flashing on the display Do not use too many hierarchical levels and folders Tracks do not play back in the order you have intended them to play The playback order is determined when the files are recorded The elapsed playing time is not correct This sometimes ...

Страница 208: ...folderthatcontains databutdoesnotcontainvalidMP3 WMA AAC WAV track No File flashes on the display No USB appears on the display Connect a USB device that contains tracks encoded in an appropriate format Not Support appears on the display and track skips The track is unplayable Read failed appears on the display The connected USB device may be malfunctioning or may not have been formatted correctly...

Страница 209: ...a better signal reception The sound is interrupted or skipped during playback of a Bluetooth audio player Reduce the distance between the unit and the Bluetooth audio player Disconnect the device connected for Phone Turn off then turn on the unit When the sound is not yet restored Connect the player again The connected audio player cannot be controlled Check whether the connected audio player supp...

Страница 210: ...d nano Disconnect the headphones from the iPod nano Update the firmware version of the iPod nano No File appears on the display No tracks are stored Import tracks to the iPod The iPod s controls do not work after disconnecting from this unit Reset the iPod Microsoft and Windows Media are either registered trademarks or trademarks of Microsoft Corporation in the United States and or other countries...

Страница 211: ... disc out holding it by the edges Always hold the disc by the edges Do not touch its recording surface When storing a disc in its case gently insert the disc around the center holder with the printed surface facing up Make sure to store discs in cases after use Connectors Center holder To keep discs clean A dirty disc may not play correctly If a disc does become dirty wipe it with a soft cloth in ...

Страница 212: ...Response 40 Hz to 20 000 Hz Signal to Noise Ratio 70 dB Line Out Level Impedance 2 5 V 20 kΩ load full scale Output Impedance 1 kΩ Subwoofer Out Level Impedance 4 0 V 20 kΩ load full scale Other Terminal AUX auxiliary input jack USB cable Aerial input TUNER SECTION Frequency Range FM1 FM2 87 5 MHz to 108 0 MHz FM3 65 00 MHz to 74 00 MHz AM MW 522 kHz to 1 620 kHz LW 144 kHz to 279 kHz FM Tuner Usa...

Страница 213: ...ards USB 1 1 USB 2 0 Data Transfer Rate Full Speed Maximum 12 Mbps Low Speed Maximum 1 5 Mbps Compatible Device Mass storage class Compatible File System FAT 32 16 12 Playable Audio Format MP3 WMA AAC WAV Max Current 500 mA 5 V BLUETOOTH Version Bluetooth 1 2 certified Power Class Class 2 Radio possible distance 10 m Service Area 10 m Profile HFP 1 5 OPP 1 1 A2DP 1 2 AVRCP 1 3 GENERAL Power Requir...

Страница 214: ...агрузите Ваше устройство Для получения информации о перезагрузке Вашего устройства обратитесь на соответствующую страницу Маєте ПРОБЛЕМУ з функціонуванням Повторно налаштуйте систему Див сторінку Як повторно налаштувати пристрій 2008 Victor Company of Japan Limited Bіктор Компані оф Джепен Лімітед 12 3 чоме Морійя чо Канагава ку Йокогама Канагава 221 8520 Японія ...

Страница 215: ...налы НЕИСПОЛЬЗУЕМЫХ проводов изоляционной лентой Радиатор во время использования сильно нагревается Старайтесь его не трогать во время удаления устройства Список деталей для установки и подключения Следующие детали поставлены в комплекте с устройством При отсутствии какого либо элемента немедленно свяжитесь с дилером автомобильного специалиста JVC Heat sink Радиатор Радіатор PRECAUTIONS on power s...

Страница 216: ... Зігніть відповідні фіксатори для надійного встановлення екрану на його місці Removing the unit Before removing the unit release the rear section Insert the two handles then pull them as illustrated so that the unit can be removed Вставьте два рычажка затем потяните их как показано на рисунке чтобы вынуть устройство Вставте дві ручки а потім потягніть їх на себе згідно з ілюстрацією щоби витягти п...

Страница 217: ...ит в комплект 2 Перед проверкой работы устройства подключите этот провод иначе питание не включится To metallic body or chassis of the car К металлическому корпусу или шасси автомобиля На металічний корпус або на шасі авто To a live terminal in the fuse block connecting to the car battery bypassing the ignition switch constant 12 V К разъему фазы в блоке предохранителя минуя блок зажигания постоян...

Страница 218: ...n Is the yellow lead connected No sound from the speakers Is the speaker output lead short circuited Sound is distorted Is the speaker output lead grounded Are the terminals of L and R speakers grounded in common Noise interfere with sounds Is the rear ground terminal connected to the car s chassis using shorter and thicker cords This unit becomes hot Is the speaker output lead grounded Are the te...

Страница 219: ... отмене демонстрации функций дисплея см на стр 5 For installation and connections refer to the separate manual Указания по установке и выполнению соединений приводятся в отдельной инструкции INSTRUCTIONS ИНСТРУКЦИИ ПО ЭКСПЛУАТАЦИИ GET0528 001A U РЕСИВЕР С ПРОИГРЫВАТЕЛЕМ КОМПАКТ ДИСКОВ KD BT22 KD BT22 ...

Страница 220: ...lved in a traffic accident Caution If the temperature inside the car is below 0 C the movement of animation and text scroll will be halted on the display to prevent the display from being blurred appears on the display When the temperature increases and the operating temperature is resumed these functions will start working again Caution on volume setting Digital devices CD USB produce very little...

Страница 221: ...ol panel 6 Using the remote controller RM RK50 7 Listening to the radio 8 Disc operations 10 Listening to the USB device 12 Using the Bluetooth devices 13 Using the Bluetooth cellular phone 15 Using the Bluetooth audio player 18 EXTERNAL DEVICES Listening to the CD changer 19 Listening to the iPod 20 Listening to the other external components 22 SETTINGS Selecting a preset sound mode 23 General se...

Страница 222: ... buttons and the control dial enter the corresponding control mode Ex When you press number button 1 after pressing M MODE to operate the FM tuner To use these controls for original functions press M MODE again However pressing SEL makes the unit enters a different mode Waiting for about 15 seconds without pressing any of these buttons will automatically cancels the control Avoid touching the conn...

Страница 223: ...hour Select Clock Min minute then adjust the minute Select 24H 12H then 24Hours or 12Hours 4 Finish the procedure Changing the display information and pattern When the power is turned off Check the current clock time Ex When tuner is selected as the source Source operation display If a station has been assigned a title station title appears after about 5 seconds To assign a title to a station see ...

Страница 224: ...page17 1 TUNER Select preset station CD USB CD CH Select folder USB iPod Enter the main menu Hold iPod Enter the main menu Pause playback Confirm selection 2 Turn on the power Turn off the power Hold Attenuate the sound if the power is on Bluetooth Switch the conversation media during a phone call conversation 3 Display window 4 Enter exit Bluetooth menu Display the dialed list Hold 5 Flip down th...

Страница 225: ...he remote controller RM RK50 Remote sensor 1 Turns the power on if pressed briefly or attenuates the sound when the power is on Turns the power off if pressed and held Switches the conversation media during a phone call conversation 2 Changes the FM AM bands with 5 U Changes the preset stations with D Changes the folder of the MP3 WMA AAC WAV While playing an MP3 disc on an MP3 compatible CD chang...

Страница 226: ...wards or reverses the track if pressed and held Changes the tracks if pressed briefly 3 Exit from the setting While listening to an iPod in menu selecting mode Connected to KS PD100 Selects an item if pressed briefly Then press D to confirm the selection Skips 10 items at a time if pressed and held Connected to the USB cable Start play back the selected folder directly if pressed and held Reverse ...

Страница 227: ... FM1 band Using the number buttons 1 2 3 Using the Preset Station list When is shown on the display you can move back to the previous screen by pressing number button 3 1 Follow steps 1 and 2 of Using the number buttons on the left column By holding 5 the Preset Station List will also appear go to step 4 2 3 Display the Preset Station List 4 Select the preset number you want to store into You can ...

Страница 228: ... source or eject the disc To stop play and eject the disc Press SOURCE to listen to another playback source Pressing or holding the following buttons allows you to Press Select track Hold Reverse fast forward track MP3 WMA AAC Select folder Number buttons 2 Locate particular folder 3 for MP3 WMA AAC or track directly 1 Byholdingeitheroneofthebuttons youcandisplay theFolderList seepage11 2 Presstos...

Страница 229: ...When File is selected in step 3 After pressing M MODE press the following buttons to Skip 10 tracks MP3 WMA AAC Within the same folder Repeat Track Repeat current track Repeat Folder MP3 WMA AAC Repeat current folder Random Folder MP3 WMA AAC Randomly play all tracks of current folder then tracks of next folders Random Disc Randomly play all tracks You can also cancel the playback mode by selectin...

Страница 230: ...ou cannot connect a computer to the USB cable from the rear of the unit Make sure all important data has been backed up to avoid losing the data Do not leave a USB device in the car expose to direct sunlight or high temperature to avoid deformation or cause damages to the device Some USB devices may not work immediately after you turn on the power For more details about USB operations see pages 34...

Страница 231: ...xt message Play back a Bluetooth audio player Refer also to the instructions supplied with the Bluetooth device Connecting a Bluetooth device for the first time Pairing and PIN code When you connect a Bluetooth device to the unit for the first time make pairing between the unit and the device Pairing allows Bluetooth devices to communicate with each other To make pairing you may need to enter the ...

Страница 232: ...ting flashes then Pairing Ok or Connected Device Name appears on the display when the connection is established Now you can use the device through the unit appears when the connection is established The device remains registered even after you disconnect the device Use Cnnct Phone or Cnnct Audio or activate Auto Cnnct to connect the same device from next time on See the following and pages 30 and ...

Страница 233: ...wing step Received Shows the list of the received calls Go to the following step Phonebook Shows the name phone number of the phone book of the unit Go to the following step To copy the phone book memory see page 17 Preset Shows the list of preset numbers Go to the following step To preset numbers see page 17 Dial Number Shows the phone number entry screen See How to enter phone number on page 16 ...

Страница 234: ...on hold and answer the waiting call Press any button except control dial To restore the on hold call press any button except control dial again When you end one call you can connect to the other When a text message comes in If the cellular phone is compatible with Text Message and MSG Notice is set to On see pages 30 and 31 the unit rings and Received Message appears on the display to inform you o...

Страница 235: ...the Instructions manual supplied with your cellular phone Presetting the phone number You can preset up to six phone numbers When is shown on the display you can move back to the previous screen by pressing number button 3 1 Display the phone number you want to preset by using one of the Call items 2 Select a phone number You can also enter a new phone number see also How to enter phone number on ...

Страница 236: ...k Refer also to pages 14 and 15 for connecting disconnecting deleting a registered device Bluetooth Information If you wish to receive more information about Bluetooth visit the following JVC web site http www jvc victor co jp english car After pressing M MODE press the following buttons to Repeat Track Repeat current track Repeat All Repeat all tracks Repeat Group Repeat all tracks of current gro...

Страница 237: ...oneofthebuttons youcandisplay theDiscList seepage11 To select a disc folder track on the list See Selecting a folder track on the list only for MP3 WMA AAC file on page 11 Select Disc in step 3 to display the Disc List of the CD changer After pressing M MODE press the following buttons to Skip 10 tracks MP3 Within the same folder Repeat Track Repeat current track Repeat Folder MP3 Repeat all track...

Страница 238: ...nect an iPod to the USB cable or through KS PD100 Playback starts automatically from where it had been paused previously If an iPod has been connected press SOURCE to select USB iPod or iPod as the playback source 2 Select a track 3 Adjust the volume and sound as you want See pages 23 25 Playback control from the unit Button For iPod connected through KS PD100 For iPod connected to the USB cable P...

Страница 239: ...y holding 5 you can fast skip in every layer of the main menu If a track is selected playback starts automatically If the selected item has another layer you will enter the layer Repeat steps 2 and 3 until the desired track is played The menu selecting mode will be canceled If no operations are performed for about 5 seconds for iPod connected through KS PD100 15 seconds for iPod connected to the U...

Страница 240: ... Adapter KS U58 Preparation Make sure Ext In is selected for the external input setting see page 28 AUX auxiliary input jack on the control panel 1 Select EXT IN or AUX IN 2 Turn on the connected component and start playing the source 3 Adjust the volume 4 Adjust the sound as you want see pages 23 25 Connecting an external component to the AUX input jack 3 5 mm stereo mini plug not supplied Portab...

Страница 241: ...t EQ 3 Select On If Bypass is selected you can listen to the original sound mode recorded lights up on the display 4 Select a preset sound mode Preset value setting for each sound mode Sound mode Preset value Band 1 100 Hz Band 2 320 Hz Band 3 1 kHz Band 4 3 2 kHz Band 5 10 kHz USER 0 0 0 0 0 ROCK 3 2 0 1 1 CLASSIC 2 2 0 1 0 POPS 0 1 0 1 2 HIP HOP 4 1 2 0 1 JAZZ 3 2 1 2 2 ...

Страница 242: ...nt select the source you want to adjust E Loudness Off or On Turn the control dial to select Off or On When On is selected low and high frequencies sound are boosted to produce a well balanced sound at low volume level 4 Exit from the setting Adjusting the sound You can adjust the sound characteristics to your preference When is shown on the display you can move back to the previous screen by pres...

Страница 243: ...to 6 2 Press number button 5 then turn the control dial to select the frequency 3 Press number button 5 then turn the control dial to select the quality slope Q 6 Repeat steps 3 and 4 to adjust the other frequency bands 7 Store the adjustments Adjustable sound elements Sound elements Range selectable items Band 1 100 Hz Band 2 320 Hz Band 3 1 kHz Band 4 3 2 kHz Band 5 10 kHz Frequency 68 Hz 100 Hz...

Страница 244: ...etting reference page MOV movie Demo Display demonstration On Off Display demonstration will be activated automatically if no operation is done for about 20 seconds 5 Cancels LevelMeter Audio level meter Meter 1 Meter 2 Select the different level meter patterns Press DISP to show the selected level meter CLOCK Clock Disp 1 Clock display On Off Clock time is shown on the display when the power is t...

Страница 245: ...u turn on the headlights Cancels Dims the display and button illumination Set the timer for dimmer 29 Any hour Any hour Initial 6PM 7AM Contrast Contrast 1 8 Initial 5 Adjust the display contrast to make the display indications clear and legible LCD Type Display type Auto Positive Negative Positive pattern will be selected during the day time 4 while negative pattern will be used during the night ...

Страница 246: ... in your iPod Initial selected item depends on your iPod setting Amp Gain Amplifier gain control High PWR Low PWR Volume 00 Volume 50 Volume 00 Volume 30 Select if the maximum power of each speaker is less than 50 W to prevent damaging the speaker COLOR Color Sel Color selection Initial All Source Color Pale Select your favorite display color for each source or for all sources 29 Color Set Color s...

Страница 247: ...each source except when selecting All Source in step 3 6 Exit from the setting Setting the time for dimmer When is shown on the display you can move back to the previous screen by pressing number button 3 1 Follow steps 1 to 3 on page 26 In step 2 select DISP In step 3 select Dimmer 2 Select Time Set 3 Adjust the dimmer start time 1 Turn the control dial to set the dimmer start time 2 Press to sel...

Страница 248: ...listed below and on page 31 according to your preference When is shown on the display you can move back to the previous screen by pressing number button 3 1 2 Select Settings 3 Select a setting item Auto Cnnct Ô Auto Answer Ô MSG Notice 1 Ô MIC Ô PhoneBook Ô Initialize Ô Name Ô Address Ô Version Ô Phone Device 2 Ô Audio Device 2 Ô back to the beginning 4 Change the setting accordingly If PhoneBook...

Страница 249: ... the unit as shown on Bluetooth devices Address Address of the unit Version Hardware and software versions of the Bluetooth module Phone Device 2 Name of the connected Bluetooth phone Audio Device 2 Name of the connected Bluetooth audio player 1 IftheconnectedBluetoothphonedoesnotsupport textmessagenotification viaBluetooth theunitwill notreceiveanynotificationuponthearrivalofatext message 2 Appea...

Страница 250: ...c playback stops Next time you select CD as the playback source playback will start from where it had been stopped previously After ejecting a disc or removing a USB device No Disc or No USB appears and you cannot operate some of the buttons Insert another disc reattach a USB device or press SOURCE to select another playback source Tuner operations Storing stations in memory During SSM search All ...

Страница 251: ...isc characteristics or for the following reasons Discs are dirty or scratched Moisture condensation has occurred on the lens inside the unit The pickup lens inside the unit is dirty The files on the CD R CD RW are written using the Packet Write method There are improper recording conditions missing data etc or media conditions stained scratched warped etc CD RWs may require a longer readout time s...

Страница 252: ...ayers This unit may be unable to play back some USB devices or some files due to their characteristics or recording conditions Depending on the shape of the USB devices and connection ports some USB devices may not be attached properly or the connection might be loose When connecting a USB mass storage class device refer also to its instructions Connect one USB mass storage class device to the uni...

Страница 253: ...nit is turned off the device is disconnected Warning messages for Bluetooth operations Connection Error The device is registered but the connection has failed Use Connect to connect the device again See page 14 Error Try the operation again If Error appears again check if the device supports the function you have tried Continuedonthenextpage Please Wait The unit is preparing to use the Bluetooth f...

Страница 254: ...es more than 16 characters it scrolls on the display This unit can display up to 128 characters Notice When operating an iPod some operations may not be performed correctly or as intended In this case visit the following JVC web site http www jvc co jp english car support ks pd100 index html Title assignment If you try to assign titles to more than 30 station frequencies Name Full appears Delete u...

Страница 255: ...ile listening to the radio Connect the antenna firmly Disc playback Disc cannot be played back Insert the disc correctly CD R CD RW cannot be played back Tracks on the CD R CD RW cannot be skipped Insert a finalized CD R CD RW Finalize the CD R CD RW with the component which you used for recording Disc can neither be played back nor ejected Unlock the disc see page 10 Eject the disc forcibly see p...

Страница 256: ...sc that contains MP3 WMA AAC tracks Not Support appears on the display and track skips Skip to the next track encoded in an appropriate format or to the next non copy protected WMA track Correct characters are not displayed e g album name This unit can only display letters capital A Z small a z numbers and a limited number of symbols see page 32 USB device Noise is generated The track played back ...

Страница 257: ...again The sound is interrupted or skipped during playback of a USB device Turn off then turn on the unit Connect the device again when the sound is not yet restored Bluetooth The unit cannot be detected by the Bluetooth device Search from the Bluetooth device again Reset the unit When Open appears on the display search from the Bluetooth device again The unit does not make pairing with the Bluetoo...

Страница 258: ... The CD changer does not work at all Reset the unit see page 3 iPod The iPod does not turn on or does not work Check the connecting cable and its connection Update the firmware version Charge the battery The sound is distorted Deactivate the equalizer either on this unit or the iPod Disconnect appears on the display Check the connecting cable and its connection Charge the battery Playback stops Th...

Страница 259: ... disc out holding it by the edges Always hold the disc by the edges Do not touch its recording surface When storing a disc in its case gently insert the disc around the center holder with the printed surface facing up Make sure to store discs in cases after use Connectors Center holder To keep discs clean A dirty disc may not play correctly If a disc does become dirty wipe it with a soft cloth in ...

Страница 260: ... Q Q slope Q0 7 to Q2 0 Frequency Response 40 Hz to 20 000 Hz Signal to Noise Ratio 80 dB Line Out Level Impedance 2 5 V 20 kΩ load full scale Subwoofer Out Level Impedance 4 0 V 20 kΩ load full scale Output Impedance 1 kΩ Other Terminal CD changer jack AUX auxiliary input jack USB cable Antenna input TUNER SECTION Frequency Range FM 87 5 MHz to 108 0 MHz AM 531 kHz to 1 602 kHz FM Tuner Usable Se...

Страница 261: ...ards USB 1 1 USB 2 0 Data Transfer Rate Full Speed Maximum 12 Mbps Low Speed Maximum 1 5 Mbps Compatible Device Mass storage class Compatible File System FAT 32 16 12 Playable Audio Format MP3 WMA AAC WAV Max Current 500 mA 5 V BLUETOOTH Version Bluetooth 1 2 certified Power Class Class 2 Radio possible distance 10 m Service Area 10 m Profile HFP 1 5 OPP 1 1 A2DP 1 2 AVRCP 1 3 GENERAL Power Requir...

Страница 262: ...d Having TROUBLE with operation Please reset your unit Refer to page of How to reset your unit Затруднения при эксплуатации Пожалуйста перезагрузите Ваше устройство Для получения информации о перезагрузке Вашего устройства обратитесь на соответствующую страницу ...

Страница 263: ...истемы требуется инвертор напряжения который может быть приобретен у дилера автомобилнего специалиста JVC ПРЕДУПРЕЖДЕНИЯ Для предотвращения коротких замыканий мы рекомендуем Вам отсоединить отрицательный разъем аккумулятора и осуществить все подключения перед установкой устройства После установки обязательно заземлите данное устройство на шасси автомобиля Примечания Заменяйте предохранитель другим...

Страница 264: ...едназначенные для прочной установки корпуса Removing the unit Before removing the unit release the rear section Insert the two handles then pull them as illustrated so that the unit can be removed Ë π ß 2 Õ π ß π ËÕß À Èæ π ß æ π Èπ ÀÈ ËÕπ ÿ ª Õ ÕÕ π Ë ËÕ Ê ß π ß Èß ÕßÕ πÕÕ π Вставьте два рычажка затем потяните их как показано на рисунке чтобы вынуть устройство Õ ÿ ª Õ ËÕπ Õ ÿ ª Õ ÀȪ ÀπÈ µ Ë π È ...

Страница 265: ...upgrade your car stereo system Connect the remote lead blue with white stripe to the remote lead of the other equipment so that it can be controlled through this unit Disconnect the speakers from this unit connect them to the amplifier Leave the speaker leads of this unit unused ÿ µËÕ Õ æ ø ÕÕ Ï æ ËÕ æ Ë ÿ æ ß ÀÈ µÕ Õ Õß πµÏ µËÕ µ Ë πÈ ß π È µ Ë ÕßÕÿª ÏÕ Ëπ Ê æ ËÕ ÿ ÿ ª Õ π È È Õ æßÕÕ ÿ ª Õ π È È ...

Страница 266: ... µÕ Ï µË ßÊ Õß JVC È Ëπ π Õ µÈÕß ÈÕ ËÕ µËÕµË ßÀ Ë πª Õ Õ ª µÕ Ï ËÕ ÿËπ iPod Õ π Õ Ï ø Õ ª µÕ Ï À ÿËπ iPod KS PD100 ËÕß Ëπ æ ß æ æ æ ÈÕ È µËÕ Line Output Õ ª µÕ Ï Line Input KS U57 ËÕß Ëπ æ ß æ æ æ ÈÕ ËÕß 3 5 Stereo Mini Õ ª µÕ Ï AUX Input KS U58 При подключении внешних устройств см также руководства поставляемые для устройств и адаптера ПРЕДОСТЕРЕЖЕНИЕ Перед подключением внешних компонентов убедит...

Страница 267: ...ENGLISH KD BT22 CD RECEIVER KD BT22 For canceling the display demonstration see page 5 For installation and connections refer to the separate manual INSTRUCTIONS GET0528 003A UT ...

Страница 268: ...lved in a traffic accident Caution If the temperature inside the car is below 0 C the movement of animation and text scroll will be halted on the display to prevent the display from being blurred appears on the display When the temperature increases and the operating temperature is resumed these functions will start working again Caution on volume setting Digital devices CD USB produce very little...

Страница 269: ...ol panel 6 Using the remote controller RM RK50 7 Listening to the radio 8 Disc operations 10 Listening to the USB device 12 Using the Bluetooth devices 13 Using the Bluetooth cellular phone 15 Using the Bluetooth audio player 18 EXTERNAL DEVICES Listening to the CD changer 19 Listening to the iPod 20 Listening to the other external components 22 SETTINGS Selecting a preset sound mode 23 General se...

Страница 270: ... buttons and the control dial enter the corresponding control mode Ex When you press number button 1 after pressing M MODE to operate the FM tuner To use these controls for original functions press M MODE again However pressing SEL makes the unit enters a different mode Waiting for about 15 seconds without pressing any of these buttons will automatically cancels the control Avoid touching the conn...

Страница 271: ...hour Select Clock Min minute then adjust the minute Select 24H 12H then 24Hours or 12Hours 4 Finish the procedure Changing the display information and pattern When the power is turned off Check the current clock time Ex When tuner is selected as the source Source operation display If a station has been assigned a title station title appears after about 5 seconds To assign a title to a station see ...

Страница 272: ...page17 1 TUNER Select preset station CD USB CD CH Select folder USB iPod Enter the main menu Hold iPod Enter the main menu Pause playback Confirm selection 2 Turn on the power Turn off the power Hold Attenuate the sound if the power is on Bluetooth Switch the conversation media during a phone call conversation 3 Display window 4 Enter exit Bluetooth menu Display the dialed list Hold 5 Flip down th...

Страница 273: ...he remote controller RM RK50 Remote sensor 1 Turns the power on if pressed briefly or attenuates the sound when the power is on Turns the power off if pressed and held Switches the conversation media during a phone call conversation 2 Changes the FM AM bands with 5 U Changes the preset stations with D Changes the folder of the MP3 WMA AAC WAV While playing an MP3 disc on an MP3 compatible CD chang...

Страница 274: ...wards or reverses the track if pressed and held Changes the tracks if pressed briefly 3 Exit from the setting While listening to an iPod in menu selecting mode Connected to KS PD100 Selects an item if pressed briefly Then press D to confirm the selection Skips 10 items at a time if pressed and held Connected to the USB cable Start play back the selected folder directly if pressed and held Reverse ...

Страница 275: ... FM1 band Using the number buttons 1 2 3 Using the Preset Station list When is shown on the display you can move back to the previous screen by pressing number button 3 1 Follow steps 1 and 2 of Using the number buttons on the left column By holding 5 the Preset Station List will also appear go to step 4 2 3 Display the Preset Station List 4 Select the preset number you want to store into You can ...

Страница 276: ... source or eject the disc To stop play and eject the disc Press SOURCE to listen to another playback source Pressing or holding the following buttons allows you to Press Select track Hold Reverse fast forward track MP3 WMA AAC Select folder Number buttons 2 Locate particular folder 3 for MP3 WMA AAC or track directly 1 Byholdingeitheroneofthebuttons youcandisplay theFolderList seepage11 2 Presstos...

Страница 277: ...When File is selected in step 3 After pressing M MODE press the following buttons to Skip 10 tracks MP3 WMA AAC Within the same folder Repeat Track Repeat current track Repeat Folder MP3 WMA AAC Repeat current folder Random Folder MP3 WMA AAC Randomly play all tracks of current folder then tracks of next folders Random Disc Randomly play all tracks You can also cancel the playback mode by selectin...

Страница 278: ...ou cannot connect a computer to the USB cable from the rear of the unit Make sure all important data has been backed up to avoid losing the data Do not leave a USB device in the car expose to direct sunlight or high temperature to avoid deformation or cause damages to the device Some USB devices may not work immediately after you turn on the power For more details about USB operations see pages 34...

Страница 279: ...xt message Play back a Bluetooth audio player Refer also to the instructions supplied with the Bluetooth device Connecting a Bluetooth device for the first time Pairing and PIN code When you connect a Bluetooth device to the unit for the first time make pairing between the unit and the device Pairing allows Bluetooth devices to communicate with each other To make pairing you may need to enter the ...

Страница 280: ...ting flashes then Pairing Ok or Connected Device Name appears on the display when the connection is established Now you can use the device through the unit appears when the connection is established The device remains registered even after you disconnect the device Use Cnnct Phone or Cnnct Audio or activate Auto Cnnct to connect the same device from next time on See the following and pages 30 and ...

Страница 281: ...wing step Received Shows the list of the received calls Go to the following step Phonebook Shows the name phone number of the phone book of the unit Go to the following step To copy the phone book memory see page 17 Preset Shows the list of preset numbers Go to the following step To preset numbers see page 17 Dial Number Shows the phone number entry screen See How to enter phone number on page 16 ...

Страница 282: ...on hold and answer the waiting call Press any button except control dial To restore the on hold call press any button except control dial again When you end one call you can connect to the other When a text message comes in If the cellular phone is compatible with Text Message and MSG Notice is set to On see pages 30 and 31 the unit rings and Received Message appears on the display to inform you o...

Страница 283: ...the Instructions manual supplied with your cellular phone Presetting the phone number You can preset up to six phone numbers When is shown on the display you can move back to the previous screen by pressing number button 3 1 Display the phone number you want to preset by using one of the Call items 2 Select a phone number You can also enter a new phone number see also How to enter phone number on ...

Страница 284: ...k Refer also to pages 14 and 15 for connecting disconnecting deleting a registered device Bluetooth Information If you wish to receive more information about Bluetooth visit the following JVC web site http www jvc victor co jp english car After pressing M MODE press the following buttons to Repeat Track Repeat current track Repeat All Repeat all tracks Repeat Group Repeat all tracks of current gro...

Страница 285: ...oneofthebuttons youcandisplay theDiscList seepage11 To select a disc folder track on the list See Selecting a folder track on the list only for MP3 WMA AAC file on page 11 Select Disc in step 3 to display the Disc List of the CD changer After pressing M MODE press the following buttons to Skip 10 tracks MP3 Within the same folder Repeat Track Repeat current track Repeat Folder MP3 Repeat all track...

Страница 286: ...nect an iPod to the USB cable or through KS PD100 Playback starts automatically from where it had been paused previously If an iPod has been connected press SOURCE to select USB iPod or iPod as the playback source 2 Select a track 3 Adjust the volume and sound as you want See pages 23 25 Playback control from the unit Button For iPod connected through KS PD100 For iPod connected to the USB cable P...

Страница 287: ...y holding 5 you can fast skip in every layer of the main menu If a track is selected playback starts automatically If the selected item has another layer you will enter the layer Repeat steps 2 and 3 until the desired track is played The menu selecting mode will be canceled If no operations are performed for about 5 seconds for iPod connected through KS PD100 15 seconds for iPod connected to the U...

Страница 288: ... Adapter KS U58 Preparation Make sure Ext In is selected for the external input setting see page 28 AUX auxiliary input jack on the control panel 1 Select EXT IN or AUX IN 2 Turn on the connected component and start playing the source 3 Adjust the volume 4 Adjust the sound as you want see pages 23 25 Connecting an external component to the AUX input jack 3 5 mm stereo mini plug not supplied Portab...

Страница 289: ...t EQ 3 Select On If Bypass is selected you can listen to the original sound mode recorded lights up on the display 4 Select a preset sound mode Preset value setting for each sound mode Sound mode Preset value Band 1 100 Hz Band 2 320 Hz Band 3 1 kHz Band 4 3 2 kHz Band 5 10 kHz USER 0 0 0 0 0 ROCK 3 2 0 1 1 CLASSIC 2 2 0 1 0 POPS 0 1 0 1 2 HIP HOP 4 1 2 0 1 JAZZ 3 2 1 2 2 ...

Страница 290: ...nt select the source you want to adjust E Loudness Off or On Turn the control dial to select Off or On When On is selected low and high frequencies sound are boosted to produce a well balanced sound at low volume level 4 Exit from the setting Adjusting the sound You can adjust the sound characteristics to your preference When is shown on the display you can move back to the previous screen by pres...

Страница 291: ...to 6 2 Press number button 5 then turn the control dial to select the frequency 3 Press number button 5 then turn the control dial to select the quality slope Q 6 Repeat steps 3 and 4 to adjust the other frequency bands 7 Store the adjustments Adjustable sound elements Sound elements Range selectable items Band 1 100 Hz Band 2 320 Hz Band 3 1 kHz Band 4 3 2 kHz Band 5 10 kHz Frequency 68 Hz 100 Hz...

Страница 292: ...etting reference page MOV movie Demo Display demonstration On Off Display demonstration will be activated automatically if no operation is done for about 20 seconds 5 Cancels LevelMeter Audio level meter Meter 1 Meter 2 Select the different level meter patterns Press DISP to show the selected level meter CLOCK Clock Disp 1 Clock display On Off Clock time is shown on the display when the power is t...

Страница 293: ...u turn on the headlights Cancels Dims the display and button illumination Set the timer for dimmer 29 Any hour Any hour Initial 6PM 7AM Contrast Contrast 1 8 Initial 5 Adjust the display contrast to make the display indications clear and legible LCD Type Display type Auto Positive Negative Positive pattern will be selected during the day time 4 while negative pattern will be used during the night ...

Страница 294: ... in your iPod Initial selected item depends on your iPod setting Amp Gain Amplifier gain control High PWR Low PWR Volume 00 Volume 50 Volume 00 Volume 30 Select if the maximum power of each speaker is less than 50 W to prevent damaging the speaker COLOR Color Sel Color selection Initial All Source Color Pale Select your favorite display color for each source or for all sources 29 Color Set Color s...

Страница 295: ...each source except when selecting All Source in step 3 6 Exit from the setting Setting the time for dimmer When is shown on the display you can move back to the previous screen by pressing number button 3 1 Follow steps 1 to 3 on page 26 In step 2 select DISP In step 3 select Dimmer 2 Select Time Set 3 Adjust the dimmer start time 1 Turn the control dial to set the dimmer start time 2 Press to sel...

Страница 296: ...listed below and on page 31 according to your preference When is shown on the display you can move back to the previous screen by pressing number button 3 1 2 Select Settings 3 Select a setting item Auto Cnnct Ô Auto Answer Ô MSG Notice 1 Ô MIC Ô PhoneBook Ô Initialize Ô Name Ô Address Ô Version Ô Phone Device 2 Ô Audio Device 2 Ô back to the beginning 4 Change the setting accordingly If PhoneBook...

Страница 297: ... the unit as shown on Bluetooth devices Address Address of the unit Version Hardware and software versions of the Bluetooth module Phone Device 2 Name of the connected Bluetooth phone Audio Device 2 Name of the connected Bluetooth audio player 1 IftheconnectedBluetoothphonedoesnotsupport textmessagenotification viaBluetooth theunitwill notreceiveanynotificationuponthearrivalofatext message 2 Appea...

Страница 298: ...c playback stops Next time you select CD as the playback source playback will start from where it had been stopped previously After ejecting a disc or removing a USB device No Disc or No USB appears and you cannot operate some of the buttons Insert another disc reattach a USB device or press SOURCE to select another playback source Tuner operations Storing stations in memory During SSM search All ...

Страница 299: ...isc characteristics or for the following reasons Discs are dirty or scratched Moisture condensation has occurred on the lens inside the unit The pickup lens inside the unit is dirty The files on the CD R CD RW are written using the Packet Write method There are improper recording conditions missing data etc or media conditions stained scratched warped etc CD RWs may require a longer readout time s...

Страница 300: ...ayers This unit may be unable to play back some USB devices or some files due to their characteristics or recording conditions Depending on the shape of the USB devices and connection ports some USB devices may not be attached properly or the connection might be loose When connecting a USB mass storage class device refer also to its instructions Connect one USB mass storage class device to the uni...

Страница 301: ...nit is turned off the device is disconnected Warning messages for Bluetooth operations Connection Error The device is registered but the connection has failed Use Connect to connect the device again See page 14 Error Try the operation again If Error appears again check if the device supports the function you have tried Continuedonthenextpage Please Wait The unit is preparing to use the Bluetooth f...

Страница 302: ...es more than 16 characters it scrolls on the display This unit can display up to 128 characters Notice When operating an iPod some operations may not be performed correctly or as intended In this case visit the following JVC web site http www jvc co jp english car support ks pd100 index html Title assignment If you try to assign titles to more than 30 station frequencies Name Full appears Delete u...

Страница 303: ...ile listening to the radio Connect the antenna firmly Disc playback Disc cannot be played back Insert the disc correctly CD R CD RW cannot be played back Tracks on the CD R CD RW cannot be skipped Insert a finalized CD R CD RW Finalize the CD R CD RW with the component which you used for recording Disc can neither be played back nor ejected Unlock the disc see page 10 Eject the disc forcibly see p...

Страница 304: ...sc that contains MP3 WMA AAC tracks Not Support appears on the display and track skips Skip to the next track encoded in an appropriate format or to the next non copy protected WMA track Correct characters are not displayed e g album name This unit can only display letters capital A Z small a z numbers and a limited number of symbols see page 32 USB device Noise is generated The track played back ...

Страница 305: ...again The sound is interrupted or skipped during playback of a USB device Turn off then turn on the unit Connect the device again when the sound is not yet restored Bluetooth The unit cannot be detected by the Bluetooth device Search from the Bluetooth device again Reset the unit When Open appears on the display search from the Bluetooth device again The unit does not make pairing with the Bluetoo...

Страница 306: ... The CD changer does not work at all Reset the unit see page 3 iPod The iPod does not turn on or does not work Check the connecting cable and its connection Update the firmware version Charge the battery The sound is distorted Deactivate the equalizer either on this unit or the iPod Disconnect appears on the display Check the connecting cable and its connection Charge the battery Playback stops Th...

Страница 307: ... disc out holding it by the edges Always hold the disc by the edges Do not touch its recording surface When storing a disc in its case gently insert the disc around the center holder with the printed surface facing up Make sure to store discs in cases after use Connectors Center holder To keep discs clean A dirty disc may not play correctly If a disc does become dirty wipe it with a soft cloth in ...

Страница 308: ... Q Q slope Q0 7 to Q2 0 Frequency Response 40 Hz to 20 000 Hz Signal to Noise Ratio 80 dB Line Out Level Impedance 2 5 V 20 kΩ load full scale Subwoofer Out Level Impedance 4 0 V 20 kΩ load full scale Output Impedance 1 kΩ Other Terminal CD changer jack AUX auxiliary input jack USB cable Antenna input TUNER SECTION Frequency Range FM 87 5 MHz to 108 0 MHz AM 531 kHz to 1 602 kHz FM Tuner Usable Se...

Страница 309: ...ards USB 1 1 USB 2 0 Data Transfer Rate Full Speed Maximum 12 Mbps Low Speed Maximum 1 5 Mbps Compatible Device Mass storage class Compatible File System FAT 32 16 12 Playable Audio Format MP3 WMA AAC WAV Max Current 500 mA 5 V BLUETOOTH Version Bluetooth 1 2 certified Power Class Class 2 Radio possible distance 10 m Service Area 10 m Profile HFP 1 5 OPP 1 1 A2DP 1 2 AVRCP 1 3 GENERAL Power Requir...

Страница 310: ... 2008 Victor Company of Japan Limited EN CT 0108DTSMDTJEIN Having TROUBLE with operation Please reset your unit Refer to page of How to reset your unit ...

Страница 311: ... car s chassis again after installation Notes Replace the fuse with one of the specified rating If the fuse blows frequently consult your JVC car audio dealer It is recommended to connect speakers with a maximum power of more than 50 W both at the rear and at the front with an impedance of 4 Ω to 8 Ω If the maximum power is less than 50 W change Amp Gain setting to prevent the speakers from being ...

Страница 312: ...ted so that the unit can be removed 按圖所示 將兩片板條型把手插入卡槽 然後 輕穩地從兩側向外拉兩片把手 本機隨之拉 出 拆卸本機 在拆卸本機前 應將本機後部的固定和連接部分鬆開 Do the required electrical connections 進行所需的電路連接 1 When you stand the unit be careful not to damage the fuse on the rear 2 Avoid touching the connectors 3 Not supplied for this unit Bend the appropriate tabs to hold the sleeve firmly in place 弄彎機殼的突舌 把外套機殼 牢固在儀表板內 INSTALLATION IN DASH MOUNTI...

Страница 313: ...metallic body or chassis of the car 接至金屬體或汽車底盤 To a live terminal in the fuse block connecting to the car battery bypassing the ignition switch constant 12 V 接至保險絲單元內的帶電端子 保險絲單元與車裝電池相連接 用於旁路點火開關 恆定 12 V To an accessory terminal in the fuse block 接至保險絲單元內的附屬端子 Right speaker rear 右揚聲器 後置 Left speaker rear 左揚聲器 後置 Right speaker front 右揚聲器 前置 Left speaker front 左揚聲器 前置 15 A fuse 15 A 保險絲 LINE OUT see ...

Страница 314: ...裝置 型號名稱 CD 換碟器 CD CH CH X1500 等 您也可以經由不同的 JVC 轉換器連接以下裝置 連接導線可能需要另購 裝置 轉換器 型號名稱 iPod iPod 端子轉換器 KS PD100 帶有線性輸出插孔的便攜式音頻 播放機 線性輸入轉換器 KS U57 帶有 3 5 mm 立體聲迷你型插孔的 便攜式音頻播放機 AUX 輸入轉換器 KS U58 To disconnect the connector 想要拔開連接器 Hold the connector tightly 1 then pull it out 2 緊按連接器 1 再將其拔出 2 CD CH KS PD100 KS U57 KS U58 USB devices USB 裝置 您不能將電腦連接至本機後面板上的 USB 電纜 USB device USB 裝置 USB cable approx 1 2 m USB...

Отзывы: