background image

ENGLISH

19

Connection

Connection


 Connecting/disconnecting  a 
registered Bluetooth device

Once the devices are registered, you can 
disconnect the current device and connect 
another device from the registered devices.

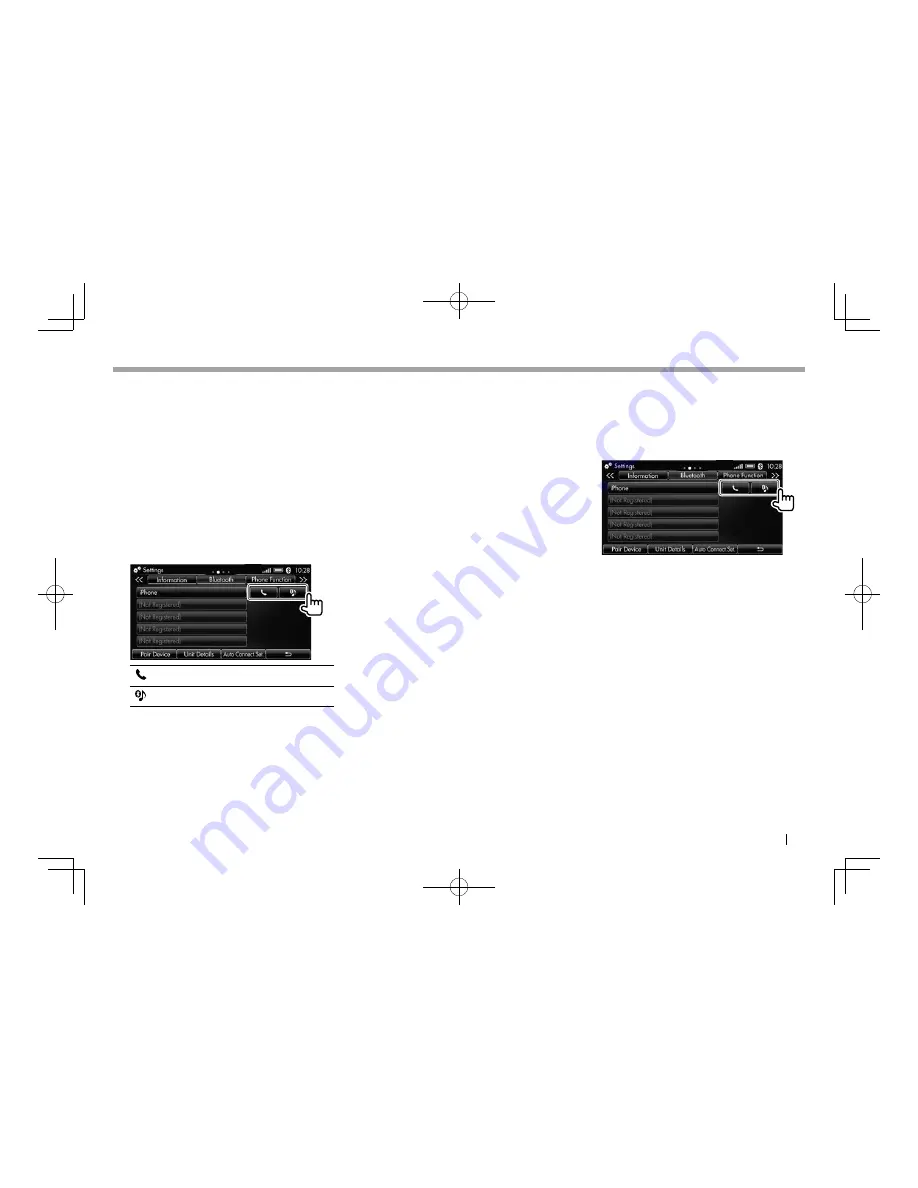
To connect a Bluetooth device manually

You can connect one mobile phone and one 
audio device from the registered devices.

1

 Display 

the 

<Bluetooth>

 settings 

screen. (Page 17)

2

  Select the device usage for the target 

device.

 ]

Connect as a mobile phone.

 ]

Connect as an audio device.

The button for the connected device is 
highlighted.

•  When selecting the device usage while 

another device is connected, a message 
window is displayed. Select 

[Yes]

. The 

previously connected device will be 
disconnected.

•  To check the device information of the 

registered device, touch the device name.

•  When a mobile phone is connected,


the signal 

strength and battery level are displayed when 
the information is acquired.

To disconnect a Bluetooth device

1

 Display 

the 

<Bluetooth>

 settings 

screen. (Page 17)

2

  Select the device usage for the device 

you want to disconnect.

A message window is displayed. Select 

[Yes]

.

LinkDisplayAudio̲NAS.indb   19

LinkDisplayAudio̲NAS.indb   19

5/12/16   5:38 PM

5/12/16   5:38 PM

Содержание K1027

Страница 1: ...er to it again if you do not understand any points or in the event of problems Although the service area is expanding Android Auto and CarPlay services are NOT available in some markets Please check the latest information concerning availability in your region from the below website Android Auto http www android com auto hit the road CarPlay http www apple com ios feature availability applecarplay...

Страница 2: ...51 SiriusXM Satellite Radio 52 Activating subscription 52 Tuning in to a channel 53 Presetting channels 55 Replaying the contents 56 Using TuneMix 56 Using TuneStart 57 Using TuneScan 57 Receiving alerts for big plays SportsFlash 58 Receiving alerts for favorite games Game Alert 60 Receiving alerts for favorite contents Artist Song Alert 61 Restricting channel reception Parental Lock 64 Resetting ...

Страница 3: ...dvance of the modification of the terms e g by publishing the information about such modification on Mitsubishi Motors web page details of website The changes of these terms enter into force within 14 days as of publishing it on such website If the customer does not agree with the modifications revisions or additions the customer s sole and exclusive remedy is to not use the product In certain jur...

Страница 4: ... AGENTS THEREOF ARE NOT LIABLE IN ANY CASE WHATSOEVER TO THE CUSTOMER A WITH RESPECT TO USE OF THE PRODUCT THE APPLICATION SOFTWARE OR DATA IN THE PRODUCT AND B ERRORS MISTAKES OR INACCURACIES OF THE APPLICATION SOFTWARE DATA OR CONTENT IN THE PRODUCT AND C ANY BUGS VIRUSES TROJAN HORSES WHICH MAY BE TRANSMITTED TO OR THROUGH THE APPLICATION OR SOFTWARE PROVIDED BY ANY THIRD PARTY AND D ANY ERRORS...

Страница 5: ...subishi Motors is not responsible for any third party applications and any term and conditions relating to the third party applications Mitsubishi Motors may change reduce limit suspend remove modify access to or disable access to any third party applications at any time and without notice to the customer 5 Modifications Mitsubishi Motors reserves the right to improve modify and change without lia...

Страница 6: ...riving without being able to hear sounds outside the vehicle may result in an accident Do not disassemble or modify the product Doing so may lead to malfunction smoke or fire Avoid relying on this product for guidance to emergency facilities hospitals fire departments police stations etc Contact such emergency facilities directly When operating ensure that the vehicle is stopped in a safe area in ...

Страница 7: ...to safe driving and lead to an accident Therefore stop the vehicle in a safe location before performing such operations Do not use this product if a malfunction has occurred such as when the screen does not light up or no sound is audible This may lead to accident fire or electric shock Ensure water or other foreign objects do not enter the product Otherwise smoke fire electric shock or malfunctio...

Страница 8: ...reens move to the current playback source control screen 7 Menu button Displays hides the menu window available for the current source and function Touch Page 11 Common screen operations Touch screen operations To perform operations on the screen you need to touch touch and hold or flick to select an item display setting menu screen or change the page etc Touch Touch the screen gently to select an...

Страница 9: ...ays tracks on a device connected via Bluetooth Page 68 Phone Displays the Phone screen to make a call Page 31 SiriusXM 1 Switches to the SiriusXM radio broadcast Page 52 Apps 2 Switches to the CarPlay screen Page 25 or Android Auto screen Page 27 iPod Plays tracks on iPod iPhone Page 38 Settings Displays the Settings screen to configure the settings Page 76 USB Plays tracks on a USB device Page 42...

Страница 10: ...yed only for plug in hybrid vehicles 7 HDMI is not displayed when the car is not equipped with the HDMI input terminal or when an HDMI device is not connected Customizing the Home screen You can change the item order on the Home screen 1 Touch and hold the item you want to move To change the page flick the screen Hold Cursors appear around the selected item 2 Move the item Touch the cursor of the ...

Страница 11: ...e menu window While the source control screen is displayed touch the Menu button on the monitor panel 2 Select an item To hide the menu window touch the Menu button on the monitor panel again List screen descriptions While displaying a list to make a selection you can display more items or change the page Indications and buttons on the list screen 2 1 3 4 5 6 7 1 Battery level and signal strength ...

Страница 12: ...page currently displayed 3 Battery level and signal strength of the connected Bluetooth mobile phone Appears when a Bluetooth mobile phone is connected 4 Bluetooth indicator Lights up when a Bluetooth device is connected 5 button Displays the previous setting tabs 6 button Displays the next setting tabs 7 button Returns to the previous screen LinkDisplayAudio NAS indb 12 LinkDisplayAudio NAS indb ...

Страница 13: ...e The Home screen is displayed Setting the clock Set the clock time displayed on the screen 1 Display the Settings screen On the Home screen touch Settings 2 Display the Clock settings screen 1 then select the setting method 2 Touch repeatedly to display the Clock setting tab Page 12 Auto Synchronizes the clock time with the GPS Go to step 3 When the GPS signal reception is not good it takes time ...

Страница 14: ...rmat is selected you can change AM PM by selecting AM PM 5 Select the time format and daylight saving time setting Switch 12H 24H Display Selects the time format 12H 12 hours 24H 24 hours Daylight Saving Time Select your country to activate the daylight saving time To deactivate it select Off In Mexico select US CA where US daylight saving time is used 6 Select the date display 1 and clock type 2 ...

Страница 15: ...iate cable depending on the iPod iPhone model Use a cable certified by Apple Inc otherwise functions may not be performed correctly For playable iPod iPhone types see page 93 For Lightning connector models Use Lightning to USB cable accessory of iPod iPhone to connect iPod iPhone iPod iPhone Lightning connector model USB input terminal Lightning to USB cable accessory of iPod iPhone For 30 pin con...

Страница 16: ...ercially available compatible with your USB device You cannot connect a computer or portable HDD to the USB input terminal For playable file types and notes on using USB devices see page 94 USB input terminal USB device USB 2 0 cable commercially available USB extension cable commercially available Connecting an HDMI device Connect an HDMI device such as a portable media player or portable DVD pla...

Страница 17: ...ay using iPhone connected via Bluetooth the Bluetooth connection is canceled When an Android phone compatible with Android Auto is connected to the USB input terminal the device is connected via Bluetooth automatically and the Bluetooth mobile phone currently connected is disconnected If the mobile phone currently connected is in use it remains connected and the Android phone compatible with Andro...

Страница 18: ...asskey displayed on the screen When the registration is complete the Bluetooth settings screen is displayed To change the passkey for registration 1 Display the Bluetooth settings screen Page 17 2 Display the Unit Bluetooth Details screen 3 Display the Change Passkey screen 4 Enter a 4 digit passkey 1 then confirm the entry 2 Touch to delete the last entry LinkDisplayAudio NAS indb 18 LinkDisplayA...

Страница 19: ... The button for the connected device is highlighted When selecting the device usage while another device is connected a message window is displayed Select Yes The previously connected device will be disconnected To check the device information of the registered device touch the device name When a mobile phone is connected the signal strength and battery level are displayed when the information is ...

Страница 20: ...ge 17 2 Display the Auto Connect Set screen 3 Activate the auto connection To cancel the auto connection select Off Deleting a registered Bluetooth device If you want to register a new device after 5 devices have been registered or if a registered device is no longer used delete the registration 1 Display the Bluetooth settings screen Page 17 2 Select the device to delete 3 Delete the registration...

Страница 21: ...e monitor panel To restore the audio source Press the PWR VOL control on the monitor panel again Displaying the clock screen You can display the large clock screen 1 Touch Clock on the Home screen To return to the Home screen Touch the Home button on the monitor panel You can display the Clock settings screen to change the clock settings from the clock screen Touch the time date display area to di...

Страница 22: ...Night settings screen On the Home screen touch Day Night 2 Select the brightness setting Auto Dims the screen and button illumination when you turn on the headlights or position lamps Day Brightens the screen and button illumination Night Dims the screen and button illumination Displaying the picture from the connected camera The around view or rear view screen from the connected camera is display...

Страница 23: ...le voice commands on this product see page 95 About Voice Control screen for this product 1 2 3 5 4 1 Voice recognition status indicator You can speak voice commands only when the indicator is highlighted 2 Instruction message Follow the message displayed 3 End button Touch or say End to exit the Voice Control screen 4 Voice command list Say a command from the list You can also perform an operatio...

Страница 24: ...n start the voice recognition control procedure in step 2 below from the next time on 2 Press and hold the button on the steering wheel By touching Start on the screen you can also activate voice control recognition 3 Speak to the connected Bluetooth device through the microphone built in the car Voice control recognition may not work when the Bluetooth connection is not good To finish using voice...

Страница 25: ...e models of iOS 8 or later iPhone 5 iPhone 5c iPhone 5s iPhone 6 iPhone 6 Plus iPhone 6s iPhone 6s Plus Connecting iPhone compatible with CarPlay Connect iPhone compatible with CarPlay to the USB input terminal using Lightning to USB cable accessory of iPhone Use a cable certified by Apple Inc otherwise functions may not be performed correctly iPhone compatible with CarPlay USB input terminal Ligh...

Страница 26: ...ed 1 Touch and hold Home to activate Siri Hold To deactivate Siri touch Home 2 Talk to Siri through the microphone built in the car To operate using the buttons on the steering wheel press and hold the button Page 72 To deactivate Siri press the button on the steering wheel Switching to the CarPlay screen while displaying another screen You can switch to the CarPlay screen while listening to anoth...

Страница 27: ...able accessory of Android phone If Android Auto and Apps are not ready install Android Auto and Apps beforehand USB input terminal USB 2 0 cable commercially available Android phone Bluetooth connection is canceled when the Android phone is connected to the USB input terminal Use the phone and audio player function on the Android phone If two Android phones compatible with Android Auto are connect...

Страница 28: ... car To deactivate voice control recognition touch To operate using the buttons on the steering wheel press and hold the button Page 72 To deactivate voice control recognition press and hold the button on the steering wheel Switching to the Android Auto screen while displaying another screen You can switch to the Android Auto screen while listening to another source or displaying another screen Th...

Страница 29: ...aled calls received calls and missed calls up to 20 entries in total Receiving a call When a call comes in the incoming call screen is displayed You can select the incoming call screen size on the Phone Function settings screen Page 37 To receive a call Touch Answer Incoming screen is shrunk when Incoming Screen Size is set to Small Screen Page 37 When Auto Answer is set to On Page 37 the product ...

Страница 30: ... can turn off the microphone temporarily While muting the Mute button is highlighted To restore the microphone volume Touch Mute again Turning off the hands free mode You can turns off the hands free mode and talk on the phone directly during a call When the hands free mode is off any buttons other than End Small Screen and Hands free OFF are disabled on the screen Entering numbers during a call Y...

Страница 31: ...screen to display the Phone screen and select a method to make a call from direct number entry address book history or favorites list When Phone Function Lock is set to On a password is required Page 36 To unlock the security enter the password then select Enter 1 Touch Phone on the Home screen 1 2 3 4 5 6 1 Enters the phone number directly Page 32 2 Makes a call 3 Displays the address book Page 3...

Страница 32: ...one To customize the address book of this product see page 34 1 Display the Phone screen Page 31 2 Display the Address Book List screen When an update of the address book is required see page 34 3 Select the contact from the address book To search for the contact by initial select Alphabet Search to display the keypad then select the initial If the initial of the contact is not a letter or number ...

Страница 33: ...phone number missed calls received calls dialed calls Selecting the phone number from the favorites list You can register a contact from the address book as a favorite to make access to the frequently used phone numbers easier To customize the favorites list see page 34 1 Display the Phone screen Page 31 2 Display the Favorites screen 3 Select the contact from the favorites list When a voice tag i...

Страница 34: ...obile phones you may need to operate the mobile phone to start transfer of the phone book Registering items to the favorites list You can register up to 20 items from the address book to the favorites list When the mobile phone is unregistered the items on the favorites list are also cleared 1 Display the Favorites screen Page 33 2 Display the Register to Favorites screen 3 Select the items to reg...

Страница 35: ...d then select the initial If the initial of the contact is not a letter or number select To close the keypad screen touch Registering voice tags for contacts in the favorites list You can register voice tags for the contacts registered in the favorites list to make calling easier using voice control You can call a contact by speaking the voice tag after activating voice control Page 23 1 Select th...

Страница 36: ...m the Settings screen see page 76 2 Activate the mobile phone security The password setting screen is displayed 3 Enter a 4 digit password 1 then confirm the entry 2 Touch to delete the last entry Touch What is Phone Function Lock to know about the Phone Function Lock To close the message window select Cancel 4 Repeat step 3 to enter the password again for confirmation The mobile phone security is...

Страница 37: ... Phone Function settings screen You can change the settings for using a mobile phone 1 Display the Phone Function settings screen To display from the menu window see the left column To display from the Settings screen see page 76 2 Change the settings Phone Volume Adjusts the volume level during a call Auto Answer Activates deactivates auto answer Off The product does not answer calls automaticall...

Страница 38: ...rk To activate deactivate the artwork see page 40 5 Track information Touching the information area displays detailed information of the current track To return to the source control screen touch 6 Progress bar and playing time total playing time By dragging the position indicator on the bar you can change the playback position Operation buttons Displays the information of the current track S T Se...

Страница 39: ... the current track playback screen select Current Track Selecting the playback mode You can select the repeat mode and shuffle mode 1 Display the menu window While the iPod source control screen is displayed touch the Menu button on the monitor panel 2 Select a playback mode Repeat Song Repeats the current track Repeat Category Repeats all tracks in the current category Repeat Off Deactivates the ...

Страница 40: ...ol screen is displayed touch the Menu button on the monitor panel 2 Select Switch iPod Each time you touch Switch iPod the iPhone iPod changes alternately Displaying hiding the album artwork You can display hide the album artwork if the file has tag data that includes the album artwork 1 Display the menu window While the iPod source control screen is displayed touch the Menu button on the monitor ...

Страница 41: ...lower Reads the contents slowly Normal Reads the contents at normal speed Faster Reads the contents faster Adjusting the sound during playback You can adjust the sound for playing iPod iPhone 1 Display the menu window While the iPod source control screen is displayed touch the Menu button on the monitor panel 2 Display the Sound settings screen 3 Make adjustment on the Sound settings screen Page 7...

Страница 42: ...k To return to the source control screen touch To activate deactivate the album artwork see page 45 5 Current folder Touching skips to a track in the previous next folder 6 Track information Touching the information area displays detailed information of the current track To return to the source control screen touch 7 Progress bar and playing time total playing time By dragging the position indicat...

Страница 43: ... Current Track Selecting the playback mode You can select the repeat mode and shuffle mode You cannot activate both the repeat mode and shuffle mode at the same time You can play up to 65535 tracks in shuffle mode 1 Display the menu window While the USB source control screen is displayed touch the Menu button on the monitor panel 2 Select a playback mode Repeat Song Repeats the current track Repea...

Страница 44: ...e select Scan To stop the track scan select Stop Settings for USB playback You can change the settings for playing USB devices from the menu window Switching to another USB device When two USB devices are connected to the USB input terminals you can switch the USB device to play 1 Display the menu window While the USB source control screen is displayed touch the Menu button on the monitor panel 2 ...

Страница 45: ... USB settings screen 3 Change the settings Off Hides the album artwork On Displays the album artwork Adjusting the sound during playback You can adjust the sound for playing USB devices 1 Display the menu window While the USB source control screen is displayed touch the Menu button on the monitor panel 2 Display the Sound settings screen 3 Make adjustment on the Sound settings screen Page 73 LinkD...

Страница 46: ...on information for analog stations 1 Station frequency currently tuned in 2 Station name 3 Preset list switch tab only for FM Selects one of the preset lists where 6 stations are registered 4 Program information Touching the information area displays detailed information sent by the current station To close the information screen touch 5 Preset list Page 49 Displayed when the FM station sends the ...

Страница 47: ...nals as well as main channel signals HD1 The currently tuned channel lights up in orange 4 HD Radio indicator Lights up in orange while receiving the digital signals of HD Radio station Lights up in gray while receiving the analog signals of HD Radio station Not displayed while receiving the signals of conventional radio stations 5 Station frequency currently tuned in 6 Station name 7 Preset list ...

Страница 48: ...and sub channel for HD Radio search starts When a station of sufficient signal strength is found the search stops automatically Touching and holding I I changes the frequencies continuously When you release the button search starts To stop searching touch I I To select sub channels directly You can select sub channel and main channel directly by touching the sub channel indicator on the source con...

Страница 49: ...eactivate Category Filter select Filter Off You can select a station from all received stations 3 Select a category The available stations for the selected category are listed The currently selected category is highlighted 4 Select a station from the list See the left column Presetting stations Storing stations in memory You can preset 6 stations for AM and 12 stations for FM 6 stations for each p...

Страница 50: ...isplay the menu window While the FM or AM source control screen is displayed touch the Menu button on the monitor panel 2 Display Tuner settings screen 3 Change the settings HD Radio FM Selects the HD Radio reception mode for FM HD Radio AM Selects the HD Radio reception mode for AM When the digital reception On is selected The indicator of the HD Radio button lights up in orange You can listen to...

Страница 51: ...ngth are found scanning stops for a while Then scanning starts again until you stop 3 Stop scanning to listen to the station Adjusting the sound while listening You can adjust the sound for while listening to the radio from the menu window 1 Display the menu window While the FM or AM source control screen is displayed touch the Menu button on the monitor panel 2 Display the Sound settings screen 3...

Страница 52: ...creen and listen to a channel 1 Touch SiriusXM on the Home screen Indications and buttons on the source control screen You can perform operations to listen to a favorite service 2 1 3 4 5 6 7 8 SiriusXM Satellite Radio reception information 1 Warning message area 2 Progress bar time code Page 56 3 Channel logo 4 Channel number Category 5 SiriusXM Satellite Radio indicators TuneMix Lights up in blu...

Страница 53: ...lert set program Pages 60 61 Go Back For SportsFlash Returns to your last tuned program from SportsFlash alerted program Page 59 Tuning in to a channel Searching for a channel You can search for a channel on the SiriusXM source control screen To tune in to a channel manually Touch repeatedly Each time you touch the button the channels change one by one Touching and holding changes the channels con...

Страница 54: ...ighlighted and also indicated by the speaker mark When the channels are parental locked the lock mark is displayed To select this channel you are required to enter the password Page 64 Once lock is canceled temporarily the unlock mark is displayed To list up channels by category Category Filter 1 Display the Station List screen See the left column 2 Display the Category Filter screen category list...

Страница 55: ...revious next song touch O or N Presetting channels Storing channels in memory You can preset 36 channels 6 for each preset list You can only use the preset channels in preset lists 1 and 2 for Smart Favorites Page 57 1 Tune in to a channel you want to preset Page 53 2 Select a preset list 1 then touch and hold a preset button to store 2 Hold The channel selected in step 1 is stored If another chan...

Страница 56: ...tes behind the current broadcast Operation buttons for Replay The following buttons work for Replay and Smart Favorites W I W Pauses Replay I Starts Replay S T S Skips Replay position backward touch and reverses hold T Skip Replay position forward touch and fast forwards hold Live Finishes Replay and goes back to the current broadcast When you turn off the power switch or ignition all buffer recor...

Страница 57: ...Start select Off To return to previous screens touch Using TuneScan You can scan the buffer recordings current channel and Smart Favorites channels So you can find your favorite songs TuneScan works for the music channels certified by SiriusXM You can also scan the buffer recording of the channels which are not parental locked When no buffer recording is available you cannot activate TuneScan To a...

Страница 58: ...e teams You can register up to 12 teams for SportsFlash You can receive information for up to 5 games at the same time 1 Display the menu window While the SiriusXM source control screen is displayed touch the Menu button on the monitor panel 2 Display Settings screen for SiriusXM 3 Display SportsFlash screen 4 Display Team Settings screen 5 Select a league 6 Select favorite teams To select teams o...

Страница 59: ... previous screens after setting is done touch Switching to the game information When a big play happens during one of the games an alert screen appears Touch Jump to listen to the big play To cancel the currently received alert touch Ignore You will receive future alerts for the game To cancel the alert for this game touch Skip Game Once you move to the alerted game you can go back to the previous...

Страница 60: ...creen for SiriusXM 3 Display Game Alert screen 4 Display Select Leagues screen 5 Select a league 6 Select favorite teams To select teams of other leagues touch and repeat this step To select teams by the team name touch Alphabet Search then enter the first letter of the team name To return to previous screens after setting is done touch repeatedly Activating Game Alert Activation is required once ...

Страница 61: ...ontents artists songs start playing You can tune in to the channel broadcasting your favorite contents artists songs Registering your favorite artists and songs You can register the artists and songs while listening to your favorite songs Total number of contents artists songs you can register is 60 Touch beside the artist name to register the artist Each time you touch the button it changes regis...

Страница 62: ...gs by name touch Alphabet Search then enter the first letter of the name To return to previous screens after setting is done touch repeatedly Activating Artist Song Alert You need to activate Artist Alert and Song Alert separately Song Alert has priority over Artist Alert if both alerts are received at the same time 1 Display the menu window While the SiriusXM source control screen is displayed to...

Страница 63: ...t song When one of your favorite contents artists songs starts playing an alert screen appears Touch Jump to tune in to the alerted broadcast program To cancel the alert for this content touch Cancel Deleting artists and songs from the list You can delete unwanted artists and songs from the lists 1 Display the menu window While the SiriusXM source control screen is displayed touch the Menu button ...

Страница 64: ...eturn to previous screens after setting is done touch repeatedly Restricting channel reception Parental Lock You can restrict access to some SiriusXM channels Restricting channel reception You need to enter the password to restrict channel reception No password is set initially at the factory Once you have registered your password note it somewhere 1 Display the menu window While the SiriusXM sour...

Страница 65: ...teps are only for User setting 7 Select the channels on the channel list The lock marks beside the channel numbers are highlighted once Parental Lock is set for the channels To change the channel list touch Category or All Channel To return to previous screens after setting is done touch repeatedly Changing the password You can use your own password 4 digit number Once you change the password note...

Страница 66: ... time you touch the button the last entered number is deleted 7 Enter the new password again for confirmation Touch to delete the incorrect entry Each time you touch the button the last entered number is deleted Resetting SiriusXM settings You can reset all SiriusXM settings To reset settings 1 Display the menu window While the SiriusXM source control screen is displayed touch the Menu button on t...

Страница 67: ...t the function that you want to know about To use the functions listed on the screen touch SXM Settings The Settings screen for SiriusXM is displayed 3 Close the help window Adjusting the sound during playback You can adjust the sound for listening to the SiriusXM from the menu window 1 Display the menu window While the SiriusXM source control screen is displayed touch the Menu button on the monit...

Страница 68: ...nd information displayed on the screen differ among the connected devices 1 2 3 4 5 Playback information 1 Repeat mode indicator Page 69 1 2 Track number Total track number 3 Shuffle mode indicator Page 69 1 4 Track information 2 Touching the information area displays detailed information of the current track To return to the source control screen touch 5 Progress bar and playing time total playin...

Страница 69: ... track track scan You can listen to the first 10 seconds of each track by scanning the tracks 1 Display the menu window While the Bluetooth Audio source control screen is displayed touch the Menu button on the monitor panel 2 Start the track scan To stop the track scan select Stop Settings for Bluetooth audio device playback You can change the settings for playing Bluetooth audio devices from the ...

Страница 70: ...e monitor panel 2 Select Bluetooth Settings 3 Change the settings For details on settings see page 77 Adjusting the sound during playback You can adjust the sound for playing Bluetooth audio devices 1 Display the menu window While the Bluetooth Audio source control screen is displayed touch the Menu button on the monitor panel 2 Display the Sound settings screen 3 Make adjustment on the Sound sett...

Страница 71: ...HDMI device is not connected Video will not be displayed while driving 1 Select HDMI as the source On the Home screen touch HDMI 2 Turn on the connected HDMI device and start playback Adjusting the sound during playback You can adjust the sound for playing external components from the menu window 1 Display the menu window While the HDMI source control screen is displayed touch the Menu button on t...

Страница 72: ...rce Press Turns off on the playback source Hold 3 button Used for the voice control recognition For operating this product see page 23 For operating the Bluetooth interfaced device see page 24 For operating CarPlay see page 26 For operating Android Auto see page 28 4 Answer button Receives the call 5 Hang up button Ends the call 6 Selection buttons Selects the tracks stations and channels Press Re...

Страница 73: ...Select Tone on the Sound settings screen See the left column 2 Adjust the tone for each sound Touch to increase and to decrease To clear the adjustments on the Tone setting screen select Reset The Punch setting is adjustable only when your car is equipped with a premium audio system with sub woofer Adjusting the speaker output balance You can adjust the output balance of the front rear speakers an...

Страница 74: ... the surround settings Surround Sets the surround type Off Deactivates surround dts Neural Surround 1 2 PremiDIA WIDE 2 Sound Field 1 Sets the center position in the sound field Stage Select this when only the driver is in the car Normal Select this when the listeners are sitting on the front seats Live Select this when the listeners are sitting on both the front and rear seats To clear the adjust...

Страница 75: ...f Deactivates the speed compensated volume effect PremiDIA HD 1 Selects the compressed audio correction level Low High Off Deactivates the effect DOLBY VOLUME 2 Selects the automatic volume adjustment level Low Med High Off Deactivates the effect To clear the adjustments on the Other settings screen select Reset 1 Displayed when your car is equipped with a premium audio system with without sub woo...

Страница 76: ...ound settings screen Adjust the sound for listening to the audio sources For details see page 73 75 Brightness Contrast settings screen Adjust the brightness and contrast of the screen Brightness Adjusts the brightness of the screen 5 to 5 Initial 3 for Day 2 for Night Contrast Adjusts the contrast of the screen 5 to 5 Initial 0 To clear the adjustments on the Brightness Contrast settings screen s...

Страница 77: ...nfirm the information about the product Version Information Shows the version of the product Open Source License Shows the open source license Touch Display to display the Open Source License To close the screen touch Bluetooth settings screen Configure settings for using Bluetooth devices such as registration connection and other general operations For details see pages 17 20 Touching the Bluetoo...

Страница 78: ... Voice Changes the learning method for voice commands of the product Manual Learns voice commands manually to recognize your voice better Selecting Manual displays the voice command setup screen After the message window is displayed select Yes Select Start on the next message window then register voice commands Use the manual setup in the quiet place when your car is parked Auto Initial Learns you...

Страница 79: ...sing USB devices For details see page 45 Album Artwork Displays hides artwork of the USB device Off On Initial Tuner settings screen Configure settings for HD Radio reception FM and AM HD Radio is not available in Canada For details see pages 50 HD Radio FM Activates HD Radio reception mode for FM For USA and Mexico Off On Initial For Canada Off Initial On HD Radio AM Activates HD Radio reception ...

Страница 80: ...ngs screen Auto Synchronizes the date and the clock time with the GPS Off On Initially checked Eastern Manual To set the clock manually check Manual then touch the date and time button shown here to display manual clock settings screen Off Initial On Switch 12H 24H Display Selects the time display format 12H Initial 24H Daylight Saving Time Select your country to activate the daylight saving time ...

Страница 81: ...nstant MPG Indicates instantaneous fuel consumption Charge Indicates instantaneously regenerated electrical power This shows the electrical power charged by Regenerative Brake but not by the engine Cumul Indicates cumulative amount of regenerated electrical power Function buttons on the screen Function Description You can read the function description After you read it touch to close the window Re...

Страница 82: ...e battery and engine and how it is consumed by them 1 Display the Vehicle Info screen On the Home screen touch Vehicle Info 2 Display the Energy Flow screen Touch to display the Energy Flow setting tab if this screen is not displayed 2 1 5 7 6 3 4 4 Indications on the energy flow screen 1 Distance you can drive only by electric power 2 Total distance you can drive both by electricity and fuel 3 En...

Страница 83: ...g Regenerative Brake To monitor energy consumption Eco Information You can check your Eco driving level Average Consumption of electricity and gasoline 1 Display the Vehicle Info screen On the Home screen touch Vehicle Info 2 Display the Eco Information screen Touch to display the Eco Information setting tab if this screen is not displayed EV Drive Ratio will be reset and become 100 when the batte...

Страница 84: ...n Touch to display the History Information setting tab if this screen is not displayed Function buttons on the screen MPG Displays fuel consumption MPG Elec Consump Displays electricity consumption mile kWh Power Displays electricity consumption used for driving and for air conditioner Regenerated electricity level is also displayed You can switch the above graphs to check the long term history an...

Страница 85: ... 5 minutes If the power switch is set to the OFF or ACC position within 5 minutes after it is turned ON short term history does not keep the record on the graph MPG histories Long term history Short term history Elec Consump histories Long term history Short term history Power histories Long term history Short term history LinkDisplayAudio NAS indb 85 LinkDisplayAudio NAS indb 85 5 12 16 5 39 PM 5...

Страница 86: ...vated The indicator on the button lights up MPG is reset when the power switch has been off for about 4 hours To manually reset average MPG data select No Manual Reset Mode Auto Reset and Manual Reset are both linked to settings of the meters To monitor your Eco driving level Eco Information You can check your Eco driving level Driving Score This function is only for the cars equipped with Idling ...

Страница 87: ...el consumption History Information You can check the fuel consumption both in a long term and in a short term and the history of your driving scores 1 Display the Vehicle Info screen On the Home screen touch Vehicle 2 Display the History Information screen Function buttons on the screen Short MPG Displays fuel consumption in a short term every 5 minutes when the engine is on Long MPG Displays fuel...

Страница 88: ...y Each time you touch the button the last entered number is deleted After you enter the price you can check the following on the screen On Long term History you can check the electricity price for the last 12 months by touching Cost On Short term History you can check the electricity cost of each day of the month Electricity cost for the last charge and total cost for the month are also shown Chec...

Страница 89: ...mperature set for the left air conditioner 8 AUTO indicator Lights up when air conditioning system is set to AUTO 9 DUAL indicator Lights up when dual air conditioning system is in use p Temperature set for the right air conditioner q Wind strength indicators w Outside temperature e Temperature set for the air conditioner Checking the current position of your car You can check the current position...

Страница 90: ... function setting tab you want is not displayed The screen shows the menu item name and its current setting Ex Keyless Entry System screen 3 Select the item to change 1 then display the setting screen 2 Ex To set Turn Signal Lights Answerback Available functions are displayed on the screen To know about the function touch Explanation To reset the function touch Reset A message window is displayed ...

Страница 91: ...ipped with the electric heater To know about this function touch What is Timed AC To reset all timers touch Reset All A message window is displayed Select Yes 3 Set the timer Select the day of the week start time and timer operating duration To reset the timer touch Reset A message window is displayed Select Yes 4 Set the other timers by repeating steps 2 and 3 To activate the timer The timer is a...

Страница 92: ... Select the day of the week start time and end time To fully charge the battery touch On for Full Charge Charging stops only after fully charged To reset the timer touch Reset A message window is displayed Select Yes 4 Set the other timers by repeating steps 2 and 3 To activate the timer The timer is activated by either the clock built in this product or the one built in the bluetooth phone connec...

Страница 93: ...droid phone compatible with this product check the Inter Operability List http www iopinfo sda mitsubishi motors com cs bt index php Notes on playing iPod iPhone The following iPod iPhone can be connected to this product You can also check updated information about iPhone models compatible with this product Check the Inter Operability List http www iopinfo sda mitsubishi motors com cs bt index php...

Страница 94: ...Notes on using a USB device This product may not play back files in a USB device properly when using a USB extension cable USB devices equipped with special functions such as data security functions cannot be used with the product Do not use a USB memory which has been divided into 2 or more partitions Depending on the shape of the USB device and connection port some USB devices may not be attache...

Страница 95: ... conditioner or heater is not too strong Voice command list To switch the source Voice commands Operations Audio On Turns on the audio source Audio Off Turns off the audio source Source List Announces the source names Once all source names are announced returns to the previous screen AM Switches to the AM source FM Switches to the FM source iPod Switches to the iPod source USB Switches to the USB ...

Страница 96: ...s the current track Repeat Category 3 Repeats all tracks in the current category Repeat Folder 1 Repeats all tracks in the current folder Repeat Off 3 Deactivates the repeat mode Repeat All 1 2 Repeats all tracks in the device Scan 1 2 For USB Select All or Folder For Bluetooth Audio Scan starts Scan On 2 Starts the track scan Scan Folder 1 Scans all the tracks in the current folder Scan All 1 Sca...

Страница 97: ...loose Contact your Mitsubishi Motors Dealer The microphone has a bad connection Contact your dealer for inspection No microphone is connected or the connection is loose Contact your Mitsubishi Motors Dealer Troubleshooting What appears to be trouble is not always serious Check the following points before calling your Mitsubishi Motors Dealer For operations with the external components refer also t...

Страница 98: ...s not work correctly You cannot use some Apps when reception status of the connected device is poor This is not a malfunction of the product Phone Phone sound quality is poor Reduce the distance between the product and the Bluetooth mobile phone Move the car to a place where you can get a better signal reception iPod iPhone No sound comes out of the speakers Disconnect iPod iPhone from the USB inp...

Страница 99: ...tooth phone Turn off then turn on the product When the sound is not yet restored connect the player again RHDMI Only for the car equipped with the HDMI input terminal No video is shown on the screen While driving no video is shown You can only listen to the sounds Disconnect then connect the HDMI device Turn on the HDMI device Connect the HDMI device correctly Specifications RMonitor section Pictu...

Страница 100: ...quency Range 2333 465 MHz to 2344 045 MHz Dynamic Range Satellite 1 2 94 0 dBm Terrestrial 90 0 dBm RHDMI interface section Connector Type TYPE E HDMI Standard HDMI 1 4 RAudio section Maximum Power Front Rear 35 W 4 at 14 4 V Power Output Full Bandwidth Power at less than 1 THD 24 W 4 External Audio Max Input Level 1 Vrms 100 kΩ Speaker Impedance 4 Ω RGeneral Operating Voltage 13 2 V 10 V to 16 V ...

Страница 101: ...been designed to connect specifically to iPod or iPhone respectively and has been certified by the developer to meet Apple performance standards Apple is not responsible for the operation of this device or its compliance with safety and regulatory standards Please note that the use of this accessory with iPod or iPhone may affect wireless performance iPhone iPod iPod classic iPod nano and iPod tou...

Страница 102: ...VEN IF ADVISED OF THE POSSIBILITY OF SUCH DAMAGE libFLAC Copyright C 2000 2001 2002 2003 2004 2005 2006 2007 2008 2009 Josh Coalson Redistribution and use in source and binary forms with or without modification are permitted provided that the following conditions are met Redistributions of source code must retain the above copyright notice this list of conditions and the following disclaimer Redis...

Страница 103: ...eration of the device Le présent appareil est conforme aux CNR d Industrie Canada applicables aux apprareils radio exempts de licence L exploitation est autorisée aux deux conditions suivantes 1 l appareil ne doit pas produire de brouillage 2 I utilisateur de l appareil doit accepter tout brouillage radioélectrique subi même si le brouillage est susceptible d en compromettre le fonctionnement The ...

Страница 104: ...rtaining to the Licensed Software Any and all copyrights and other rights pertaining to the Licensed Software and related documents shall belong to the Licensor or the original holder of the right who granted to the Licensor the license or sublicense for the Licensed Software hereinafter the Original Rightholder and the User shall not be entitled to any right other than the license granted hereund...

Страница 105: ... the software component in executable format which is based on the license granted under the GNU General Public License or Lesser General Public License hereinafter GPL LGPL it requires an availability of the source code for the relevant component For details of the software component covered by GPL LGPL please visit the following website URL http www2 jvckenwood com gpl Please note that we are un...

Отзывы: