background image

January 31, 2002 2:48 pm

Page 11

— 11 —

Master Page: Right

Editing with another video recorder or a 
camcorder

You can use your recorder as the source player or the recording 
deck. You can use a camcorder as the source player and your 
recorder as the recording deck. Refer also to the other 
components’ instruction manuals for connection and its 
operations.

A

Make connections

Connection with another video recorder

A

When using your recorder as the source player …

… connect its L-1 IN/OUT connector to the recording deck.

B

When using your recorder as the recording deck …

… connect its L-1 IN/OUT or L-2 IN/DECODER connector to the 
source player.

Connection with a camcorder

Connect the camcorder’s AUDIO/VIDEO OUT connectors to the 
recorder’s front panel AUDIO/VIDEO input connectors.

When using a monaural camcorder, connect its AUDIO OUT 
connector to the AUDIO L input connector on your recorder.

When the JVC camcorder is equipped with the Master Edit 
Control, you can control the recorder from the camcorder. 
Connect the mini-plug cable (not supplied with this recorder) 
between the PAUSE connector on the recorder and the EDIT 
connector on the camcorder.

B

Load cassettes

Insert the playback cassette into the source player and the cassette 
to be recorded on into the recording deck.

C

Select input mode on recording deck

Select the correct external input on the recording deck. On this 
recorder, press 

AUX

 and/or 

PR+/–

.

Connection with another video recorder

Select “L-1” for the L-1 IN/OUT connector, or “L-2” for the L-2 IN/
DECODER connector.

Connection with a camcorder

Select “F-1”.

D

Select edit mode

Select the appropriate edit mode for the components if such a 
mode is equipped.

On this recorder, set “PICTURE CONTROL” to “EDIT”. (

12)

E

Start playback

Engage the Play mode of the source player.

F

Start recording

Engage the Record mode of the recording deck.

Audio Dubbing

Audio Dubbing replaces the normal audio sound of a previously 
recorded tape with a new soundtrack.

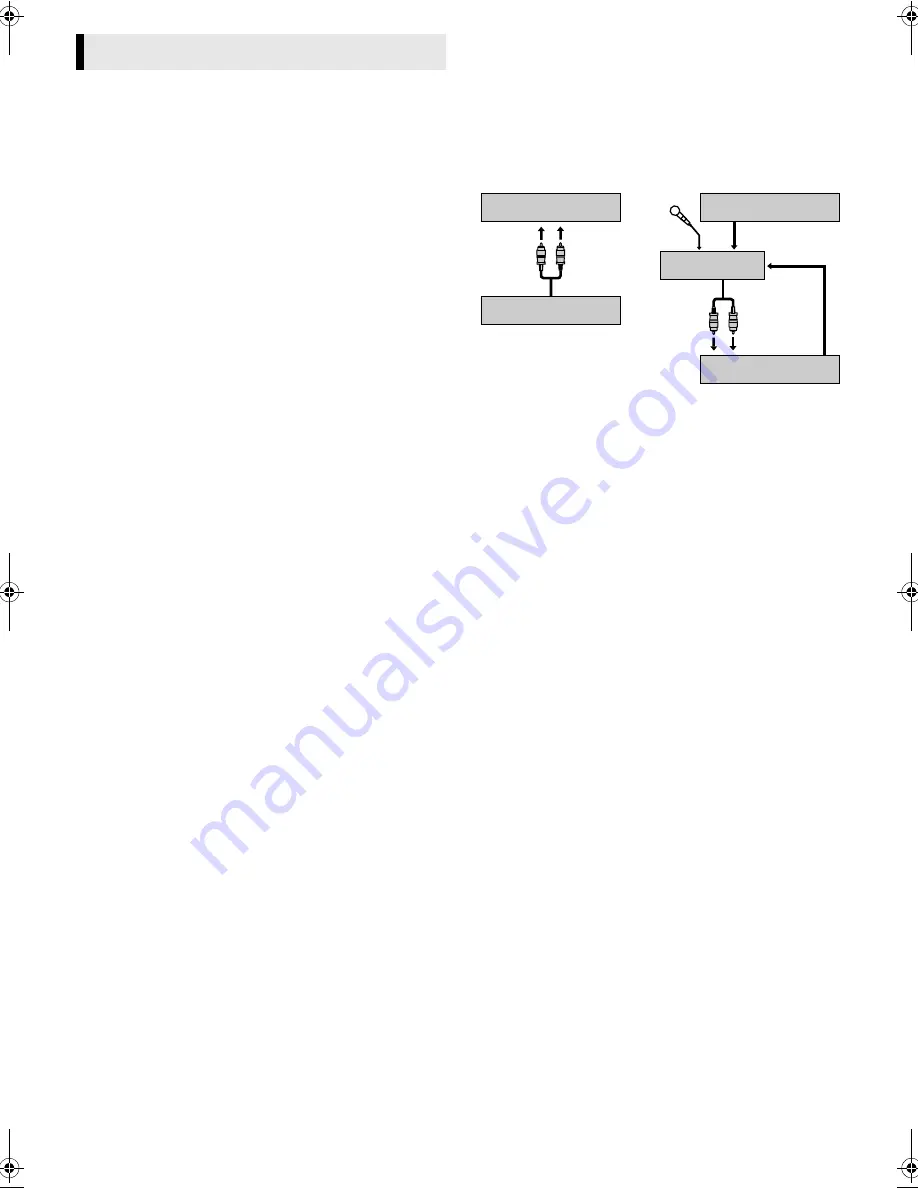
A

Make connections

Connect an audio component to the AUDIO input connectors on 
the recorder’s front panel.

When connecting a monaural audio component, use only the 
recorder’s AUDIO L input connector.

B

Select input mode on recording deck

Press 

AUX

 and/or 

PR

 to select “F-1”.

C

Locate start point, and engage Audio Dubbing mode

Load a cassette and press 

4

 on the recorder. Press 

9

 at the point 

where you want to start dubbing, then press 

A.DUB

.

The recorder enters the Audio Dubbing Pause mode. (“

” 

blinks, and “

$

” lights on the display panel.) 

To perform Audio Dubbing with audio mixing, press 

AUDIO 

twice. 

* Audio Dubbing with audio mixing is not possible if you are using a 

monaural audio component, or if you don’t have an audio mixer.

D

Start dubbing

Engage the Play mode of the audio component, then press 

4

 on 

the recorder. Audio Dubbing begins at this point.

To pause dubbing, press 

9

. Press 

4

 to resume dubbing.

E

End Audio Dubbing

Press 

8

 on the remote control or 

0

 on the recorder, then 

engage the Stop mode of the audio component.

NOTES:

When monitoring the sound during Audio Dubbing, the normal 
soundtrack is automatically selected. If you wish to hear the 
mixed sound (Hi-Fi + Normal soundtracks), press 

AUDIO

 to 

select “HI FI NORM”.

Audio Dubbing stops automatically when the counter reaches 
“0:00:00”, and the recorder enters the Play mode. Check the 
counter reading on the screen before dubbing.

Audio Dubbing is also possible using the rear panel L-1 IN/OUT 
or L-2 IN/DECODER connector. When using these 21-pin 
SCART connectors, be sure to select the correct input mode 
(“L-1” or “L-2”) in step

2

2

2

2

.

Audio Dubbing is not possible with cassettes whose record 
safety tab has been removed.

When playing back an audio-dubbed tape, press 

AUDIO

 to 

select the soundtrack you wish to hear. (

6, “Selecting 

Soundtrack”)

Editing

To AUDIO

input

Original 
sound

Your recorder

CD player, etc.

Audio Mixer

AUDIO

OUT

CD player, etc.

Your recorder

To AUDIO

input

Mixer output

HR-J790EU-001EN.fm  Page 11  Thursday, January 31, 2002  2:50 PM

Содержание HR-J790EU

Страница 1: ...t the power cord from the mains outlet 䡲 Dangerous voltage inside Refer internal servicing to qualified service personnel To prevent electric shock or fire hazard remove the power cord from the mains outlet prior to connecting or disconnecting any signal lead or aerial WARNING There are two different types of SECAM colour systems SECAM L used in FRANCE also called SECAM West and SECAM B used in Ea...

Страница 2: ...trol can operate most of your recorder s functions as well as basic functions of JVC TV sets Point the remote control toward the receiving window on the recorder The maximum operating distance of the remote control is about 8 m To operate your JVC TV while holding down TV press the corresponding button 1 TV VCR TV PR TV TV Volume TV Muting NOTE If the remote control does not work properly remove i...

Страница 3: ...B Situate recorder Place the recorder on a stable horizontal surface C Connect recorder to TV RF Connection A Disconnect the TV aerial cable from the TV B Connect the TV aerial cable to the ANT IN connector on the rear of the recorder C Connect the provided RF cable between the RF OUT connector on the rear of the recorder and the TV s aerial connector AV Connection If your TV is equipped with a 21...

Страница 4: ... If both Auto Channel Set and Clock Set have been performed successfully the correct current time is displayed Turn on the TV and select its video channel or AV mode Then make sure that all necessary stations have been stored in the recorder s memory by using the PR button s If Auto Channel Set has succeeded but Clock Set has not 1 is displayed A Turn on the TV and select its video channel or AV m...

Страница 5: ...receiver s 21 pin SCART connector D Connect Satellite Controller to recorder Connect the Satellite Controller to the SAT CONTROL connector on the rear panel E Turn on satellite receiver Turn on the satellite receiver s power F Access Main Menu screen then Initial Set screen Press MENU Press rt to place the pointer next to INITIAL SET then press OK or e G Access Sat Control Set screen Press rt to p...

Страница 6: ...again to resume normal playback If there is vertical jitter press PR or to correct the picture Pause and Frame by Frame playback Press 9 to pause then press w or e or 9 repeatedly Press 4 to resume normal playback OR Push the JOG dial to pause then turn the JOG dial to the left or right Push the JOG dial again to resume normal playback High Speed Search Press 3 or 5 OR Turn the JOG dial quickly to...

Страница 7: ...ded cassette remove its record safety tab To record on it later cover the hole with adhesive tape Basic Recording A Load a cassette Make sure the record safety tab is intact If not cover the hole with adhesive tape before inserting the cassette The recorder turns on and the counter is reset automatically B Select recording channel Press PR or the number keys Or push the JOG dial then turn it to th...

Страница 8: ...ded on the Hi Fi audio track and the standard audio programme on the normal audio track NOTES If the quality of stereo sound being received is poor the broadcast may be received in monaural with better quality Before playing back a programme recorded in stereo or a bilingual programme refer to Selecting Soundtrack 墌 6 Set the Guide Program numbers manually only in the following cases When you sele...

Страница 9: ...8 or WEEKLY number key 9 Pressing the button again makes the DAILY or WEEKLY display disappear C Press OK or PROG D Press The recorder turns off automatically and is displayed on the display panel To timer record a satellite broadcast using the SHOWVIEW system A Perform Satellite Receiver Control Set 墌 5 B Perform steps 1 1 1 1 4 4 4 4 In step 2 2 2 2 you cannot set VPS PDC to ON C Leave the satel...

Страница 10: ...o SAT for the channel position press the number key 0 E Return to normal screen Press repeatedly until no Program screen is shown F Re engage timer recording standby mode Press The recorder turns off automatically and is displayed on the display panel When AUTO TIMER is set to ON 墌 12 the timer recording standby mode automatically resumes when you turn off the recorder Automatic Satellite Programm...

Страница 11: ...ing replaces the normal audio sound of a previously recorded tape with a new soundtrack A Make connections Connect an audio component to the AUDIO input connectors on the recorder s front panel When connecting a monaural audio component use only the recorder s AUDIO L input connector B Select input mode on recording deck Press AUX and or PR to select F 1 C Locate start point and engage Audio Dubbi...

Страница 12: ...cassette NOTE The recorder checks the tape condition for about 7 seconds then starts recording To make sure you record the desired scene or programme completely perform the following steps A Press and hold 9 and press 7 After about 7 seconds the recorder re enters Record Pause mode B Press 4 to start recording 䡵 PICTURE CONTROL AUTO NORM EDIT SOFT SHARP This function helps you to adjust the playba...

Страница 13: ...ECAM signals or play back a MESECAM tape NOTES About NTSC Playback Some TVs shrink the picture vertically and place black bars at the top and bottom of the screen or cut off the top and bottom portions of superimposed displays This is not a malfunction The picture may roll up and down This can be corrected if your TV has the V HOLD control function The counter and tape remaining time readings will...

Страница 14: ...g When you can see the picture but can hear no audio select appropriate TV system For Central or Eastern Europe D K or for Western Europe B G Press e until D K or B G blinking Then press rt to select D K or B G E Store new channel Press OK Repeat steps 2 2 2 2 5 5 5 5 as necessary F Return to normal screen Press MENU Deleting a channel A Access Confirmation screen Perform step 1 1 1 1 of Manual Ch...

Страница 15: ...2 2 3 3 3 3 as necessary D Return to normal screen Press MENU TV station and ID list The ID abbreviation is what is shown on screen in lieu of the station name The ID abbreviation is listed in the Confirmation screen and is displayed on the screen when the recorder is tuned to a different station ID STATION NAME ID STATION NAME 1000 3SAT 9LIV ADLT ANT3 ARD ARTE B1 BBC BBC1 BBC2 BR3 C C1 CAN5 CANV ...

Страница 16: ...set the video channel to another vacant position and try again D Exit Video Channel Set mode Press OK Specifications shown are for SP mode unless specified otherwise E O E Design and specifications subject to change without notice Major Countries TV System Austria Denmark Finland Holland Italy Norway Spain Switzerland Sweden Germany Egypt B G China Mongolia Rumania Bulgaria Czech Rep Slovakia Hung...

Отзывы: