
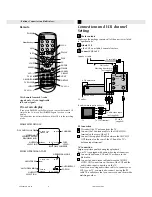


Remote
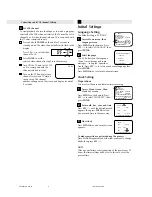
Connections and VCR channel
Setting
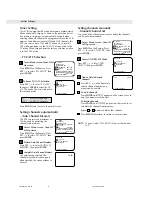
Check contents
Make sure the package contains all of the accessories listed
in “Specifications”.
Situate VCR
Place the VCR on a stable, horizontal surface.
Connect VCR to TV
1
2
3
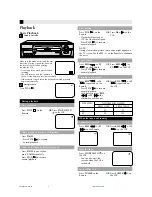
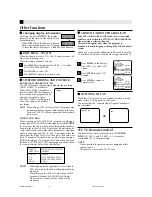
On-screen display
If you press
DISPLAY
on the Remote, you can see the current VCR
status on the TV screen. Press
DISPLAY
again to exit on-screen
display.
The indications are not recorded even if the VCR is in the recording
mode.
WHILE OPERATING A TAPE
WHILE WATCHING TV
00 : 00 : 00 SP
CH 125
8 : 30 AM THU
STEREO SAP
STEREO
CHANNEL
TAPE
SPEED
REAL TIME COUNTER
STEREO AND
SEPARATE AUDIO
PROGRAM (SAP)
OUTPUT
SELECTION
00 : 00 : 00 SP
CH 125
8 : 30 AM THU
HI-FI
AUTO TR.
STEREO
OPERATING MODE
TAPE IN
AUTO TRACKING
HI-FI STEREO
AUTO REPEAT
OUTPUT
SELECTION
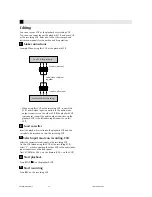
– Buttons, Connectors and Indicators –
Antenna or cable
UHF/VHF
OUT(TV)
IN(ANT)
VIDEO
OUT
AUDIO
L
R
UHF/VHF
OUT(TV)
IN(ANT)
VIDEO
OUT
AUDIO
L
R
Coaxial cable
Flat feeder
Matching transformer
(not supplied)
AC power cord
Back of VCR
AC outlet
To audio/video input connectors
Audio/video cable
(not supplied)
To 75
Ω
terminal
RF cable
(supplied)
TV
RF Connection
Disconnect the TV antenna from the TV.
Connect the TV antenna cable to the UHF/VHF IN
terminal on the rear of the VCR.
Connect the supplied RF cable between the UHF/VHF
OUT terminal on the rear of the VCR and the TV’s
antenna input terminal.
AV Connection
(improves picture quality during tape playback.)
If your TV is equipped with audio/video input connectors
Connect the antenna, VCR and TV as shown in the
illustration.
Connect an audio/video cable between the AUDIO/
VIDEO OUT connectors on the rear of the VCR and the
audio/video input connectors on the TV.
• Even if you are using audio/video cables to connect your
VCR to your TV, you must also connect it using the RF
cable. This will ensure that you can record one show while
watching another.
2
3
1
2
1
This Remote transmit A code
signals only; it is not applicable
to B code signals.
DAY AND CLOCK TIME
MENU
REC
REW
FF
CH
(AUX)
ENTER
1
2
3
4
5
6
7
0
8
9
SET
–
TV/VCR
TIMER
A.MONITOR
SP/EP
DISPLAY
CANCEL
C.RESET
TV CH
TV VOL
INPUT
+
–
+
–
+
–
+
PAUSE
PLAY
STOP
TV POWER
POWER
TV POWER
TV/VCR
Number keys
CANCEL
C.RESET
REW
REC
STOP
MENU
TV CH–/+
A.MONITOR
AUX
TIMER
CH–/+
SP/EP
PLAY
FF
PAUSE
ENTER
SET–/+
INPUT
POWER
TV VOL–/+
DISPLAY
4F22001AE Cov-07
16/01/2002, 19:05
4


