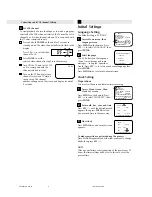
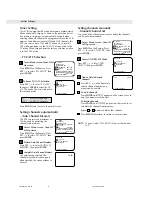
JVC HR-J6009UM Скачать руководство пользователя страница 11

Press 

MENU 

on the Remote.

Press 

SET –/+

 to select “SAP”

option.

Press 

ENTER

 to select “ON”

position.

Press 

MENU

 to return to

normal screen.

Other Functions

Changing display information

Each time you press 

DISPLAY

, the display

panel shows the time counter and the clock
time alternatively.
• When 

DISPLAY

 on the Remote is pressed,

time counter will appear on the TV screen.
To reset the time counter, press 

C. RESET

 on the Remote.

BLUE BACK — ON/OFF

When this function is set to “ON”, the TV screen becomes all
blue in the following case:
When receiving a channel not in use.

Press 

MENU

 on the remote. Press 

SET –/+

 to select

“NO NOISE BACKGROUND”.

Press 

ENTER

 to select “ON”.

Press 

MENU

 to return to normal screen.

1

2
3

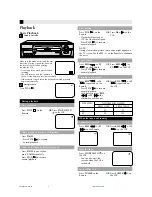
SEPARATE AUDIO PROGRAM (SAP)

When the VCR is turned on or a channel selection is made,
make certain "SAP" appears on the screen.
This means that the "Separate Audio Program" broadcast-
ing is available.

STEREO  SAP

SAP

OR

LISTENING TO SAP

Your VCR is fitted with an SAP broadcast system which
enables you to switch to a SEPARATE AUDIO PROGRAM
when viewing a selected channel.
This function applies only when the program is
broadcast in multi-languages through the SAP broadcast
system.

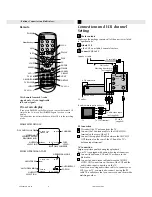
When a TV is connected with an audio/video cable, turn the
TV and this VCR on, and select the video input mode the TV.

+/–/ENTER/MENU

MENU

CLOCK SET

TIMER REC SET

ON

OFF

ON

OFF

AUTO REPEAT

CH SET UP
SAP
LANGUAGE/IDIOMA/LANGUE 

ON OFF

NO NOISE BACKGROUND

+/–/ENTER/MENU

MENU

CLOCK SET

TIMER REC SET

ON

OFF

ON

OFF

AUTO REPEAT

CH SET UP
SAP
LANGUAGE/IDIOMA/LANGUE 

ON OFF

NO NOISE BACKGROUND

STEREO RECORDING AND PLAYBACK

When a MTS STEREO broadcast is
received, the STEREO will appear on
the screen and the program can be
viewed or recorded in stereo.
The Hi-Fi STEREO recording proce-
dure is the same as for normal
recordings.

NOTE:

When using a CATV system, stereo TV programs may
be transmitted over a mono cable channel. In this case
the word "STEREO" will not appear and the sound will
be in mono.

OUTPUT SELECTION

The VHS Hi-Fi audio system permits high fidelity recording
of MTS STEREO TV broadcasts.

When viewing an MTS STEREO TV program, or playing a
prerecorded VHS Hi-Fi STEREO videotape, press 

A.MONITOR

to select how the audio will be heard through the speakers.
Normally set to the Hi-Fi STEREO position, this button can be
set to the MONO position if the stereo broadcast or videotape
audio is of poor quality. The "R" and "L" positions allow the
audio from the Right or Left Hi-Fi channel to be heard over
both TV speakers. This button has no effect when viewing a
MONO videotape or TV program. Each time when you press
the button, OUTPUT SELECTION display appears on the screen
for several seconds. Refer to the chart below.

RECORDING STEREO BROADCASTS

STEREO

NOTES: •

 When playing back a tape that is not recorded in

Hi-Fi stereo mode, the audio will automatically be
monaural.

 When listening to a VHS Hi-Fi video tape or MTS

broadcast through the VHF/UHF jack (Audio/
Video cord not connected), the sound will be
monaural.

OUTPUT
SELECTION

STEREO
L ch
R ch
MONO

SOUND HEARD ON BOTH
SPEAKERS

STEREO
LEFT CHANNEL AUDIO
RIGHT CHANNEL AUDIO
MONO

1

2

3

JVC TV Remote Control

This Remote can control some functions (

TV POWER

,

INPUT

TV CH –/+

 and 

TV VOL –/+

) of a remote

controllable JVC TV without setting.

NOTE:

• It’s not possible to operate a unit not equipped with a

remote sensor.

• This Remote can control a JVC TV only.

 4F22001AE 08-Back

16/01/2002, 19:07

11

Содержание HR-J6009UM

Страница 1: ...s power from the unit but switches operating current on and off shows electrical power standby and l shows ON This unit is produced to comply with Standard IEC 60065 Use the conversion plug provided depending on the type of your AC WALL outlet The rating plate and safety caution are on the rear of the unit IMPORTANT It may be unlawful to record or play back copyrighted material without the consent...

Страница 2: ...ch as cosmetics or medicines flower vases potted plants cups etc on top of this unit 7 DO NOT place any naked flame sources such as lighted candles on the apparatus 8 AVOID violent shocks to the VCR during transport MOISTURE CONDENSATION Moisture in the air will condense on the VCR when you move it from a cold place to a warm place or under extremely humid conditions just as water droplets form on...

Страница 3: ...FF STOP EJECT Cassette loading slot PLAY CH STOP EJECT REW FF REC VIDEO AUDIO input connectors POWER Remote sensor Rear Panel AC power cord UHF VHF IN ANT AUDIO VIDEO OUT UHF VHF OUT TV Timer Record One touch Timer Recording Tape In ATR Auto Tracking VCR AM PM Multi Function Display Display Panel 4F22001AE Cov 07 16 01 2002 19 05 3 ...

Страница 4: ...pplied To 75 Ω terminal RF cable supplied TV RF Connection Disconnect the TV antenna from the TV Connect the TV antenna cable to the UHF VHF IN terminal on the rear of the VCR Connect the supplied RF cable between the UHF VHF OUT terminal on the rear of the VCR and the TV s antenna input terminal AV Connection improves picture quality during tape playback If your TV is equipped with audio video in...

Страница 5: ...R Press MENU twice to return to normal screen ENTER MENU LANGUAGE IDIOMA LANGUE ENGLISH FRANCAIS ESPA OL ENTER MENU MENU CLOCK SET TIMER REC SET ON OFF ON OFF AUTO REPEAT CH SET UP SAP LANGUAGE IDIOMA LANGUE ON OFF NO NOISE BACKGROUND 2 3 4 Initial Settings Clock Setting Access Menu screen then Clock Set screen Press MENU on the Remote Press SET to select CLOCK SET then press ENTER ENTER MENU MENU...

Страница 6: ...annels this VCR can receive up to 113 Cable TV channels To use this VCR with an antenna set the TV CATV menu option to the TV mode When shipped from the factory this menu option is in the CATV mode ENTER MENU CH SET UP TV CATV AUTO CH MEMORY ADD DELETE CH 001 ENTER MENU MENU CLOCK SET TIMER REC SET ON OFF ON OFF AUTO REPEAT CH SET UP SAP LANGUAGE IDIOMA LANGUE ON OFF NO NOISE BACKGROUND Setting ch...

Страница 7: ...on the Remote Pause playback and view still picture Press PAUSE Press PLAY to resume normal playback Pause and Frame by Frame playback Press PAUSE to pause then press PAUSE repeatedly Press PLAY to resume normal playback Slow motion Press PLAY on the Remote Playback will proceed at 1 10 th of the normal speed Press PLAY to resume normal playback Speed search Press REW or FF on the Remote Press PLA...

Страница 8: ...briefly for a fine adjustment or press and hold for a coarse adjustment Press SP EP on the Remote to reactivate automatic tracking Playing back tape repeatedly Auto Repeat Play Access Menu screen Press MENU on the Remote Press SET to select AUTO REPEAT ENTER MENU MENU CLOCK SET TIMER REC SET ON OFF ON OFF AUTO REPEAT CH SET UP SAP LANGUAGE IDIOMA LANGUE ON OFF NO NOISE BACKGROUND ENTER MENU MENU C...

Страница 9: ...e the chart To cancel OTR press STOP or turn off the power CH 125 The One touch Timer Recording feature provides a simple and convenient way to make a timed recording EXAMPLE One touch Timer Recording for 30 minutes When a TV is connected with an audio video cable turn the TV on and select the video input mode on the TV Load a cassette tape with the erase prevention tab intact The clock display wi...

Страница 10: ...ding the automatic rewinding mechanism does not function NOTE Do not overlap programs as portions of the conflicting programs will be lost The first recording time has priority over the next recording time as shown in the diagram ENTER CANCEL MENU 26 WE 11 00PM 11 30PM 125 EP DATE START END CH ENTER CANCEL MENU DATE START END CH When setting the Timer Recording press ENTER until the desired settin...

Страница 11: ...adcast is received the STEREO will appear on the screen and the program can be viewed or recorded in stereo The Hi Fi STEREO recording proce dure is the same as for normal recordings NOTE When using a CATV system stereo TV programs may be transmitted over a mono cable channel In this case the word STEREO will not appear and the sound will be in mono OUTPUT SELECTION The VHS Hi Fi audio system perm...

Страница 12: ...o the left audio input connector on this VCR Load cassettes Insert the playback cassette into the playback VCR and the cassette to be recorded on into the recording VCR Select input mode on recording VCR Select the correct external input on the recording VCR On this VCR when using this VCR as the recording VCR Select L when connecting the other VCR to the audio video input connectors on the front ...

Страница 13: ...ce of vinyl tape over the gap Press the Number key or CH button to select your desired TV program The TIMER button has not been pressed The TIMER REC symbol is not lit on the display The time is not set correctly The recording start end time is not set correctly Set to TV or turn off the VCR power button The TV VCR function is in the VCR mode Before Requesting Service Make sure by first checking t...

Страница 14: ... to change without notice Specifications AC 110 V 220 V 50 Hz 60 Hz 10 W 2 0 W 5 C to 40 C 41 F to 104 F 20 C to 60 C 4 F to140 F Horizontal only 360 mm x 95 mm x 224 mm 3 2 kg VHS NTSC standard 210 min with ST 210 video cassette 630 min with ST 210 video cassette NTSC type color signal and EIA monochrome signal 525 lines 60 fields DA 4 Double Azimuth head helical scan system 42 dB 230 lines 100 H...

Отзывы: