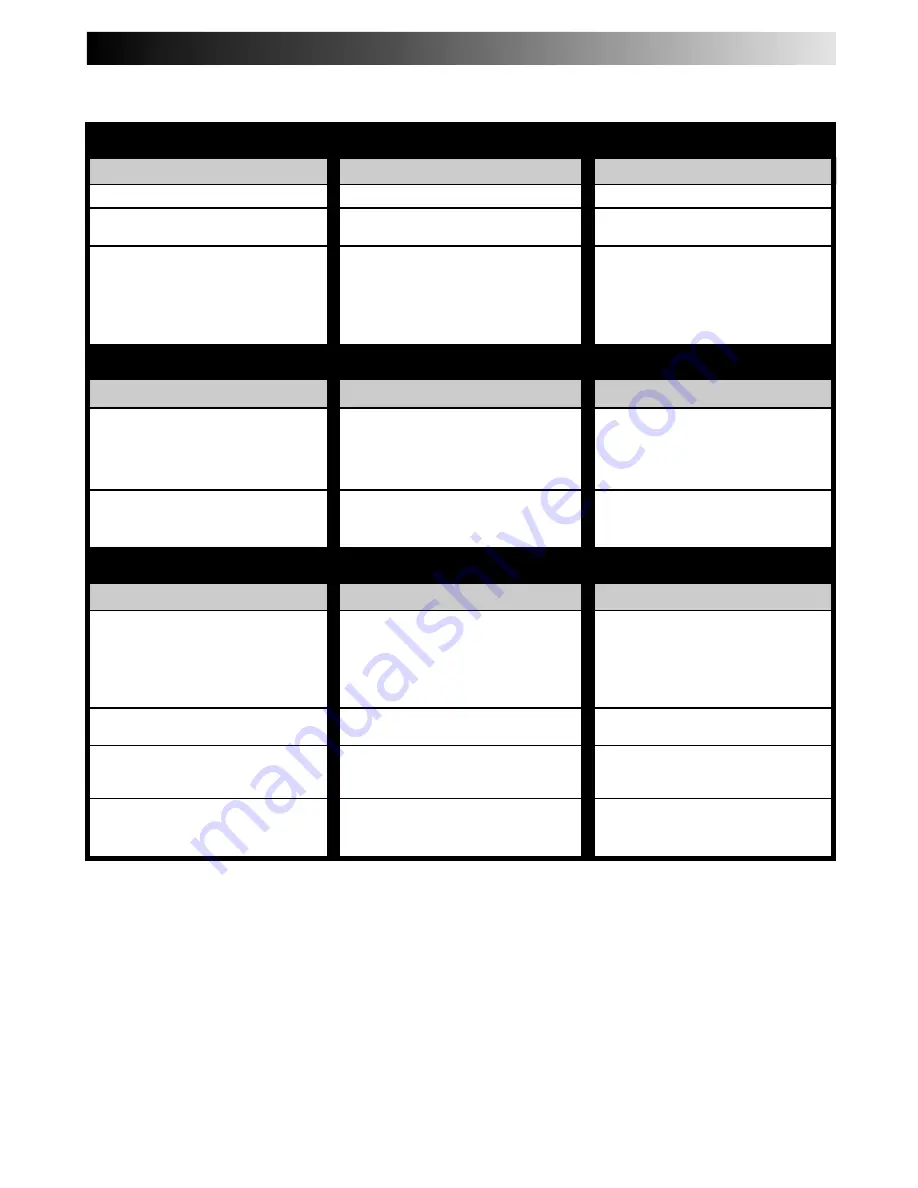
background image

EN 

59

TROUBLESHOOTING

Before requesting service for a problem, use this chart and see if you can repair the trouble yourself. Small problems are often easily
corrected, and this can save you the trouble of sending your VCR off for repair.

POSSIBLE CAUSE

The power cord is disconnected.

The TIMER mode is engaged with
Auto Timer set to "OFF" (

Z

 pg. 47).

The batteries are discharged.

The A/B CODE switch is in the
wrong position.

The TV/CABLE/DBS/VCR switch is
in the wrong position.

SYMPTOM

1. The power won’t come on.

2. The clock works, but the VCR’s

power won’t come on.

3. The remote control won’t function.

CORRECTIVE ACTION

Connect the power cord.

Press TIMER to disengage.

Replace the dead batteries with new ones.
Re-perform the A/B Code setting
(

Z

 pg. 58).

Set the switch to the position
corresponding with the unit you want
to operate.

POWER

POSSIBLE CAUSE

The cassette was inserted incorrectly.

The Counter Memory indicator
(“M”) is lit on the front display
panel.

SYMPTOM

1. The cassette gets stuck partway

during loading, and is ejected.

2. The tape stops during rewind or

fast forward.

CORRECTIVE ACTION

Make sure the cassette's window is
facing up, the rear label side is facing
you and the arrow on the front of the
cassette is pointing towards the VCR.
Then insert the cassette

Press C.MEMORY to disengage the
Counter Memory mode and extin-
guish the indicator (

Z

 pg. 31).

SYMPTOM

1. The tape is running but the picture

won’t appear.

2. Breaks are noticeable in Hi-Fi

soundtrack.

3. The playback picture is blurred or

interrupted, even though TV
broadcasts are clear.

4. The Hi-Fi soundtrack cannot be

heard.

POSSIBLE CAUSE

If you’re using the RF OUT connec-
tion (

Z

 pg. 6), the channel selector

on the TV is set incorrectly.

If you’re using the AV connection
(

Z

 pg. 6), the TV receiver is set to

the wrong mode.

Automatic tracking is engaged.

The video heads may be dirty.

The AUDIO MONITOR option at
the Audio Select screen was set
incorrectly.

CORRECTIVE ACTION

Set the channel selector to channel 3
or 4.

Set the TV receiver to its AV mode.

Disengage Auto Tracking and adjust
the tracking manually (

Z

 pg. 26).

The heads must be cleaned. Consult
your JVC dealer.

Set AUDIO MONITOR to "HI-FI"
(

Z

 pg. 29).

TAPE TRANSPORT

PLAYBACK

CONTINUED ON NEXT PAGE.

Содержание HR-DD840KR

Страница 1: ...USE REC STOP EJECT PLAY q POWER REW FF JOG SHUTTLE VIDEO MONO L AUDIO R SP EP MENU CH OK A DUB SLOW SLOW H M S V C R TIMER ST SAP AM PM RE C PLAY PAUSE M 8 4 0 6 10 20dB NORM L R SP ILLUMI GUIDE C MEMORY SKIP SEARCH POWER ENTER PLAY STOP OSD DAILY M F AUX C RESET CH SKIP CANCEL TV VOL CH SP EP DISPLAY TV VCR VIDEO TV CABLE DBS VCR TIMER WEEKLY A 1 2 4 5 3 6 8 0 7 9 B REW REC FF PAUSE ADD MENU OK M...

Страница 2: ...to vibration 2 DO NOT block the VCR s ventilation openings 3 DO NOT place heavy objects on the VCR or remote control 4 DO NOT place anything which might spill on top of the VCR or remote control 5 AVOID violent shocks to the VCR during transport MOISTURE CONDENSATION Moisture in the air will condense on the VCR when you move it from a cold place to a warm place or under extremely humid conditions ...

Страница 3: ... paying particular attention to cords at plugs convenience receptacles and the point where they exit from the product 5 Ventilation Slots and openings in the cabinet are provided for ventilation To ensure reliable operation of the product and to protect it from overheating these openings must not be blocked or covered Do not block the openings by placing the product on a bed sofa rug or other simi...

Страница 4: ...plained in the manual This section also illustrates the controls and connections on the front and rear panel the front display panel and the remote control The Z mark signals a reference to another page for instructions or related information Operation buttons necessary for the various procedures are clearly indicated through the use of illustrations at the beginning of each major section BEFORE Y...

Страница 5: ...S 67 FOR SERVICING Only in U S A 68 WARRANTY Only in U S A 69 INSTALLING YOUR NEW VCR 6 Basic Connections 6 INITIAL SETTINGS 7 Plug Play 7 Language 8 Clock 9 Preparation 9 Semi Auto 10 Manual 11 Auto 11 Tuner 12 Set Receivable Channels 12 Add Or Delete A Channel 14 Cable Box Control 15 Situate And Connect Controller 15 Set Cable Box Output Channel 16 Set Cable Box Brand 17 VCR Plus Setup 18 DBS Re...

Страница 6: ...red on the clock and tuner channels are being set automatically Wait for the time to be displayed on the front display panel before powering on the VCR FINAL PREPARATION FOR USE 5 Power on the VCR and select the VCR channel 3 or 4 by setting the switch on the rear of the VCR as shown in the illustration You can now perform simple playback Z pg 23 or simple recording Z pg 24 INSTALLING YOUR NEW VCR...

Страница 7: ...enna cable may not be connected to the VCR there may not be a Host PBS signal available in your area or your cable box may not be set to the PBS channel Ensure that the antenna cable is connected correctly If you use a cable box ensure that your local PBS channel is selected on your cable box Z ATTENTION CABLE BOX SUB SCRIBERS Then power on and power off the VCR the Plug Play function will be auto...

Страница 8: ...n Spanish or French move the highlight bar arrow to LANGUAGE SELECT by pressing CH5 or TIME SCAN5 then press OK SELECT LANGUAGE 5 At the Language Select screen move the highlight bar arrow to the desired language by pressing CH5 or TIME SCAN5 then press MENU as many times as necessary to return to the normal screen 1 2 4 5 3 6 8 0 7 9 q Turn on the TV and select the VCR channel 3 or 4 or AV mode M...

Страница 9: ...e Main Menu screen move the highlight bar arrow to CUSTOM SET by pressing CH5 or TIME SCAN5 then press OK ACCESS CLOCK SET MODE SELECT SCREEN 4 Move the highlight bar arrow at the Custom Set screen to OVERRIDE AUTO CLOCK SET by pressing CH5 or TIME SCAN5 then press OK Turn on the TV and select the VCR channel 3 or 4 or AV mode MAIN MENU PROGRAM SET FUNCTION SET TUNER SET CUSTOM SET AUTO PICTURE VI...

Страница 10: ... MENU if AUTO is highlighted on the Host Channel Select screen To manually select AUTO or the PBS channel press CH or TIME SCAN5 to cycle through AUTO or the channel numbers hold button down to speed through numbers and stop when the desired number appears Press MENU and the Semi Auto Clock Set screen reappears NOTES For cable box users Select AUTO or the channel on your VCR that receives the cabl...

Страница 11: ...sing CH or TIME SCAN5 then press MENU twice to return to the Semi Auto Clock Set screen SELECT D S T MODE 9 You have three choices a Select AUTO and the adjustment to your VCR s clock will be made according to the incoming signal from the host channel b Select ON and the adjustment will be made based on the clock itself c Select OFF if Daylight Saving Time doesn t apply to you Move the highlight b...

Страница 12: ...nnels are skipped NOTES At the end of Auto Channel Set SCAN COMPLETED appears on screen If the scan was unsuccessful SCAN COMPLETED NO SIGNAL appears on screen Check the connections and start again RETURN TO NORMAL SCREEN 5 Press MENU as many times as necessary INITIAL SETTINGS cont Turn on the TV and select the VCR channel 3 or 4 or AV mode MAIN MENU PROGRAM SET FUNCTION SET TUNER SET CUSTOM SET ...

Страница 13: ...set the channels At the Tuner Set screen move the highlight bar arrow to BAND by pressing CH5 or TIME SCAN5 then press OK Press MENU as many times as necessary to return to the normal screen INFORMATION TUNER SET BAND AFC AUTO CHANNEL SET MANUAL CHANNEL SET PRESS 5 THEN OK PRESS MENU TO END BAND TV CATV PRESS 5 TO SELECT PRESS MENU TO END 1 2 4 5 3 6 8 0 7 9 q MENU O K MENU C H TIME SCAN CH OK ...

Страница 14: ...r tuning on certain CATV systems ACCESS MANUAL CHANNEL SET SCREEN 4 Move the highlight bar arrow to MANUAL CHANNEL SET by pressing CH5 or TIME SCAN5 then press OK STORE OR SKIP DESIRED CHANNEL 5 Input the channel number using the NUMBER keys or by pressing CH5 or TIME SCAN5 then press ADD to add or CH SKIP to delete Repeat for each channel you want to store or skip RETURN TO NORMAL SCREEN 6 Press ...

Страница 15: ...he same channel as the cable box RF output see page 16 also NOTE When connecting your cable box refer to its instruction manual CONNECT CONTROLLER TO VCR 4 Connect to the CABLE BOX connector on your VCR About Your Cable Box This VCR has two separate methods to control your Cable Box The VCR s Wireless Remote Control Unit can control your Cable Box This eliminates the need for a separate Cable Box ...

Страница 16: ...ed to your VCR s AUDIO VIDEO IN connectors press CH5 or TIME SCAN5 to move the highlight bar arrow to ON LINE RETURN TO VCR PLUS SET UP SCREEN 7 Press MENU Turn on the TV and select the VCR channel 3 or 4 or AV mode TURN ON THE VCR 1 Press POWER ACCESS MAIN MENU SCREEN 2 Press MENU as many times as necessary Set Cable Box Output Channel MAIN MENU PROGRAM SET FUNCTION SET TUNER SET CUSTOM SET AUTO ...

Страница 17: ... one that is compat ible with your VCR The VCR can only change the cable box channel through the Controller during timer recording If your cable box is one that can t be operated with a remote control because it has no remote sensor you can t use the Controller to change its channels Make sure to leave the cable box turned on and tuned to the proper channel before the scheduled start of timer reco...

Страница 18: ...stings have section such as a chart indicating the Guide Channel numbers assigned to each station For accurate VCR Plus Programming the VCR Plus Guide Channel number for each station should match the channel number on which it is received in your area If the numbers match go directly to VCR Plus Timer Programming Z pg 42 If the numbers are different and you want to be able to timer record programs...

Страница 19: ...l and VCR or cable box channel numbers you input appear on the screen in ascending order Check to ensure you ve entered them correctly If you entered more than 10 sets of numbers press OK to see the next set of numbers Guide Channel Map contains only the Guide Channels and VCR or CABLE channels that you entered RETURN TO NORMAL SCREEN 10 Press MENU as many times as necessary You can now use VCR Pl...

Страница 20: ... The VCR s Wireless Remote Control Unit can control your DBS Receiver This eliminates the need for a separate DBS Receiver Remote Control Unit The VCR s Controller can also control your DBS Receiver This allows the VCR to change your DBS receiver s channel number during timer recording Each method must be set up separately To set up the VCR s Remote Control unit refer to page 57 To set up the Cont...

Страница 21: ...s connected to your VCR If your DBS receiver is connected to your VCR using an RF connection press CH5 or TIME SCAN5 to move the highlight bar arrow to the channel number representing the DBS receiver s output 3 4 If your DBS receiver is connected to your VCR s AUDIO VIDEO IN connectors press CH5 or TIME SCAN5 to move the highlight bar arrow to ON LINE RETURN TO CUSTOM SET SCREEN 6 Press MENU MAIN...

Страница 22: ...r DBS receiver doesn t respond to the code you can t use the Controller to change satellite channels In this case make sure to leave the DBS receiver turned on and tuned to the proper channel before the scheduled start of timer recording The VCR can only change the satellite channel through the Controller during timer recording If your DBS receiver is one that can t be operated with a remote contr...

Страница 23: ... START PLAYBACK 3 Press PLAY AUTO PICTURE appears on screen Z pg 35 STOP PLAYBACK 4 Press STOP or STOP EJECT Then press STOP EJECT to remove the cassette Full Size VHS T 30 ST 30 T 60 ST 60 T 90 T 120 ST 120 T 160 ST 160 ST 210 Compact VHS TC 20 ST C20 TC 30 ST C30 TC 40 ST C40 Compact VHS camcorder recordings can be played on this video recorder Simply place the recorded cassette into a VHS Casse...

Страница 24: ...4 Press and hold REC and press PLAY on the remote control or press REC on the VCR s front panel PAUSE RESUME RECORDING 5 Press PAUSE Press PLAY to resume recording During record pause you can change the recording channel by using the CH5 buttons or NUMBER keys STOP RECORDING 6 Press STOP or STOP EJECT Then press STOP EJECT to remove the cassette SIMPLE PLAYBACK AND RECORDING cont Turn on the TV an...

Страница 25: ...yback to decrease speed in the forward direction Continue to turn the TIME SCAN SHUTTLE ring to the left or press TIME SCAN to select the two reverse slow motion reverse play and reverse search modes OR During still picture turn the TIME SCAN SHUTTLE ring one or two positions to the right for forward slow motion or to the left for reverse slow motion OR During still picture press and hold TIME SCA...

Страница 26: ...CH5 and buttons on the VCR s front panel simultaneously When automatic tracking is re engaged Auto Picture is automatically activated NOTES To obtain a noiseless still picture it may be necessary to adjust tracking in slow playback and then engage Pause Manual tracking is possible during hands free slow motion During hands free slow motion playback simply press CH5 or on the VCR s front panel or r...

Страница 27: ...VIDEO STABILIZER by pressing CH5 or TIME SCAN5 then press OK ACTIVATE VIDEO STABILIZER 3 Move the highlight bar arrow to ON by pressing CH5 or TIME SCAN5 RETURN TO NORMAL SCREEN 4 Press MENU NOTES Regardless of the setting this function has no effect with SP recordings during recording and during special effects playback When you finish viewing the tape be sure to set it back to OFF MAIN MENU PROG...

Страница 28: ...UNT 1 23 45 Tuned in channel or AUX iliary mode When the channel is changed the new channel is displayed on the screen for 5 seconds Clock time Tape position indicator Operation mode When the operation mode is changed the new mode is displayed RECORD 5 sec PLAY 5 sec FF REW 5 sec when engaged from Stop mode RECORD PAUSE for as long as Pause is engaged and ITR 5 sec B E Cassette Loaded mark When a ...

Страница 29: ...row to your choice by pressing CH5 or TIME SCAN5 RETURN TO NORMAL SCREEN 6 Press MENU as many times as necessary AUDIO MONITOR HI FI NORM MIX PRESS 5 TO SELECT PRESS MENU TO END NOTES If the tape being played back has no Hi Fi soundtrack the Normal soundtrack will be heard no matter what choice you make at the Audio Monitor screen If you select HI FI or MIX the L and R symbols near the audio level...

Страница 30: ...rding is paused and then resumed Instant ReView At the press of a button you can power up your VCR rewind the tape and begin viewing the most recent timer recorded program ACTIVATE INSTANT REVIEW 1 After ensuring that the Timer mode is disengaged press REVIEW The power comes on and the VCR rewinds to the index code indicating the start of the last timer recorded program then begins playback automa...

Страница 31: ...s STOP during playback then press REW or FF The tape rewinds or fast forwards and stops at approxi mately 0H 00M 00S automatically To cancel Counter Memory press C MEMORY Counter Reset Next Function Memory The Next Function Memory tells the VCR what to do after rewinding Before continuing ensure that the VCR is in stop mode a For Automatic Start Of Playback After Tape Rewind press REW then press P...

Страница 32: ... record safety tab is removed MAKE CONNECTION 1 Connect your VCR to an AV COMPU LINK component as shown in the illustration on page 33 The mini plug cable is a mono 3 5 mm mini plug to mono 3 5 mm mini plug connector TURN ON THE VCR 2 Press POWER ACCESS MAIN MENU SCREEN 3 Press MENU as many times as necessary ACCESS FUNCTION SET SCREEN 4 Press CH5 or TIME SCAN5 to move the highlight bar arrow to F...

Страница 33: ... Linked components are turned on and the TV set to its AV mode automatically NOTE Connection varies depending on the type of JVC TV you have Please refer to the TV s instruction manual when making this connection Your VCR AV COMPU LINK Television Example SPECIAL FUNCTION PAUSE AV COMPU LINK PRESS 5 TO SELECT PRESS MENU TO END PAUSE SPECIAL FUNCTION q MENU C H 1 2 4 5 3 6 8 0 7 9 MENU TIME SCAN CH ...

Страница 34: ... POWER Preparation TURN ON THE VCR 1 Press POWER ACCESS MAIN MENU SCREEN 2 Press MENU as many times as necessary ACCESS AUTO PICTURE SCREEN 3 Press CH5 or TIME SCAN5 to move the highlight bar arrow to AUTO PICTURE then press OK SELECT MODE 4 Move the highlight bar arrow to ON by pressing CH5 or TIME SCAN5 NOTE When using rental tapes or tapes recorded on other VCRs select ON or OFF as desired to g...

Страница 35: ...k START PLAYBACK 1 Press PLAY The VCR adjusts the playback picture quality based on the quality of the tape in use AUTO PICTURE NOTES The Auto Picture screen only appears at the beginning of automatic tracking However even though the screen doesn t appear after that the Auto Picture function is operative SUPERIMPOSE must be set to ON if the Auto Picture screen is to be displayed Z pg 28 1 2 4 5 3 ...

Страница 36: ...D RECORDING FEATURES cont ACTIVATE VARIABLE SPEED SEARCH 1 During playback or still turn the VCR s TIME SCAN SHUTTLE ring It remains at that position even after you release it Each time it passes a click position the playback speed changes Refer to the chart on pg 37 for playback speeds OR During playback momentarily press TIME SCAN or To increase the speed in the forward direction press repeatedl...

Страница 37: ...h speed search with a tape containing both SP and EP recordings the search speed will change automatically to 7x normal playback speed with TimeScan when the recording tape speed switches from EP to SP Depending on the tape in use noise may appear or the upper part of the picture may be distorted Picture may appear distorted in comparison to normal playback In TimeScan mode there will be a time la...

Страница 38: ... Move the highlight bar arrow to AUDIO SELECT by pressing CH5 or TIME SCAN5 then press OK ACCESS TIMESCAN AUDIO SCREEN 4 Move the highlight bar arrow to TIMESCAN AUDIO by pressing CH5 or TIME SCAN5 then press OK SELECT MODE 5 Move the highlight bar arrow to ON or OFF by pressing CH5 or TIME SCAN5 RETURN TO NORMAL SCREEN 6 Press MENU as many times as necessary TIMESCAN AUDIO ON OFF PRESS 5 TO SELEC...

Страница 39: ...selector to set the channel you want to watch Recording Features Display Elapsed Recording Time RESET COUNTER TO ZERO 1 Before recording starts press C RESET The counter resets to zero and displays the exact elapsed time as the tape runs DISPLAY ELAPSED TIME ON SCREEN 2 During recording press OSD at any time to see the elapsed time All indications corresponding to the current status of the VCR are...

Страница 40: ...ht bar arrow to FUNCTION SET by pressing CH5 or TIME SCAN5 then press OK ACCESS AUDIO SELECT SCREEN 3 Move the highlight bar arrow to AUDIO SELECT by pressing CH5 or TIME SCAN5 then press OK ACCESS 2ND AUDIO SCREEN 4 Move the highlight bar arrow to 2ND AUDIO by pressing CH5 or TIME SCAN5 then press OK SELECT MODE 5 Move the highlight bar arrow to ON by pressing CH5 or TIME SCAN5 RETURN TO NORMAL S...

Страница 41: ... then press OK ACCESS HI FI REC LEVEL SCREEN 4 Press CH5 or TIME SCAN5 to move the highlight bar arrow to HI FI REC LEVEL then press OK SELECT MODE 5 Move the highlight bar arrow to MANUAL by pressing CH5 or TIME SCAN5 ADJUST AUDIO RECORDING LEVEL 6 Press FF or REW Press FF or REW briefly 5 times to move the on screen s audio levels by one division on the scale To move the audio levels faster keep...

Страница 42: ...r page 9 for the clock setting procedure If you are using the Illumi Guide feature the following buttons will light up NUMBER keys 0 9 CANCEL and MENU ENTER PLUSCODE NUMBER 3 Press the appropriate NUMBER keys to enter the PlusCode number printed in the TV listings for the TV program you wish to record To make corrections press CANCEL and input the correct PlusCode number If the PlusCode number you...

Страница 43: ...gins to blink Then press the appropriate NUMBER keys CH5 or TIME SCAN5 to obtain the desired setting If you are using a DBS receiver the BAND indication TV or CATV or DBS appears at right of the channel number display when OK or TIME SCAN is pressed See ATTENTION FOR DBS RECEIVER USERS on page 45 RETURN TO NORMAL SCREEN 7 Press MENU as many times as necessary Press just once to access the Auto Tim...

Страница 44: ...u are using the Illumi Guide feature OK blinks when the following buttons are lit NUMBER keys 0 9 TIME SCAN CANCEL and MENU SELECT PROGRAM NUMBER 4 Press the appropriate NUMBER keys or CH5 or TIME SCAN5 to select a vacant program number then press OK The first time you set the timer program ming function all the program numbers will be blank in this case just press OK when the Program Set screen a...

Страница 45: ...a regular recording is in progress the on screen menu will not be recorded If the end of tape is reached during timer recording the cassette is automatically ejected When timer recording cable or satellite channels through an external tuner be sure to keep the cable box or satellite receiver s power ON SET PROGRAM INFORMATION 5 Press the appropriate NUMBER keys to set the date start stop time and ...

Страница 46: ...OK CHECK PROGRAM INFORMATION 4 Press CH5 or TIME SCAN5 to check the programs in succession Check And Cancel Programs CANCEL A PROGRAM 5 Press CANCEL Repeat steps 4 and 5 as many times as necessary RETURN TO NORMAL SCREEN 6 Press MENU as many times as necessary If there are still programs remaining go to step 7 RE ENGAGE TIMER 7 Press TIMER again To Cancel A Program 1 2 4 5 3 6 8 0 7 9 q MENU O K M...

Страница 47: ...or On Screen Timer Programming procedure Z pg 44 press MENU SELECT MODE 2 Move the highlight bar arrow to your choice ON or OFF by pressing CH5 or TIME SCAN5 RETURN TO NORMAL SCREEN 3 Press MENU as many times as necessary NOTE For safety when AUTO TIMER is set to OFF all other VCR functions are disabled while the Timer mode is engaged To disengage the timer press TIMER Auto Timer When the Auto Tim...

Страница 48: ... you want to record for more than 30 minutes press REC to extend the time Each press extends recording time by 30 minutes NOTES You can only perform ITR using the REC button on the VCR s front panel After you set the ITR time the previous display reappears To check the remaining time press REC once during record ing and the remaining time will be displayed for about 5 seconds Be careful not to pre...

Страница 49: ... on the front display panel in place of a channel number NOTE When using this VCR as the recorder make sure to select FRONT or REAR depending on which input connectors you use at the Aux Input Screen To select the correct AUX input connector follow steps 4 5 9 11 from the Edit From A Camcorder section Z pg 50 START PLAYER 4 Set to its play mode NOTE If the player is equipped with a superimpose OSD...

Страница 50: ... SET RECORDER S INPUT MODE 3 Press NUMBER key 0 to set to AUX ACCESS MAIN MENU SCREEN 4 Press MENU as many times as necessary ACCESS FUNCTION SET SCREEN 5 Press CH5 or TIME SCAN5 to move the highlight bar arrow to FUNCTION SET then press OK If you re using a JVC Master Edit Control equipped camcorder step 6 If not step 9 ACCESS SPECIAL FUNCTION SCREEN 6 Press CH5 or TIME SCAN5 to move the highligh...

Страница 51: ...ny times as necessary START PLAYER 12 Set the camcorder to its play mode NOTE If the camcorder is equipped with a superimpose OSD disable feature then set its superimpose or display feature to OFF before pressing play START RECORDER 13 Set your VCR to its record mode If you are using a Master Edit Control equipped JVC camcorder it can put the recorder automatically into Record mode Refer to camcor...

Страница 52: ...reen To select the correct AUX input connector follow steps 4 5 9 11 from the Edit From A Camcorder section Z pg 50 LOCATE END POINT 3 Load the recording cassette into your VCR and play it back to determine the edit out point the end of the segment to be replaced using the JOG TIME SCAN SHUTTLE controls or TIME SCAN and PAUSE RESET THE COUNTER 4 Press C RESET to change the counter display to 0H00M...

Страница 53: ... AV INSERT EDITING If you want to replace the picture Hi Fi audio soundtrack and normal audio soundtrack all at the same time In step 6 above after you press INSERT press A DUB also REC and PLAY blink and PAUSE lights up on the display panel NOTES Insert editing is not possible with cassettes whose safety tab has been removed In insert editing the recording speed SP EP is determined by the previou...

Страница 54: ...AY to resume dubbing END AUDIO DUBBING 6 Press STOP to stop the tape in your VCR and engage the audio component s Stop mode Pre recorded tape Audio dubbed tape Normal audio track Video Hi Fi audio track NOTES When monitoring the sound during Audio Dubbing the normal soundtrack is automatically selected If you wish to hear the Hi Fi or mixed sound Hi Fi Normal soundtracks refer to the Select The So...

Страница 55: ...ntil you replace your remote control s batteries PANASONIC has two codes If the TV does not function with one code try entering the other OPERATE TV 4 First press POWER on the remote to see if the TV s power goes off as it should If it does try other operations The POWER TV VCR CH5 VOL and NUMBER keys on the remote can all be used to operate the TV For some brands of TV you must press ENTER after ...

Страница 56: ... having pressed the NUMBER keys To return the remote to VCR control set the TV CABLE DBS VCR switch to VCR NOTES You must set the cable box brand for your remote control and the cable box brand for your Controller Z pg 17 separately The list of cable box brands that can be controlled by your remote control is different from the list of brands that can be controlled by your controller It is possibl...

Страница 57: ...s can be used to operate the DBS receiver For some brands of DBS receiver you must press ENTER after having pressed the NUMBER keys To return the remote to VCR control set the TV CABLE DBS VCR switch to VCR NOTES You must set the DBS receiver brand for your remote control and the DBS receiver brand for your Controller Z pg 22 separately It is possible that the remote control will not operate your ...

Страница 58: ...is VCR to respond to B code commands 1 2 4 5 3 6 8 0 7 9 POWER A B CODE UNPLUG VCR S POWER CORD 1 Unplug from the AC outlet SET A B CODE SWITCH 2 Set the A B CODE switch on the remote control to B PLUG IN POWER CORD 3 Plug back in to the AC outlet TURN VCR POWER ON 4 Press POWER on the remote The VCR will now respond only to B code commands To set the VCR to respond to A code signals again repeat ...

Страница 59: ...ading and is ejected 2 The tape stops during rewind or fast forward CORRECTIVE ACTION Make sure the cassette s window is facing up the rear label side is facing you and the arrow on the front of the cassette is pointing towards the VCR Then insert the cassette Press C MEMORY to disengage the Counter Memory mode and extin guish the indicator Z pg 31 SYMPTOM 1 The tape is running but the picture won...

Страница 60: ...sette and cover its hole with adhesive tape or replace it with a cassette on which the safety tab is intact Check the programmed data and re program as necessary then press TIMER again The program may not have been recorded in its entirety Next time make sure you have enough time on the tape to record the entire program Connect the Controller correctly Z pg 15 After confirming your cable box s out...

Страница 61: ... the VCR s timer memory are used OTHER PROBLEMS CORRECTIVE ACTION If you need the skipped channels restore them Z pg 14 Press PAUSE to pause the recording change channels then press PLAY to resume recording Set the switch to the correct position Re set the remote control to the correct brand Z pg 55 or 56 or 57 Select a different Host Channel during the Semi Auto setting procedure Z pg 10 or perfo...

Страница 62: ...arch the VCR can t find the program I want to see Why not A There may be index codes too close together Q During playback on screen operational indicators sometimes jitter Why does this happen A If the condition of the tape being played back is not good jittering of the video including on screen indicators may occur RECORDING Q When I pause and then resume a recording the end of the recording befo...

Страница 63: ...0 Insert Cassette 23 Insert Editing 52 Instant ReView 30 ITR Instant Timer Recording 48 L Language Selection 8 M Main Menu 8 Manual Channel Setting 14 Manual Clock Setting 11 Manual Tracking 26 MBR Multi Brand Remote Code Setting 55 N Next Function Memory 31 O On Screen Display 28 On Screen Timer Programming 44 On Screen Timer Recording 44 Override Auto Clock Setting 9 P PBS Channel 7 Playback 23 ...

Страница 64: ... Z pg 50 0 Instant REVIEW Button Z pg 30 Recording Speed SP EP Button Z pg 24 Front Display Panel Z pg 65 Remote Control Sensor INSERT Button Z pg 53 Audio Dubbing A DUB Button Z pg 54 PAUSE Button Z pg 25 STOP EJECT Button Z pg 23 PLAY Button Z pg 23 INSERT PAUSE REC STOP EJECT PLAY q POWER REW FF JOG SHUTTLE VIDEO MONO L AUDIO R SP EP MENU CH OK A DUB SLOW SLOW H M S V C R TIMER ST SAP AM PM RE ...

Страница 65: ...AUDIO VHF UHF L MONO R OUT TV OUT IN 1 2 5 6 8 7 3 4 H M S V C R TIMER ST SAP AM PM RE C PLAY PAUSE M 8 4 0 6 10 20dB NORM L R SP 0 8 7 2 1 6 4 3 5 9 1 Audio Level meter Z pg 41 2 Play Mode Indicator 3 Recording Mode Indicator Instant Timer Recording Indicator Z pg 48 4 VCR Mode Indicator Z pg 39 5 Multi Channel TV Sound Indicators Z pg 40 6 AM PM Indicators Z pg 7 7 Clock Display Z pg 7 8 Audio O...

Страница 66: ... pg 28 DAILY Timer Recording Button Z pg 43 WEEKLY Timer Recording Button Z pg 43 TIMER Button Z pg 43 Channel CH 5 Buttons Z pg 24 TV VCR Button Z pg 39 q TV CABLE DBS VCR Switch Z pg 55 w Fast Forward FF Button Z pg 23 e PAUSE Button Z pg 25 r STOP Button Z pg 23 t SKIP SEARCH Button Z pg 37 y OK Button Z pg 8 u TIME SCAN Button Z pg 8 36 i ILLUMI GUIDE Button Z pg 42 Installing Batteries 1 Open...

Страница 67: ...al to noise ratio 45 dB Horizontal resolution 240 lines Frequency range Normal audio 70 Hz to 10 000 Hz Hi Fi audio 20 Hz to 20 000 Hz Input Output RCA connectors IN x 2 OUT x 1 TUNER Tuning system Frequency synthesized tuner Channel coverage VHF Channels 2 13 UHF Channels 14 69 CATV 113 Channels RF output Channel 3 or 4 switchable preset to Channel 3 when shipped 75 ohms unbalanced SPECIFICATIONS...

Страница 68: ...L HEADQUARTERS JVC SERVICE ENGINEERING COMPANY OF AMERICA DIVISION OF US JVC CORP 107 Little Falls Road Fairfield NJ 07004 2105 Pack your JVC unit in the original carton or one of equivalent size and strength Enclose with the unit a letter stating the problem or symptom that exists and also a copy of the receipt or bill of sale you received when you purchased your JVC unit Print your home return a...

Страница 69: ...d with the products or if the model or serial number has been altered tampered with defaced or removed 2 Initial installation and installation and removal for repair 3 Operational adjustments covered in the Owner s Manual normal maintenance video and audio head cleaning 4 Damage that occurs in shipment due to act of God and cosmetic damage 5 Signal reception problems and failures due to line power...

Страница 70: ...MEMO ...

Страница 71: ...MEMO ...

Страница 72: ...1997 VICTOR COMPANY OF JAPAN LTD U U C Printed in Malaysia 0597HOV UN PJ JVC COMPANY OF AMERICA DIVISION OF US JVC CORP 41 Slater Drive Elmwood Park N J 07407 JVC CANADA INC 21 Finchdene Square Scarborough Ontario M1X 1A7 ...

Отзывы: