background image

Advanced operations

24

7

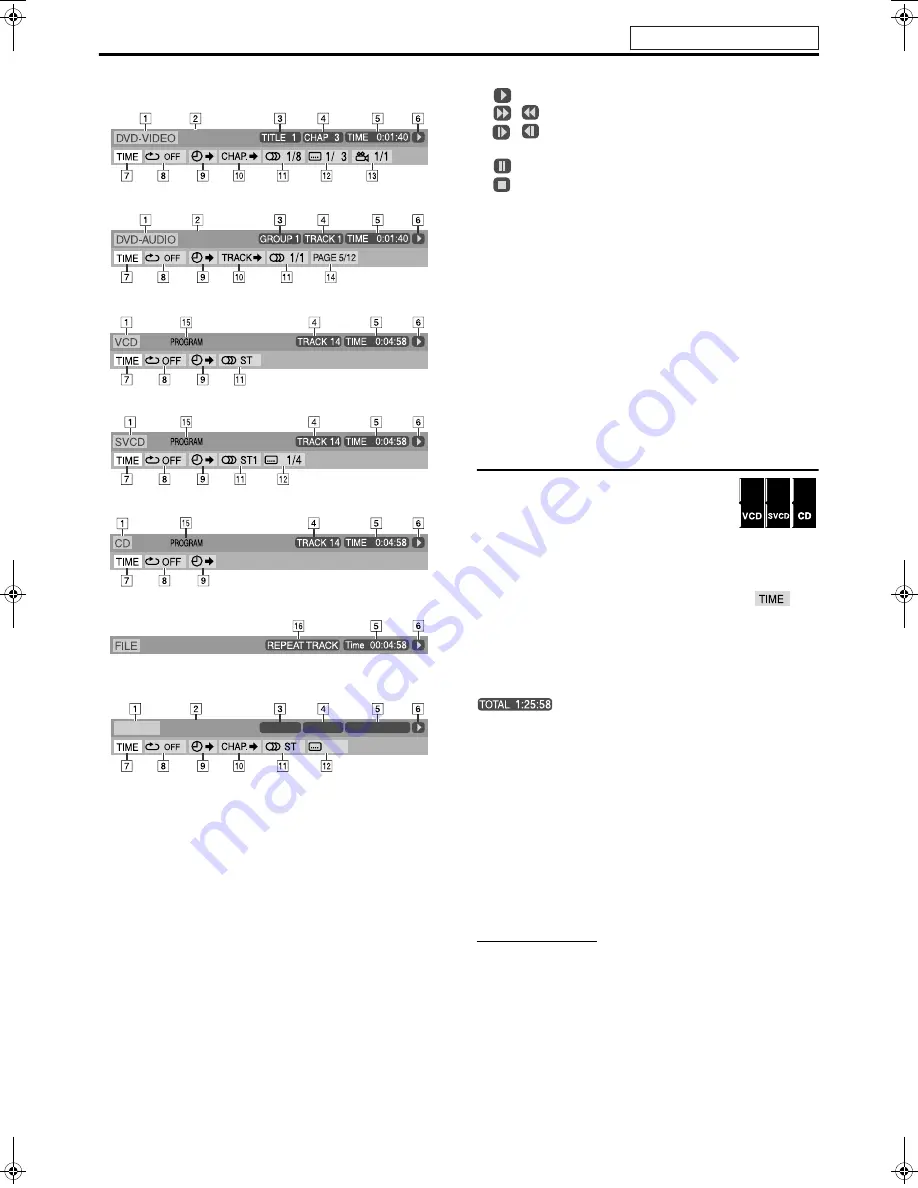
Contents of the on-screen bar during playback

DVD VIDEO

DVD AUDIO

VCD

SVCD

CD

MPEG-4

*

*

7

N

 are not available.

DVD VR disc

A

Shows disc type.

B

Shows audio information.

C

Shows current title (for DVD VIDEO), group (for DVD 
AUDIO) number or play mode (for DVD VR).

D

Shows current chapter number (for DVD VIDEO and DVD VR) 
or track number (for other type of discs).

E

Shows time information. See “Changing the time information”.

F

Shows playback status.

:

appears during playback.

 / 

: appears during fast forward/reverse.

 / 

: appears during playback in forward slow-motion/

reverse slow-motion.

:

appears when paused.

:

appears when stopped.

G

Select this to change time information (

E

). See “Changing the 

time information” below.

H

Select this for Repeat Playback. (

A

pg. 31)

I

Select this for time search function. (

A

pg. 26)

J

Select this for chapter (for DVD VIDEO and DVD VR) or track 
(for DVD AUDIO) search function. (

A

pg. 25)

K

Select this to change audio language, channel, or stream. 
(

A

pg. 28)

L

Select this to change subtitle language and subpicture. 
(

A

pg. 27)

M

Select this to change view angle. (

A

pg. 27)

N

Select this to change the page. (

A

pg. 29)

O

Shows Playback Mode status.
PROGRAM: appears during Program Playback. (

A

pg. 30)

RANDOM: appears during Random Playback. (

A

pg. 31)

P

Shows Repeat Mode status. (

A

pg. 31)

Changing the time information

You can change the time information in the on-
screen bar on the TV screen and the display 
window of the center unit.

7

During playback

1

Press ON SCREEN twice.

The on-screen bar appears on the TV screen.

2

Press Cursor 

3

/

2

 to highlight 

.

3

Press ENTER repeatedly to select the 
desired information.

Example:
When elapsed playing time of disc is selected.

7

VCD/SVCD/CD

• TIME:

Elapsed playing time of current track

• REM:

Remaining time of current track

• TOTAL: Elapsed time of disc
• T. REM: Remaining time of disc

7

DVD VIDEO/DVD AUDIO/DVD VR

• TIME:

Elapsed playing time of current chapter/track

• REM:

Remaining time of current chapter/track

• TOTAL: Elapsed time of Title/Group/Program
• T. REM: Remaining time of Title/Group/Program

4

Press ON SCREEN.

The on-screen bar disappears.

NOTE

• When playing back DVD VR, “TIME” and “REM” cannot be shown.

Dolby D

2/0 . 0ch

Dolby D

2/0 . 0ch

DVD-VR

PG 1

Dolby D

2/0 . 0ch

CHAP 3 TOTAL 0 : 00 : 34

ON

DVD

VR

DVD

AUDIO

DVD

VIDEO

See page 22 for button locations.

TH-S77[U].book  Page 24  Wednesday, April 27, 2005  2:01 PM

Содержание GVT0154-001A

Страница 1: ...TH S77 GVT0154 001A US UN UG UX DVD DIGITAL CINEMA SYSTEM INSTRUCTIONS Consists of XV THS77 SP PWS77 SP THS77F SP THS77C and SP THS77S ...

Страница 2: ...by a newspaper or cloth etc the heat may not be able to get out Do not place any naked flame sources such as lighted candles on the apparatus When discarding batteries environmental problems must be considered and local rules or laws governing the disposal of these batteries must be followed strictly Do not expose this apparatus to rain moisture dripping or splashing and that no objects filled wit...

Страница 3: ...place the apparatus on a level surface The minimal clearances are shown below PHONES MIN MIC LEVEL MAX MIC 2 MIC 1 8 cm Wall or obstructions XV THS77 3 cm 3 cm 15 cm XV THS77 10 cm Front No obstructions Wall or obstructions SP PWS77 20 cm 15 cm 15 cm Wall or obstructions SP PWS77 15 cm Front No obstructions Wall or obstructions ...

Страница 4: ...the scan mode 16 Optimizing the speaker settings Smart Surround Setup 17 Playback 18 Basic playback 18 One touch replay 20 Fast forward fast reverse search 20 Skip to the beginning of a desired selection 20 Locating a desired title group using number buttons 21 Playing back a bonus group 21 Selecting the desired title playlist from the control display 21 Advanced operations 22 Using the surround m...

Страница 5: ...recautions Avoid moisture water and dust Do not place the system in moist or dusty places Avoid high temperatures Do not expose the system to direct sunlight and do not place it near a heating device When you are away When away on travel or for other reasons for an extended period of time disconnect the power cord plugs from the wall outlet Do not block the vents Blocking the vents may damage the ...

Страница 6: ...e which is indicated on the rear panel If a DVD with an improper Region Code number is loaded REGION CODE ERROR appears on the TV screen and playback cannot start Notes on DVD R DVD RW and DVD RAM This system can also play finalized DVD Rs or DVD RWs recorded in DVD VIDEO format and DVD RWs or DVD RAMs recorded in DVD VR format This system can also play DVD Rs or DVD RWs if MP3 WMA JPEG and MPEG 4...

Страница 7: ...he system supports the types of the advanced simple profile as MPEG 4 files MPEG 4 ASF The system supports MPEG 4 files followed the condition below File format ASF Visual profile MPEG 4 SP Simple Profile Audio CODEC G 726 Max picture size 352 x 288 CIF Max bit rate 384 kbps Notes on file types This product incorporates copyright protection technology that is protected by U S patents and other int...

Страница 8: ... B S P CHAP TRK PG PL BONUS ST RDS TA NEWS INFO PRG RND MHz kHz MONO MP3 RESUME Display window pg 23 pg 38 pg 19 pg 23 pg 16 pg 19 pg 21 pg 29 pg 37 pg 38 pg 31 pg 18 pg 18 pg 18 pg 15 Disc tray inside pg 18 pg 39 Remote sensor pg 7 pg 18 pg 15 pg 14 pg 27 pg 19 pg 30 pg 19 pg 20 pg 15 pg 31 pg 37 pg 39 pg 14 pg 11 pg 11 pg 11 pg 8 pg 11 pg 11 pg 10 pg 10 ...

Страница 9: ...ubwoofer Setting the VOLTAGE SELECTOR Before plugging set the correct voltage for your area with the voltage selector switch on the rear panel of the powered subwoofer 4Ω 16Ω FROM XV THC3 XV THS55 XV THS58 XV THS66 Front Rear POWER ON lamp pg 14 pg 9 Power cord pg 11 pg 11 Do not block the ventilation openings See below Voltage selector switch ...

Страница 10: ...MEMORY ENTER TITLE GROUP ANGLE VFP ZOOM PAGE REPEAT SET UP SLEEP FRONT L FRONT R LEVEL S WFR TV RETURN A B RPT SETTING SMART S SETUP CENTER PLAY MODE RETURN DIMMER KEYCON I i 100 CANCEL SCAN MODE TREBLE BASS SURR R SURR L SLOW SLOW TITLE GROUP ANGLE VFP ZOOM PAGE REPEAT SETUP SLEEP TV RETURN A B RPT SETTING SMART S SETUP PLAY MODE RETURN DIMMER 100 CANCEL SCAN MODE TREBLE NOTE To use the buttons u...

Страница 11: ...you use coaxial cable for the FM antenna as it is well shielded against interference Connecting the FM and AM antennas If the antenna cord is covered with the insulation coat twist and pull the insulation coat off and remove 1 Center unit 2 3 Antenna cord Outdoor single vinyl covered wire antenna not supplied AM loop antenna Center unit Extend the supplied FM antenna horizontally Center unit FM an...

Страница 12: ...t them Do not reproduce sounds at so high a volume that they are distorted otherwise the speakers may be damaged by internal heat buildup Connecting the satellite front center surround speakers 4Ω 16Ω Connect the black cords to the black r terminals Connect the white cords to the q terminals referring to the table below Speaker cord supplied FRONT SPEAKERS LEFT White FRONT SPEAKERS RIGHT Red CENTE...

Страница 13: ...eo S video Composite video Distortion of picture may occur when connecting to the TV via a VCR or to a TV with a built in VCR You need to set MONITOR TYPE in the PICTURE menu correctly according to the aspect ratio of your TV A pg 35 7 To connect a TV equipped with the component video input jacks NOTE If your TV supports progressive video input you can enjoy a high quality picture by setting the p...

Страница 14: ...ect the power cord before cleaning or moving the system Do not pull on the power cord to unplug the cord When unplugging the cord always grasp and pull the plug so as not to damage the cord Except for the countries of Middle East If the AC outlets do not match the AC plugs use the supplied AC plug adapters Connecting the powered subwoofer Connecting to an analog component FROM XV THC3 XV THS55 XV ...

Страница 15: ...nd try each one until you enter the correct one 7 Operation Aim the remote control at the TV IMPORTANT Before using the remote control to operate a TV Set the remote control mode selector to TV The following buttons are available TV Turns TV on and off TV VOL Adjusts the volume TV VIDEO Selects the input mode either TV or VIDEO CHANNEL Changes the channels 1 10 0 10 100 Selects the channel TV RETU...

Страница 16: ... 5 Press number buttons 1 9 0 to enter the manufacturer s code 2 digits Examples For a GI Jerrold product Press 0 then 1 For a Sony product Press 2 then 0 6 Release VCR DBS If there is more than one code listed for your brand try each one until you enter the correct one 7 Operation Aim the remote control at the DBS tuner or CATV converter IMPORTANT Before using the remote control to operate a DBS ...

Страница 17: ...l or 0 on the center unit One of the source selecting buttons on the remote control 3 on the center unit You can use the same buttons on the remote control The buttons on the remote control are used to explain most of the operations in this manual You can use the buttons on the center unit same as on the remote control for operations unless otherwise noted The buttons described below are used on p...

Страница 18: ...he headphones and your hearing Before disconnecting headphones as high volume may be suddenly output from the speakers While connecting a pair of headphones to the PHONES jack on the center unit the system automatically cancels the surround mode A pg 22 currently selected deactivates the speakers turns the subwoofer s power off and activates the headphone mode H PHONE appears on the display window...

Страница 19: ...and stopped 1 Press and hold SCAN MODE for 2 seconds NTSC PAL or NTSC PRG PAL PRG appears on the display window 2 Press Cursor 3 2 to select the desired mode NTSC Select when your TV supports the NTSC interlaced video input only NTSC PRG Select when your TV equipped with component jacks supports the NTSC progressive video input PAL Select when your TV supports the PAL interlaced video input only P...

Страница 20: ...s the best settings for each speaker COMPLETED appears on the TV screen when Smart Surround Setup completes When FAILED appears on the TV screen The system could not detect the clapping sound correctly In such a case follow the instructions that appear on the TV screen When the system detects the clapping sound as FAILED three times set the delay time DELAY and the output level LEVEL manually A pg...

Страница 21: ...ing TOP MENU PG or MENU PL shows the control display on the TV screen A pg 21 7 To pause playback Press 8 To return to playback press 3 play button 7 To stop Press 7 7 On screen guide icons During DVD VIDEO playback the following guide icons may appear for a while on the TV screen appears at the beginning of a scene containing multi subtitle languages appears at the beginning of a scene containing...

Страница 22: ...minute second Surround mode and digital signal format A pg 23 Title number Pressing FL DISP Chapter number P LPCM SURR 1 1 2 2 2 3 4 5 P LPCM SURR T 1 G 3 Track number Elapsed playing time hour minute second Group number Signal and speaker indicators Pressing FL DISP Track number LPCM 1 2 1 3 3 Track number Elapsed playing time minute second Signal and speaker indicators 1 1 MP3 2 2 3 3 4 1 1 MP3 ...

Страница 23: ...rward reverse search This feature may not work for some discs 7 Using x 4 buttons 7 For DVD VIDEO DVD VR chapter During playback For VCD SVCD track During playback without PBC function For DVD AUDIO CD MP3 WMA JPEG MPEG 4 track file During playback or while stopped Press x or 4 repeatedly NOTE When playing back an MP3 JPEG file you can make operations using the file control display A pg 26 This fe...

Страница 24: ...BONUS indicator goes off If you enter the wrong number reenter the correct number To clear the key number entry Perform whichever one of the following Open the disc tray Turn off the system 7 During playback or while stopped 1 Press TOP MENU PG or MENU PL The control display is shown on the TV screen and the system starts playback of the first title playlist The PLAY LIST is shown only when the pl...

Страница 25: ...o reproduce multichannel soundtracks of the software encoded with DTS Digital Surround DTS Digital Surround DTS is another discrete multichannel digital audio format available on CD and DVD software The buttons described below are used on pages 22 to 33 DVD VIDEO TOP MENU PG MENU PL ON SCREEN AUDIO SUBTITLE SURROUND AUDIO ENTER ANGLE VFP ZOOM PAGE REPEAT A B RPT SETTING PLAY MODE RETURN 100 CANCEL...

Страница 26: ... AUDIO 7 When playing back digital multichannel software except during SURR OFF mode The appropriate multichannel surround mode DOLBY D DTS Digital Surround or Linear Packed PCM is automatically selected 7 When playing back 2 channel source You can select either mode of Dolby Pro Logic II MOVIE MUSIC or the DSP ALL ST mode Press SURROUND repeatedly to select the desired mode The surround mode is t...

Страница 27: ... Select this to change view angle A pg 27 N Select this to change the page A pg 29 O Shows Playback Mode status PROGRAM appears during Program Playback A pg 30 RANDOM appears during Random Playback A pg 31 P Shows Repeat Mode status A pg 31 Changing the time information You can change the time information in the on screen bar on the TV screen and the display window of the center unit 7 During play...

Страница 28: ...on using the number buttons see How to use the number buttons A pg 20 To return to the menu Press RETURN When NEXT or PREVIOUS is shown on the TV screen To go to the next page press x To return to the previous page press 4 NOTE If you want to play a PBC compatible VCD SVCD without using the PBC function perform any of the following Start playback by pressing number buttons while stopped Press x re...

Страница 29: ... not available The file control display appears automatically during playback MP3 WMA or while stopped 7 For MP3 WMA During playback or while stopped For JPEG MPEG 4 While stopped 1 Press Cursor 3 2 Y 5 to select the desired group track file For MP3 WMA playback starts from the selected track 2 Press 3 play button or ENTER Track playback slide show starts from the selected track file When you pres...

Страница 30: ... SUBTITLE Example DVD VIDEO ENGLISH is selected out of 3 subtitle languages recorded 2 Press Cursor Y 5 to select the desired subtitle For DVD VR Pressing SUBTITLE activates the subtitles subpictures regardless of whether the subtitles are recorded or not subpictures will not change if no subpictures is recorded For SVCD An SVCD can contain up to four subtitles Pressing SUBTITLE changes the subtit...

Страница 31: ...ing stereo left sound and right sound Frame by frame playback 7 During playback Press 8 repeatedly Each time you press the button the still picture advances by one frame To return to normal playback Press 3 play button Playing back in slow motion 7 During playback 1 Press 8 at the point where you want to start playback in slow motion from The system pauses playback 2 Press SLOW 9 Playback in forwa...

Страница 32: ...se press 8 to pause slide show playback then zoom in During DVD AUDIO playback this feature is available only for the video part During JPEG MPEG 4 playback there may be a case where Cursor 3 2 Y 5 does not work in step 2 above Changing the VFP setting The VFP Video Fine Processor function enables you to adjust the picture character according to the type of programming picture tone or personal pre...

Страница 33: ...the chapters tracks whose number is up to 99 For CD SVCD or VCD When the total playback time exceeds 99 minutes 59 seconds will appear on the display window But it is possible to continue programming For DVD VIDEO DVD AUDIO MP3 or WMA When you press ENTER instead of the number buttons in the Track Chapter column ALL appears and all the tracks or chapters on the selected group or title are programm...

Страница 34: ...except for MP3 WMA JPEG MPEG 4 1 Press ON SCREEN twice The on screen bar appears on the TV screen 2 Press Cursor 3 2 to highlight 3 Press ENTER 4 Press Cursor Y 5 repeatedly to select the Repeat mode 5 Press ENTER 6 Press ON SCREEN The on screen bar disappears To cancel Repeat Playback Select OFF in step 4 Random playback Repeat playback DVD AUDIO DVD VIDEO DVD VR DVD AUDIO DVD VIDEO 1 1 3 1 0 1 2...

Страница 35: ...3 Press ENTER 4 Press Cursor Y 5 repeatedly to select A B 5 Press ENTER at the beginning of the part you want to repeat point A 6 Press ENTER at the end of the part you want to repeat point B A B Repeat Playback starts 7 Press ON SCREEN The on screen bar disappears To cancel Select OFF in step 4 then press ENTER NOTE When playing back a DVD VIDEO A B Repeat Playback is possible only within the sam...

Страница 36: ...rching for or skipping chapters or tracks A PCM Auto PCM Normally select this The system automatically detects the incoming signals DD Select this if the symptoms above occur when playing a disc or software encoded with DOLBY D DTS Select this if the symptoms above occur when playing a disc or software encoded with DTS Digital Surround BAL Balance You can adjust the balance between the front left ...

Страница 37: ... AM Ameharic IW Hebrew RW Kinyarwanda AR Arabic JI Yiddish SA Sanskrit AS Assamese JW Javanese SD Sindhi AY Aymara KA Georgian SG Sangho AZ Azerbaijani KK Kazakh SH Serbo Croatian BA Bashkir KL Greenlandic SI Singhalese BE Byelorussian KM Cambodian SK Slovak BG Bulgarian KN Kannada SL Slovenian BH Bihari KO Korean KOR SM Samoan BI Bislama KS Kashmiri SN Shona BN Bengali Bangla KU Kurdish SO Somali...

Страница 38: ...an mode to the progressive PAL PRG or NTSC PRG A pg 16 you can obtain optimal picture quality by selecting whether the content on the disc is processed by frame film source or by field video source Normally set to AUTO AUTO Used to play a disc containing both video and film source materials This system recognizes the source type video or film of the current disc according to the disc information I...

Страница 39: ...nter speaker 1 ms Delay time of surround speakers 2 ms FRONT LEFT SPEAKER FRONT RIGHT SPEAKER CENTER SPEAKER SURROUND RIGHT SPEAKER SURROUND LEFT SPEAKER Adjust the distance from the listening position to the speakers Within the range from 0 ms to 15 ms by 1 ms 7 Subwoofer menu SUBWOOFER LEVEL You can set the output level of the subwoofer in the 6 dB to 6 dB range CROSS OVER The signals below the ...

Страница 40: ... Press 8 while holding down 7 7 To change the interval spacing into 9 kHz Press 3 while holding down 7 1 Press FM AM repeatedly to select the band Example When the system is tuned in to 810 kHz 2 Press TUNING 9 repeatedly until you find the frequency you want When you hold down the button until the system starts searching for stations and then release it the system stops searching automatically wh...

Страница 41: ...s on using the number buttons see How to use the number buttons A pg 20 NOTE You can also select a preset number by pressing y 1 When the stereo FM program currently tuned in is noisy you can change the FM reception mode to improve the reception 7 While listening to an FM station Press FM MODE The FM reception mode appears on the display window Each time you press the button the FM reception mode ...

Страница 42: ...an reserve your desired songs groups titles and tracks chapters to play in the order of your choice Up to 12 songs can be reserved with this function 7 While stopped with KARAOKE function turned on 1 Press RESERVE The reservation list appears on the TV screen 2 Press number buttons 1 10 10 to select your desired song to reserve by specifying the group title and track chapter numbers Example To spe...

Страница 43: ... recorded on a normal disc VOCAL MASK You can enjoy Karaoke with a normal disc containing no multiplex audio or multisound Karaoke audio etc by attenuating the frequencies around a human voice with this function 7 During playback with KARAOKE function turned on Press VOCAL Each time you press VOCAL vocal mask function turns on and off alternately NOTE The voice may not be masked enough with some d...

Страница 44: ...t the power cord and system cord correctly A pg 11 The remote control does not work The batteries are exhausted Replace the batteries A pg 7 Sunlight is falling directly on the remote sensor Hide the remote sensor from direct sunlight No sound The system cord and or speaker cord is not connected Check the connection Connecting the powered subwoofer A pg 9 11 The audio cord is not connected to DIGI...

Страница 45: ...ubwoofer SP PWS77 Amplifier section Front 140 W per channel RMS at 4 C at 1 kHz with 10 total harmonic distortion Center Surround 130 W per channel RMS at 4 C at 1 kHz with 10 total harmonic distortion Subwoofer 140 W RMS at 4 C at 100 Hz with 10 total harmonic distortion Speaker section Speaker unit 16 cm Bass reflex Power Handling Capacity 140 W Impedance 4 C Frequency Range 30 Hz to 200 Hz Gene...

Страница 46: ...s AC line BEFORE PLUGGING IN do check that your mains AC line voltage corresponds with the position of the voltage selector switch provided on the outside of this equipment and if different reset the voltage selector switch to prevent from a damage or risk of fire electric shock Mains AC Line Instruction ...

Отзывы: