background image

14

 EN

T
T
T
T

E

2
3
3
4

X

0
0
5
0

I T

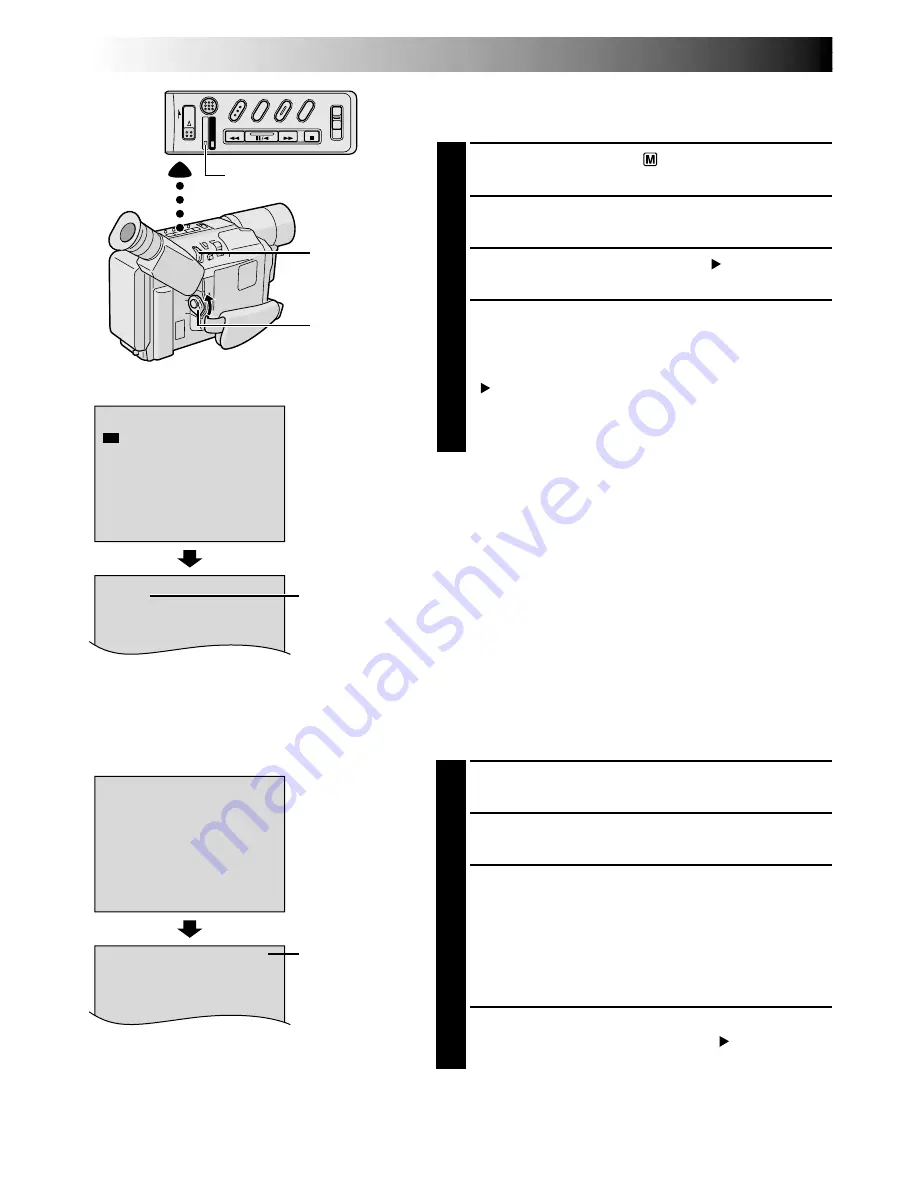
TAPE LENGTH

T 3 0

S

E

E

P

P

X I T

REC MODE

SP

GETTING STARTED

  (cont.)

Tape length
indicator

TAPE LENGTH
Menu

MENU Wheel

Power Switch

Tape Length Setting

Set the tape length according to the length of the tape
used.

1

Perform steps 

1

 through 

3

 above.

2

Rotate the 

MENU

 Wheel to select “TAPE LENGTH”,

then press it. The TAPE LENGTH Menu appears.

3

Rotate the 

MENU

 Wheel to select the correct tape

length setting.
•T20=20 minutes
•T30=30 minutes
•T35=35 minutes
•T40=40 minutes
(in SP)

4

Press the 

MENU

 Wheel in. The Menu Screen

reappears with the highlight bar on “ RETURN”.
Press the 

MENU

 Wheel in


to close the Menu Screen.

NOTE:

The tape remaining time (

 pg. 18) is correct only if the

correct tape length has been selected.

REC MODE Menu

Recording mode
indicator

Recording Mode Setting

Set the tape recording mode depending on your preference.

1

Set the Power Switch to “

”. The VIDEO Lamp

comes on.

2

Press the 

MENU

 Wheel in. The Menu Screen

appears.

3

Rotate the 

MENU

 Wheel to select “ TO SYSTEM

MENU” and press it to display SYSTEM MENU.

4

Rotate the 

MENU

 Wheel to select “REC MODE” and

press it. The REC MODE Menu appears. Select “SP”
or “EP” by rotating the 

MENU

 Wheel and press it.

The Menu Screen reappears with the highlight bar on
“ RETURN”. Press the 

MENU

 Wheel in to close the

Menu Screen.
•“EP” (Extended Play) is more economical, providing

three times the recording time.

NOTE:

If the recording mode is switched during recording, the
playback picture will be blurred at the switching point.

Display

Display

VIDEO Lamp

Содержание GR-SXM530

Страница 1: ...GITAL STILL CAMERA D S C RECORDING PLAYBACK 27 34 D S C RECORDING 28 29 D S C PLAYBACK 30 34 ADVANCED FEATURES 35 53 REFERENCES 54 75 TROUBLESHOOTING 55 57 DETAILS 58 59 INDEX 60 63 TERMS 64 65 CAUTIONS 66 68 SPECIFICATIONS 69 ESPAÑOL 70 73 FOR SERVICING Only in U S A 74 WARRANTY Only in U S A 75 For Customer Use Enter below the Model No and Serial No which is located on the bottom of cabinet Reta...

Страница 2: ... on pages 66 68 before use NOTES The rating plate serial number plate and safety caution are on the bottom and or the back of the main unit The rating information and safety caution of the AC Adapter are on its upper and lower sides WARNING TO REDUCE THE RISK OF FIRE OR ELECTRIC SHOCK DO NOT EXPOSE THIS APPARATUS TO RAIN OR MOISTURE Dear Customer Thank you for purchasing the JVC Compact VHS camcor...

Страница 3: ...ed Ni Cd batteries into the trash or the municipal waste stream which may be illegal in your area Please call 1 800 8 BATTERY for information on Ni Cd battery recycling and disposal bans restrictions in your area JVC s involvement in this program is part of our commitment to preserving our environment and conserving our natural resources IMPORTANT SAFETY INSTRUCTIONS 1 Read these instructions 2 Ke...

Страница 4: ... R03 Battery x 2 for Remote Control Unit PROVIDED ACCESSORIES Lens Cap PC Connection Cable for Windows PC CD ROM The CD ROM contains the following 4 software programs Picture Navigator Presto Mr Photo PhotoAlbum ImageFolio AA R6 Battery for Cassette Adapter Cassette Adapter VHS Playpak C P7U ...

Страница 5: ...EN5 1 3 2 How To Attach The Lens Cap To protect the lens attach the provided lens cap to the camcorder as shown in the illustration ...

Страница 6: ... camcorder power is turned off To cancel Automatic Demonstration set the Power Switch to and press the MENU Wheel in while the demo is in progress This takes you directly to the demo mode s Setting Menu so you will not have to go through the main Menu Screen Rotate the MENU Wheel to select OFF and press it NOTES When a tape whose Erase Protection tab is in the position that allows recording is loa...

Страница 7: ...8 9 Grip Adjustment 10 Viewfinder Adjustment 10 Shoulder Strap Attachment 10 Tripod Mounting 10 Date Time Settings 11 Recording Format Setting 12 13 Recording Mode Setting 14 Tape Length Setting 14 Loading Unloading A Cassette 15 Picture Mode Setting 16 ...

Страница 8: ... pack from the camcorder then try charging again If the battery operation time remains extremely short even after having been fully charged the battery is worn out and needs to be replaced Please purchase a new one Using the optional AA V15 AC Power Adapter Charger you can charge the BN V11U V12U V20U V400U battery pack without the camcorder However it cannot be used as an AC adapter To AC outlet ...

Страница 9: ...e power source make sure that the camcorder s power is turned off Failure to do so can result in a camcorder malfunction NOTES Recording time is reduced significantly under the following conditions Zoom or Record Standby mode is engaged repeatedly The LCD monitor is used repeatedly Before extended use it is recommended that you prepare enough battery packs to cover 3 times the planned shooting tim...

Страница 10: ...ly to Stabilize the camcorder To prevent damage to the unit caused by falling over do not use a small sized tripod Tripod Mounting 1 Align the screw and camera direction stud on the tripod with the camera s mounting socket and stud hole Then tighten the screw Grip Adjustment 1 Separate the Velcro strip 2 Pass your right hand through the loop and grasp the grip 3 Adjust so that your thumb and finge...

Страница 11: ...s 3 Rotate the MENU Wheel to select TO SYSTEM MENU and press it to display SYSTEM MENU Rotate the MENU Wheel to select NEXT and press it to display the next page 4 Rotate the MENU Wheel to select DATE TIME and press it The DATE TIME Menu appears 5 To set YEAR MONTH DAY or TIME hour minute rotate the MENU Wheel to select the desired item and press it When the setting begins blinking rotate the MENU...

Страница 12: ...s it to display SYSTEM MENU If a VHS cassette is loaded rotate the MENU Wheel to select S VHS ET then press it The S VHS ET Setting Menu appears If an S VHS cassette is loaded rotate the MENU Wheel to S VHS then press it The S VHS Setting Menu appears 4 Rotate the MENU Wheel to set to either of the parameters then press it The Menu Screen reappears with the highlight bar on RETURN In the S VHS ET ...

Страница 13: ... are played back on a VCR equipped with the SQPB S VHS QUASI PLAYBACK function S VHS picture quality is not available Tapes recorded in S VHS ET mode cannot be played back on some VCRs including some JVC VCRs eg HR S6600U HR SC1000U etc Tapes recorded in S VHS or S VHS ET mode cannot be played back correctly on a normal VHS VCR You can play back S VHS ET recordings not only on this camcorder but a...

Страница 14: ...remaining time pg 18 is correct only if the correct tape length has been selected REC MODE Menu Recording mode indicator Recording Mode Setting Set the tape recording mode depending on your preference 1 Set the Power Switch to The VIDEO Lamp comes on 2 Press the MENU Wheel in The Menu Screen appears 3 Rotate the MENU Wheel to select TO SYSTEM MENU and press it to display SYSTEM MENU 4 Rotate the M...

Страница 15: ...he LCD monitor The cassette holder can t be opened unless a power supply is attached Make sure that the tape is not slack when loading the cassette If there is any slack turn the gear on the cassette in the direction of the arrow to take up the slack Make sure the Erase Protection tab is in the position that allows recording If not slide the tab Some cassettes have removable tabs If the tab has be...

Страница 16: ...t NOTES The number of storable images depends on the selected Picture mode as well as the composition of the subjects in the images The numbers listed above are applicable when the camcorder s memory is empty when there are no sample images stored Approximate Number of Storable Images 30 60 Picture Quality Mode FINE STANDARD R D W S T D P S N E I A I I N R E C D V P S C A E X Z E H E P T P T T M O...

Страница 17: ...alistic Shooting 19 Self Recording 19 Zooming 20 Picture Stabilizer 20 Quick Review for scenes recorded onto a tape 21 Retake 21 Video Light 21 VIDEO PLAYBACK 22 26 LCD Monitor Brightness Adjustment 22 Speaker Volume Control 22 Still Playback 22 Shuttle Search 22 Tracking 23 TBC Time Base Corrector 23 Counter Memory Function 23 Playback Special Effects 23 Basic Connections 24 25 Tape Dubbing 25 Us...

Страница 18: ...Of The LCD Monitor rotate the BRIGHT Wheel until the bright level indicator on the display moves and the appropriate brightness is reached VIDEO RECORDING Power Switch Position Suitable for standard recording using NO special effects or manual adjustments Allows you to set recording functions using the menus for more creative capabilities OFF Switches off the camcorder Allows you to play back your...

Страница 19: ...ecording so you do not erase any of it To remove the indications from the camcorder s display during recording pg 40 42 Self Recording JOURNALISTIC SHOOTING In some situations different shooting angles may provide more dramatic results Hold the camcorder in the desired position and tilt the LCD monitor in the most convenient direction It can rotate 270 90 downward 180 upward SELF RECORDING You can...

Страница 20: ...fer To deactivate Digital Zoom set D ZOOM to OFF in SYSTEM MENU pg 41 Digital zoom cannot be used when the VIDEO ECHO mode pg 39 is activated Picture Stabilizer To compensate for unstable images caused by camera shake particularly at high magnification 1 Press P STABILIZER appears 2 To switch off the Picture Stabilizer press P STABILIZER The indicator disappears Accurate stabilization may not be p...

Страница 21: ...m 11 13 16 between the video light and people or objects Do not use near flammable or explosive materials It is recommended that you consult your nearest JVC dealer for replacing the video light Video Light To brighten the scene when natural lighting is too dim 1 Set LIGHT OFF AUTO ON as required OFF Turns off the light AUTO Automatically turns on the light when the camcorder senses insufficient l...

Страница 22: ... Wheel Set to Speaker LCD Monitor Brightness Adjustment Rotate the BRIGHT Wheel towards to brighten or towards to darken The Bright Level Indicator is displayed under the Date Time Display when you play back images recorded in Wide Mode pg 41 Speaker Volume Control Slide the Power Zoom Lever VOL towards to turn up the volume or towards to turn down the volume The Speaker Volume Indicator is displa...

Страница 23: ...BC mode is activated TBC is displayed Counter Memory Function Makes it easier to locate a specific tape segment 1 Press COUNTER R M and hold for more than 1 second The counter resets to 0 00 00 2 Press COUNTER R M for less than 1 second M appears 3 After recording or playback press 5 then 2 The tape automatically stops at or close to 0 00 00 4 Press 4 6 to start playback The counter memory functio...

Страница 24: ...d A V input connectors Use optional S Video and Audio cables To S Video Input To S Video Output To TV or VCR When connecting the cables open this cover Connector cover To Audio Input S Video cable optional To Audio Output TV VCR When connecting the cables open this cover Basic Connections VCR TV These are some basic types of connections When making the connections refer also to your VCR and TV ins...

Страница 25: ...l to avoid a sudden burst of sound when the camcorder is turned on If you have a TV or speakers that are not specially shielded do not place the speakers adjacent to the TV as interference will occur in the camcorder playback picture Tape Dubbing 1 Following the illustration on pg 24 connect the camcorder and the VCR 2 Set the camcorder s Power Switch to turn on the VCR s power and insert the appr...

Страница 26: ...r into the VCR and play the tape back as you would any other 4 Slide the latch and the compartment door opens automatically This may take around 10 seconds Do not attempt to force the adapter open Then insert your finger in the hole on the underside of the adapter as shown in the illustration at left and push up and remove the cassette NOTES During tape loading and unloading do not touch the reels...

Страница 27: ... S C RECORDING PLAYBACK CONTENTS D S C RECORDING 28 29 Quick Review for still images stored in the built in memory 29 D S C PLAYBACK 30 34 Normal Playback 30 Slide Show 30 INDEX Screen 31 Index Playback 31 Protecting Images 32 Deleting Images 33 Connection To A Windows PC 34 ...

Страница 28: ...omes on If the DSC Lamp is not lit press REFRESH for approx 1 second to select DSC An image appears 2 To select the Picture Mode perform steps 2 through 4 of Picture Mode Setting on pg 16 3 Rotate the MENU Wheel to select SNAPSHOT and press it The SNAPSHOT Menu appears Rotate the MENU Wheel to select the appropriate mode among the 4 Snapshot modes pg 29 and press it Selection is complete 4 The Men...

Страница 29: ...ransfer them to a VCR connected to the camcorder and record them onto a tape Image data stored in the camcorder s built in memory can be transferred to a Windows PC and saved using the provided image transfer software Picture Navigator pg 34 There is a momentary camera shutter type blackout together with the image Continuous camera shutter type blackout takes place 4 or 9 times with the image like...

Страница 30: ... and the viewfinder switches off automatically to save power The playback picture can be viewed in the viewfinder with the LCD monitor shut on the LCD moitor or on a connected TV pg 24 When viewing a playback picture on a connected TV it may jitter slightly You can also view the playback picture on the LCD monitor with it flipped over and retracted To brighten the LCD monitor rotate the BRIGHT Whe...

Страница 31: ...till images shot in the STANDARD mode Protect icon When an image is protected against its accidental erasure a padlock mark appears next to the Picture mode indicator and that image cannot be deleted Selected Image An image is framed like this when it is selected Rotate MENU to move the frame to the desired image Display Playback Screen Index Playback You can view all still images stored in memory...

Страница 32: ...ate the MENU Wheel to move the frame to the desired image and press it A padlock mark appears on the selected image Repeat this procedure for all images you do not wish to delete by accident 5 Rotate the MENU Wheel upward to select EXIT then press it twice The normal playback screen appears NOTE When the memory is initialized or corrupted even protected images are deleted If you do not want to los...

Страница 33: ... press it twice The Menu Screen closes TO DELETE ALL IMAGES Before doing the following perform steps 1 through 3 above 4 Rotate the MENU Wheel to select ALL and press it The Delete Excute Menu appears 5 Rotate the MENU Wheel to select ENTER and press it After ENTER blinks all the images are deleted and the Menu Screen reappears Press the MENU Wheel in again to close the Menu Screen To cancel delet...

Страница 34: ... the provided CD ROM for details During transfer of the still image the camcorder s screen becomes blue and is displayed After transferring is finished the screen displays the same still image as in step 2 4 Close the software then switch off the camcorder For Windows To COM Port RS 232C Makes the DSC lamp come on PC connection cable To DIGITAL connector NOTES Before transferring still images from...

Страница 35: ...ot 43 Exposure Control 44 Focusing 45 White Balance Adjustment 46 Manual White Balance Operation 46 Date Time Insert 47 Instant Titles 47 Animation 48 Time Lapse 48 USING THE REMOTE CONTROL UNIT 49 53 Installing The Batteries 50 Playback Zoom 51 Animation And Time Lapse 51 Insert Editing VIDEO 52 Insert Editing Insert A Still Image From The Built In Memory Onto A Tape 53 Audio Dubbing 53 ...

Страница 36: ... repeatedly until OFF appears OFF is displayed for approx 2 seconds NIGHT ALIVE Button Power Switch A NIGHT AUTO The shutter speed is automatically adjusted maximum 1 6 sec 1 NIGHT 10X The shutter speed is set to 1 6th of a second to provide 10 times the sensitivity 2 NIGHT 60X The shutter speed is set to 1 second to provide 60 times the sensitivity Appears when the Power Switch is set to NOTES Du...

Страница 37: ...he picture into from a mosaic pattern SHUTTER Wipe A black screen moves in from the top and bottom closing over the image like a shutter or a new image pushes open the black screen vertically from the center SLIDE Wipe A black screen moves in from the left to gradually cover the image or a new image moves in from right to left DOOR Wipe Wipes in as the two halves of a black screen open to the left...

Страница 38: ...asy look TWILIGHT Dusk twilight scenery fireworks etc look more natural and dramatic The following happens when Twilight mode is selected Auto gain control is turned off White Balance is set to FINE day mode but can also be manually changed to another mode pg 46 Auto Focus becomes available only in the range of 10 m 32 ft to infinity To focus when the subject to camera distance is less than 10 m 3...

Страница 39: ... with the WIDE mode pg 40 41 for a classic look NEGA POSI The colors of a picture are reversed MOSAIC Turns recorded scenes into a mosaic pattern STRETCH Doubles the width of the picture horizontally CLASSIC FILM Makes your footage look like a classic movie by shooting in black and white with a strobing effect and black bars added at the top and bottom STROBE Your recording looks like a series of ...

Страница 40: ...EFRESH for approx 1 second to select VIDEO the DSC Lamp goes out or DSC the DSC Lamp comes on according to each function s explanation described at the bottom of pages 41 and 42 2 Press the MENU Wheel in The Menu Screen appears 3 Rotate the MENU Wheel to select the desired function To go from CAMERA MENU to SYSTEM MENU rotate the MENU Wheel to select TO SYSTEM MENU and press it SYSTEM MENU is comp...

Страница 41: ...ected the DSC Lamp is not lit If DSC is selected the DSC Lamp is lit this function will not be activated even though the highlight bar on the Menu Screen will move to that position Functions listed without an asterisk are available when either DSC or VIDEO is selected Allows you to set the recording mode SP or EP depending on your preference pg 14 50X Allows you to use the Digital Zoom By digitall...

Страница 42: ...nt date and time pg 11 ON Demonstrates certain functions automatically When DEMO MODE is set to ON and the Menu Screen is closed the demonstration starts Operating the Power Zoom Lever during the demonstration stops the demonstration temporarily If the Power Zoom Lever is not moved for more than 1 minute after that the demonstration will resume NOTE When a tape whose Erase Protection tab is in the...

Страница 43: ...RD F P E U I X L N I L T UP SNAPSHOT Power Switch During shooting DSC Lamp MENU Wheel Menu Screen REFRESH Button Menu Screen Display FULL Snapshot mode with no frame PIN UP Pin Up mode SNAPSHOT RECORDING 1 Press SNAPSHOT Regardless of the Power Switch position or Snapshot recording takes place using the selected Snapshot mode If you press during Record Standby a still image will be recorded for ap...

Страница 44: ...enu appears 4 Rotate the MENU Wheel to select MANU then press it The Menu Screen disappears and 00 exposure control level counter appears 5 To brighten the image rotate the MENU Wheel downward The exposure control level counter increases maximum 06 To darken the image rotate the MENU Wheel upward The exposure control level counter decreases maximum 06 6 Press the MENU Wheel in The setting is compl...

Страница 45: ... appear The focus is locked at this point 5 To focus on a farther subject rotate the MENU Wheel upward appears and blinks To focus on a nearer subject rotate the MENU Wheel downward appears and blinks 6 Press the MENU Wheel in The setting is complete The Menu Screen reappears with the highlight bar on RETURN 7 Press the MENU Wheel in The Menu Screen disappears and reappears to indicate the focus i...

Страница 46: ...PIA or MONOTONE mode pg 39 is activated Manual White Balance Operation Perform Manual White Balance when shooting under various types of lighting 1 Follow steps 1 through 4 of the white balance adjustment and select MWB 2 Hold a sheet of plain white paper in front of the subject Adjust zoom or position yourself so that the white paper fills the screen 3 Press the MENU Wheel in until MWB begins bli...

Страница 47: ... W C E F A U E A U E O X F P R R S P R D N I P R P P D G T Y V Y E Y N I R A C E N A T B C C I H W G T I I A H A O U T R T R L L B D L L T I I I A A A E H O S D D B Y T D N T A A Y I A M Y Y O Y A S N S S Instant Titles The camcorder has eight preset titles in memory You can superimpose one of them over the video image Instant Titles can be displayed not only in English but also in French Spanish ...

Страница 48: ...s make sure that VIDEO is selected the DSC Lamp is not lit The Power Switch is set to The camcorder is in the Record Standby mode The recording mode is set to SP NOTES for Animation and Time Lapse For best results make sure the camcorder is secured when shooting in Animation or Time Lapse mode Fade or wipe in out cannot be performed during Animation or Time Lapse shooting Before performing other o...

Страница 49: ... 51 Functions the same as the Recording Start Stop Button on the camcorder Retake forward pg 21 Time Lapse pg 51 With the camcorder s Power Switch set to Zoom in out pg 51 Playback start pg 22 Rewind Reverse Shuttle Search Previous Still Image Playback pg 22 30 Stop pg 22 Insert Editing pg 52 53 Fast Forward Forward Shuttle Search Next Still Image Playback pg 22 30 Pause pg 22 Audio dubbing pg 53 ...

Страница 50: ...Replace the battery compartment cover USING THE REMOTE CONTROL UNIT cont 5m 16 ft When using the remote control be sure to point it at the remote sensor The illustration shows the approximate transmitted beam effective area for indoor use The transmitted beam may not be effective or may cause incorrect operation outdoors or when the remote sensor is directly exposed to sunlight or powerful lightin...

Страница 51: ...sly set level Animation And Time Lapse The remote control lets you set release Interval Time and Recording Time without using the Menu Screen Animation 1 Set Instead of performing steps 1 and 2 on pg 48 Animation press REC TIME on the remote control Each time REC TIME is pressed the Recording Time indicator appears changing in the following order 1 4S 1 2S 1S 5S and no indication off 2 Release Ins...

Страница 52: ...f the scene you want to replace press PLAY to view the recorded tape and press PAUSE exactly at the Edit In point where the new scene should start 5 Press and hold INSERT and without releasing INSERT press and release PAUSE on the Remote Control The Insert Editing indicator appears and the Insert Editing mode is engaged When the scene the camcorder is aimed at appears on the screen go to the next ...

Страница 53: ...s been removed cover the hole with adhesive tape Do not press STOP during Insert Editing or Audio Dubbing or the edit points will not be accurate During Insert Editing and Audio Dubbing when Insert Pause or Audio Dub Standby is engaged the counter may go slightly past 0 00 00 Recording however stops at exactly 0 00 00 Insert Editing Insert A Still Image From The Built in Memory Onto A Tape You can...

Страница 54: ...ONTENTS TROUBLESHOOTING 55 57 DETAILS 58 59 INDEX 60 63 Controls Connectors And Indicators 60 61 Indications 62 63 TERMS 64 65 CAUTIONS 66 68 SPECIFICATIONS 69 ESPAÑOL 70 73 FOR SERVICING Only in U S A 74 WARRANTY Only in U S A 75 ...

Страница 55: ...n after a few minutes try turning the power back on If it still does not come on consult your nearest JVC dealer The Power Switch is set to Certain combinations of modes or effects are not possible to use Set DISPLAY to FULL in SYSTEM MENU pg 42 This sometimes occurs when the contrast between the back ground and the object is great It is not a defect of the camcorder Sunlight is directly entering ...

Страница 56: ... Recording mode for about 5 seconds so that the tape runs smoothly Using the Fade in function at this point is a good way to begin an animated program pg 48 The TV has not been set to its VIDEO mode or channel If A V connection is used the TV s VIDEO TV Switch has not been set to VIDEO If DSC is selected the DSC Lamp is lit it is not possible to play back a tape Press REFRESH for approx 1 second t...

Страница 57: ...DSC Lamp is lit Since the camcorder is a microcomputer controlled device external noise and interference from a TV a radio etc might prevent it from functioning properly For example when a still image you shot is stored in the camcorder s built in memory the above may cause the following Although the remaining number of shots indicator shows that shooting is possible a still image cannot be stored...

Страница 58: ...do not use the AC Adapter near a radio Since the AC Adapter processes electricity internally it becomes warm during use Be sure to use it only in well ventilated areas The following operation stops charging or discharging Set the Power Switch to or Disconnect the AC Adapter from the camcorder Unplug the AC Adapter s power cord from the AC outlet Detach the battery from the camcorder The date time ...

Страница 59: ... left in this condition for 5 minutes TAPE END also appears when a cassette whose tape is already at its end is loaded If the Recording Start Stop button is pressed after the Record Standby mode has continued for over 5 minutes recording may not start immediately While shooting sound is not heard from the speaker The TBC indicator turns green gray with a camcorder equipped with a black white viewf...

Страница 60: ...60EN INDEX Controls Connectors And Indicators I 2 1 3 5 6 7 8 9 0 y u Y U T Q W E R p i r t w e q o 4 ...

Страница 61: ... pg 20 Speaker Volume Control VOL pg 22 Picture Stabilizer Button P STABILIZER pg 20 Time Base Corrector Button TBC pg 23 Power Switch OFF pg 18 22 28 30 Recording Start Stop Button pg 18 Battery Release Switch BATTERY RELEASE pg 8 Diopter Adjustment Control pg 10 Connectors The connectors q to r are located beneath the cover q S Video Output Connector S pg 24 w Audio Output Connector A pg 24 e Vi...

Страница 62: ...cator remains at 0 Night Alive Indicator pg 36 Displayed at 3 for approx 2 seconds when Night Alive is switched from one mode to another by pressing NIGHT ALIVE then only the indicator remains at 0 3 Fade Wipe Standby Indicator pg 37 Displayed at 3 for approx 2 seconds when the Fade Wipe is switched from one effect to another by pressing FADE WIPE then only the indicator remains at 4 Picture Mode ...

Страница 63: ...cleaning cassette If the warning remains after cleaning consult your nearest JVC dealer The error indications E01 E06 show what type of malfunction has occured If an error indication and warning appear turn the unit off remove the power supply battery etc and wait a few minutes for them to clear When it does you can resume using the camcorder If the indication remains consult your nearest JVC deal...

Страница 64: ...g 33 Delete Select Menu pg 33 Demonstration Mode pg 6 42 Digital Effects pg 39 Digital Zoom pg 41 Digital Still Camera pg 27 34 Diopter Adjustment pg 10 E Electronic Fog Filter Mode pg 38 Erase Protection pg 15 Exposure Control pg 44 F Fade In Out pg 37 Fast Forward Tape pg 22 FINE Mode pg 16 Fine Still pg 22 Full Image pg 29 43 G Grip Adjustment pg 10 H High Speed Shutter Mode pg 38 I INDEX Menu ...

Страница 65: ...ode pg 39 Shoulder Strap Attachment pg 10 Shuttle Search pg 22 Slide Show Mode pg 30 Snapshot During Playback pg 43 Snapshot Mode pg 28 43 Snapshot VIDEO pg 43 Specifications pg 69 Sports Mode pg 38 STANDARD Mode pg 16 Star Mark On The Setting Menus pg 31 33 Still Image Data Transfer pg 34 Still Playback pg 22 Store A Still Image In The Built In Memory pg 28 Strobe Effect pg 39 Super LoLux S LX pg...

Страница 66: ...7 Remove the batteries from the unit if it is to be stored for an extended period to avoid battery leakage which can cause malfunctions Plug adapter Battery Packs The battery packs are nickel cadmium or nickel metal hydride batteries Before using the supplied battery pack or an optional battery pack be sure to read the following cautions 1 To avoid hazard do not burn do not short circuit the termi...

Страница 67: ...t the sun carry it by holding the viewfinder or the LCD monitor Be sure to hold the main unit with both hands or use the grip swing it excessively when using the shoulder strap About moisture condensation You may have observed that pouring a cold liquid into a glass will cause drops of water to form on the glass outer surface This same phenomenon occurs on the head drum of a camcorder when it is m...

Страница 68: ... the equipment into an outlet on a circuit different from that to which the receiver is connected Consult the dealer or an experienced radio TV technician for help This Class B digital apparatus complies with Canadian ICES 003 Cet appareil numérique de la classe B est conforme à la norme NMB 003 du Canada For Your Maintenance 1 After Use 1 Set the Power Switch to OFF to turn off the camcorder 2 Op...

Страница 69: ...k Power consumption Viewfinder on 4 7 W LCD monitor on 5 4 W Video light 3 0 W Signal system NTSC type Video recording system Luminance FM recording Color Converted sub carrier direct recording Conforms to VHS standard Cassette cassette Tape speed SP 33 35 mm sec 1 5 16 ips EP 11 12 mm sec 7 16 ips Recording time max SP 40 minutes EP 120 minutes with TC 40 D S C format Recording format Digital dat...

Страница 70: ...En este caso retire la batería de la videocámara luego intente la carga nuevamente Si el tiempo de funcionamiento de la batería queda extremadamente corto aun después de haber sido completamente cargada la batería está estropeada y necesita ser reemplazada Sírvase comprar una nueva Utilizando el adaptador cargador de alimentación CA AA V15 opcional es posible cargar las baterías BN V11U V12U V20U ...

Страница 71: ... no hacerlo puede producir un error de funcionamiento en la videocámara NOTAS El tiempo de grabación es reducido sensiblemente bajo las siguientes condiciones El modo zoom o modo de espera de grabación es activado repetidas veces EL monitor LCD es usado repetidas veces Antes del uso prolongado se recomienda la preparación de baterías suficientes para cubrir 3 veces el tiempo planeado de filmación ...

Страница 72: ... lámpara VIDEO se encenderá y aparecerá una imagen 3 Si la lámpara DSC está encendida presione REFRESH durante aprox 1 segundo para seleccionar VIDEO 4 Presione el botón inicio parada de grabación Comenzará la grabación Para detener temporariamente la grabación presione nuevamente el botón de inicio parada de grabación Por más detalles p 18 19 El visor se desconecta automáticamente para ahorrar en...

Страница 73: ...ar DSC 4 Presione el botón SNAPSHOT Una imagen fija es filmada y almacenada en la memoria de la cámara de video Por más detalles p 28 29 El visor se desconecta automáticamente para ahorrar energía cuando el monitor LCD es abierto a un ángulo mayor de 60 grados El monitor LCD se activa desactiva cuando se lo abre cierre a 60 grados aprox ALIMENTACION REPRODUCCION FILMACION Colóquelo en 3 Botones de...

Страница 74: ... Just as quality is a keyword in the engineering and production of the wide array of JVC products service is the key to maintaining the high level performance for which JVC is world famous The JVC service and engineering organization stands behind our products NATIONAL HEADQUARTERS JVC SERVICE ENGINEERING COMPANY OF AMERICA DIVISION OF JVC AMERICAS CORP 10 New Maple Avenue Pine Brook NJ 07058 9641...

Страница 75: ... to any attachment not provided with the products or if the model or serial number has been altered tampered with defaced or removed 2 Initial installation and installation and removal for repair 3 Operational adjustments covered in the Owner s Manual normal maintenance video and audio head cleaning 4 Damage that occurs in shipment due to act of God and cosmetic damage 5 Signal reception problems ...

Страница 76: ...U Printed in Malaysia 1000MKV UN PJ EN GR SXM930 GR SXM730 VICTOR COMPANY OF JAPAN LIMITED COPYRIGHT 2000 VICTOR COMPANY OF JAPAN LTD ...

Отзывы: