20
EN
A
M
PL
AY
OFF CAMER
A
5S
FOCUS
EXPOSURE
AUTO
OFF
OFF
AUTO
AUTO
W. BALANCE
FADER
/ WIPE
P. AE
/ EFFECT
END
0
FLASH ADJ.
TO MODE MENU
4
– – – – –
6
– – – – –
REC MODE
WIDE MODE
OFF
40X
SP
ZOOM
GAIN UP
DIS
END
ON
AGC
OFF
SELF-TIMER
TO DATE / TIME MENU
TO SYSTEM MENU
AUTO
FLASH
4
ON SCREEN
OFF
ON
DISPLAY
INDICATION
ON
DATE / TIME
RETURN
DATE/TIME
25 . 12 . 99
16 : 40
4
RECORDING
Advanced Features
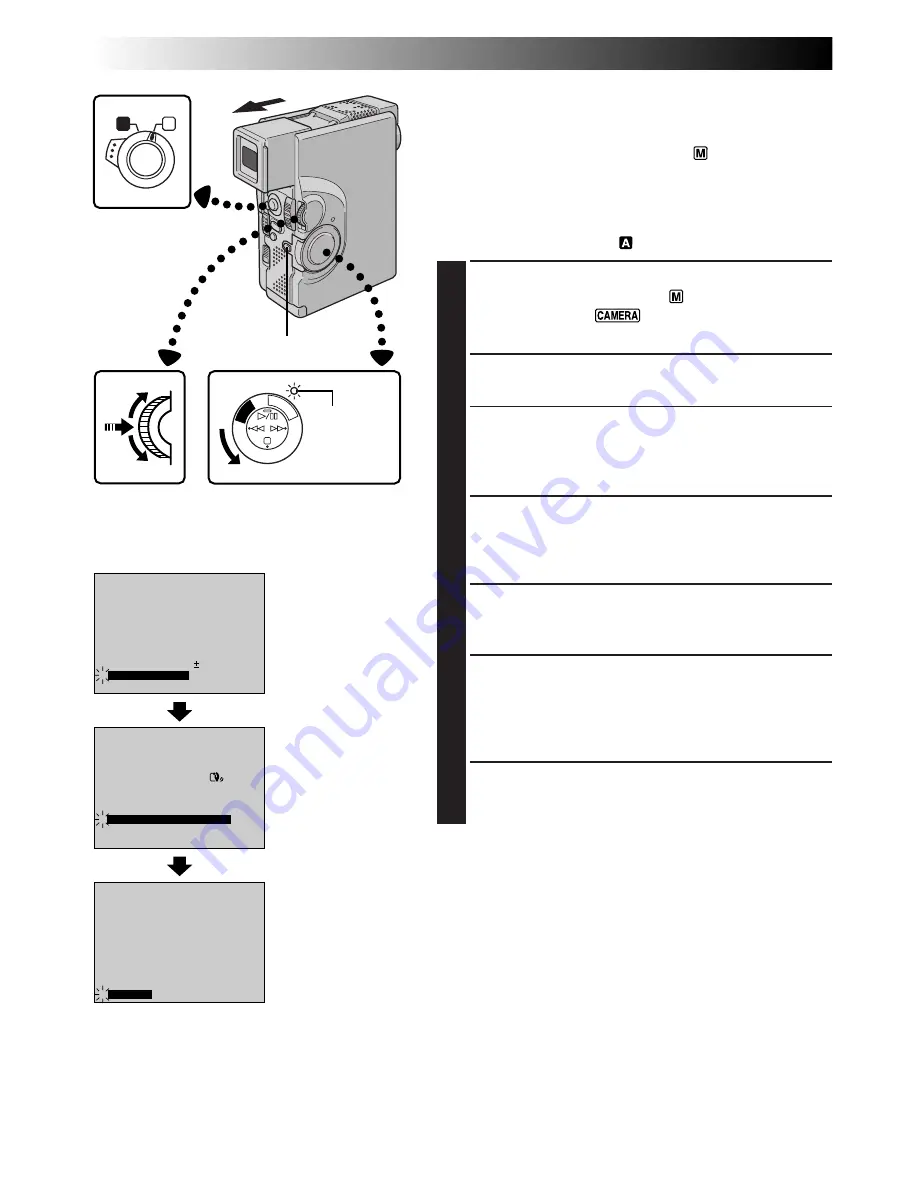
Displaying The Date And Time During
Recording
When the Operation Switch is set to “
”, you can choose
whether to display the date and time during recording or
not. You must first set the date and time (“Date/Time
Settings”,
Z
pg. 8). Set “DISPLAY” to “ON” in the Date/
Time Menu. The Date/Time is always displayed when the
Operaton Switch is set to “
”.
1
SELECT OPERATION MODE
Set the Operation Switch to “
”. Then, set the
Power Switch to “
” or “5S” while pressing
down the Lock Button.
2
ACCESS RECORDING MENU
Press MENU/SET. The Recording Menu appears.
3
ACCESS MODE MENU
Move the highlight bar to “TO MODE MENU” by
rotating MENU/SET. Press it and the Mode Menu
appears.
4
ACCESS DATE/TIME MENU
Move the highlight bar to “TO DATE/TIME MENU”
by rotating MENU/SET. Press it and the Date/Time
Menu appears.
5
SELECT FUNCTION
Move the highlight bar to “DISPLAY” by rotating
MENU/SET, then press it.
6
SET FUNCTION PARAMETERS
Cycle through the available settings of the selected
functions by rotating MENU/SET and stop when the
one you want is displayed. Then press it and the
highlight bar automatically moves to “RETURN”.
7
CLOSE RECORDING MENU
Press MENU/SET twice. Selection is complete and the
menu disappears.
NOTES:
●
Connect the camcorder to a TV and set “ON SCREEN”
to “ON” in the Date/Time Menu. The display appears on
the connected TV .
●
Even if “ON SCREEN” is set to “ON”, the indications are
removed from the TV if “INDICATION” is set to “OFF”
(
Z
pg. 21).
Display
MENU/SET Dial
Power Switch
Mode Menu
RECORDING
Advanced Features
Date/Time Menu
Power lamp
Recording Menu
Lock Button
Operation Switch


