background image

26

 EN

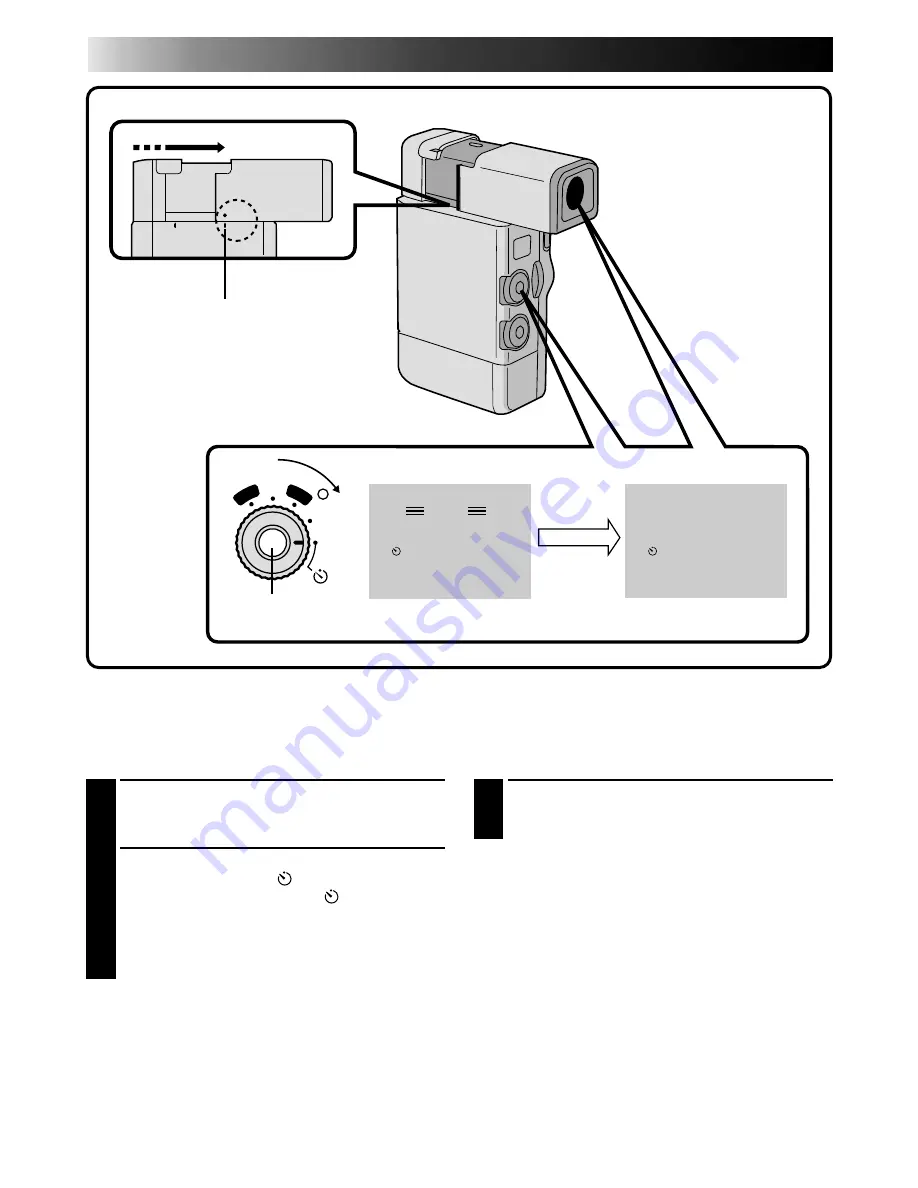
1

PULL OUT VIEWFINDER

Align its mark to “STANDBY”. The lens cover
opens automatically.

2

SELECT MODE

Set the Power Dial to “

” and press

RECORDING START/STOP. “

” appears in

the viewfinder, and the tally lamp lights and
begins blinking 15 seconds before recording
starts. When the lamp stops blinking, recording
begins.

3

END RECORDING

Press RECORDING START/STOP and set the
Power Dial to the “REC” or “OFF” position.

To Take A Snapshot In The Self-Timer Mode . . .
..... in step 2, press SNAPSHOT instead of

RECORDING START/STOP. After 15 seconds, a
6-second still with the shutter sound effect and
a white border is recorded. After that, the
camcorder enters the RECORD/STANDBY
mode.

Self-Timer

Once the camcorder is set, you (or whomever is operating the camcorder) can get into the scene, putting the
final touch on a memorable picture.

OFF

5S

REC

PLAY

– – –

F . AUTO

PAUSE

REC

F . AUTO

VIEWFINDER

STANDBY

RECORDING
START/STOP BUTTON

After 15 sec.

DURING RECORDING

RECORDING  

Advanced Features (Cont.)

Содержание GR-DVJ70

Страница 1: ...Operation 16 Menus 17 Basic Recording 21 Advanced Features 23 PLAYBACK 42 Basic Connections 42 Basic Playback 45 Playback Menu 46 Advanced Features 48 EDITING 50 Docking Station 50 Dubbing 50 Brand Setting 51 Random Assemble Editing 52 For More Accurate Editing 55 Audio Dubbing 57 Insert Editing 58 TROUBLESHOOTING 59 AFTER USE 62 CONTROLS INDICATIONS AND CONNECTORS 63 Main Unit 63 Viewfinder Indic...

Страница 2: ...025 use of another battery may present a risk of fire or explosion n Dispose of used battery promptly n Keep away from children n Do not disassemble and do not dispose of in fire SAFETY PRECAUTIONS IMPORTANT Connection to the mains supply in the United Kingdom DO NOT cut off the mains plug from this equipment If the plug fitted is not suitable for the power points in your home or the cable is too ...

Страница 3: ...mage your hearing DON T obstruct the ventilation of the equipment for example with curtains or soft furnishings Overheating will cause damage and shorten the life of the equipment DON T use makeshift stands and NEVER fix legs with wood screws to ensure complete safety always fit the manufacturer s approved stand or legs with the fixings provided according to the instructions DON T allow electrical...

Страница 4: ... V778U is also recom mended It holds two batteries and keeps them sufficiently warm even at an outside temperature of 0 C Lithium ion is vulnerable in colder temperatures Keep the battery in a pocket when not in use or use the optional CU V778U power grip SAFETY PRECAUTIONS CAUTION To avoid electric shock or damage to the unit first firmly insert the small end of the power cord into the AC Power A...

Страница 5: ...ata into blocks writing one block of each data type on each track of the tape ABOUT DVC 3 Audio Area The digital audio signal is recorded here 4 ITI Insert and Tracking Information Area Insert editing and post recording editing tracking signals are recorded here 1 Sub Code Area The Time Code and Date Time data are written here separate from the video data This enables you to display the date and t...

Страница 6: ...der and align the mark with STANDBY The lens cover opens automatically 2 Set the Power Dial to REC then press RECORDING START STOP A beep signals the start of recording 3 To pause during recording press RECORDING START STOP Two beeps indicate the RECORD STANDBY mode 4 When you re finished push the viewfinder in aligning its mark with CAMERA OFF PLAYBACK 1 Pull out the viewfinder The lens cover ope...

Страница 7: ...ons on pg 42 44 46 58 purchase the accessory kit CU V70KIT E available optionally Remote control unit RM V708U or RM V710U Docking Station Lithium battery CR2025 for remote control unit Editing cable S VIDEO cable AUDIO and VIDEO cable ø3 5 DV TV or VCR DC cord Power Grip CU V778U Battery pack BN V714U AUDIO and VIDEO cable Phono Docking Station TV or VCR T W PROVIDED ACCESSORIES Lithium battery C...

Страница 8: ...ach one right after the other If you attach a second battery while the first one is being charged the time required for charging will increase POWER CORD DC JACK POWER LAMP CHARGE INDICATOR 1 CHARGE INDICATOR 2 BATTERY PACK BN V714U BLACK RED CHARGE MARKER The charge marker does not move by itself After charging or removing a discharged battery be sure to set the marker to the predetermined positi...

Страница 9: ...C Power Adapter Charger processes electricity internally it becomes warm during use Be sure to use it only in well ventilated areas Be sure to securely connect the power cord to the AC Power Adapter Charger Before connecting to an AC outlet connect the power cord to the AC Power Adapter Charger If you plug into an AC outlet first and the power cord s terminal comes in contact with a metal surface ...

Страница 10: ...t Using The CAM Stand During Recording If you record while leaving the camcorder on a desk or table it may tip or be accidentally knocked over Attach it to the CAM Stand before this type of use 1 SUPPLY POWER Plug the DC Power Cord into the camcorder 2 ATTACH TO CAM STAND Attach as shown in the illustration paying particular attention to the DC Power Cord MIC AV OUT DC IN 6V Connector is under thi...

Страница 11: ...n page 2 4 for information on safe handling of lithium batteries After changing the lithium battery reset the date and time Z pg 12 1 OPEN BATTERY COVER Slide off as shown in the illustration 2 REMOVE OLD BATTERY Pull the battery holder out as shown and slide the battery down and out of the holder 3 INSERT NEW BATTERY Insert the battery with the side showing in the holder Then insert the battery h...

Страница 12: ... increase and toward to decrease input the day Press SET Repeat the procedure to input the month year hour and minute Press SET when the pointer is next to END to exit NOTE If you don t exit the Date Time Menu the clock display will not move but the camcorder s internal clock continues to operate Once you close the menu the date and time in the viewfinder begin operation from the current date and ...

Страница 13: ...y force If you wait a few seconds and the cassette holder doesn t open close the cassette cover and try again Be careful not to get your fingers caught in the holder when it s closing If this happens the holder will open automatically after a few seconds When the camcorder is suddenly moved from a cold place to a warm environment wait a short time before opening the cover To protect valuable recor...

Страница 14: ... best viewing 1 ATTACH HAND STRAP Slide the strap through the eyelet pulling firmly to ensure secure attachment 1 SELECT OPERATION MODE Set the Power Dial to REC 2 ADJUST DIOPTER Pull out the viewfinder and slide the Diopter Adjust Lever Slide in either direction while looking at the viewfinder display until it looks best to you PAUSE OFF 5S REC PLAY 1 2 POWER DIAL VIEWFINDER DIOPTER ADJUST LEVER ...

Страница 15: ...or Z pg 52 ZOOM Buttons Z pg 48 DISPLAY Button Z pg 57 SHIFT Button Z pg 48 SLOW Rewind Forward Buttons Z pg 48 LEFT RIGHT Buttons Z pg 48 FADE WIPE Button Z pg 52 EFFECT ON OFF Button Z pg 49 EFFECT Button Z pg 49 RECORDING START STOP Button Z pg 58 POWER ON OFF Button When the camcorder s Power Dial is set to PLAY you can turn the unit s power on and off using the RM V708U or RM V710U KNOB CANCE...

Страница 16: ... pg 24 20x only ON OFF ON OFF ON OFF ON OFF P AE Effects Z pg 34 Not operational YES can t change once set YES FADER WIPE Z pg 29 Not operational YES can t change once set YES RECORDING Full Auto Manual Operation The following chart shows you which functions are available in the Full Auto and Manual operation modes 1 Factory preset for 5S However if you change the setting in the System Menu Z pg 1...

Страница 17: ... 1 SELECT OPERATION MODE Set the Power Dial to REC and set the Select Dial to MANUAL 2 ACCESS RECORDING MENU Press MENU The Recording Menu appears in the viewfinder 3 SELECT FUNCTION Place the pointer next to the desired function by sliding the Zoom Lever then press SET The pointer stops blinking indicating that the function has been selected 4 SET FUNCTION PARAMETERS Cycle through the available s...

Страница 18: ...es a brighter image than in the AGC mode but the subject s movements are not smooth or natural OFF Select this setting when lighting is not a problem AGC This is the factory setting and is automatically activated during Auto operation The overall appearance is jagged but the image is bright and the movements are more natural than in A mode Wide Mode This recording mode is compatible with wide scre...

Страница 19: ...le settings for the selected function and stop when the desired setting appears Then press SET and the pointer automatically moves to END To set the parameters for a different function repeat steps 4 and 5 6 CLOSE SYSTEM MENU Press SET twice Setting is complete and the System Menu disappears System Menu The System Menu allows you to set the following functions Scene Beep Wind Cut Sound Mode and ID...

Страница 20: ...scene dissolves and is replaced by the new scene over a 2 second period Z pg 25 ANIM Animation Each time you press RECORDING START STOP a 1 8 second recording is taken By using an inanimate object and changing its position between shots you can record the subject as though it s moving Beep The beep sounds when the power is turned on or off and at the beginning and end of recording ON To activate t...

Страница 21: ...during playback Z pg 47 VIEWFINDER VIEWFINDER RECORD STANDBY STANDBY RECORDING START STOP BUTTON DURING RECORDING POWER LAMP 5 END RECORDING When you re finished recording press RECORDING START STOP Align the viewfinder s mark with CAMERA OFF the power lamp goes out and the lens cover closes automatically When transporting make sure the viewfinder is in this position Before turning the power on ag...

Страница 22: ...e starting point of the most recent recording and the camcorder enters RECORD STANDBY mode If after the tape has rewound to the beginning of the scene you decide you don t need to re record press CAN The tape auto matically fast forwards to the end of the scene REC 30min 29 min 3 min 2 min blinking 1 min blinking 0 min blinking STOP PLAY PAUSE Stable Shooting Positions CAN BUTTON RECORDING Cont RE...

Страница 23: ...tion and connecting a video printer to the station it will become possible to print out snapshots Snapshot Use your camcorder like a regular camera and take a snapshot or several of them in succession 1 PULL OUT VIEWFINDER Align its mark to STANDBY The lens cover opens automatically 2 TAKE SNAPSHOT Press SNAPSHOT PHOTO appears in the viewfinder and the image bordered by a white frame will be recor...

Страница 24: ...riable the quicker you slide the Zoom Lever the quicker the zoom action NOTE Digital zoom 20x and 100x cannot be used while the Video Echo effect Z pg 35 the Picture Wipe Dissolve function Z pg 31 or the 5SD mode Z pg 25 are activated T W T W D T W T D W T D W T D W T D W ZOOM LEVER ZOOM IN T Tight ZOOM OUT W Wide 10X zoom zone ZOOM DISPLAY Digital zoom zone RECORDING Advanced Features Cont ...

Страница 25: ...TART STOP within 5 seconds after recording starts RECORD STANDBY is not engaged Scene Record a vacation or an important event in 5 second clips to keep the action moving The 5 Second function may also be activated during Full Auto operation While the 5 Second mode is activated Fade Wipe Z pg 29 P AE Effects Z pg 34 and other manual operations cannot be performed OFF 5S REC PLAY REC 5S MODE PAUSE 5...

Страница 26: ...to the REC or OFF position To Take A Snapshot In The Self Timer Mode in step 2 press SNAPSHOT instead of RECORDING START STOP After 15 seconds a 6 second still with the shutter sound effect and a white border is recorded After that the camcorder enters the RECORD STANDBY mode Self Timer Once the camcorder is set you or whomever is operating the camcorder can get into the scene putting the final to...

Страница 27: ... of the tape See page 47 for information about displaying Time Codes The video recording may not start from exactly 00 00 00 The Time Code cannot be reset If you start recording from the end of the previous recording leaving no blank space there may be situations where a clean transition is not possible Whenever you start recording in a blank portion the Time Code counts from 00 00 00 That means t...

Страница 28: ... to REC and the Select Dial to MANUAL 2 ACCESS RECORDING MENU Press MENU The Recording Menu appears in the viewfinder 3 ACCESS DATE TIME MENU Place the pointer next to TO DATE TIME MENU by sliding the Zoom Lever Slide toward to move up and toward to move down Press SET and the Date Time Menu appears in the viewfinder 4 INPUT DATE AND TIME Place the pointer next to DISPLAY by sliding the Zoom Lever...

Страница 29: ...lect the desired effect the Fader Wipe Menu disappears and the effect is activated within 2 seconds The indicator representing the selected effect appears in the viewfinder NOTE Refer to pages 30 32 for Fade Wipe effects and techniques 4 START RECORDING Press RECORDING START STOP The buzzer sounds indicating the start of recording 5 DEACTIVATE FADE WIPE EFFECTS In step 3 place the pointer next to ...

Страница 30: ...ER Fade in or out with a full screen mosaic effect WH WH BK B W RECORDING START STOP BUTTON FADE WIPE EXAMPLE WHITE FADER Wipe In SHUTTER WIPE Wipe in toward the centre of a black screen from the top and bottom or wipe out from the centre toward the top and bottom leaving a black screen SLIDE WIPE Wipe in from right to left or wipe out from left to right DOOR WIPE Wipe in as the two halves of a bl...

Страница 31: ... Menu Z pg 29 If you want to use effects not currently appearing on the menu exchange those appearing for others Z pg 33 1 START RECORDING Press RECORDING START STOP 2 ENGAGE RECORD STANDBY MODE Press RECORDING START STOP when one scene is finished The point at which the scene ended is stored in memory 3 RESUME RECORDING If you start recording a new scene within 5 minutes of the end of the previou...

Страница 32: ... recording starts with a Fade In or Wipe In If you press RECORDING START STOP during recording RECORD STANDBY mode is preceded by a Fade Out or Wipe Out when you resume recording it begins with a Fade In or Wipe In NOTES The Picture Wipe Dissolve feature is not available when Random Fader is activated When using MOSAIC FADER a black bar may appear at the bottom of the screen RECORDING Advanced Fea...

Страница 33: ...ECT Cycle through the remaining effects by sliding the Zoom Lever in either direction and stop when the one you want is displayed Press SET The pointer automatically moves to END To replace other effects repeat steps 4 and 5 6 CLOSE MENU Press SET twice Selection is complete and you can use the new effects during recording Z pg 29 1 SELECT OPERATION MODE Set the Select Dial to PRO 2 ACCESS RECORDI...

Страница 34: ...Effects You can choose any one of the effects from the P AE Effects Menu In addition you can exchange 5 of the 13 options that appear for other available effects Z pg 36 1 SELECT OPERATION MODE Set the Select Dial to PRO EFFECT appears in the viewfinder 2 ACCESS PRODUCTION EFFECTS MENU Press SET twice The P AE Effects Menu appears in the viewfinder 3 SELECT EFFECT Place the pointer next to the des...

Страница 35: ...d 1 50 The shutter speed is fixed at 1 50th of a second 1 100 The shutter speed is fixed at 1 100th of a second 1 250 factory preset 1 500 These settings allow fast moving images to be captured one frame at a time for vivid stable slow motion playback The faster the shutter speed the darker the picture becomes Use in areas with good lighting Checked u effects are factory preset To use other effect...

Страница 36: ... recording Z pg 34 FOCUS EXP WB PRO AUTO SET T W WIDE MODE ZOOM D I S GA I N UP TO FADER W IPE MENU TO P AE EFFECT MENU TO DATE TIME MENU TO SYSTEM MENU END OFF 20X OFF AGC ITEM ZOOM SW SET SET BUTTON P AE EFFECT CUSTOMIZE 1 2 3 4 5 END SHUTTER1 250 TW IL IGHT SEP I A MONOTONE CLASS I C F I LM B W 1 250 ITEM ZOOM SW SET SET BUTTON VIEWFINDER VIEWFINDER ZOOM LEVER MENU BUTTON SET BUTTON POWER DIAL ...

Страница 37: ... automatically However when focusing is difficult or when the subject is not in the middle of the viewfinder adjust the focus manually FOCUS EXP WB PRO AUTO SET FOCUS T W OFF 5S REC PLAY To Change To Auto Focus set the Select Dial to FOCUS and press SET once quickly The manual focus indications disappear Or set the Select Dial to AUTO NOTES Manual focus is recommended in the following situations W...

Страница 38: ...s too bright or too dark in compari son with the subject adjust the Exposure manually To Return To Automatic Exposure Control set the Select Dial to EXP then press SET quickly The Exposure setting display disappears Or set the Select Dial to AUTO NOTES Manual exposure adjustment is recommended in the following situations When shooting using reverse lighting or when the background is too bright Whe...

Страница 39: ...ng when the subject changes its distance thus its size in the viewfinder or when you want to lock the brightness level When the subject is close keep the iris locked Even when the subject moves away from you the image will not darken NOTES Iris lock is recommended in the following situa tions When shooting on a reflective natural background such as at the beach or when skiing When shooting objects...

Страница 40: ... of lighting White Balance Adjustment The white balance is usually adjusted automatically However when you want to shoot in various types of lighting or when shooting a scene with changing tint use this function 4 ENTER SELECTION Press SET Setting is complete and the indicator representing the selected setting appears in the viewfinder To Return To Automatic White Balance select AUTO in step 3 Or ...

Страница 41: ... based on the colour changing the tint Red paper deeper green blue paper orange yellow paper deeper purple NOTES A subject can be shot under various types of lighting conditions indoors natural flourescent candlelight etc Because the colour temperature is different depending on the light source the tint of the subject will differ depending on the white balance settings Use this function for a more...

Страница 42: ...2 PLACE CAMCORDER IN DOCKING STATION If you plan to use the MENU button while the camcorder is docked you need to pull out its viewfinder before attaching 3 ATTACH AND LOCKS Press down on the camcorder and slide the Lock Lever in the direction of the arrow The camcorder and the Docking Station are now securely attached Make sure that the camcorder does not have a DC cord or an AV cable connected t...

Страница 43: ...your VCR s instruction manual 5 START PLAYBACK Press PLAY You can watch the scenes you recorded on the TV 6 END PLAYBACK Press STOP and if you re not going to continue using the camcorder set the Power Dial to OFF NOTES If when using an S Video cable there s no picture connect the camcorder s output to the regular video input on the TV or VCR and try again Set the VIDEO OUT select switch of connec...

Страница 44: ... Slide the cover Z pg 45 and press PLAY You can watch the scenes you recorded on the TV 7 END PLAYBACK Press STOP and if you re not going to continue using the camcorder set the Power pDial to OFF NOTES To choose whether or not the following displays appear on the connected TV Date Time Time Code set to ON or OFF in the Playback Menu Z pg 49 Playback Sound Mode Display set the Power Dial to REC an...

Страница 45: ... mode is automatically engaged After 5 minutes in the stop mode the camcorder s power is automatically turned off 1 SELECT MODE Pull out the viewfinder and set the Power Dial to PLAY 2 OPEN COVER Slide the camcorder s Operation Panel cover as shown in the illustration 3 REWIND TAPE Press REW If you rewind all the way to the end of the tape it stops automatically 4 WATCH RECORDING Press PLAY You ca...

Страница 46: ...oom Lever to cycle through the available settings for the selected function and stop when the desired setting appears Then press SET and the pointer automatically moves to END To set parameters for other functions repeat steps 2 and 3 4 CLOSE MENU Press SET again and the menu disappears 1 ACCESS PLAYBACK MENU Press MENU The Playback Menu appears in the viewfinder and on the connected TV 2 SELECT F...

Страница 47: ...e the output sound without having to access the Playback Menu Make sure you point the remote control at the Docking Station s sensor During playback the camcorder detects the sound mode in which the recording was made This detection cannot be made during fast forward or rewind Displaying The Time Code During Playback You can display the Time Code on screen during playback This is especially useful...

Страница 48: ...cessing the picture may take on a mosaic effect 1 FIND ZOOM SCENE Press PLAY to start playback 2 ACTIVATE ZOOM Press ZOOM on the remote control Make sure the remote control is pointed at the Docking Station s sensor Pressing T zooms in 3 LOCATE PORTION OF MAGNIFIED SCENE You can move the image on screen around to find a particular portion of the picture While holding down SHIFT press LEFT RIGHT UP...

Страница 49: ...sappears and the selected function is activated NOTE To deactivate the selected effect press EFFECT ON OFF on the remote control The effects that can be used during playback are Classic Film Monotone Sepia Strobe and Video Echo The effects work the same in playback as they did in recording Refer to page 35 for more information Playback Effects These effects allow you to be creative with the playba...

Страница 50: ...iewfinder indications don t appear on the connected TV If they do appear during dubbing they are being recorded onto the new tape To clear the Playback Sound Mode Display press DISPLAY on the RM V708U or RM V710U Remote Control Select DISPLAY and TIME CODE from the Playback Menu to show or hide the Date Time and the Time Code on the recording 1 MAKE CONNECTIONS Connect the Docking Station to your ...

Страница 51: ...remote toward the VCR s infrared sensor Then referring to the VCR CODE LIST on the left press and hold MBR SET and press button A and then B The code is automatically set once you release the MBR SET button and the VCR s power comes on 2 OPERATE THE VCR Make sure the VCR s power is on Then while holding SHIFT press the button on the remote for the desired function The functions the remote can cont...

Страница 52: ...ess the appropriate control button 2 START SOURCE PLAYBACK Press PLAY and then press R A EDIT ON OFF on the remote control Make sure to point the remote control at the Docking Station s sensor The Random Assemble Editing Menu appears on the TV screen If you re not using a Fade Wipe at the PROGRAMME 1 Edit In point go to step 4 3 EXECUTE FADE WIPE IN Press FADE WIPE Cycle through the effects by pre...

Страница 53: ...e effect is turned off To combine these effects use Sepia or Monotone during recording then use Dissolve or Black White Fader during Random Assemble Editing CONTINUED ON NEXT PAGE POWER DIAL REMOTE SENSOR PROGRAMME RANDOM ASSEMBLE EDITING MENU 4 SET EDIT IN POINT At the beginning of the scene press EDIT IN OUT on the remote control The Edit In position appears in the viewfinder and on the connecte...

Страница 54: ... dubbing is complete the camcorder enters the PAUSE mode and the recorder enters its RECORD STANDBY mode If you don t register an Edit Out point the tape will be dubbed all the way to the end automatically 12 STOP EDITING Engage the STOP modes for the camcorder and the recorder NOTES During dubbing make sure the remote control is pointed at the recorder s sensor and that the path between the two i...

Страница 55: ...scenes you wanted or find that you ve recorded scenes you didn t want For a cleanly edited tape confirm and adjust the timing of the camcorder against your VCR 1 PREPARE FOR R A EDIT Play back the tape in the camcorder then point the remote control at the Docking Station s Remote sensor and press R A EDIT ON OFF R A EDIT appears on the TV screen 2 CHOOSE A SCENE Perform Random Assemble Editing on ...

Страница 56: ...Power Dial to PLAY and press PLAY 5 ACCESS PLAYBACK MENU Press MENU The Playback Menu appears on the TV screen 6 SELECT FUNCTION Place the pointer next to SYNCHRO by sliding the Zoom Lever then press SET The pointer stops blinking indicating that the function has been selected T W 48kHz MODE 32kHz MODE SYNCHRO D I SPLAY T I ME CODE END FULL SOUND SOUND1 0 0 ON OFF I TEM ZOOM SW SET SET BUTTON 48kH...

Страница 57: ...for Audio Dubbing it is not effective from the point where 48 kHz recording began 1 FIND EDIT IN POINT Play back the tape to locate the point where editing will start then press PAUSE 2 CONNECT EXTERNAL MICROPHONE Connect an optional stereo microphone Then while holding A DUB on the remote control press PAUSE Pull out the viewfinder and 6e appears Press DISPLAY on the remote control if sending the...

Страница 58: ...ges If you perform Insert Editing onto a blank space on the tape the audio and video may be disrupted Make sure you only edit recorded areas 1 FIND EDIT OUT POINT Confirm the time code at this point Z pg 47 2 FIND EDIT IN POINT Press REW until the point is located then press PAUSE 3 PREPARE FOR INSERT EDITING Press and hold INSERT on the remote control then press PAUSE 6w and the Time Code min sec...

Страница 59: ...AY The cassette s cover is open 8 Your TV has AV input terminals but is not set to its VIDEO mode 9 This is a result of exceedingly high contrast and is not a malfunction 10 The 5 Second mode in the System Menu is set to ANIMATION 11 Depending on the light source the 1 30 shutter speed may be deactivated in order to reduce the shakiness in the picture 12 P AE Effects Sepia Monotone or Slow Slow Sh...

Страница 60: ...ed after the last selected scene for editing was registered TROUBLESHOOTING Cont 13 Turn off the Video Echo effect Wait until the Picture Wipe or Dissolve effects are completed Change the setting of either the System Menu or the Power Dial Do not attempt to take a Snapshot when performing Digital Zoom 14 Set the Select Dial to MANUAL Change the setting of the Power Dial 15 Turn off Sepia and Monot...

Страница 61: ...rtain FADE WIPE P AE Effects and other functions that cannot be used together are selected at the same time 24 If Audio Dubbing or Insert Editing have been performed repeatedly on the same portion of the tape disturbance to the sound and picture may result 25 26 A malfunction of some kind has occurred In this case the camcorder s functions become unusable 18 Make sure the Squeeze mode Cinema mode ...

Страница 62: ...as shown in the illustration Cleaning The Camcorder 1 CLEAN EXTERIOR Wipe gently with a soft cloth 2 CLEAN LENS Blow it with a blower brush then wipe gently with lens cleaning paper 3 REMOVE POWER SUPPLY Remove the battery pack or disconnect the AC Power Adapter Charger 4 OPEN CASSETTE DOOR There is no power to the camcorder so the cassette holder won t open 5 PULL OUT VIEWFINDER Pull out the view...

Страница 63: ...mp The tally lamp lights while recording is in progress 5 SNAPSHOT Button Z pg 23 6 Ext Mic Input Jack Z pg 57 7 AV Output Jack Z pg 10 8 DC Input Jack Z pg 10 9 Multi Connector Located inside the cover Connect to the Docking Station s multi connector To avoid malfunction do not touch this connector or force the cover open 0 LCD Display Window Remaining Tape Time during recording Time Code during ...

Страница 64: ...r Z pg 18 6 Record Standby Indicator Z pg 25 7 Cassette Loaded Indicator Appears when no tape is loaded or when you try to record with the record safety tab set to SAVE 8 Condensation Warning When this indicator appears all functions are disabled Turn the unit off for a few hours and when you turn it on again the indicator should disappear D T W 48kHz FULL 1 2 3 4 5 6 7 8 9 0 q w e u i r p PHOTO R...

Страница 65: ...lock lithium battery is not in place or exhausted For inserting or replacing the clock battery refer to page 10 Wind Cut Indicator Z pg 20 Date Time Display Z pg 12 Recording Mode Indicator Z pg 25 Sound Mode Display Z pg 20 Time Code Display Z pg 27 q Snapshot Indicator Z pg 23 w Self Timer Indicator Z pg 26 e Focus Indicators Z pg 37 r Iris Lock Indicator Z pg 39 t White Balance Indicator Z pg 4...

Страница 66: ...ording time per charge NOTE It is normal for the battery pack to be warm after charging or after use Temperature Range Specifications Charging 10 C to 35 C Operation 10 C to 40 C Storage 10 C to 30 C NOTES Recharging time is based on room temperature of 20 C The lower the temperature the longer recharging takes CAUTIONS Battery Terminals Cap Cassettes To properly use and store your cassettes be su...

Страница 67: ... such cases first disconnect its power supply unit battery pack AC Power Adapter Battery Charger etc and clock battery and then re connect it and proceed as usual from the beginning Main Unit 1 For safety DO NOT open the camcorder s chassis disassemble or modify the unit short circuit the terminals of the battery pack Keep it away from metallic objects when not in use allow inflammables water or m...

Страница 68: ...D Zoom 10x Optical Zoom 20x 100x Digital Zoom Lens diameter F1 6 f 4 5 45 mm Filter Diameter ø27 Viewfinder Electronic 0 55 color LCD White balance AUTO MAN Iris AUTO LOCK Microphone Condensor type stereo Operating temperature 0 40 C Operating humidity 35 80 Storage temperature 20 50 C Dimensions 43 W x 148 H x 88 D mm Weight Main unit approx 450 g During recording Approx 520 g With BN V714U Batte...

Страница 69: ... H x 71 mm D Weight Approx 50 g AC Adapter Charger AA V70EK Power AC 110 240 V 50 60 Hz Power consumption 15 W Output power DC 3 6 V 1 3 A charge DC 6 0 V 1 1 A VTR Operating temperature 0 C 40 C when charging 10 C 35 C Dimensions 112 mm W x 44 mm H x 63 mm D Weight Approx 185 g ...

Страница 70: ...d modes It means that the GR DV1 or your VCR is paused and ready to record CCD Charge coupled device Solid state imaging device used in camcorders as the camera s image pickup analogous to the eye s retina except that picture information is output as electric signals Diopter adjustment Reacts to your eye strength making viewfinder indications and images easier to see Dew sensor If condensation for...

Страница 71: ...Z pg 30 Focus Adjustment Z pg 37 G H I Insert Editing Z pg 58 Iris Z pg 39 Iris Lock Z pg 39 J K L Lithium Battery Z pg 2 Loading A Tape Z pg 13 M N O On Screen Menus Z pg 17 P P AE Effects Z pg 34 Playback On TV Z pg 43 Power AC Battery Z pgs 8 10 Q R Random Assemble Editing Z pg 52 Record Standby Z pg 6 Recording Format Z pg 6 Remote Control Z pg 15 S Self Timer Z pg 26 Set VCR Brand Z pg 51 Sho...

Страница 72: ...GR DVJ70 COPYRIGHT 1997 VICTOR COMPANY OF JAPAN LTD EK Printed in Japan 0397MSV UN VP VICTOR COMPANY OF JAPAN LIMITED ...

Отзывы: