Contents
Safety Precautions ................................. 2
Names of Parts and Functions ............... 4
Grip Belt Adjustment .............................. 4
Getting Started
Charging the Battery Pack ..................... 5
Inserting an SD Card .............................. 6
Using the Icon Buttons/Thumbnails ........ 6
Clock Setting .......................................... 7
Video Quality .......................................... 7
Recording
Video Recording .................................... 8
Still Image Recording ............................. 9
Playback
Playing Back/Deleting Files on this Unit . . 10
Playing Back on TV .............................. 11
Copying
Dubbing Files by Connecting to a DVD
Recorder or VHS .................................. 12
Further Information
Changing Menu Settings ...................... 13
Troubleshooting ................................... 14
Cautions ............................................... 16
Recordable Time/Specifications .......... 18
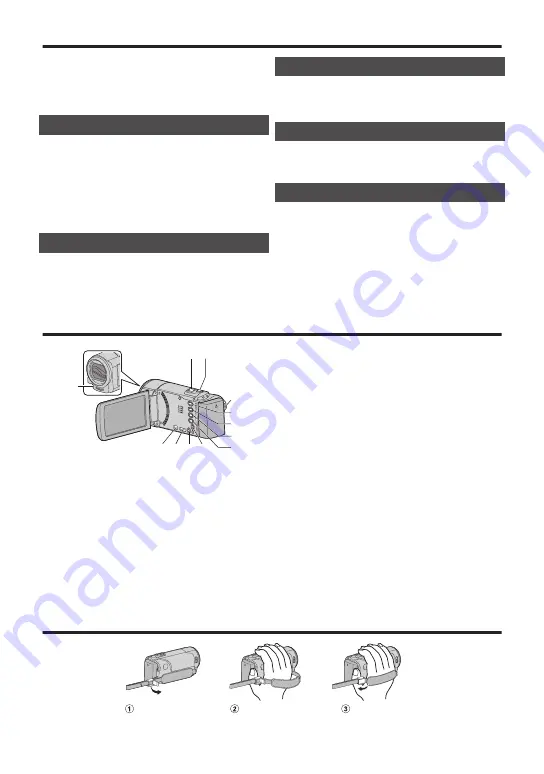
Names of Parts and Functions
.
D
J
B C
E
F
G
H
A
K
I
L
A
Light
B
C
SNAPSHOT (Still Image Recording)
Button
D
START/STOP (Video Recording)
E
A
/
B
(Video/Still Image) Button
Switches between video and still image modes.
F
SILENT Button
G
a
(Image Stabilizer) Button
H
INFO (Information) Button
Recording : Displays the remaining
time (for video only) and
battery power.
Playback : Displays file information
such as recording date.
I
AV Connector
J
M
(Power) Button
Press and hold to turn the power on/off
while the LCD monitor is opened.
K
HDMI Mini Connector
L
USB Connector
Grip Belt Adjustment
.
Close the lever
Adjust the length
of the belt
Open the lever on
the strap lock
4


